Table of Contents >> Show >> Hide
- Why a Painted HEMNES Bookcase Is Worth the Effort
- Before You Start: What to Know About Painting IKEA Furniture
- Supplies You’ll Want for a Smooth Finish
- How to Paint an IKEA HEMNES Bookcase Step by Step
- Best Paint Colors for IKEA HEMNES Bookcases
- Common DIY Mistakes to Avoid
- Should You Paint or Refinish the Wood?
- Final Thoughts
- Real-World DIY Experiences With Painting an IKEA HEMNES Bookcase
If you have an IKEA HEMNES bookcase that looks a little tired, a little too plain, or a little too “I bought this when I was in my beige era,” paint can fix that. And unlike some furniture makeovers that require a workshop, a welder, and emotional support, this one is very doable for a careful DIYer with a free weekend and reasonable patience.
The good news is that HEMNES bookcases are a smart candidate for a makeover. They are known for their classic lines, useful proportions, and wood construction that feels more upgrade-friendly than bargain-bin furniture that flakes when you look at it too hard. That means a painted HEMNES bookcase can go from standard issue to custom-looking without the price tag of built-ins.
In this guide, you’ll learn how to paint an IKEA HEMNES bookcase the right way, from prep and priming to color selection, sealing, drying, and avoiding the usual DIY mistakes. The goal is simple: a finish that looks intentional, smooth, and durable enough to survive books, baskets, fingerprints, and the occasional decorative object you pretend is functional.
Why a Painted HEMNES Bookcase Is Worth the Effort
A lot of IKEA hacks focus on replacing hardware, adding trim, or styling shelves until they look expensive. Those tricks work, but paint changes the entire mood of the piece. Suddenly a basic white or dark-stained shelf becomes a moody library moment, a cheerful kids’ room upgrade, or a polished home-office backdrop that looks a lot more custom than “assembly required.”
Painting also helps when your bookcase no longer fits the room. Maybe your HEMNES looked great in one apartment but now clashes with warmer flooring, darker walls, or a more grown-up design style. Instead of buying new furniture, painting lets you keep the sturdy structure and update the finish. That is the kind of budget logic that feels almost suspiciously mature.
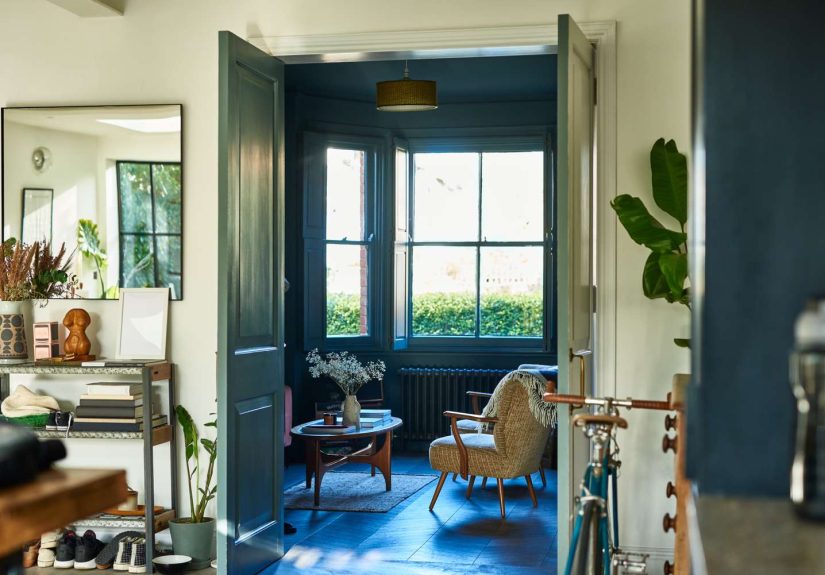
Best of all, you can tailor the look. A single-color satin finish creates a refined, built-in vibe. A contrasting back panel adds depth. A darker tone feels dramatic and tailored. A soft sage, navy, charcoal, or creamy off-white can make the whole room look more intentional.
Before You Start: What to Know About Painting IKEA Furniture
Not all paint jobs fail because of the paint
Most bad furniture paint jobs fail because of prep. If paint peels, chips, streaks, or feels gummy, the problem is usually one of four things: the surface was dirty, the finish was too glossy, the primer was skipped, or the piece was handled before it had time to cure. In other words, the boring steps are secretly the VIPs.
HEMNES is easier to paint than slick laminate furniture
That matters because glossy laminate can be fussy. A HEMNES bookcase is generally more forgiving than super-slick synthetic furniture, but it still needs a proper scuff-sand and bonding primer if it has an existing factory finish. Do not assume “it’s wood” means “I can slap paint on it and hope for the best.” Hope is not a primer.
Choose the right finish
For most bookcases, satin or semi-gloss is the sweet spot. Matte finishes can look beautiful, but they tend to be less forgiving when shelves get bumped by hardcovers, baskets, and enthusiastic cleaning. High gloss can be striking, but it shows surface flaws and brush marks more easily. Satin usually offers the best balance of softness, durability, and easy cleaning.
Supplies You’ll Want for a Smooth Finish
Gather everything before you start so you do not wind up holding a sticky roller in one hand while searching for sandpaper with the other. A typical HEMNES painting setup includes:
- Drop cloths or rosin paper
- Screwdriver for removing shelves or hardware
- Cleaner or degreaser
- Microfiber cloths or tack cloth
- Sandpaper in medium and fine grits
- Wood filler for dents, chips, or old hardware holes
- Bonding primer
- Interior furniture-safe paint or trim enamel
- High-quality angled brush
- Small foam roller or fine-finish roller
- Optional topcoat such as polycrylic or polyurethane
- Painter’s tape if you want sharp contrast lines
- Dust mask and good ventilation
How to Paint an IKEA HEMNES Bookcase Step by Step
1. Empty the bookcase and remove what you can
Take everything off the shelves. Then remove adjustable shelves, hardware, and anything else that can come off easily. If you try to paint around brackets, corners, and shelf pins, you’ll spend the rest of the day inventing new curse words. Label parts and keep screws in a bag so reassembly does not become a mystery game.
2. Clean like you mean it
Even furniture that “looks clean” is usually carrying dust, hand oils, residue, and mystery grime. Wipe the entire piece down with a cleaner or degreaser, especially the shelf fronts, sides, and top edge where hands touch most often. Let it dry fully before moving on. Paint and dirt are not soulmates.
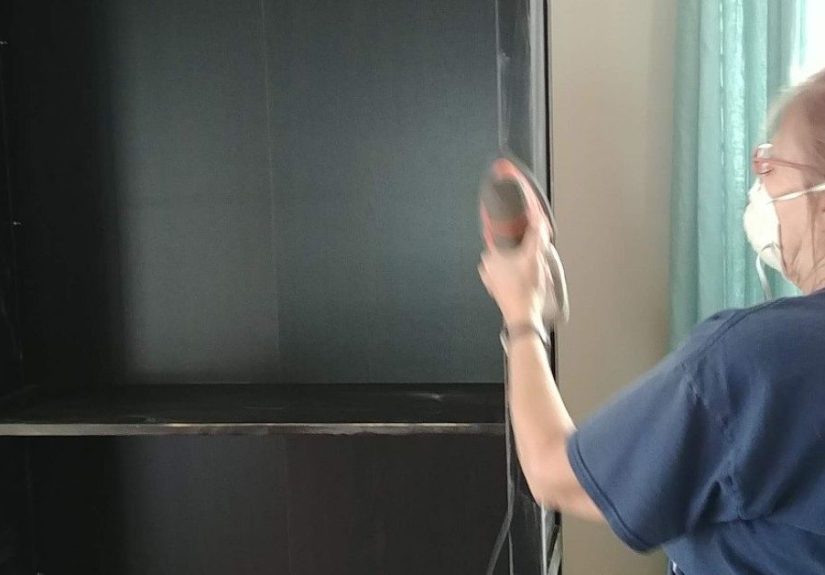
3. Sand for adhesion, not punishment
If your HEMNES is already finished, you usually do not need to strip it to bare wood. What you do need is a light but thorough scuff-sand so the surface loses its slickness and the primer has something to grip. Focus on broad flat surfaces, shelf edges, and any shiny spots. Use a finer touch on factory-finished areas and avoid aggressive sanding that could create uneven patches.
If you’re dealing with scratches, nicks, or older drips from some previous DIY crime scene, sand those areas a bit more and smooth them out before priming. After sanding, vacuum the dust, then wipe everything down with a tack cloth or slightly damp microfiber cloth and let it dry completely.
4. Repair dents, chips, and shelf wear
This is the step that separates “freshly painted furniture” from “professional-looking makeover.” Fill any gouges, seam gaps, or dents with wood filler. Let it dry, then sand it flush so it disappears into the surface. If your bookcase has any especially porous repaired areas, spot-prime them after sanding.
If your particular unit has any engineered or fiberboard components, especially on hidden panels or repaired sections, be extra careful to seal and prime those areas well. They can absorb finish differently than solid wood and may need a little more finesse to look uniform.
5. Prime everything
Do not skip primer. That advice is not dramatic. It is practical. A good bonding primer helps paint adhere, evens out porous repairs, reduces tannin or stain bleed, and creates a smoother final result. Apply a thin, even coat with a small roller on the larger flat areas and a brush for corners, trim detail, and crevices.
If you’re painting the bookcase a very light color over a dark finish, primer matters even more. The same goes for deep, dramatic colors where you want richness and uniform coverage. Let the primer dry fully according to the label, then lightly sand any roughness before wiping away dust.
6. Apply thin coats of paint
This is the part everyone wants to rush. Resist. The best-looking furniture finishes come from multiple thin coats, not one heroic swamp of paint. Use a high-quality brush for detailed areas and a foam or fine-finish roller for large flat surfaces. Roll gently, then tip off or back-brush if needed to smooth lines.
Paint in the direction of the grain where visible. Work methodically: sides first, then interior uprights, then shelves, then the face frame. Check corners and undersides for drips before they dry. Two coats are often enough, but darker original finishes, bold color changes, or patchy coverage may need a third coat.
If you want a designer-style upgrade, paint the outer frame one color and the back panel another. A muted contrasting back adds depth and makes styling objects pop. It is a small trick with big payoff, like putting on earrings before a video call.
7. Decide whether to add a protective topcoat
For a decorative bookcase in a low-impact room, some furniture paints are durable enough on their own once fully cured. But for hard-working shelves, family spaces, kids’ rooms, or anyone who tends to slide baskets around like they’re in a furniture rodeo, a clear protective topcoat is smart.
Choose a clear water-based topcoat if you want minimal yellowing and easier indoor use. Apply thin coats and avoid overworking the product. If you use a roller, smooth out bubbles before they dry. Let each coat dry as directed, then sand lightly between coats if needed for a silky finish.
8. Let it dry, then let it cure
This is the step most people sabotage. Dry to the touch is not the same as fully cured. Your painted HEMNES may feel ready in a day or two, but many latex and acrylic finishes need much longer to reach full hardness. That means you should wait before loading shelves with heavy books, dragging baskets across them, or reinstalling everything and declaring victory too early.
At minimum, allow the piece to dry thoroughly before reassembly. Then treat it gently for the next couple of weeks. The finish will thank you by not imprinting, scratching, or sticking to every object you place on it.
Best Paint Colors for IKEA HEMNES Bookcases
Classic choices that always work
Soft white, warm ivory, greige, and light taupe are easy winners if you want the bookcase to feel built in. These shades blend well with trim, walls, and changing decor, which is helpful if your design style is “I redecorate emotionally.”
Bold colors that look expensive
Navy, charcoal, olive, and deep green create instant drama. They work especially well in offices, dining rooms, and reading corners. Darker paint can make a standard bookcase feel more architectural and less flat-pack.
Playful colors for personality
Muted blue, dusty blush, sage, and clay tones can make a HEMNES bookcase feel custom and current without turning it into a giant crayon. These shades are great for nurseries, craft rooms, and creative spaces where you want color without chaos.
Common DIY Mistakes to Avoid
Skipping the cleaning step: Dust and oils ruin adhesion. Clean first, always.
Painting over a glossy finish without sanding: That shortcut often leads to peeling.
Using thick coats: Thick paint creates drips, brush marks, and longer dry times.
Ignoring cure time: This is how beautiful shelves get dented by books on day one.
Using cheap tools: A lousy brush can leave more texture than the furniture you started with.
Forgetting protection on high-use pieces: A bookcase is not a museum object. It gets touched, bumped, and loaded. Plan accordingly.
Should You Paint or Refinish the Wood?
If you love the natural wood look and your HEMNES is unfinished or can be stripped effectively, refinishing is an option. But for most people, paint is the faster, cleaner, and more forgiving route. It covers uneven tone, hides minor damage, works with more design styles, and lets you dramatically change the look without chasing perfection in the original finish.
In plain English: if your goal is “make it look amazing without turning this into a semester-long woodworking class,” paint usually wins.
Final Thoughts
Painting an IKEA HEMNES bookcase is one of those DIY projects that punches above its weight. It does not require exotic tools, but it can completely change how a room feels. With proper prep, a quality primer, thin coats of paint, and enough patience during the drying and curing stages, you can end up with a piece that looks custom, polished, and surprisingly expensive.
So yes, your old HEMNES can absolutely have a second act. And unlike some second acts, this one involves less drama, more color, and a much better shelf presence.
Real-World DIY Experiences With Painting an IKEA HEMNES Bookcase
One of the most relatable things about painting a HEMNES bookcase is that the project almost always starts with overconfidence. The bookcase looks simple. The paint color is exciting. The before photo is mildly offensive. You think, “This will be easy.” And honestly, it is manageable, but it is the kind of manageable that rewards patience and punishes swagger. Most DIYers discover this somewhere between sanding shelf number three and realizing they forgot to clean the top edge.
A common experience is that the piece already looks better after primer. That sounds ridiculous, but it is true. Once the shiny or uneven old finish is dulled, repaired, and covered in a clean primer coat, the bookcase suddenly looks intentional. It is like seeing someone after a haircut and good lighting. You realize the makeover was not only possible, it was overdue.
Another typical lesson is how much the tool choice affects the final result. People often assume the paint itself is the whole story, then discover that a high-quality brush and a fine-finish roller make a huge difference. A cheaper brush can leave drag marks, loose bristles, and texture that no amount of optimism can explain away. On the other hand, the right roller can make broad shelf sides look smooth and even, which is exactly what gives painted furniture that clean, near-factory look.
There is also the emotional roller coaster of waiting between coats. The first coat nearly always looks worse than expected. It can appear streaky, thin, or suspiciously unimpressive. This is normal. The second coat is where the transformation starts to show up. By the third coat, if one is needed, people usually swing from doubt to pride with almost alarming speed. Suddenly they are texting photos, rearranging decor, and considering whether the matching dresser should also “accidentally” receive a makeover.
Then comes the most underrated experience of all: learning the difference between dry and cured the hard way. A shelf may feel dry the next day, but placing a stack of heavy books on it too soon can leave marks, sticking, or dents. Many DIYers remember this lesson forever because it arrives with the heartbreak of a freshly painted shelf getting its first scar from a decorative basket that absolutely could have waited another week.
Color choice brings its own surprises too. Light neutrals feel safe until you see how elegant a dark olive, navy, or charcoal HEMNES can look in a real room. Many people start the project thinking they want the bookcase to disappear, then realize they actually want it to anchor the room. That is one of the best parts of this DIY: the piece can shift from background furniture to a real design feature with nothing more dramatic than paint, prep, and follow-through.
In the end, most people come away from the project with the same conclusion: the painting itself is not the hard part. The discipline is the hard part. Clean thoroughly. Sand properly. Prime completely. Paint in thin coats. Let it cure. Do those things, and a humble IKEA HEMNES bookcase can look far more expensive than it has any right to. Ignore them, and the bookcase may still be useful, but it will always whisper, “I was rushed.”