Table of Contents >> Show >> Hide
- Do You Really Need to Remove the Brie Rind?
- When It Makes Sense to Remove the Rind
- What You Need Before You Start
- How to Remove the Rind from Brie Cheese: 13 Steps
- Common Mistakes to Avoid
- Should You Throw the Rind Away?
- Final Thoughts
- Kitchen Experiences: What People Usually Learn After Removing Brie Rind a Few Times
- SEO Tags
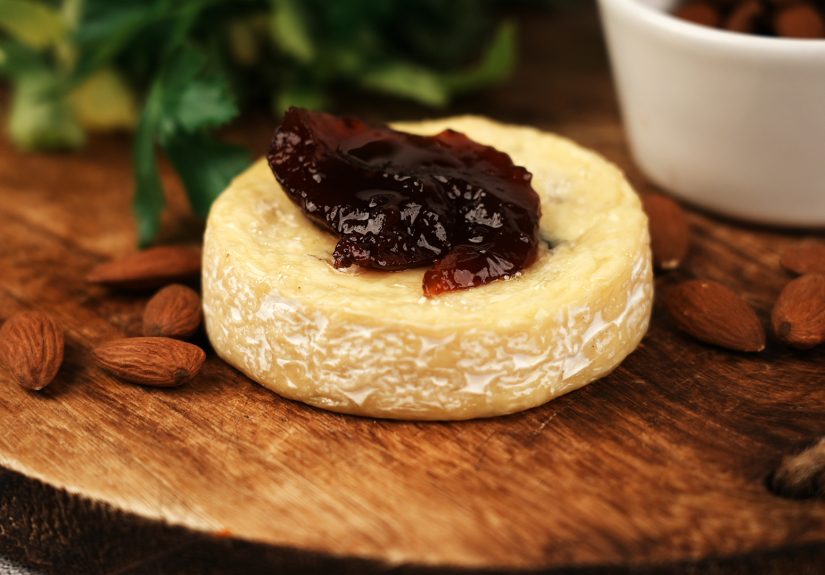
Brie is one of those cheeses that looks fancy even when you bought it while wearing sweatpants and tossing bananas into your cart. It is creamy, buttery, mild, and a little earthy, with that famous white outer coating that makes some people say, “Yum,” and others say, “Why is my snack wearing a tiny sweater?” If you are in the second group, you are not alone.
Here is the good news: the rind on Brie is edible, safe to eat, and actually part of what gives the cheese its signature flavor. But that does not mean you have to eat it. If you want a smoother texture for a sauce, a silkier filling for puff pastry bites, or a milder bite for a cheese board, removing the rind from Brie cheese is perfectly reasonable. Food people may debate it dramatically, but in your kitchen, your taste buds are the board of directors.
This guide walks you through exactly how to remove the rind from Brie cheese in 13 practical steps, without mangling the soft center or turning your cutting board into a dairy crime scene. You will also learn when removing the rind makes sense, when it is better to leave it alone, and how to avoid the common mistakes that make Brie trimming feel harder than it needs to be.
Do You Really Need to Remove the Brie Rind?
Usually, no. Brie is a bloomy-rind cheese, which means the white rind is part of the cheese-making and ripening process. It is meant to be there, and many cheese lovers prefer eating the creamy interior and rind together because the contrast adds depth. In plain English: the rind is not some weird packing material. It is part of the package.
That said, there are several situations where removing the Brie rind is a smart move. If you are melting Brie into a sauce, soup, or dip and want a smoother final texture, trimming the rind can help. If you are serving Brie to guests who are skeptical of earthy flavors, removing part of the rind can make the cheese feel more mellow and approachable. And if you are baking Brie with toppings, many cooks remove or score only the top rind so the cheese melts more evenly and the toppings sink in beautifully instead of sliding around like they are on an icy parking lot.
So no, you do not always need to remove the rind from Brie cheese. But yes, you absolutely can. This is less a rule and more a choose-your-own-cheese-adventure.
When It Makes Sense to Remove the Rind
- For silky melted dishes: sauces, soups, grilled cheese fillings, and creamy pasta dishes.
- For Brie bites or pastries: especially when you want small, clean cubes that melt neatly.
- For picky eaters: because “mild and buttery” often wins over “mild and buttery with a mushroomy flourish.”
- For some baked Brie recipes: where only the top rind is removed to help the cheese soften faster.
- For texture reasons: because some people love Brie rind and some people would rather not chew it.
What You Need Before You Start
You do not need a fancy cheese cave, a French accent, or a knife forged by dairy monks. You just need a few basics:
- A wheel or wedge of Brie
- A sharp paring knife or small serrated knife
- A clean cutting board
- Paper towels or a clean kitchen towel
- A plate or container for the trimmed cheese
The one big trick is temperature. Brie is easier to trim when it is cold and firm, not when it is fully softened at room temperature. If you try to remove the rind from warm Brie, the center may squish, ooze, and generally behave like it has given up on structure as a concept.
How to Remove the Rind from Brie Cheese: 13 Steps
- Chill the Brie first.
Place the Brie in the refrigerator if it is not already cold. If you need it even firmer, pop it into the freezer for about 15 to 20 minutes. You do not want it frozen solid. You just want the cheese stable enough that it can tolerate a knife without collapsing into a creamy puddle.
- Choose the right knife.
A small sharp paring knife gives you control, while a small serrated knife can help glide through the rind. Either works. The goal is precision, not brute force. This is surgery, not lumberjacking.
- Set up a clean, dry cutting surface.
Put the Brie on a cutting board that will not slide around. If the wrapper left the cheese damp, lightly blot it with a paper towel. Too much surface moisture makes the rind slippery and harder to trim neatly.
- Decide how much rind you actually want to remove.
Before you start slicing, figure out your end goal. For baked Brie, you may only want to remove the top rind. For a creamy sauce or pastry filling, you may want to remove the top, bottom, and sides. For a cheese board, you may decide not to remove much at all.
- Trim the top rind in shallow strokes.
If you are working with a small wheel, start at the top. Slide the knife just under the white surface and shave off a very thin layer. Do not dig too deeply. You want to remove the rind, not half the cheese with it. Think “peel,” not “excavate.”
- Rotate as you cut.
Turn the wheel or wedge a little at a time as you work. Small rotations help you keep the cut even. Long aggressive slices tend to gouge the interior and create a ragged edge, which is annoying unless your goal is “rustic” and your standards are feeling generous.
- Remove the bottom rind only if your recipe needs it.
The bottom rind can be trimmed the same way as the top, but you do not always need to remove it. For recipes where Brie is baked whole, many people leave the bottom intact so the cheese still has some structure. For sauces or fillings, trimming the bottom can make the melt smoother.
- Stand a wedge on its cut side to trim the edges.
If you have a wedge instead of a full wheel, place it on one flat cut side. Then shave the outer curved rind downward in thin strips. Work slowly and keep the knife close to the surface. This is the easiest way to remove rind from Brie wedges without sacrificing too much of the good stuff.
- Use gentle sawing motions for stubborn spots.
Some areas of the rind may cling more than others, especially near corners or where the cheese has ripened unevenly. A light sawing motion works better than pushing straight down. Forcing the knife can squish the center and make the rind tear off in messy chunks.
- Clean the knife as needed.
Brie is sticky, and your knife will collect cheese quickly. Wipe the blade every few cuts with a damp or dry towel. A clean blade gives cleaner slices and keeps you from dragging softened cheese across the surface you are trying to trim.
- Check for missed patches.
Once the main rind is off, inspect the cheese from all sides. Small white patches are not the end of the world, but if you are going for a completely smooth melt, now is the time to touch them up. Trim lightly rather than chasing perfection until you accidentally delete half the Brie.
- Cut or portion the Brie for your recipe.
After the rind is removed, slice the Brie into cubes, strips, or pieces that fit your plan. If you are making Brie bites, cube it while still cold. If you are spreading it on toast or melting it into something luxurious, let it warm slightly after trimming so it softens evenly.
- Use it right away or store it properly.
Trimmed Brie is more exposed, so wrap the cut surfaces in parchment or wax paper and store it in a covered container in the refrigerator if you are not using it immediately. Soft cheeses do best when kept cold and protected, and they should not linger forever in the fridge like a mysterious science project.
Common Mistakes to Avoid
1. Trimming warm Brie
This is the biggest mistake by far. Warm Brie is delicious to eat, but terrible to trim. Cold Brie holds its shape and makes the job much easier.
2. Cutting too deep
The rind is thin. If you remove thick slices, you will waste a lot of cheese. Use shallow cuts and patience.
3. Removing all the rind when you do not need to
For many baked Brie recipes, taking off only the top rind is enough. If you remove everything, the cheese can lose structure faster in the oven.
4. Ignoring food safety
Brie is a soft cheese, so keep it refrigerated until you need it. If you are serving someone who is pregnant or immunocompromised, check that the Brie is made with pasteurized milk and follow package guidance carefully.
Should You Throw the Rind Away?
Not necessarily. If you like the flavor, you can snack on it with the cheese you trimmed away. Some cooks even crisp trimmed Brie rind pieces in an air fryer or oven for a crunchy, savory nibble. If that sounds fun, go for it. If it sounds like a snack designed by a dare, discard it without guilt.
The main thing is to remember that the rind is edible. Removing it is about preference and function, not safety, unless the cheese shows signs of spoilage. If Brie develops an off smell, sliminess, or mold that clearly does not belong there, it is time to say goodbye and move on.
Final Thoughts
Learning how to remove the rind from Brie cheese is not difficult once you know the trick: keep the cheese cold, use a sharp knife, and trim in very thin layers. That is really the whole game. The rest is just deciding how much rind to remove based on what you are making.
If you are serving Brie on a board, leaving the rind on is often the best move. If you are making a smooth sauce, creamy appetizer, or neat little pastry bite, trimming the rind can absolutely improve the texture. In other words, there is no Brie police. There is only your recipe, your preference, and a small white cheese wheel waiting for your decision.
So the next time you stare down a wedge of Brie and wonder whether to eat the rind, trim it, score it, or panic slightly and Google it, you will know exactly what to do. Preferably before your crackers get stale.
Kitchen Experiences: What People Usually Learn After Removing Brie Rind a Few Times
The first time most people try to remove Brie rind, they assume it will behave like peeling an apple or trimming a block of cheddar. Then the knife goes in, the center starts to squish, and suddenly the cutting board looks like a creamy weather event. That is why the “chill it first” advice matters so much in real life. Once home cooks try the cold-Brie method, the whole task becomes less dramatic. Instead of fighting the cheese, they guide the knife along the surface and realize the rind comes off in delicate strips, not in one magical zipper-like peel.
Another common experience is discovering that Brie changes personality depending on the recipe. Someone may remove every bit of rind for a sauce and love the smooth result, then regret doing the same thing for baked Brie because the cheese melts too fast and loses its shape. After a couple of attempts, most cooks figure out that there is a difference between fully trimming Brie and simply removing the top rind. That small adjustment can be the difference between “elegant appetizer” and “cheese lava with crackers.” Delicious? Maybe. Photogenic? Debatable.
People also tend to learn that Brie rind is more about preference than right or wrong. Some tasters find it earthy, mushroomy, and pleasantly rustic. Others take one bite and make the exact same face they would make if someone described wet leaves as a dessert topping. In group settings, this usually leads to compromise: leave the rind on for a cheese board, but trim it for hot appetizers and melted dishes. That way the Brie fans stay happy, and the rind skeptics do not feel like they are being challenged to an edible trust fall.
One surprisingly helpful lesson comes from entertaining. If you cube Brie for pastry bites while it is cold, it behaves beautifully. If you wait until it warms up, every cube turns into a soft-edged blob with ambition problems. Experienced cooks learn to portion first, then warm later if needed. It is a tiny timing detail, but it saves a lot of frustration.
And perhaps the funniest shared experience is that many people start out determined to remove the rind forever, only to slowly come around after trying better-stored Brie. A properly handled Brie often tastes milder and cleaner than a sad, tightly wrapped piece that has been lingering too long. Once people taste Brie that is fresh, correctly stored, and served at the right temperature, they sometimes decide the rind was not the villain after all. It was just bad storage wearing a cheese disguise.
So if your first attempt is imperfect, welcome to the club. Brie is soft, a little fussy, and worth figuring out. After a few rounds, you will know whether you prefer it fully trimmed, lightly scored, or proudly intact. And that, honestly, is the kind of hands-on kitchen knowledge that sticks better than any recipe note ever could.