Table of Contents >> Show >> Hide
- What “Run Up a Wall and Flip” Actually Means
- Before You Start: Prerequisites That Make This Safer (and Way More Learnable)
- The 14 Steps to Run Up a Wall and Flip
- Step 1: Warm up like you actually plan to leave the ground
- Step 2: Inspect your wall and landing like a responsible superhero
- Step 3: Choose your approach line and starting distance
- Step 4: Dial in “quiet landings” first (yes, even for flipping)
- Step 5: Master the wall step (without flipping)
- Step 6: Find your best “plant foot” and plant height
- Step 7: Learn the wall-set position (the moment that decides everything)
- Step 8: Drill the “push away” cue (separate from the flip)
- Step 9: Add a small tuck on mats (micro-flip reps)
- Step 10: Commit to the full rotationon a forgiving surface
- Step 11: Spot the landing and open at the right time
- Step 12: Reduce training wheels gradually (mats → thinner mats → controlled ground)
- Step 13: Troubleshoot the three big problems (under-rotate, over-rotate, drift)
- Step 14: Build a practice plan (because your body likes consistency)
- Common Mistakes (and How to Fix Them)
- Conditioning That Makes Wall Flips Easier (and Safer)
- A Sample 4-Week Progression (Adjust to Your Level)
- FAQ: Quick Answers That Save You Time (and Sometimes Skin)
- Training Experiences: What It Typically Feels Like (500+ Words)
Running up a wall and flipping (often called a wall flip in freerunning) is one of those moves that looks like movie magicuntil you
remember physics is undefeated and your ankles have feelings. The good news: with smart progressions, the right wall, and a little humility, you can
learn it safely and cleanly.
Safety note (please read): A wall flip is an advanced acrobatic skill with real risk of head, neck, wrist, knee, and ankle injuries.
If you’re not already comfortable with basic jumping/landing mechanics and beginner flips on soft surfaces, work up to this with a qualified coach.
Don’t train this alone on concrete. Your ego won’t spot you.
What “Run Up a Wall and Flip” Actually Means
In most parkour/freerunning contexts, a wall flip is a backflip initiated by a wall step (or two steps) where you drive up and push away
from the wall to create height and backward rotationthen land facing the wall (or slightly turned), ideally on two feet with a controlled absorption.
The move is less “climb the wall” and more “use the wall like a springboard you politely kick and then leave.”
Before You Start: Prerequisites That Make This Safer (and Way More Learnable)
Skill checklist
- Confident jump-and-land on flat ground (quiet feet, knees tracking, stable torso).
- Comfortable wall step / wall run without slipping (both legs).
- Backwards rotation familiarity (e.g., trampoline back drop to feet, back tuck drills on mats, or assisted backflip progressions).
- Fear management skills: you can bail safely and stop a rep when it feels wrong.
Pick the right setup
- Wall: sturdy, dry, textured (not glossy paint), and as close to vertical as possible.
- Landing zone: wide, flat, and padded (gym mats or a foam pit). Avoid uneven grass (surprise holes are undefeated).
- Shoes: clean soles with good grip. If you can hear your shoe squealing, that’s a clue.
- Spotter/coach: strongly recommended, especially for your first full attempts.
The 14 Steps to Run Up a Wall and Flip
These steps are written as a progression you can train over multiple sessions. Don’t “speedrun” them. The goal is a repeatable, controlled wall flip
not a one-time miracle followed by a three-week limp.
Step 1: Warm up like you actually plan to leave the ground
Do 8–12 minutes of light movement (jog, jump rope, fast walk), then dynamic mobility: leg swings, walking lunges, ankle circles, hip openers, and a few
gentle hops. Finish with 3–5 “practice landings” (small jump, stick the landing, reset). Your joints should feel awake, not attacked.
Step 2: Inspect your wall and landing like a responsible superhero
Check for dust, moisture, loose bricks, or weird ledges. Clear the landing area. If your wall has mystery grit on it, remember: gravity loves practical jokes.
Do a few light wall steps to test traction before you commit to anything bigger.
Step 3: Choose your approach line and starting distance
Start with a moderate approach (not a full sprint). Most beginners do better when they can control their last two steps. Pick a line that lets
you hit the wall straight-on or slightly angledwhatever helps you place your foot reliably without twisting your knee.
Step 4: Dial in “quiet landings” first (yes, even for flipping)
Practice jumping up and landing softly: absorb through ankles, knees, and hips together, keeping your chest tall and your knees tracking over your toes.
If your knees cave inward or your heels slam loudly, slow down and clean it up. A pretty flip with a messy landing is just a delayed complaint form.
Step 5: Master the wall step (without flipping)
Run in, place one foot on the wall around waist-to-chest height (varies by athlete and wall), and step up while pushing up and awaythen
drop back down onto the mats. Keep it light and consistent. You’re training accuracy and the feeling of rebound, not trying to win a height contest.
Step 6: Find your best “plant foot” and plant height
Try both sides. Your plant foot should feel stable, like you can drive through it. If the wall is too slick or your plant is too high, you’ll slip.
If it’s too low, you’ll struggle to get height. You’re looking for the sweet spot where you can step, extend, and push away cleanly.
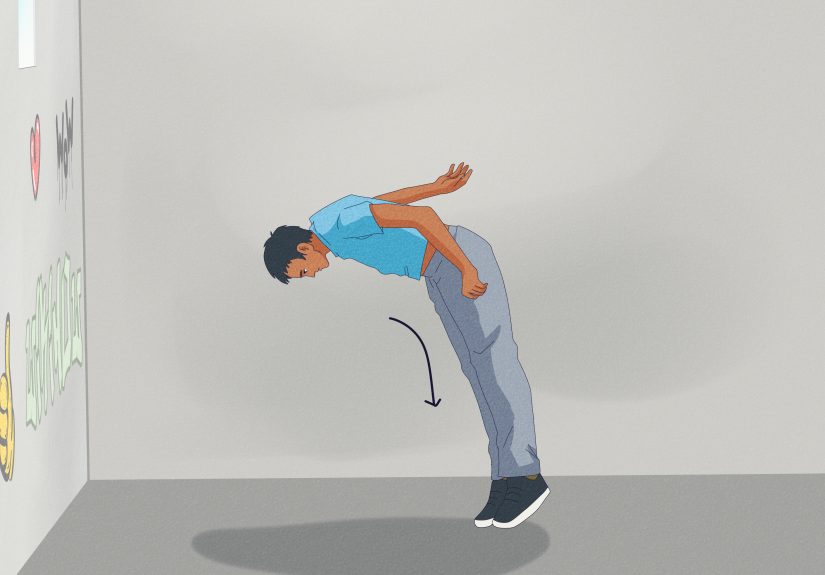
Step 7: Learn the wall-set position (the moment that decides everything)
As your foot contacts the wall, think: hips under you, chest up, eyes forward. Swing your arms as you step to help generate lift. The wall flip
is won in the “set”not in the tuck. If you set crooked, you’ll rotate crooked.
Step 8: Drill the “push away” cue (separate from the flip)
Do reps where you wall step and then jump backward onto your back on a soft mat (a controlled back-drop drill). The goal is to feel the direction:
not just up, but up and away from the wall so you have space to rotate without scraping your shins or panicking mid-air.
Step 9: Add a small tuck on mats (micro-flip reps)
From a wall step, pop up and away and do a small tuck or “curl” in the air, then land or fall safely to mats. You’re teaching your body the timing:
set → float → tuck (briefly) → open. Keep the tuck compact and short; don’t stay folded like you’re hiding from your responsibilities.
Step 10: Commit to the full rotationon a forgiving surface
When your set is consistent, try a full wall flip onto thick mats (or into a foam pit with supervision). Drive up and away, then tuck only after you feel lift.
A common beginner error is tucking too early, which turns “jump” into “throw yourself backward and hope.”
Step 11: Spot the landing and open at the right time
As you come around, look for the floor and open your tuck so your feet can meet the ground. Think “land like a cat, not like a filing cabinet.”
Absorb quietly, reset, and repeat only if the last rep felt controlled.
Step 12: Reduce training wheels gradually (mats → thinner mats → controlled ground)
Only progress surfaces when you can land cleanly on the current one repeatedly. If you land twisted, hop out wildly, or feel knee/ankle discomfort,
you’re not ready to make the ground harder. Progression is earned, not declared.
Step 13: Troubleshoot the three big problems (under-rotate, over-rotate, drift)
- Under-rotating: you likely need a better set (more lift) or a slightly later tucknot a more violent tuck.
- Over-rotating: open earlier and focus on a taller takeoff rather than “hurling” backward.
- Drifting into the wall: push away more; don’t let your shoulders collapse toward the wall at plant.
Step 14: Build a practice plan (because your body likes consistency)
Train wall flip progressions 1–2 times per week, 30–60 minutes, after a thorough warm-up. Cap high-effort attempts before fatigue ruins your form.
A simple rule: when your plant foot gets sloppy or your landings get loud, you’re done for the day. Finish with mobility and easy cooldown.
Common Mistakes (and How to Fix Them)
“I’m slipping on the wall.”
Clean your shoe soles, choose a grippier wall, lower the plant height slightly, and reduce approach speed until you can hit the wall precisely.
Slipping is not “part of learning”it’s your environment voting “no.”
“My flip feels scary even though I can backflip.”
That’s normal. The wall changes your takeoff timing and removes the familiar ground “pop.” Use more wall-set drills and back-drop progressions.
Also: get a spot. Fear is information, not an insult.
“My knees cave in on landing.”
Regress to jump-and-stick drills. Strengthen hips and improve landing mechanics before you keep stacking flips on top of unstable landings.
This isn’t being cautiousit’s being employed in the future by your own knees.
Conditioning That Makes Wall Flips Easier (and Safer)
Power and “brakes” (strength + deceleration)
- Squats or split squats (controlled)
- Calf raises (slow and full range)
- Hip hinges (Romanian deadlifts or good mornings)
- Jump-and-stick drills (small jumps, perfect landings)
Ankles and balance (your plant foot’s best friends)
- Single-leg balance (eyes open → eyes closed)
- Toe/heel walks and controlled ankle hops
- Foot/ankle conditioning routines (especially if you’ve sprained an ankle before)
Mobility that actually helps
- Ankle dorsiflexion mobility (helps absorption and stable landings)
- Hip flexor mobility (helps with set and posture)
- Thoracic spine mobility (helps keep chest up during takeoff)
A Sample 4-Week Progression (Adjust to Your Level)
Everyone learns at a different pace, but here’s a practical template:
- Week 1: landing mechanics + wall steps + push-away drills.
- Week 2: add back-drop drills + micro tucks on mats.
- Week 3: assisted full rotations (coach/spot + thick mats or pit).
- Week 4: repeat clean reps, then gradually reduce padding only if consistent.
FAQ: Quick Answers That Save You Time (and Sometimes Skin)
Is a wall flip the same as a wall backflip?
Most people use the terms interchangeably. In freerunning, “wall flip” often implies a backflip initiated by a wall step (one-step or two-step).
Do I need a full sprint?
Usually no. Too much speed makes your plant less accurate. Start moderate and increase only if it improves your set.
Should I learn a backflip first?
It helps a lot to understand backward rotation and safe landing patterns, but some athletes learn wall flip through coached progressions without a perfect
standing backflip. Either way, you need solid landings and body control before you go upside down near a wall.
Training Experiences: What It Typically Feels Like (500+ Words)
If you hang around a parkour gym long enough, you’ll notice a pattern: almost everyone’s first wall flip journey includes a phase best described as
“confident legs, nervous brain.” People can wall step all day, they can even throw a backflip on a trampoline, but combining them makes the mind yell,
“Excuse me, why are we flipping next to architecture?”
One common experience is discovering that the wall flip is less about bravery and more about timing. Beginners often assume they need to “send it harder.”
What actually changes the game is the moment the foot touches the wall. Athletes who finally “get it” usually report the same lightbulb moment:
they stopped trying to rip a backflip off the wall and started trying to jump up first. The flip becomes a byproduct of a clean set.
The rep feels calmeralmost slowerbecause the body has time to rise and rotate instead of panic-rotate.
Another very normal experience: the “mystery slip.” Someone trains on a slightly dusty wall or with shoes that were just used outside, and suddenly their
plant foot slides a few inches. Even if it doesn’t cause a fall, it rattles confidence. Coaches often respond with the least glamorous advice on earth:
wipe your soles, test the wall, and lower the plant. It’s not cinematic, but it works. In practice, “I’m scared” is sometimes just “my traction is questionable.”
You’ll also see a lot of athletes negotiate with their tuck. Early attempts often include a tuck that shows up too soon and stays too longlike it’s paying rent.
The result is under-rotation (because there wasn’t enough lift) or a wild landing (because they opened late). When they clean it up, the cue is usually simple:
set tall, then tuck quick, then open sooner than you think. The landing becomes quieter, the knees look happier, and the athlete stops doing that
dramatic “save” hop that makes every rep look like an argument with gravity.
Fear management is its own chapter of the wall flip story. Many athletes progress fastest when they give themselves permission to bail. In gyms, you’ll often
see coached “bail reps” where the athlete wall steps, pops away, and intentionally lands on their back on a matproving they can exit safely. That single change
tends to unlock confidence because the brain stops treating every attempt as a do-or-die audition.
Finally, there’s the moment people don’t expect: after the first clean wall flip, the next day often feels harder. Not physicallymentally. The brain now knows
what the move is supposed to feel like, and it gets picky. Athletes start chasing the “perfect” rep and overthinking the approach. The practical fix is boring
but effective: go back to basics for five minutes. Do a few wall steps. Do a few jump-and-stick landings. Then try again. The body remembers. The mind calms down.
And suddenly the wall flip is a skill you ownnot a stunt you survived.