Table of Contents >> Show >> Hide
- What It Means to Share a USB Printer
- Before You Start: Quick Setup Checklist
- Method 1: Share a USB Printer from a Windows PC
- Method 2: Share a USB Printer from a Mac
- Method 3: Share a USB Printer Through Your Router
- Method 4: USB Print Server vs USB Device Server
- Step-by-Step Example Setups
- Troubleshooting Shared USB Printers
- Security and Future-Proofing Tips
- Which Sharing Method Should You Choose?
- Real-World Experiences and Lessons From Shared USB Printer Setups
- Final Thoughts
If your trusty USB printer still works like a champ, but your household (or office) has evolved into a jungle of laptops, desktops, and “Who printed 47 pages of memes?” energy, you don’t need to retire the printer. You just need to share it the smart way.
The good news: a USB printer can absolutely become a network printer. The better news: you have more than one way to do it. You can share it through a Windows or Mac computer, use a router with a built-in print server feature, or install a dedicated USB print server/device server. Each option has pros, cons, and one tiny catch: printers are drama-free only when drivers, permissions, and network settings behave.
This guide breaks it all down in plain English, with practical setup steps, troubleshooting tips, and real-world examples. By the end, you’ll know exactly which setup fits your space, your devices, and your tolerance for IT adventures.
What It Means to Share a USB Printer
A USB printer normally connects to one computer with a cable. Sharing it means making that printer available to other devices on the same local network. In other words, you turn a “single-seat” printer into a network printer without replacing the hardware.
There are three common ways to do this:
1) Share Through a Computer (Host PC or Mac)
The printer stays plugged into one computer. That computer shares the printer over your network, and other devices connect to it. This is the easiest and cheapest option.
2) Share Through a Router with a USB Print Server Feature
Some routers have a USB port and a print server function. You plug the printer into the router, install the router’s print utility on each computer, and print through the network.
3) Use a Dedicated USB Print Server or USB Device Server
This is a standalone hardware box that connects your USB printer (and sometimes other USB devices) to the network. Some models are basic print-only devices, while others act as USB-over-network bridges and support scanners or multifunction printers too.
Think of it like this: you can either make a computer the middleman, make your router the middleman, or buy a tiny specialized middleman. Technology is basically a series of middlemen with LEDs.
Before You Start: Quick Setup Checklist
- Make sure the printer works locally first. Test print from the computer it’s connected to.
- Install the correct driver. This matters more than people think (and yes, it matters even if Windows “sort of found something”).
- Keep devices on the same local network. Same Wi-Fi / same LAN segment.
- Use a trusted private network. Printer sharing is best on a private/home/office network, not public Wi-Fi.
- Know your printer type. If it’s a multifunction printer (print/scan/fax), basic print servers may not support scanning.
- Name things clearly. A printer share name like
OfficeLaseris better thanPrinter(3).
Method 1: Share a USB Printer from a Windows PC
This is the most common approach for homes and small offices. One Windows computer becomes the “host” (the printer is plugged into it), and other computers connect to the shared printer over the network.
Step 1: Connect and Test the Printer on the Host PC
Plug the USB printer into the host PC and install the driver. Print a test page. If the printer is flaky on the host computer, it will be extra flaky on the network. Fix local printing first.
Step 2: Turn On Printer Sharing
In Windows, go to printer settings, open the printer’s properties, and enable Share this printer. Assign a clear share name. This is the name client devices will use to connect.
Pro tip: keep the share name short and simple. Spaces and punctuation aren’t illegal, but they love causing confusion at the worst possible time.
Step 3: Confirm Network Sharing Settings
On the host PC, make sure network discovery and file/printer sharing are enabled. If your network profile is set to Public, Windows may act like your printer is a classified government asset and hide it from everyone.
Step 4: Find the Host Computer Name or IP Address
Client devices can connect using either the host computer name or its local IP address. Write down one (or both). If the printer connection fails by name, the IP address is often a reliable backup.
Step 5: Add the Shared Printer on Other Windows Devices
On each client PC:
- Open Printers & scanners.
- Choose Add device.
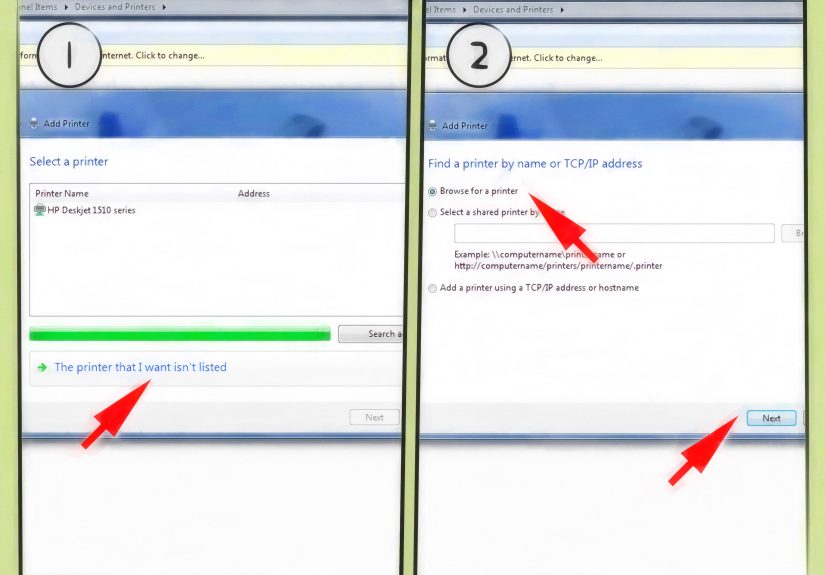
- If the printer doesn’t appear, select Add manually.
- Choose Select a shared printer by name.
- Enter a path like
\ComputerNamePrinterShareNameor\192.168.x.xPrinterShareName.
Windows may ask for credentials from the host PC. That’s normal. It’s Windows being responsible for once.
Important Windows Gotcha: Driver Mismatch
If some devices can print and others can’t, the issue is often a driver mismatchespecially in mixed environments (older Windows versions, different system architectures, or vendor-specific drivers).
Some manufacturers recommend installing additional drivers on the host server so client PCs can connect cleanly. If you’ve ever seen a shared printer appear but refuse to print, this is a top suspect.
Method 2: Share a USB Printer from a Mac
Mac users can also share a USB printer over the local network, and Apple makes the setup pretty straightforward.
How It Works on macOS
You plug the USB printer into the Mac, then turn on Printer Sharing in System Settings. Other Macs (and some UNIX/Linux systems) on the same local network can use it.
Basic Steps
- Connect the USB printer to your Mac and confirm it prints locally.
- Open System Settings > General > Sharing.
- Turn on Printer Sharing.
- Select the printer you want to share.
- Choose who can print (everyone or selected users).
This method is ideal if a Mac mini or desktop stays on all day. If it’s a MacBook that gets closed and carried away, the shared printer will disappear every time the laptop goes on a field trip.
Method 3: Share a USB Printer Through Your Router
If your router has a USB port, it may include a built-in print server feature. This setup removes the need for a host PC to stay on, which is a huge win for homes and small offices.
How Router-Based Print Sharing Works
You plug the printer into the router’s USB port. Then each computer installs the router vendor’s printer-sharing utility (for example, a USB printer controller app). The router manages access to the printer over the network.
Why People Love This Method
- No dedicated host computer required
- Great for shared home networks
- Cleaner setup (printer can sit near router)
- Usually cheap if your router already supports it
Common Router Print Server Limitations
- May require vendor software on every computer
- Linux support can be limited on some brands
- Multifunction features (scan/fax) may not work
- Firewall software can block the vendor utility
In real life, router print sharing is either “set it once and forget it” or “why is there a USB Control Center app in my startup folder?” It depends on the router model and driver compatibility.
Method 4: USB Print Server vs USB Device Server
This is where many people get tripped up, because the names sound similar but the functionality can be very different.
USB Print Server (Print-Only)
A traditional print server is built for one job: letting multiple computers send print jobs to a USB printer over the network. These are usually affordable and simple.
Best for: plain printers, stable environments, basic office use.
USB Device Server (USB Over Network)
A USB device server is more flexible. It shares USB devices over the network, not just printers. That means some models can support scanners, multifunction printers, label printers, card readers, or specialty USB devices.
Best for: multifunction printers, scanning workflows, or offices that need more than just printing.
The Big Difference That Saves Headaches
If you need scanning, do not assume a basic print server will support it. Many low-cost print servers are print-only. For a multifunction printer, you typically need a USB device server (or a network-native printer) if you want print + scan functionality to work reliably.
This is the difference between “We shared the printer!” and “Why does the scan button do absolutely nothing?”
Step-by-Step Example Setups
Example A: Home Office (Windows Host Sharing)
Scenario: You have one USB laser printer and two Windows laptops.
- Plug the printer into a desktop PC that stays on during work hours.
- Enable printer sharing on that PC.
- Turn on network discovery and file/printer sharing.
- On each laptop, add the printer manually using the shared path.
- Test print from both laptops.
Best practice: set the desktop to avoid sleeping during the day. A sleeping host PC equals a mysterious “Printer offline” message on every client.
Example B: Small Team (Router USB Print Server)
Scenario: Four people share one USB printer, and nobody wants to leave a PC running 24/7.
- Plug the printer into the router’s USB port.
- Enable the router’s print server feature in the router admin panel.
- Install the router vendor’s printer utility on each computer.
- Install the printer driver on each computer.
- Use the utility to connect or auto-connect to the printer.
Best practice: if printing randomly fails, check local firewall software first. Router print utilities often get blocked.
Example C: Design Studio (USB Device Server)
Scenario: You use a multifunction printer and need both printing and occasional scanning from multiple desks.
- Use a USB device server, not a basic print server.
- Install the vendor’s device-sharing software on each workstation.
- Connect the MFP to the device server and the device server to Ethernet.
- Install the full printer/scanner driver package on each computer.
- Test both printing and scanning workflows.
Best practice: schedule who uses scanning-heavy tasks if the device server gives one-computer-at-a-time access for USB sessions.
Troubleshooting Shared USB Printers
Problem: The Printer Doesn’t Appear on the Network
- Check that all devices are on the same local network.
- Confirm the host computer is on and awake.
- Verify network discovery and printer sharing are enabled.
- Try adding the printer manually using the host IP address.
Problem: It Connects, But Won’t Print
- Reinstall the correct driver on the client PC.
- Make sure the host PC has the proper printer driver installed.
- On Windows shared setups, install additional drivers for other client types if needed.
- Restart the print spooler service (classic fix, still works).
Problem: Router Print Utility Can’t See the Printer
- Make sure the router’s print server feature is enabled.
- Confirm the printer is powered on and recognized by the router.
- Temporarily disable firewall software to test detection.
- Install the router vendor’s utility on every client PC.
Problem: Printing Works, Scanning Doesn’t
This usually means you’re using a print-only server. For multifunction printers, use a USB device server or connect the MFP to a computer and share it in a way that supports scanning separately.
Problem: Linux Device Can’t Print Through the Router Utility
Some consumer router print server features rely on Windows/macOS utilities and do not support Linux well (or at all). In that case, a dedicated network-capable printer, IPP/CUPS server, or a better USB device server is the cleaner long-term path.
Security and Future-Proofing Tips
Printer sharing sounds simple, but printers are part of your networkso security matters.
1) Use a Private Network Profile
Only enable printer sharing on trusted networks (home or office). Don’t expose a shared printer on public Wi-Fi.
2) Prefer Modern Printing Standards When Possible
If your printer supports IPP, AirPrint, or Mopria (or you can print through a modern CUPS/IPP setup), you can reduce driver pain and improve compatibility across devices.
3) Watch Windows Printing Changes
Windows printing is gradually shifting toward a more secure, modern print stack. That’s good for security and long-term reliability, but it also means older driver-heavy workflows may need updates over time.
4) Keep a Stable IP for the Host or Print Server
If you connect clients using IP address, reserve that IP in your router (DHCP reservation) so the printer path doesn’t break after a reboot.
Which Sharing Method Should You Choose?
Choose Computer Sharing If…
- You want the cheapest option
- You already have a desktop PC or Mac that stays on
- You only need printing (or simple home-office use)
Choose Router Print Server If…
- Your router supports USB printer sharing
- You don’t want a host computer running all day
- You’re okay installing vendor utilities on each computer
Choose a USB Device Server If…
- You need multifunction printer features (especially scanning)
- You want a more professional shared-device setup
- You manage multiple users or specialty USB workflows
If your current USB printer is old but reliable, sharing it can easily add a few more years to its useful life. That’s good for your budget, good for your workflow, and good for the planet. Also good for avoiding the emotional burden of printer shopping.
Real-World Experiences and Lessons From Shared USB Printer Setups
One of the most common real-world experiences is that the setup looks “done” long before it’s actually stable. A team prints one test page, celebrates, and then the first large PDF job fails the next morning because the host PC went to sleep overnight. In practice, the most successful shared USB printer setups include small operational rules: keep the host computer awake during work hours, don’t unplug the USB cable casually, and label the printer share name clearly so new users can connect without guessing.
Another very common experience: driver issues show up only on one machine. Three computers print perfectly, but one laptop refuses to cooperate and displays a vague error like “Driver unavailable” or “Cannot connect to printer.” In many cases, the fix is boring but effective: remove the printer, install the correct manufacturer driver, then reconnect using the shared path manually. Shared printing tends to punish shortcuts. If one person used a generic Windows driver and another installed the full vendor package, their results can be wildly different.
Router-based print sharing is often praised for convenience, but it creates a different kind of user experience. People love that no main computer has to stay on, but they forget that each device still needs the router utility and proper permissions. In small offices, a frequent support moment is someone buying a new laptop and assuming the printer will “just appear” because the router is doing the sharing. Then comes the classic IT sentence: “Did you install the utility?” It’s not glamorous, but standardizing the setup steps (driver first, utility second, test page third) saves time every single time.
Multifunction printers create the biggest expectation gap. Teams often assume that if printing works over a basic print server, scanning will too. Then someone tries to scan receipts, contracts, or IDs and finds out the scanner function is invisible. This is why experienced setups treat printing and scanning as separate requirements during planning. If scanning matters, people who choose a USB device server (or move to a truly network-capable MFP) usually have a much smoother experience than those trying to force a print-only device to behave like a full USB-over-network solution.
There’s also a human side to printer sharing that nobody mentions in product manuals: naming conventions and communication matter. A printer called “HP-USB” doesn’t tell people where it is, who maintains it, or which one to use when there are multiple printers. A name like “FrontDesk-Laser” or “Office-Shipping-Printer” is much better. In shared spaces, the small detailsprinter name, default settings, paper tray labels, and a note taped nearby with the network pathreduce confusion more than any advanced setting ever will.
Finally, the best long-term experience usually comes from choosing the setup that matches real usage, not just the cheapest hardware. If only two people print occasionally, Windows or Mac sharing is perfectly fine. If multiple users print daily and nobody wants a host PC always on, router sharing is usually the sweet spot. If scanning and specialty workflows are part of the job, a USB device server (or a modern network printer) pays for itself in reduced frustration. The lesson people learn after the third “Why is the printer offline?” moment is simple: shared printing works great when the setup matches the workflowand becomes a comedy show when it doesn’t.
Final Thoughts
Sharing a USB printer is still a smart, practical solution in 2026. You don’t need to replace a good printer just because it doesn’t have Wi-Fi. With the right setup, you can turn a basic USB printer into a reliable network printer for your home, classroom, or office.
If you want the quickest path, share it from a Windows PC or Mac. If you want less dependency on one computer, use a router print server. If you need advanced device supportespecially scanninggo with a USB device server. Pick the method that fits your actual workflow, not the one that looks coolest in the product photo.
And remember: every shared printer is only one good label, one correct driver, and one test page away from peace.