Table of Contents >> Show >> Hide
- Why Folders Get Hidden in Windows 7
- How to Unhide Folders in Windows 7: 9 Steps
- Step 1: Click the Start button
- Step 2: Open Control Panel
- Step 3: Go to Appearance and Personalization
- Step 4: Click Folder Options
- Step 5: Select the View tab
- Step 6: Choose “Show hidden files, folders, and drives”
- Step 7: Uncheck “Hide protected operating system files (Recommended)” only if necessary
- Step 8: Click Apply, then OK
- Step 9: Remove the Hidden attribute from the folder itself
- What If the Folder Still Will Not Show Up?
- Command Prompt Option for Advanced Users
- Best Practices After You Unhide the Folder
- Common Examples of Hidden Folders in Windows 7
- Extra Experience and Real-World Situations
- Conclusion
- SEO Tags
If a folder has vanished in Windows 7, do not panic and do not immediately assume your computer has developed a dramatic flair for mystery. In many cases, the folder is still sitting right where it belongs, quietly wearing the Hidden attribute like an invisibility cloak. The good news is that learning how to unhide folders in Windows 7 is usually quick, painless, and far less exciting than losing your files forever.
This guide walks you through the exact process in nine clear steps. Along the way, you will also learn why folders become hidden, when to reveal protected files, and what to do if a folder still refuses to show up. Whether you are trying to find AppData, recover files on a flash drive, or simply stop Windows from playing hide-and-seek, this tutorial will help.
One quick heads-up before we begin: Windows 7 is an older operating system, so be extra careful when changing visibility settings. Hidden folders are often hidden for a reason. Some store app data, while others hold system files that should not be edited casually. Think of this as opening a backstage door, not redecorating the theater.
Why Folders Get Hidden in Windows 7
Before jumping into the steps, it helps to understand what you are dealing with. In Windows 7, a folder can be hidden in two common ways:
- It has the Hidden attribute enabled. This means Windows is set to keep it out of normal view.
- It is a protected operating system file or folder. These are even more concealed because Windows assumes you should not be poking around in them on a random Tuesday.
Folders may also appear “missing” after a malware issue, a copied drive, a software install, or an accidental Properties change. A folder is not always gone just because you cannot see it. Sometimes it is merely hiding with the confidence of a cat under a couch.
How to Unhide Folders in Windows 7: 9 Steps
Step 1: Click the Start button
Begin in the lower-left corner of your desktop and click the Start button. This opens the main menu where you can search for settings and tools in Windows 7.
If you already have a Windows Explorer window open, that is fine too. But using Start is the easiest path for most people, especially if you do not remember where Folder Options lives.
Step 2: Open Control Panel
From the Start menu, click Control Panel. If your Control Panel is set to Category view, you will see grouped sections like Appearance and Personalization. If it is set to Small icons or Large icons, you can jump directly to Folder Options.
Either route works. Windows 7 just enjoys giving you multiple doors to the same room.
Step 3: Go to Appearance and Personalization
In Category view, click Appearance and Personalization. This section includes display settings, themes, and the all-important folder settings that control what Windows Explorer shows.
If you do not see this category because your Control Panel is showing icons instead, skip ahead mentally and open Folder Options directly.
Step 4: Click Folder Options
Under Appearance and Personalization, click Folder Options. This opens the dialog box that controls file and folder display behavior in Windows 7.
Another shortcut is to open any folder, click Organize near the top-left corner, and then choose Folder and search options. Same destination, slightly different scenic route.
Step 5: Select the View tab
Inside Folder Options, click the View tab. This is where Windows stores the settings for hidden files, hidden folders, known file extensions, and protected operating system files.
You will see a long list of Advanced settings. Take a breath. It looks busy, but you only need a couple of items from the list.
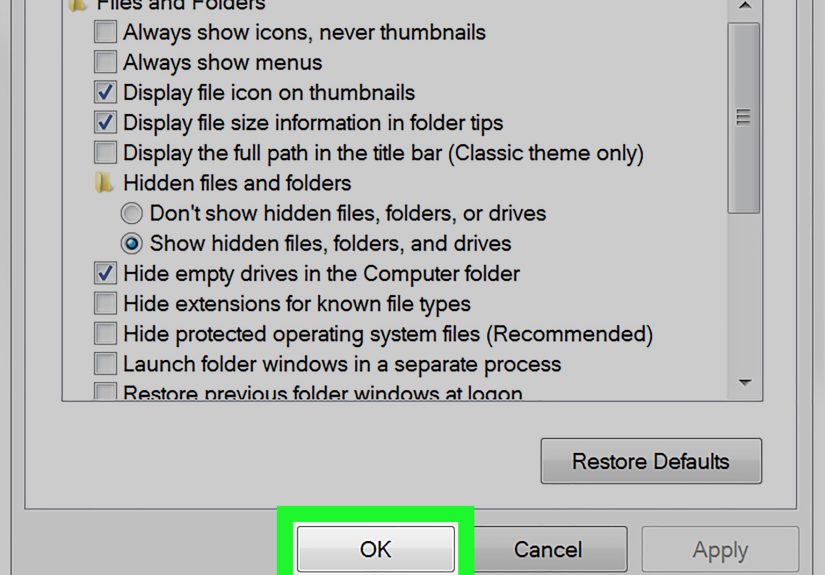
Step 6: Choose “Show hidden files, folders, and drives”
Scroll until you find the Hidden files and folders section. Select the radio button for Show hidden files, folders, and drives.
This is the main switch that tells Windows 7 to stop concealing standard hidden items. As soon as you apply the setting, hidden folders usually appear faded or slightly transparent compared with regular folders. That washed-out look is Windows saying, “Yes, this is real, but please do not lick the machinery.”
Step 7: Uncheck “Hide protected operating system files (Recommended)” only if necessary
If the folder you need is still not visible, look farther down the list and find Hide protected operating system files (Recommended). Uncheck it only if you specifically need access to a system folder, such as certain configuration or program data locations.
Windows will show a warning, and for good reason. These files and folders are important to the operating system. Click Yes only if you understand that you are revealing sensitive items, not redecorating them. For everyday folder recovery, you often do not need this step at all.
Step 8: Click Apply, then OK
Click Apply, then click OK. This saves your changes and closes the Folder Options window.
Now open the drive or folder where your missing item should be. If the folder was hidden using standard attributes, it should now appear. A common example is the AppData folder inside your user profile, which is normally hidden in Windows 7.
Step 9: Remove the Hidden attribute from the folder itself
Seeing the folder is helpful, but if you want it to stay visible even after you return Windows to normal settings, you need to unhide the folder itself.
- Right-click the faded hidden folder.
- Choose Properties.
- On the General tab, look for the Hidden checkbox.
- Uncheck Hidden.
- Click Apply.
- If prompted, choose whether to apply changes to the folder only or to the folder, subfolders, and files.
- Click OK.
If the folder contains lots of files, choose the option to apply changes to the folder, subfolders, and files. That way you are not unhiding the front door while leaving everything inside wearing camouflage.
What If the Folder Still Will Not Show Up?
If you followed the nine steps and the folder still does not appear, the issue may not be simple visibility. Here are a few likely reasons:
The folder has both Hidden and System attributes
Some folders are marked with both attributes, which makes them harder to reveal. In that case, you may need to show protected operating system files temporarily or use the Command Prompt to clear attributes.
The folder path is wrong
It sounds obvious, but it happens constantly. Check the exact location. For example, users often expect to find application data in Documents when it actually lives under the user profile.
Malware changed file attributes
Certain infections and shady USB worms have a bad habit of hiding files and folders. If many items suddenly disappeared from a flash drive or external drive, run a reputable antivirus scan before doing anything else.
You are dealing with permissions, not hidden status
A folder may exist but still be inaccessible because your account does not have permission to open it. That is a different issue from a hidden folder, and the fix usually involves ownership or security settings.
Command Prompt Option for Advanced Users
If a folder remains hidden because of attributes, you can use attrib in Command Prompt. For example, an advanced user might open Command Prompt and clear hidden attributes from a specific folder. This method is powerful, but it is best used carefully and only when you know the exact path. One wrong command in the wrong place is a wonderful way to create a brand-new problem.
For most people, the Folder Options method is the safest and easiest way to show hidden folders in Windows 7.
Best Practices After You Unhide the Folder
- Return Folder Options to a safer default after you finish browsing.
- Leave protected operating system files hidden unless you truly need them.
- Back up important files before editing anything in hidden folders.
- Use clear folder names so you can find what you need without turning Windows into a ghost tour.
- Scan removable media if folders disappeared unexpectedly.
Common Examples of Hidden Folders in Windows 7
Some folders are hidden by design because they store settings or support files rather than everyday documents. Common examples include:
- AppData inside your user profile
- ProgramData on the system drive
- Certain system folders used by Windows and installed applications
- Folders on flash drives hidden by malware or user error
If you only need one folder visible, it is smarter to unhide that folder in Properties than to leave all hidden files visible forever. Windows does not need your curiosity that much.
Extra Experience and Real-World Situations
People usually search for how to unhide folders in Windows 7 when they are stressed, confused, or convinced that their files have packed up and moved out overnight. In real life, the problem often starts with something simple. A student tries to find a saved project and notices the folder is gone. A parent plugs in an old flash drive full of family photos and sees an empty drive. A small business user needs an old email archive or accounting backup and suddenly realizes the folder is invisible. In each case, the files are often still there. Windows is just not showing them.
One common experience involves the AppData folder. Someone follows software instructions that say, “Paste this file into AppData,” then opens their user folder and sees absolutely nothing called AppData. Cue the confusion, the muttering, and the suspicion that the tutorial writer lives in a different universe. The fix is usually just enabling hidden folders in Folder Options. Once AppData appears, everything makes sense again, and the panic level drops from “total disaster” to “mild annoyance.”
Another frequent scenario happens with USB drives. A person uses a flash drive at school, work, or an old shared computer. Later, they plug it into their Windows 7 PC and all their folders seem missing. Yet the drive still shows used space. That is a huge clue. If storage is occupied, the files often still exist and may simply be hidden. In these cases, revealing hidden files can expose the folders immediately. If it does not, a malware scan and attribute repair may be necessary. This is also why people should avoid trusting random public computers with important storage devices. They are the digital equivalent of lending your suitcase to a raccoon.
Then there are users who accidentally hide folders themselves. It is surprisingly easy. Right-click, open Properties, click the Hidden box, forget you did it, and weeks later wonder why the folder disappeared. This happens more than most people admit. The good news is that accidental hiding is one of the easiest problems to reverse. Once the folder is visible again, clearing the Hidden attribute solves it for good.
There is also the “advanced user with too much confidence” story. This person unhides protected operating system files, starts exploring, and suddenly finds a jungle of strange folders, configuration files, and mysterious desktop.ini files. The experience can be educational, but it can also become a speedrun toward regret if they start deleting things at random. That is why the smartest habit is to reveal only what you need, make the change you came for, and then restore safer visibility settings when finished.
In practice, the best experience is not just knowing the nine steps. It is understanding when to use them, when to stop, and when a “missing” folder is really a permissions or malware problem instead. Once you know that, Windows 7 becomes much less mysterious. It may still be old-school, but at least it stops pretending your folders vanished into another dimension.
Conclusion
Learning how to unhide folders in Windows 7 is mostly about knowing where the visibility settings live and how Windows uses file attributes. Open Control Panel, head to Folder Options, switch the View settings, and then remove the Hidden attribute from the specific folder if you want it to remain visible. That is the heart of the process.
The trick is to be careful, especially when dealing with protected operating system files. Reveal only what you need, avoid changing random system items, and run a malware scan if folders disappeared unexpectedly. With the right steps, you can make hidden folders visible again without turning your PC into a cautionary tale.