Table of Contents >> Show >> Hide
- Why Mushrooms Make Perfect Flat Lay Subjects
- My Mushroom Flatlay Setup (Simple, Not Precious)
- Styling Rules I Actually Follow (Most Days)
- A Quick Safety + Ethics Note (Because Mushrooms Are Not Candy)
- The 40 Best Mushroom Flatlay Photographs (Described Like You’re Standing Over My Set)
- Photo 1: “The Farmer’s Market Haul”
- Photo 2: “Oyster Mushroom Ruffles”
- Photo 3: “Shiitake Starbursts”
- Photo 4: “The Cast-Iron Mood”
- Photo 5: “Minimalist Mushroom Study”
- Photo 6: “Forager’s Field Notes”
- Photo 7: “Garlic + Mushroom Romance”
- Photo 8: “Bowl of Earth Tones”
- Photo 9: “The Slice-and-Show”
- Photo 10: “Herb Garden Crash”
- Photo 11: “Monochrome Mocha”
- Photo 12: “Bright, Airy, and Slightly Smug”
- Photo 13: “The Knife Handle Lead-In”
- Photo 14: “Peppercorn Scatter”
- Photo 15: “Mushroom Grid (But Make It Human)”
- Photo 16: “Rustic Basket Story”
- Photo 17: “Salt + Butter = Plot”
- Photo 18: “Slate + Steam (Implied)”
- Photo 19: “The Single Wild Card”
- Photo 20: “Forest Floor Illusion”
- Photo 21: “Cream + Charcoal Contrast”
- Photo 22: “Tiny Bowl, Big Personality”
- Photo 23: “Gills as Graphic Design”
- Photo 24: “Mushroom + Egg Breakfast Board”
- Photo 25: “The Cookbook Corner”
- Photo 26: “Citrus Surprise”
- Photo 27: “Everything Bagel Seasoning Moment”
- Photo 28: “The Wooden Board Classic”
- Photo 29: “Neutral Linen Symphony”
- Photo 30: “Moody Black Bowl”
- Photo 31: “The ‘Oops, I Dropped Them’ Shot”
- Photo 32: “Paper Wrap Elegance”
- Photo 33: “Spice Jar Shadow Play”
- Photo 34: “The Three-Texture Rule”
- Photo 35: “Tiny Cutting Board, Tight Crop”
- Photo 36: “Autumn Palette”
- Photo 37: “Clean Hands, Clean Frame”
- Photo 38: “The One Perfect Cap”
- Photo 39: “Kitchen Counter Reality”
- Photo 40: “The Grand Finale Spread”
- My Step-by-Step Workflow for Mushroom Flatlays
- Common Mushroom Flatlay Mistakes (I Have Made All of These, Relax)
- Conclusion
- Extra: of Real-World Mushroom Flatlay Experience (Stuff You Only Learn the Hard Way)
I didn’t set out to become “the person who arranges fungi like they’re attending a tiny, fashionable dinner party.”
It just… happened. One rainy weekend I photographed a handful of cremini mushrooms on a cutting board, added a
thrift-store butter knife for drama, and suddenly my camera roll looked like a woodland Pinterest board got a
culinary degree.
If you’re into mushroom flatlay photography (or you’re mushroom-curious and want to become a fully licensed
fun-gi), welcome. This post is a deep dive into how I style, light, and shoot top-down mushroom flatlaysplus
my 40 favorite “best of” compositions, described in enough detail that you can recreate the vibe without copying
a single frame.
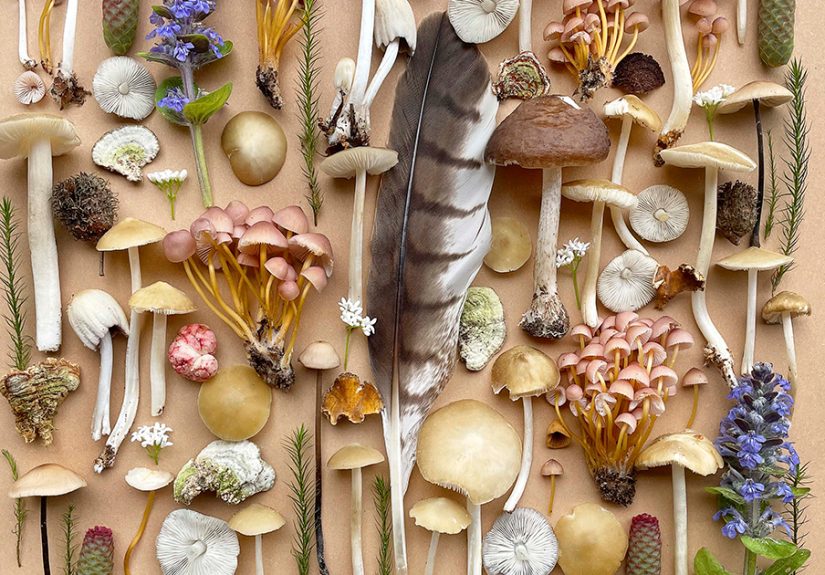
Why Mushrooms Make Perfect Flat Lay Subjects
Mushrooms are basically the supermodels of still life photography: sculptural, moody, and oddly photogenic even
when they’re “a little rustic.” A mushroom flatlay has built-in texture (gills, pores, scales), color variation
(cream to cocoa to ink-black), and shape language (domes, funnels, coral-like frills). They also play well with
propsfrom linen napkins to field guidesbecause mushrooms naturally suggest story: foraging, cooking, forests,
cozy kitchens, science labs, witchy apothecaries… you get the idea.
The secret sauce: texture + repetition
Flat lay photography thrives on patterns and micro-details. Mushrooms deliver both. Photograph a cluster of
oyster mushrooms and you get layered ruffles. Line up sliced shiitakes and you get a rhythm of starburst gills.
Add a sprinkle of salt and it looks like tiny snow fell on your “forest floor.”
My Mushroom Flatlay Setup (Simple, Not Precious)
Light: indirect window light is the MVP
I shoot most of my flat lay photos near a window with bright, indirect daylight. Direct sun can carve harsh
shadows that make mushrooms look like they’re under interrogation. Indirect light gives soft contrast, keeps
colors honest, and makes the textures read without screaming.
Camera and lens (use what you’ve got)
A phone works. A DSLR/mirrorless works. What matters is consistency: stabilize your camera (tripod, overhead arm,
or an improvised stack of cookbooks) and keep your angle truly top-down. If you’re using a camera, a 35mm–50mm
equivalent is a sweet spot for natural-looking proportions in overhead photography.
Surfaces I rotate like a stylish raccoon
- Matte wood: warm, cozy, rustic.
- Stone or slate: moody, editorial, “forest after rain.”
- Neutral paper: clean, modern, color-forward.
- Well-loved baking sheets: instant kitchen realism.
Styling Rules I Actually Follow (Most Days)
1) Build a “mushroom cast” with different roles
Every good mushroom flatlay needs characters. I usually combine:
hero mushrooms (the prettiest whole ones),
supporting mushrooms (smaller or more textured),
and extras (slices, crumbs of soil, herbs, peppercorns, garlic skins).
That mix creates deptheven in a top-down shot.
2) Break the flatness on purpose
Flat lay doesn’t mean “pressed like a panini.” I add small height shifts: a folded linen corner, a tilted bowl,
a knife handle, a mushroom sliced and slightly stacked. The goal is subtle dimension without turning the scene
into a Jenga tower.
3) Choose a color story, then commit
Mushrooms lean neutral, which makes them incredibly flexiblebut also easy to make boring. I pick one “accent”
color (green herbs, red pepper flakes, blue enamel bowl) and repeat it in small doses. Repetition makes the frame
feel intentional, not accidental.
A Quick Safety + Ethics Note (Because Mushrooms Are Not Candy)
If your flat lay involves wild mushrooms, treat them with respect. Never eat a wild mushroom unless you are
100% certain of its identification, and don’t rely on a single app or a random comment thread for safety.
Some toxins aren’t destroyed by cooking, and mushroom poisonings can be severe. If you suspect poisoning,
contact Poison Control immediately at 1-800-222-1222 (in the U.S.) or seek emergency care.
Also: check local rules before foragingmany public lands have specific guidelines and permit requirements.
The 40 Best Mushroom Flatlay Photographs (Described Like You’re Standing Over My Set)
I’m listing these as “photo recipes”: subject, styling choices, lighting vibe, and why each composition works.
Feel free to borrow the ideas, not the exact arrangementyour mushrooms deserve their own spotlight.
Photo 1: “The Farmer’s Market Haul”
A heap of mixed cremini and white button mushrooms spilling from a brown paper bag onto warm wood, with a
scribbled receipt peeking out. Soft window light, gentle shadows, cozy Saturday energy.
Photo 2: “Oyster Mushroom Ruffles”
Pale oyster mushrooms fanned like fabric swatches on slate, paired with a single silver fork for scale.
High texture, low colorpure shape study.
Photo 3: “Shiitake Starbursts”
Sliced shiitakes arranged in a loose spiral on parchment, gills facing up. A dusting of flaky salt makes the
gills pop without shouting.
Photo 4: “The Cast-Iron Mood”
Whole mushrooms in a tiny cast-iron skillet, rosemary scattered like confetti. Dark background, side bounce
from a white card for “editorial but edible.”
Photo 5: “Minimalist Mushroom Study”
Three perfect white button mushrooms on off-white paper, aligned but not too aligned (we’re artists, not robots).
The negative space is the flex.
Photo 6: “Forager’s Field Notes”
Mushrooms framed by a vintage field guide (closed), pencil, and a little magnifying glass. The mushrooms are the
star, the props whisper “science.”
Photo 7: “Garlic + Mushroom Romance”
Cremini mushrooms with papery garlic skins and a butter knife. The garlic skins add airy texture that mushrooms
can’t provide on their own.
Photo 8: “Bowl of Earth Tones”
A ceramic bowl filled with mushrooms, shot on a linen napkin that’s slightly wrinkled (wrinkles = realism).
Warm color palette, soft shadows.
Photo 9: “The Slice-and-Show”
One mushroom cut cleanly in half, placed near whole ones so the gills become a focal point. Composition trick:
one “reveal” adds intrigue fast.
Photo 10: “Herb Garden Crash”
Mushrooms with parsley and thyme branches, arranged diagonally for motion. Green repeats in three places so it
reads intentional.
Photo 11: “Monochrome Mocha”
Brown mushrooms on a cocoa-toned background with a dark wooden spoon. Minimal contrast, maximum vibe.
Photo 12: “Bright, Airy, and Slightly Smug”
White mushrooms on a bright surface with a white cloth and a pale bowllight-on-light styling. Soft shadows,
clean edges, a “Sunday cookbook” feel.
Photo 13: “The Knife Handle Lead-In”
A chef’s knife placed so the handle points toward the center, guiding the eye into the mushrooms. Simple prop,
powerful composition line.
Photo 14: “Peppercorn Scatter”
Mushrooms plus a few peppercorns tossed like tiny punctuation marks. They create micro-contrast and help the
image feel alive.
Photo 15: “Mushroom Grid (But Make It Human)”
Mushrooms arranged in a loose grid with tiny imperfect spacing. The repetition is satisfying; the imperfections
keep it from feeling sterile.
Photo 16: “Rustic Basket Story”
Mushrooms in a shallow basket, a few rolling out onto wood. The basket adds context: harvest, gathering, abundance.
Photo 17: “Salt + Butter = Plot”
Mushrooms beside a dish of butter and a pinch bowl of salt. The viewer instantly understands the next scene:
cooking.
Photo 18: “Slate + Steam (Implied)”
Mushrooms on slate with a folded towel and a spoon. Nothing is cooked, but the props suggest warmth and motion.
Photo 19: “The Single Wild Card”
A neutral set with one bright elementlike a red chiliplaced off-center. The eye goes chili → mushrooms → back.
Controlled chaos.
Photo 20: “Forest Floor Illusion”
Mushrooms styled on dark paper with scattered pine needles and a few crumbs of soil (kept away from the gills so
it looks natural, not messy).
Photo 21: “Cream + Charcoal Contrast”
Light mushrooms on a charcoal background with a pale linen corner. High contrast, very scroll-stopping.
Photo 22: “Tiny Bowl, Big Personality”
One small bowl of mushrooms centered, with ingredients orbiting itgarlic, herbs, salt. A “solar system” layout
that keeps the composition organized.
Photo 23: “Gills as Graphic Design”
Several sliced mushrooms arranged gills-up like a pattern. The frame reads almost like wallpaperexcept edible.
Photo 24: “Mushroom + Egg Breakfast Board”
Mushrooms paired with eggs, pepper, and a small pan. Warm light, friendly props, “brunch at home” energy.
Photo 25: “The Cookbook Corner”
Mushrooms with a cookbook partially in frame (no readable recipejust mood), plus a wooden spoon. The book adds
narrative without stealing attention.
Photo 26: “Citrus Surprise”
Mushrooms with lemon slices (thin, bright) to lift the palette. The yellow accent turns earthy into fresh.
Photo 27: “Everything Bagel Seasoning Moment”
Mushrooms + scattered seasoning for texture. The trick is restraint: a pinch, not a snowstorm.
Photo 28: “The Wooden Board Classic”
A cutting board with mushrooms, knife, and a few slices. The composition leans classic because the story is
universally understood: prep → cook → eat.
Photo 29: “Neutral Linen Symphony”
Mushrooms against layered linens in beige and off-white. Linen adds soft texture that contrasts nicely with the
mushroom caps.
Photo 30: “Moody Black Bowl”
Dark bowl, dark background, pale mushrooms. The bowl edge frames the subject like a spotlight without needing
dramatic lighting tricks.
Photo 31: “The ‘Oops, I Dropped Them’ Shot”
Mushrooms scattered in a believable arc, as if you just bumped the counter. It looks spontaneous, but yes, I
placed them one by one like a tiny control freak.
Photo 32: “Paper Wrap Elegance”
Mushrooms on crinkled butcher paper with a simple twine bow. The paper catches light beautifully and feels
artisanal.
Photo 33: “Spice Jar Shadow Play”
Mushrooms plus a small spice jar casting a gentle shadow. The shadow creates shape and keeps the flat lay from
feeling too flat.
Photo 34: “The Three-Texture Rule”
Mushrooms (smooth), coarse salt (crunchy), linen (soft). Three distinct textures keep the frame rich even with a
limited color palette.
Photo 35: “Tiny Cutting Board, Tight Crop”
A close, tight crop with mushrooms filling the frame. This is my go-to when a mushroom batch is “photogenic but
not abundant.”
Photo 36: “Autumn Palette”
Mushrooms with sage leaves, nut shells, and warm-toned cloth. Browns and greens, a little orange if available,
all cozy all day.
Photo 37: “Clean Hands, Clean Frame”
Mushrooms styled with a small brush and a toweltools of care. It’s a subtle nod to handling and cleanliness,
and it looks good, too.
Photo 38: “The One Perfect Cap”
A single mushroom cap centered on a minimalist background with two supporting props at the edges. The restraint
makes it feel premium.
Photo 39: “Kitchen Counter Reality”
Mushrooms on a real countertop with a slightly messy towel and a half-used ingredient. Not “messy messy”just
enough to feel like someone actually cooks here.
Photo 40: “The Grand Finale Spread”
A wide, abundant overhead scene: mixed mushrooms, herbs, garlic, salt, a pan, and a linen napkinall arranged in
a flowing S-curve. It’s the flat lay equivalent of a curtain call.
My Step-by-Step Workflow for Mushroom Flatlays
- Pick the mood: bright/airy vs moody/editorial.
- Choose a surface: wood, slate, paper, or a pan.
- Build the base: place the hero mushrooms first.
- Add story props: knife, herbs, salt, bowlone at a time.
- Check the “eye path”: do you naturally scan through the frame?
- Control shadows: use a white card to lift darkness; move the set, not the sun.
- Shoot a burst: tiny changes (one mushroom rotated) can be the difference.
- Edit lightly: keep texture honest; don’t blur your fungi into plastic.
Common Mushroom Flatlay Mistakes (I Have Made All of These, Relax)
Overcrowding the scene
Mushrooms are already visually busy. If you add eight props, three sauces, two linens, and a partridge in a pear
tree, the subject gets lost. Try one hero prop + one texture prop, then stop.
Lighting that makes mushrooms look… sad
Overhead direct light can flatten everything into “beige on beige.” Move to indirect light, or add side bounce.
Mushrooms love gentle contrast.
Props that don’t match the story
A sleek gold spoon with muddy forest mushrooms can workif you’re going for “luxury swamp.” Otherwise, keep props
coherent: rustic with rustic, modern with modern.
Conclusion
Mushroom flatlays are my favorite kind of still life because they let you play both photographer and storyteller.
A single top-down photo can feel like a recipe, a foraging journal, a science illustration, or a cozy kitchen
memory. And the best part? You can build a whole portfolio with nothing more than a window, a surface, and a
handful of mushrooms that refuse to sit still like polite little vegetables.
Extra: of Real-World Mushroom Flatlay Experience (Stuff You Only Learn the Hard Way)
The first time I tried to shoot a mushroom flatlay “professionally,” I set up at noon, in direct sunlight, on a
glossy countertop. The mushrooms looked like they were being audited. Every highlight was a glare, every shadow
was a harsh little cliff, and my white button mushrooms turned into reflective ping-pong balls with existential
dread. That day taught me my first rule: if the light is mean, don’t negotiatemove.
Over time I learned to scout light the way people scout parking spots: patiently, strategically, and with mild
emotional fragility. Morning window light is my favorite because it’s bright but gentle, and the scene feels
fresh. Late afternoon light can be gorgeous too, especially for moody sets, but it’s also the time of day when
shadows start getting dramatic like they’re auditioning for a film noir. When that happens, I use a white foam
board (or, in emergencies, the back of a pizza box) to bounce light into the dark side of the mushrooms. Instant
improvement. Zero wizardry.
I also learned mushrooms have moods. Some batches are flawless: clean caps, crisp edges, photogenic gills.
Others look like they survived a tiny bar fight. Instead of forcing them into “perfect,” I style to their
personality. Rough-looking mushrooms belong on rustic wood with a worn knife and a wrinkled towel. Pristine
mushrooms can handle bright paper, minimal props, and that clean editorial vibe.
The biggest behind-the-scenes surprise? Mushrooms change fast. They dry out, bruise, and softensometimes within
the same shoot if your studio is warm. My fix is to keep the set ready before the mushrooms arrive. I pick the
surface, place the props, set the camera height, and test exposure with a stand-in object. Then I bring the
mushrooms in last, like celebrities who don’t want to wait around.
Finally, a note on handling: whether they’re store-bought or foraged (ethically and legally, please), I treat
mushrooms as food first and props second. Clean hands, clean surface, and no letting them sit in plastic bags
where moisture builds up and everything gets slimy. If a mushroom looks questionable, it becomes compostnot a
photo subject. The goal is beautiful mushroom photography, not a science experiment you didn’t sign up for.