Table of Contents >> Show >> Hide
- The Flea Market Find: Choosing a Magnifying Glass That’s More “Magic Wand” Than “Headache”
- Clean It Like You Mean It: Prep Before You Photograph
- How a Magnifying Glass Turns Into a Spring Macro Tool
- DIY Setup: Smartphone, Camera, or “Whatever’s in My Pocket”
- What to Photograph in Spring When You’re Seeing the World at 3x
- Light, Angle, and Composition: The Stuff That Makes Photos Feel Alive
- Camera Settings That Actually Help (Without Turning This Into a Physics Exam)
- Focus Stacking: The Secret Weapon for Sharp Spring Details
- Ethics: Take Photos, Not Flowers (and Please Don’t Flatten the Meadow)
- Common Problems (and Fixes) When Shooting Through a Magnifying Glass
- A Quick “Go Capture Spring” Checklist
- Conclusion: A $10 Flea Market Lens That Made Spring Feel Brand New
- Extra: 5 Spring Moments I Didn’t Expect (But the Magnifying Glass Made Unforgettable)
The thing about flea markets is they don’t just sell objectsthey sell tiny plot twists. You go in looking for a $3 ceramic cat, and you leave with a vintage magnifying glass that makes you feel like a detective in a 1940s movie. That’s exactly how my spring photography obsession got upgraded: not with an expensive macro lens, but with a slightly scuffed magnifying glass that smelled faintly like old books and ambition.
I bought it because it looked cool. I kept it because it turned spring into a full-blown science exhibit: pollen grains like confetti, leaf veins like street maps, and dew drops acting like tiny crystal balls. If you’ve ever wanted to slow down and actually see springthis is your sign (and also your excuse to wander a flea market at 8 a.m. with coffee and questionable decision-making).
The Flea Market Find: Choosing a Magnifying Glass That’s More “Magic Wand” Than “Headache”
Let’s talk about what makes a flea-market magnifying glass a good photo sidekick. You don’t need museum-grade optics. You need something that’s clear enough to render details, sturdy enough to survive a backpack, and not so scratched that every photo looks like it was taken through a snowstorm.
Quick “Should I Buy This?” Checklist
- Glass clarity: Hold it up to the light. A few tiny marks are fine; deep scratches and foggy haze are not.
- Lens shape: A larger diameter is easier to position in front of a phone or camera.
- Handle stability: Wiggle it. If it flexes like a cheap spoon, your images will wobble too.
- Magnification level: Many handheld magnifiers are around 2x–5x. That’s plenty for a “macro-ish” look.
- Bonus points: A built-in light can help, but also can create harsh reflections. Nice to have, not required.
Flea market pros often recommend showing up early for the best selection, bringing cash, and inspecting items carefully before you commit. Translation: do your scouting before you fall in love with something that has a surprise crack hiding like a villain in the third act.
Clean It Like You Mean It: Prep Before You Photograph
If your magnifying glass is vintage, it may have lived a full life: fingerprints, dust, and the kind of residue that suggests it once solved mysteries (or at least read very small receipts). Clean it gently:
- Use a microfiber cloth (the same kind you’d use for eyeglasses).
- Add a tiny bit of lens cleaner or diluted mild soap solution if it’s grimy.
- Avoid harsh chemicalsespecially if the handle has antique finishes.
This step matters more than you’d think: smudges on the magnifier become “mysterious fog” in your images, and not in the romantic way.
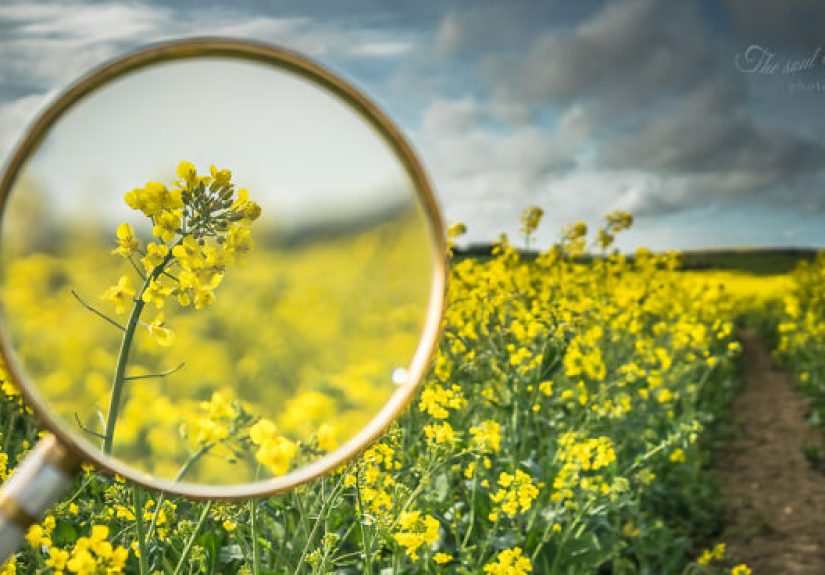
How a Magnifying Glass Turns Into a Spring Macro Tool
A magnifying glass works like a simple convex lens. When you place it between your camera and a subject, it lets you focus closer than your camera normally can. The result is close-up photography with exaggerated detailoften with a dreamy falloff around the edges, depending on the lens quality and alignment.
Three Fun Looks You Can Get
- Clean macro detail: Align the magnifier carefully for sharp petals, insects, and leaf textures.
- Natural vignette / “portal” effect: Let the edges fall out of focus so the subject looks like it’s in a tiny spring-time snow globe (but, you know, warmer).
- Abstract bokeh experiments: Tilt the magnifier slightly to create painterly blur and highlightsgreat for backlit blossoms.
DIY Setup: Smartphone, Camera, or “Whatever’s in My Pocket”
Option 1: Smartphone + Handheld Magnifier (The “No Extra Gear” Method)
- Open your camera app and switch to 1x (avoid digital zoom if possible).
- Hold the magnifier directly over your phone lens, close but not touching.
- Move the whole phone/magnifier combo toward the subject until it starts to snap into focus.
- Tap to focus. Lower exposure slightly if highlights blow out on petals.
- Take multiple shotstiny movements change focus dramatically at close distances.
Pro tip: if you have an elastic band or a simple phone clamp, you can stabilize the magnifier. But handheld works fine if you embrace the “spray-and-pray, but politely” approach.
Option 2: Camera + Magnifier (The “I’m Doing This On Purpose” Method)
With a dedicated camera, you can treat the magnifying glass like a close-up filterjust less fancy and more personality. Hold it in front of your lens, keep it centered, and adjust your distance until you find focus. Manual focus helps because autofocus can get confused when you introduce extra glass.
Option 3: Magnifier + Clip-On Macro Lens (The “Too Much Fun” Method)
If you already own a clip-on smartphone macro lens, you can combine it with the magnifier for extra magnification. Just know your depth of field will get razor-thin, and your success rate will become… an adventure.
What to Photograph in Spring When You’re Seeing the World at 3x
Spring is basically macro photography season. Everything has texture, color, and tiny details that vanish when you only look at it from standing height like a normal, emotionally stable person.
Micro-Subjects That Look Incredible Up Close
- Flower anatomy: stamens, pollen dust, petal edges, and the gradient colors you never notice.
- New leaves: vein patterns, translucent greens, and tiny serrations along the sides.
- Dew drops: they refract the scene and add sparkle (also: they disappear fast, so move like you mean it).
- Buds and sprouts: the “before” stage of spring is wildly photogenic.
- Bees and beetles: if you’re patient, insects do the posing for youbrieflythen they clock out.
Light, Angle, and Composition: The Stuff That Makes Photos Feel Alive
When you shoot close-up, lighting becomes everything. Small changes in angle can turn a petal from “glowing” to “why does it look like ham?”
Use Soft Light Like It’s a Cheat Code
Overcast skies, open shade, and early/late daylight are your best friends. Soft light reduces harsh contrast and helps colors look richerespecially in delicate wildflowers. If the sun is harsh, you can create your own shade with your body, a hat, or a piece of paper (the rare moment when being dramatic is actually useful).
Try Backlighting for Petal Glow
Flowers love backlight. When the sun is low, placing the light behind petals can make them look luminous and translucent. Watch your highlights and slightly underexpose if needed so the bright areas don’t blow out.
Get Low, Get Weird, Get Results
Macro photography rewards angles you’d never pick in everyday life. Crouch. Lie down. Photograph upward through blossoms. Look for clean backgroundslike sky, dark shade, or a distant lawnso your subject pops.
Camera Settings That Actually Help (Without Turning This Into a Physics Exam)
Macro and close-up photography come with a classic problem: depth of field gets very shallow as you get closer. That means the front of a petal might be sharp while the rest looks like a watercolor painting. Sometimes that’s gorgeous. Sometimes it’s just frustrating.
Aperture: More Depth of Field, But Not Infinite Depth of Field
Stopping down (using a higher f-number like f/8–f/16 on many lenses) can increase depth of field, but it also reduces light. And at very small apertures, diffraction can soften your image. The sweet spot depends on your lens, your subject, and how much you value sharpness versus vibe.
Shutter Speed: Freeze the Breeze
Flowers move. Even when you swear the air is calm. Use a faster shutter speed if your subject is swaying, or stabilize your shot with a tripod (or a backpack, or your knee, or the ancient art of holding your breath like a sniper).
ISO: Keep It Reasonable
Bumping ISO helps when light is low, but too much can add noiseespecially noticeable in smooth petal tones. If your phone has a “night mode,” use it cautiously for close-ups because it may blur motion.
Focus Stacking: The Secret Weapon for Sharp Spring Details
If you want a whole flower (or bug) sharp from front to back, focus stacking is the move. It’s a technique where you take multiple photos at slightly different focus distances, then blend them in editing so more of the subject is in focus. It’s especially useful for macro work because depth of field is naturally limited up close.
A Simple Field Workflow
- Stabilize the camera as much as possible (tripod helps, but you can do it handheld with practice).
- Use manual exposure so brightness stays consistent across frames.
- Start focusing at the closest point of your subject and take a shot.
- Shift focus slightly deeper and shoot again. Repeat until you’ve covered the whole subject.
- Blend in your preferred software (many photographers use Photoshop; some cameras even have stacking features).
If you’re new to this, start with something that won’t run away. Flowers are cooperative. Ants are not.
Ethics: Take Photos, Not Flowers (and Please Don’t Flatten the Meadow)
Spring is popular. Trails get crowded. Wildflowers get trampled. Many public lands ask visitors to stay on designated paths and avoid picking flowers, because removing blooms reduces future seed production and damages fragile habitats. The simplest rule: if you want to bring something home, bring a photograph.
Leave-No-Trace-Friendly Photo Habits
- Stay on trails whenever possibleespecially in sensitive wildflower areas.
- Don’t pick or “tidy up” your subject. Nature isn’t a studio set.
- Be mindful of crowds and avoid blocking paths for the perfect angle.
- Pack out trash (including “biodegradable” items that still impact wildlife and scenery).
Spring is a finite show. Let’s not be the reason next year’s season looks like it’s on a budget.
Common Problems (and Fixes) When Shooting Through a Magnifying Glass
Problem: Everything’s Blurry
- Move closer or fartherfocus distance is extremely sensitive.
- Center the magnifier over the lens; off-center placement introduces distortion.
- Clean the lens. Yes, again. Fingerprints are relentless.
Problem: Harsh Reflections and Glare
- Rotate or tilt slightly to change the reflection angle.
- Use open shade or a diffuser (even a white napkin can soften light in a pinch).
- Avoid pointing the magnifier directly at strong sunlight for long periodsbright focused light can be intense.
Problem: The Wind Won’t Stop
- Use a faster shutter speed.
- Shield the flower with your body or a jacket (carefully, without trampling anything).
- Photograph sturdier subjects like buds, thicker leaves, or low-growing plants.
A Quick “Go Capture Spring” Checklist
- Magnifying glass (clean)
- Microfiber cloth
- Phone/camera with charged battery
- Small reflector (white paper works)
- Comfortable shoes (because you will crouch-walk like a gremlin)
- Patience (and maybe allergy medsspring does not play)
Conclusion: A $10 Flea Market Lens That Made Spring Feel Brand New
You don’t need perfect gear to make compelling spring photography. You need curiosity, decent light, and a willingness to get down at flower level like you’re negotiating with the daffodils. A thrifted magnifying glass is a simple tool that can unlock close-up photography, spark creativity, and remind you how much is happening in the world that you usually ignore while speed-walking to your next obligation.
So yesbuy the quirky magnifying glass. Clean it. Take it outside. Photograph the tiny universe inside a single petal. And when someone asks what macro lens you used, you can smile and say, “A flea market special,” like you’re the Indiana Jones of springtime.
Extra: 5 Spring Moments I Didn’t Expect (But the Magnifying Glass Made Unforgettable)
I thought I was buying a tool. What I actually bought was permission to be delightfully distracted. The first weekend I took my flea-market magnifying glass out, I planned a “serious” spring walknice route, good light, maybe even a podcast playing in the background. That plan lasted about four minutes. I spotted a patch of tiny purple flowers (the kind you usually step around without noticing) and suddenly I was kneeling in the grass like I’d dropped a wedding ring and the fate of my entire afternoon depended on finding it.
Through the magnifier, those flowers weren’t tiny at all. They were dramatic. The petals had faint streaks like watercolor brush marks. There was pollen sprinkled across the center like someone had dusted it with gold. I took a few photos and realized something: spring doesn’t need help being beautifulit needs you to slow down long enough to catch it in the act.
The second surprise was dew. You hear people talk about “morning dew” like it’s a vibe, but close up it’s a whole optical trick. A single droplet can reflect the sky, the flower, and your own shadow all at oncelike a tiny glass marble with a secret life. I spent an embarrassing amount of time trying to position my phone so the droplet looked like it held a miniature landscape inside. When it finally worked, I felt like I’d won a small, extremely nerdy trophy.
The third moment was less poetic and more comedic: wind. I had lined up a shot of a tulip edge, perfectly backlit, with this gorgeous translucent glow. Then a breeze showed up and the tulip started swinging like it was auditioning for a music video. I tried to outsmart it by “timing the sway,” which is another way of saying I took twelve photos of blur and one photo that looked like a decent abstract painting. Eventually, I used my jacket as a windbreak, calmed the flower down, and got the shot. The lesson: macro photography is part art, part science, and part negotiating with weather you can’t even see.
The fourth surprise was how often strangers smiled at what I was doing. People will ignore you holding a big camera, but the second you pull out a magnifying glass, you become a friendly neighborhood oddball. One older man asked if I was “looking for clues.” I told him yesclues that spring is showing off. He laughed, then pointed me to a flowering tree around the corner that he said “goes crazy beautiful in the afternoon.” He was right. I got close-ups of petals with soft highlights and a background that melted into pastel blur. The magnifier didn’t just change the imagesit changed how people interacted with the process.
The fifth moment was the one that stuck with me: I found a single wildflower growing near a trail edge, surrounded by footprintslike it had been missed by inches all day. I stayed on the path, leaned in carefully, and photographed it without touching anything. The magnifier pulled out detail that made the flower look brave, like it was quietly insisting on existing. That’s when I realized the real “beauty of spring” isn’t only the color and lightit’s the persistence. The tiny new growth. The fragile things that still manage to bloom.
Since then, the magnifying glass has lived in my bag like a pocket-sized reminder: wonder is not always expensive. Sometimes it’s $10, a little dusty, and waiting under a table at a flea marketright next to someone selling vintage postcards and a suspiciously optimistic lava lamp.