Table of Contents >> Show >> Hide
- What Is a “Grumpy Catipus,” Exactly?
- Why I Made One (Besides the Fact That I Clearly Needed a Hobby)
- Materials and Tools I Used (A.K.A. The “Tiny Chaos” Starter Pack)
- Designing the Pattern: From Doodle to “This Might Actually Work”
- Cutting Plush Fabric Without Starting a Fuzz-Based Weather Event
- Sewing the Body: Where the Catipus Learns to Take Shape
- Stuffing: The Moment It Becomes a Real Creature (And Starts Judging You)
- Closing the Seam: The Ladder Stitch Saves the Day
- Durability and Safety Notes (Because Plushies Get Loved Aggressively)
- How to Wash and Care for Your Grumpy Catipus
- Troubleshooting: When Your Catipus Is Being Difficult (On Brand)
- Conclusion: Why a Plush That Hates Everything Is Weirdly Wonderful
- Extra: of Grumpy Catipus-Making Experience (The Emotional Support Portion)
- SEO Tags
Some people cope with stress by meditating. Some people go for a run. I, apparently, cope by sewing together a tiny creature that looks like it filed a formal complaint against existence.
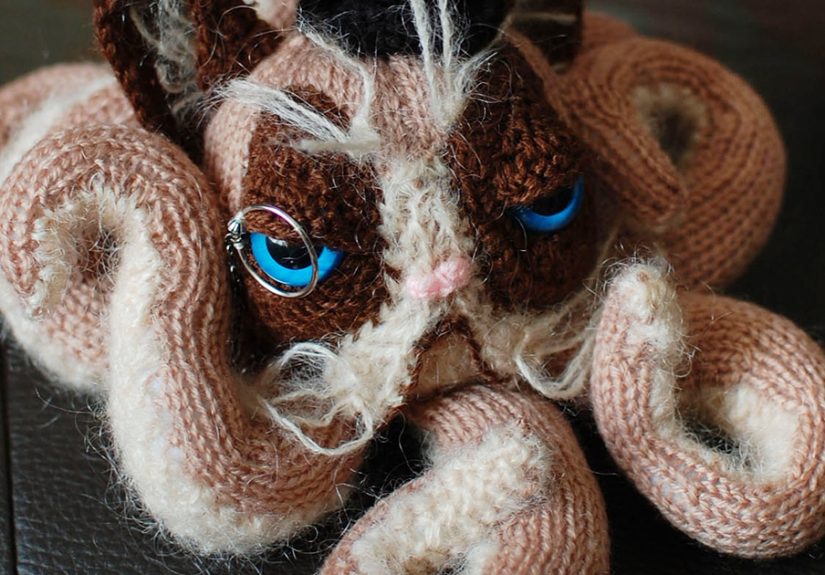
Meet the Grumpy Catipus: a handmade plush that’s part cat, part platypus, and 100% emotionally unavailable. It has a soft body, a stubborn little beak, and the facial expression of someone who just found out the world still has emails. If you’ve ever wanted a cuddly companion that silently judges your snack choices, your life decisions, and your tendency to say “I’ll do it tomorrow,” congratulationsthis is your spirit animal, but with flippers.
This post is a behind-the-scenes look at how I designed and sewed my own DIY plush, what materials actually worked (and what tried to sabotage me), and the surprisingly deep joy of creating something adorable that radiates pure disapproval. If you’re into handmade stuffed animals, quirky crafts, or you just want an excuse to buy outrageously soft fabric, welcome. The Catipus hates everythingexcept being held. Probably. Maybe.
What Is a “Grumpy Catipus,” Exactly?
In my head, a catipus is what happens when a cat and a platypus share a group project and both refuse to collaborate. You get:
- Cat energy: loaf-shaped body, dramatic eyes, the vibe of a creature that has never once said “thank you.”
- Platypus features: a squishy beak, flipper feet, and a tail that looks like it’s here to paddle away from responsibility.
- Grumpy personality: eyebrows angled like it’s eternally unimpressed by the concept of weather.
It’s basically a soft sculpture with attitude. And because it’s handmade, you can customize the level of grump from “mildly disappointed” to “has opinions about your entire playlist.”
Why I Made One (Besides the Fact That I Clearly Needed a Hobby)
I didn’t wake up one day and think, “Today I will invent a creature that would absolutely leave me on read.” It started with a simple idea: I wanted to make a plush that felt new. Something beyond the usual cute bear, bunny, or rounded blob with a smile.
I also wanted something that made me laugh. There’s a special kind of comfort in crafting a soft toy with a permanently grouchy face. It’s like: “Yes, life is chaoticbut I just stitched on tiny eyebrows with my own hands, and now this creature looks like it disapproves of capitalism.” Therapeutic!
Plus, let’s be honest: the internet loves a character. A handmade plush with a strong point of view? That’s content, baby.
Materials and Tools I Used (A.K.A. The “Tiny Chaos” Starter Pack)
You can make a catipus with plenty of fabric types, but these are the supplies that gave me the best combo of softness, structure, and sanity:
Fabric and Notions
- Plush fabric: minky/cuddle or fleece for the body (soft, forgiving, very huggable)
- Felt: for the beak, feet, and eyebrow drama
- Stabilizer (optional): helps keep felt/appliqué crisp, especially if you embroider details
- Thread: polyester thread for seams; embroidery floss for face details
- Stuffing: polyester fiberfill (easy to find, washable, fluffy)
- Eyes: embroidered eyes for a safer, softer look (especially if kids might handle it)
Tools
- Sewing machine (or strong hand-sewing patience)
- Sharp fabric scissors + small snips
- Clips or lots of pins (minky loves to slide like it’s escaping)
- Hand-sewing needle for finishing
- Marking tool (chalk or washable marker)
- Turning tool/chopstick for tiny corners
Designing the Pattern: From Doodle to “This Might Actually Work”
Here’s the trick to making a plush that looks intentional instead of like a sad pancake: build in shape. Plushies are 3D, and fabric starts out 2D, so you have to convince flat pieces to become a creature with volume and personality.
Step 1: Start With a Silhouette
I sketched a simple side profile: round body, cat-like head bump, and a beak that sticks out just enough to look ridiculous (in a good way). Then I simplified everything into pattern pieces:
- Two body sides (mirror images)
- One belly/underbody piece (gusset) to create depth
- Two beak pieces (top and bottom) or one folded beak piece
- Two feet/flippers
- One tail
- Optional ear nubs (mine are tiny, mostly symbolic)
Step 2: Add Seam Allowance Like You Mean It
I used a consistent seam allowance (about 1/4 inch is common for plush work) so the curves stayed smooth. Consistency matters more than perfectionuneven seam allowance can quietly turn your catipus into a lopsided potato with regrets.
Step 3: Build in “Grump Structure”
The grumpy face isn’t just expressionit’s placement. I positioned the eyes slightly lower than you’d expect and angled the eyebrows downward toward the center. This one decision did 90% of the emotional heavy lifting.
Cutting Plush Fabric Without Starting a Fuzz-Based Weather Event
If you’ve never cut minky before, imagine cutting a cloud that immediately sheds smaller clouds. Plush fabric is worth itbut it’s also dramatic.
Tips That Saved Me
- Respect the nap: minky has a direction; keep pattern pieces aligned so the “fur” flows the same way.
- Cut one layer at a time: it reduces shifting and keeps shapes accurate.
- Expect fuzz: a lint roller and quick vacuum pass are not optional. They are your new lifestyle.
- Mark the back: draw on the wrong side to avoid visible marks on the plush surface.
Sewing the Body: Where the Catipus Learns to Take Shape
Once the pieces were cut, I assembled in “feature order,” meaning I added details before closing the bodybecause it’s much easier to sew eyebrows on a flat face than on a round stuffed head that keeps rolling away like it’s dodging responsibility.
1) Attach Face Details Before Assembly
I embroidered the eyes and mouth directly onto the fabric. For the eyebrows, I used felt cut into sharp little slashes and stitched them down with small, neat stitches. The result: instant judgment.
2) Make the Beak (The Star of the Weird Show)
The beak can be felt or a contrasting plush. I used felt for structure and a slightly rounded shape:
- Cut beak pieces (top and bottom).
- Sew around the edges, leaving an opening to turn.
- Turn right-side out, lightly stuff (just a pinch), and topstitch to keep it tidy.
- Attach to the face panel before stitching the body together.
Pro tip: if the beak looks too cheerful, flatten it slightly and angle it downward. Yes, I am giving emotional direction to felt. No, I won’t be taking questions.
3) Assemble the Body and Belly Gusset
I stitched the belly/underbody piece to one body side first (slowly, with many clips), then attached the other body side. Curves are the “don’t rush me” part of plush sewinggo slow and pivot frequently.
Machine settings that helped: a slightly longer stitch length, steady seam allowance, and not stretching the fabric as it feeds through. If you have a walking foot, this is its time to shine.
Stuffing: The Moment It Becomes a Real Creature (And Starts Judging You)
Stuffing changes everything. Understuffed plushies can look deflated. Overstuffed plushies can look like they’re one minor inconvenience away from popping a seam.
My “Just Right” Stuffing Method
- Stuff the head and beak area firmly first so the face holds shape.
- Stuff the body in small handfuls, pushing into corners to avoid lumps.
- Pause often and “massage” the outside to distribute fiberfill evenly.
- Keep the belly slightly softer than the head for maximum cuddle comfort.
If you want weight, use caution: pellets and small weighted inserts can be choking hazards if they ever escape. For a kid-friendly plush, soft stuffing and embroidered details are the safer vibe.
Closing the Seam: The Ladder Stitch Saves the Day
After stuffing, you’ll have an opening to close. This is where the ladder stitch (also called an invisible stitch) makes the plush look professional. It pulls the folded edges together so the thread disappears like your motivation on a Monday.
- Thread a hand-sewing needle and knot the end.
- Hide the knot inside the seam allowance.
- Take small stitches alternating from one folded edge to the other.
- Pull gently every few stitcheswatch the seam “zip” closed.
When done well, it’s basically magic. When done badly, it’s still fine because your catipus can be grumpy about the seam quality too.
Durability and Safety Notes (Because Plushies Get Loved Aggressively)
If this plush might be handled by young kids, durability isn’t optionalit’s the whole job.
Safer Choices for Handmade Toys
- Embroider eyes and noses instead of using hard plastic pieces for younger children.
- Double-stitch stress points like the beak base, tail seam, and feet.
- Check seams after stuffingstuffing puts pressure on stitches and reveals weak spots fast.
- Avoid tiny add-ons (buttons, loose beads, detachable accessories) if toddlers will be around.
Even if your catipus “hates everything,” it should not be able to fall apart just because someone hugged it like a tiny wrestler.
How to Wash and Care for Your Grumpy Catipus
Plushies eventually meet real life: sticky hands, dusty shelves, accidental coffee proximity. The good news is most plush fabric and polyester stuffing can handle gentle cleaning if you’re careful.
My Go-To Care Routine
- Spot clean first: mild soap + damp cloth for small messes.
- If machine washing: place the plush in a mesh bag or pillowcase, use cold water, and choose a gentle cycle.
- Drying: air dry when possible; if you use a dryer, keep it low heat and don’t overdo it.
- Fluff reset: once fully dry, knead and reshape to redistribute stuffing.
The catipus will not thank you, but it will silently approve of being less dusty.
Troubleshooting: When Your Catipus Is Being Difficult (On Brand)
“My seams look wavy.”
Common with stretchy plush fabrics. Slow down, don’t pull the fabric, and consider a longer stitch length. Clips help keep layers aligned.
“The face looks… too happy.”
Lower the eyes slightly, angle the eyebrows more aggressively, and keep the mouth small. Remember: you are sculpting judgment.
“The beak is floppy.”
Use felt, add a layer of interfacing, or lightly stuff the beak. Topstitching can also help it hold shape.
“There is fuzz everywhere.”
Welcome. Lint roller. Vacuum. Repeat. Consider it a bonding exercise with your home.
Conclusion: Why a Plush That Hates Everything Is Weirdly Wonderful
Making a handmade Grumpy Catipus plush turned out to be equal parts craft project, comedy sketch, and minor engineering challenge. It taught me how much personality you can squeeze into felt eyebrows, how important good stitching is when something will be hugged repeatedly, and how satisfying it is to turn a goofy idea into something you can actually hold.
And here’s the best part: a grumpy plush is a mood, but it’s also an invitation. It says, “Life can be messy. Your seams can be imperfect. Your creature can look mildly annoyed forever. And it can still be lovable.”
If you try making your own, give it a name, give it a backstory, and let it judge your household in peace. Mine sits on a shelf like a tiny manager, overseeing everything and approving nothing. I’ve never felt more understood.
Extra: of Grumpy Catipus-Making Experience (The Emotional Support Portion)
The unexpected thing about making a grumpy plush is how quickly it stops being “a craft” and starts being “a roommate.” Not a helpful roommatemore like the kind that watches you reorganize your life at 1 a.m. and offers the spiritual equivalent of a raised eyebrow. The Catipus doesn’t even have movable eyebrows. I stitched them on permanently, which means I essentially handcrafted a tiny, soft statue of disapproval… and then invited it into my home.
During the build, I learned that every step has its own personality. Cutting plush fabric feels like wrestling a marshmallow that sheds glitter, except the glitter is fuzz and it gets into places glitter never dreamed of. Sewing the curved belly gusset was the moment I questioned my confidencebecause curves don’t care about your optimism. But the second I turned the body right-side out, it looked like an actual creature, and my brain went: “Oh no. I love it.” That’s when the Catipus gained power.
The face was the funniest part. I tried a “normal” expression firstslightly round eyes, gentle mouthand it came out looking politely confused, like it was waiting for a bus. So I adjusted everything by literal millimeters: eyes a bit lower, eyebrows angled inward, mouth smaller and flatter. Suddenly it looked like it had just read a group chat that started with “Hey bestie…” and ended with twenty-seven voice notes. Perfect. I didn’t just make a plush. I made a vibe.
Stuffing was also surprisingly emotional. Add too little and it looked tired. Add too much and it looked like it was full of grudges. There’s a sweet spot where it feels sturdy but still huggable. When I finally got the stuffing right and closed the seam with a ladder stitch, I held it up like a trophyand it stared back like, “Put me down. Immediately.” That’s when I realized the Catipus hates everything except attention. Which is honestly the most cat thing a catipus can do.
Now it lives in my space as a tiny reminder that creativity doesn’t have to be serious to be meaningful. I can make something ridiculous, learn real skills in the process, and end up with a finished object that makes me laugh every time I walk by. And if a friend is having a rough week, I already know the best gift: a handmade plush that looks like it’s unimpressed with the entire concept of Tuesday. Comfort, but with eyebrows.