Table of Contents >> Show >> Hide
- What a Great Backsplash Actually Does (Besides Looking Pretty)
- How High Should a Kitchen Backsplash Be?
- Choosing Materials: The “Looks vs. Lifestyle” Reality Check
- Design Ideas That Don’t Feel Like a Copy-Paste Pinterest Board
- Grout: The Tiny Detail That Can Make or Break the Whole Look
- How Much Do Kitchen Backsplashes Cost?
- DIY vs. Pro Installation: A Reality-Based Checklist
- Cleaning and Maintenance: Keep It Pretty Without Overthinking It
- Smart Planning Tips Before You Buy a Single Tile
- Wrapping Up: The Best Kitchen Backsplash Is the One You’ll Still Like After Taco Night
- Extra: Real-World Experiences (The Stuff People Only Tell You After the Tile Is Up)
A kitchen backsplash is basically your wall’s tiny raincoat: it catches splatters, shrugs off steam, and keeps your
drywall from starring in a slow-motion grease tragedy. But it’s also a design power move. The right backsplash can
make a builder-grade kitchen look custom, pull together cabinets and countertops, and give your coffee maker a
nicer backdrop than “painted drywall with a mysterious ketchup stain.”
This guide breaks down backsplash heights, materials, cost expectations, design ideas, installation basics, and
how to keep everything clean without turning your weekend into a grout-brushing reality show. Along the way, you’ll
get practical examples so you can choose something that fits your cooking style, budget, and patience level.
What a Great Backsplash Actually Does (Besides Looking Pretty)
The best kitchen backsplashes do three things at once:
- Protect the wall from water, oil, tomato sauce, and whatever your blender is doing.
- Clean easily (especially near the range and sink where life gets messy fast).
- Support the design by connecting your cabinets, counters, lighting, and hardware into one cohesive look.
Translation: the “perfect” backsplash isn’t just about trendiness. It’s about how you live in the kitchen. If you
cook daily, you’ll care a lot more about wipeability and stain resistance than someone who uses the oven mostly as
a pan-storage facility.
How High Should a Kitchen Backsplash Be?
The standard “full-height” zone
In many kitchens, the classic full-height backsplash spans the space between the countertop and the bottom of the
upper cabinetsoften around 18 inches. It’s a sweet spot: enough coverage to protect the wall where splashes
happen, while still leaving room for outlets, under-cabinet lighting, and that one appliance you refuse to put away.
The short backsplash (often 4 inches)
A 4-inch backsplash is the minimalist cousinusually matching the countertop material and running along the back
edge of the counter. It can work in some traditional layouts, but it leaves painted wall exposed, which means you’re
signing up for more wall cleaning (and possibly repainting) over time.
Full-height behind the range (a very smart compromise)
If you want to balance budget and practicality, a common strategy is: short backsplash on most runs, and a
full-height backsplash behind the range (or even to the hood). That’s where the worst splatter happensand where
you’ll most appreciate a surface that wipes clean in seconds.
Choosing Materials: The “Looks vs. Lifestyle” Reality Check
Here’s the honest truth: almost any backsplash can look amazing in a photo. The real test is whether it still looks
amazing after six months of sautéing, spaghetti night, and the occasional “I swear I measured that” cooking experiment.
Ceramic and porcelain tile
These are the go-to classics for a reason. They’re widely available, cost-friendly, and durable. Porcelain is generally
denser and less porous than ceramic, which can make it a strong choice for busy kitchens. If you want a timeless
backsplash idea that won’t age like a trendy haircut, tile is a safe bet.
Best for: everyday kitchens, most budgets, nearly any style.
Watch-outs: grout lines (more on that soon).
Glass tile
Glass tile can brighten a kitchen by reflecting light, and it’s typically nonporousmeaning stains don’t sink in the
way they can with some natural materials. It’s great for adding shimmer or color without overwhelming the room.
Best for: smaller or darker kitchens, modern looks, easy wipe-downs.
Watch-outs: fingerprints and water spots (especially with glossy finishes).
Natural stone (marble, granite, quartzite, limestone)
Stone backsplashes are the “wow” option: organic movement, unique veining, and a high-end feel. If you love the look
of marble, you can absolutely use itjust know it may need sealing and a bit of care to prevent staining or etching.
Quartzite is often chosen for its natural beauty and strong performance, while limestone brings softness and texture.
Best for: statement kitchens, warm and natural design, people who don’t fear maintenance.
Watch-outs: sealing schedules and gentle cleaning rules.
Solid slab or “countersplash” (counter material up the wall)
One of the biggest modern backsplash trends is extending the countertop materialstone or engineered surfacesup the wall
for a seamless look. No tiny tiles. No grid of grout. Just one continuous surface that’s easy to wipe and looks
intentionally luxurious. If you love clean lines (and hate grout), this is your lane.
Best for: modern and transitional kitchens, easy cleaning, bold veining and drama.
Watch-outs: higher material costs and the need for careful planning to align patterns.
Metal backsplashes (stainless steel, metal tile)
Stainless steel can feel commercialin a good way. It’s heat-resistant, easy to sanitize, and plays nicely with
modern appliances. It also shows smudges like it’s being paid per fingerprint, so plan accordingly.
Best for: high-use cooking zones, industrial or modern kitchens.
Watch-outs: visible streaks and dents in thinner materials.
Peel-and-stick backsplash tiles
Peel-and-stick backsplash products have come a long way. They’re popular for renters, quick makeovers, and DIYers who
prefer “stick and admire” over “mix thinset and question every life choice.” You’ll find styles that mimic subway tile,
stone, metal, and even artisan-inspired textures.
The key is choosing a product that fits your kitchen realities: heat near the stove, humidity, and how smooth/clean the
wall surface is. Many can work behind a stove if the manufacturer ratings allowbut you should always confirm the heat
limits for the exact product.
Design Ideas That Don’t Feel Like a Copy-Paste Pinterest Board
Subway tile, but make it interesting
Subway tile backsplash designs are timeless because they’re simple, flexible, and easy to match. If you want a twist,
play with layout: stacked vertical, herringbone, or a slimmer “mini” format. Even changing grout tone slightly can
shift the vibe from classic to modern.
Texture is the new “wow”
Smooth tile is great. Textured tile can be unforgettable. Fluted (reeded) tile, handmade-look ceramics, and tiles with
subtle ripples create light-and-shadow depthespecially under under-cabinet lighting.
Warm neutrals and earthy tones
Kitchens are drifting away from icy all-white everything and leaning into warmer neutrals, natural materials, and rich,
grounded colors. Think creamy off-whites, sand tones, soft clay, and even deeper hues used as a statement behind the range.
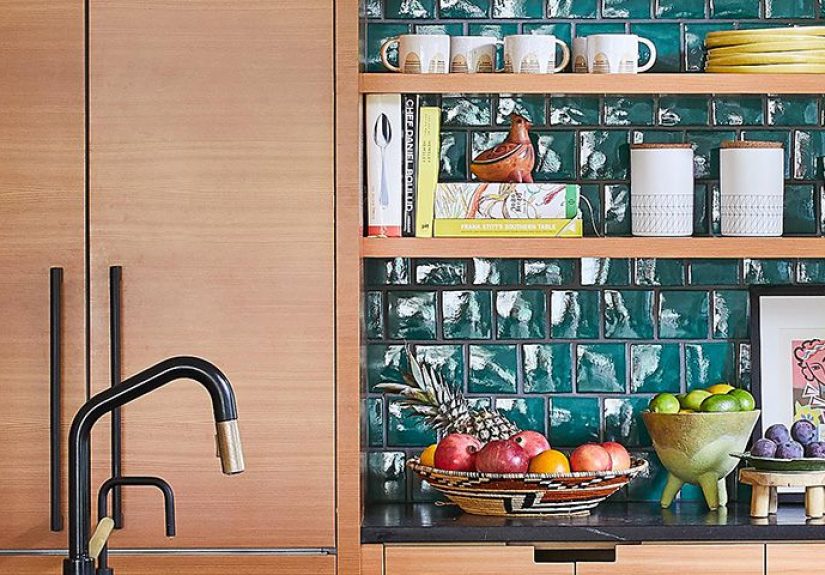
Zellige and handcrafted looks (with eyes open)
Zellige-style tile is beloved for its uneven surface and color variationimperfect in a way that feels alive. It’s a
gorgeous backsplash idea, especially when paired with warm woods and brass hardware. But the texture can also mean more
nooks where grime can settle, so it’s not the best pick if you want “wipe once, walk away” simplicity.
Big-format tile for fewer grout lines
Want the slab look without slab pricing? Large-format porcelain tiles can visually read like one surface, with tight seams
and minimal grout. This is especially useful if you want a clean, contemporary backsplash that’s easier to maintain than a
tiny mosaic.
Mirror and metallic moments (small kitchens, listen up)
Reflective backsplashesglass, metal, even mirrored lookscan make a compact kitchen feel bigger and brighter. Use them
strategically (like behind a bar or coffee station) if you want impact without going full disco ball.
Grout: The Tiny Detail That Can Make or Break the Whole Look
Grout is the punctuation of your backsplash. Done well, it disappears. Done poorly, it becomes the loudest thing in the room.
High-contrast grout can look bold and graphic, but it can also distract from the tile itselfand very light grout can show
stains quickly in cooking zones.
A practical compromise is a grout color that’s close to the tile (for a calmer look) or a mid-tone that won’t broadcast every
splash. Also consider grout joint width: smaller joints often look more modern and are easier on the eyes, but they require
careful installation.
How Much Do Kitchen Backsplashes Cost?
Backsplash cost depends on two big things: materials and labor complexity. That means a simple ceramic tile
install on a straight wall is usually far cheaper than a detailed mosaic with lots of outlet cuts and fancy borders.
Typical cost ranges
- Installed (many projects): roughly $15–$40 per square foot is a commonly reported range.
- Project totals: many kitchens land around the hundreds to low-thousands, depending on size and selections.
- Higher-end installs: intricate patterns, premium stone, or slab work can push costs upwardsometimes significantly.
What drives price up?
- More cuts (outlets, switches, windows, corners, pot fillers, floating shelves).
- Small-format mosaics (more labor, more grout lines, more time).
- Full-height coverage or wrapping multiple walls.
- Premium materials (natural stone, custom tile, slab surfaces).
- Wall repairs and prep (uneven drywall is the silent budget assassin).
DIY vs. Pro Installation: A Reality-Based Checklist
Installing a tile backsplash is one of the most popular “I can do this!” kitchen projectssometimes followed by
“I can definitely do this… tomorrow.” If you’re comfortable measuring, cutting, and working patiently, DIY can save
money. If you want flawless alignment around outlets and perfect edges, a pro can be worth it.
DIY install overview (tile)
- Prep the wall: clean, degrease, and make sure it’s flat.
- Plan the layout: dry-fit tile to avoid awkward slivers at the edges.
- Set tile: use the recommended mortar/adhesive, work in sections, and keep lines straight.
- Let it cure: many guides recommend waiting about 24 hours before grouting.
- Grout and clean: apply, wipe haze, and buff after drying.
- Seal where needed: especially grout and porous stone (follow product directions).
- Caulk changes of plane: use a flexible sealant where surfaces meet (more below).
The countertop-to-backsplash joint: grout or caulk?
Where the backsplash meets the countertop is a “change of plane.” Those surfaces can move independently (tiny shifts,
seasonal expansion, settling), and rigid grout can crack there. Many tile standards and industry guidance recommend using
a flexible sealant (often silicone or color-matched caulk) at changes of plane instead of grout.
Cleaning and Maintenance: Keep It Pretty Without Overthinking It
The easiest backsplash to clean is the one you wipe often. Grease builds up quietly on vertical surfacesthen suddenly
your kitchen smells like last week’s stir-fry and regret.
Glazed ceramic, porcelain, and glass
Generally easy: mild dish soap and warm water go a long way. For greasy build-up, use non-abrasive tools (soft sponge,
microfiber). Avoid harsh scrubbers that can scratch glossy surfaces or dull some finishes.
Natural stone
Treat stone like a nice sweater: gentle care keeps it looking expensive. Use pH-neutral or mild soap solutions, avoid
acidic cleaners, and consider sealing to reduce staining risk. If you love marble, you don’t have to fear itjust respect it.
Grout
Grout is porous, which is why it’s so talented at collecting grime. Regular cleaning helps, and many cleaning guides recommend
sealing grout periodically to slow down staining and discoloration. If you want less upkeep, consider larger-format tile or tighter grout lines.
Peel-and-stick backsplashes
Keep it simple: mild cleaner, soft cloth, no aggressive scrubbing. Longevity depends on product quality, wall prep, humidity,
and heat exposure. If removal is in your future, many guides recommend gentle heat and patience (aka: the opposite of ripping).
Smart Planning Tips Before You Buy a Single Tile
- Start with your “unchangeables”: countertops, cabinet color, flooring, fixed appliances.
- Choose your visual goal: calm backdrop (blend) or feature wall (contrast).
- Decide your cleaning tolerance: more grout = more scrubbing.
- Test samples in your lighting: under-cabinet LEDs can change everything.
- Plan outlet placement early: tile thickness affects outlet extenders and cover fit.
- Budget for edges: trim pieces, schluter strips, bullnosesmall stuff that adds up.
Wrapping Up: The Best Kitchen Backsplash Is the One You’ll Still Like After Taco Night
Kitchen backsplashes sit at the crossroads of function and style. Choose a surface that matches how you actually use
the kitchennot just how you want it to look in a perfectly staged photo. If you want low stress, go with ceramic or
porcelain in a layout you love and a grout color that won’t haunt you. If you want drama, consider a slab backsplash or
a textured artisan lookbut plan for the maintenance realities.
And remember: a backsplash doesn’t have to be the loudest thing in the room to be the best decision you make. Sometimes
the greatest compliment is, “Wowthis whole kitchen just works.”
Extra: Real-World Experiences (The Stuff People Only Tell You After the Tile Is Up)
Let’s talk about the part of kitchen backsplashes that doesn’t show up in glossy reveal photos: the lived-in experience.
Not “nightmare fuel,” just the small lessons homeowners and DIYers tend to learn the same wayby doing it once, then
immediately thinking, “If I ever do this again, I’m doing it differently.”
First: grout is a relationship. If you pick tiny mosaic tile because it looks charming, you’re also picking
hundreds (or thousands) of grout joints. That can be totally fine if you enjoy routine cleaning and don’t mind occasional
touch-ups. But people who cook often usually end up preferring fewer grout lineseither with larger tile, a slab/countersplash,
or at least a layout that doesn’t turn the whole wall into a grid. A common “wish I knew” moment is realizing that a gorgeous,
intricate backsplash behind the range becomes a magnet for grease and sauce, especially around the cooktop. That’s why so many
folks love a simple, wipe-friendly surface in the highest-splash areas.
Second: lighting changes everything. Under-cabinet lighting can make textured tile look expensive and dimensional…
or it can highlight every uneven edge and cast tiny shadows you never noticed in the showroom. Many homeowners say they’re glad
they tested samples at homemorning light, evening light, and lights-on-for-cooking lightbefore committing. The same tile that
looks soft and creamy at noon can look oddly yellow at night next to warm LEDs.
Third: the edges matter more than you think. People spend hours choosing the tile, then realize too late that the trim
choice (metal edge, bullnose, pencil liner, or a clean slab edge) is what makes it look finished. In real kitchens, those little
transition pointswhere the backsplash ends at a wall, meets open shelving, or wraps around a windoware what separate “DIY weekend project”
from “this looks professionally designed.”
Fourth: peel-and-stick is awesome… when it’s treated like its own category. The best experiences tend to come from people who
choose quality products, prep the wall properly, and respect heat limits near the stove. The worst experiences come from sticking it onto a dusty,
slightly greasy wall and hoping vibes will do the rest. (Vibes are not adhesive.) If you want a renter-friendly backsplash, peel-and-stick can be a
great upgradejust consider it a medium-term solution, not a forever finish.
Fifth: the “change of plane” joint is where reality shows up. Homeowners often notice a hairline crack where the countertop meets
the backsplash months after installation. It’s frustrating, but it’s also common when rigid grout is used at that seam. People who plan ahead and
use a flexible, color-matched sealant there tend to report fewer issues and easier long-term maintenance.
Finally, one of the most consistent experiences people share is also the simplest: choose what you love, but keep it livable.
If a trend makes you smile every time you walk into the kitchen, that matters. Just pair that joy with a practical plandurable materials near heat
and water, smart grout choices, and an installation approach that respects corners, edges, and movement. Do that, and your backsplash won’t just be
pretty on day oneit’ll stay the kind of backdrop you’re happy to cook in, clean in, and accidentally spill in for years.