Table of Contents >> Show >> Hide
- Why a Black Sketchbook Feels Like Creative Cheating (In a Good Way)
- Supplies That Make White Ink Pop on Black Paper
- Technique Tricks: How to Make White Pen Drawings Look Expensive
- 47 White Pen Drawings I Made (With Captions You Can Use)
- How to Keep White Ink Clean (So It Doesn’t Turn Into a Smudge Festival)
- Common Problems (And How I Un-ruined My Own Pages)
- Mini Gallery Strategy: How to Make 47 Drawings Feel Like a Series
- 500 More Words: The Actual Experience of Filling That Black Sketchbook
- Conclusion: Try It, Even If You “Aren’t an Artist”
Two months ago, my daughter handed me a black sketchbook like it was a sacred artifact. No speech. No ceremony. Just the look that says, “Do something cool with this.” And because I’m a responsible adult (who absolutely does not crave validation from a teenager), I decided to draw in it with a white penbecause nothing says dramatic like bright ink on a midnight page.
Here’s the surprise: drawing on black paper feels like learning art all over again. On white paper, you build shadows. On black paper, the shadows are already thereso you’re basically drawing light. It’s like your sketchbook became a tiny theater stage and every line is a spotlight cue. Also, it’s wildly satisfying when your white pen actually behaves and doesn’t skip like it’s dodging responsibilities.
Below are 47 white-pen drawings I made (with captions you can use if you’re posting your own). I’m also sharing what I learnedwhat pens worked, how I stopped smudging everything, and why black paper makes even simple doodles look like they have a film budget.
Why a Black Sketchbook Feels Like Creative Cheating (In a Good Way)
Black paper instantly boosts contrast. Your highlights look brighter, your linework looks cleaner, and even the simplest shapes feel intentional. A single white line can read as a shiny edge, moonlight, frost, or the rim of a glassdepending on what you put next to it.
It also forces you to think in values (lightness/darkness) instead of “object outlines.” You stop drawing what you think you see and start drawing what actually makes things look real: edges, reflected light, texture, and the difference between “kind of bright” and “blindingly bright.”
Supplies That Make White Ink Pop on Black Paper
You can make this work with one pen, but having a few tools turns “fun experiment” into “why am I suddenly an artsy person who owns fixative?” Here’s the short list that helps most people:
1) White gel pens (your everyday hero)
White gel pens are perfect for linework, doodles, tiny highlights, and crisp patterns. Tip sizes matter: a bolder nib usually looks more opaque on dark paper and is less likely to look “ghosty.”
2) White paint markers (for ultra-opaque highlights)
If you want the brightest possible white, paint markers can look more solid than gel pensespecially for stars, dots, lettering, and bold shapes. They can also layer beautifully once dry.
3) White pencil/charcoal/pastel (for smooth shading)
Dry media is great for soft gradients, smoky glow effects, and realistic lighting. It’s also forgiving: you can build up slowly, blend gently, and layer without waiting for ink to dry.
4) A scrap sheet + a patient attitude
On black paper, pens sometimes need a warm-up. Testing strokes on a scrap page helps you avoid the tragic moment when your first line looks like a tired spider dragging a suitcase.
Technique Tricks: How to Make White Pen Drawings Look Expensive
These are the methods that made the biggest difference for meespecially when I wanted my drawings to look intentional instead of “I was doodling during a meeting.”
Layering (aka “let it dry, then go again”)
One pass might look semi-transparent. Two or three light passes (after drying) often look brighter and smoother than one aggressive pass that gouges the paper.
Hatching and cross-hatching
Instead of shading with gray (you don’t have graywelcome to the drama), use tiny parallel lines. Closer lines look brighter. Spread-out lines look darker. Your brain blends the rest.
Stippling
Dots aren’t just cute; they’re powerful. Dense dots create a glow, a soft fade, or a textured surface like sand, snow, or stone.
Negative space planning
On black paper, what you don’t draw matters as much as what you do. Leaving areas untouched creates depth and makes your highlights look even brighter.
Edge highlights
Want instant realism? Highlight edges: the rim of a mug, the curve of a leaf, the top of a wave. Thin highlights feel shiny; thicker highlights feel closer or brighter.
47 White Pen Drawings I Made (With Captions You Can Use)
Tip for posting: If you’re sharing these online, pair each drawing with a close-up photo. White ink details love a good zoom.
- Moon in a Ring of Clouds A bright crescent with soft stippled clouds. Black paper basically does half the atmosphere for you.
- Constellation Map (Real or Invented) Dots + thin lines + tiny labels. It looks scientific even if you named it “The Snack Goblin.”
- Floating Jellyfish Transparent bell highlights and wispy tentacles. Great practice for delicate line pressure.
- Crystal Cluster Sharp edges, bright corners, and darker “missing” facets. Geometry never looked so mystical.
- Botanical Fern Study Repeating leaflets teach rhythm and patience. Mostly patience.
- Night Garden Mushrooms Caps with dotted textures and glowing gills. Fairy-core, but with good contrast.
- Snowy Pine Branch White highlights on needles + chunky snow shapes. Cozy postcard energy.
- Ocean Wave Crest Foamy spray is just chaotic dots. The secret is committing to the chaos.
- Minimal Mountain Range Thin contour lines and a few snowy peaks. Simple, clean, satisfying.
- Mandala Burst Repeated shapes that hypnotize you into forgetting time exists.
- Hummingbird in Motion Bright beak and wing edges. Tiny lines make it feel fast.
- Cat Whiskers Portrait The whiskers steal the show. Keep the face soft; make the whiskers crisp.
- Glass Marble One bright highlight and a faint rim line. Suddenly it looks like you know physics.
- Vintage Key Metallic shine is just strategic highlights. Add scratches for realism.
- Spiderweb With Dew Drops The dew drops are mini “marbles.” Instant sparkle.
- Neon-Style Lettering Outline letters, add inner glow lines, and fake a “lit tube” effect.
- City Skyline at Night Buildings as silhouettes; windows as dots and tiny rectangles.
- Fireflies in Tall Grass A few bright dots with faint halos. Easy, dreamy, addictive.
- Owl Eyes Close-Up Big bright catchlights. The eyes do all the work.
- Shell Spiral Study Thin rings + highlight edges. Surprisingly calming.
- Hot Tea Steam Swirls Curvy white lines rising from a dark mug shape. Cozy minimalism.
- Rose With Thorny Stem Petal edges highlighted; shadows are already handled by the page.
- Feather With Barbs Great for practicing “soft” lines. Make the center shaft brightest.
- Space Helmet Reflection Highlight the visor edge and add tiny star reflections. Sci-fi chic.
- Butterfly Wing Patterns Symmetry practice that feels like fancy doodling.
- Mountain Cabin Window Glow Draw the cabin in silhouette, then make the windows bright and warm (with dense white).
- Hands Holding a Small Star Use highlights to shape fingers, then make the star extra bright.
- Dragon Scale Close-Up Repeating crescents with highlight edges. Texture city.
- Compass Rose Clean lines + tiny decorative dots. Looks like a tattoo flash sheet.
- Rainy Umbrella Top View Stipple raindrops, add bright rim highlights. Mood: cinematic.
- Planets With Rings One bright ring edge and a few shadow cuts. Space doodles never fail.
- Glowing Lantern Bright center, lighter lines around, and fade outward with fewer marks.
- Wolf Silhouette With Star Fill Black shape implied by empty space; stars drawn inside. Instant poster.
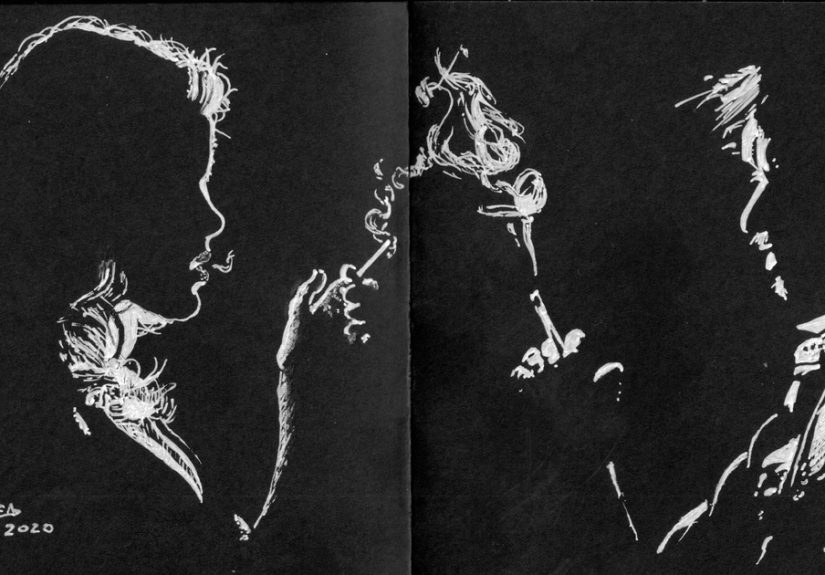
- Minimal Face Profile One line can do a lot on black paper. Add a bright eye highlight and stop.
- Vintage Camera Metallic edges and lens highlights make it pop.
- Stack of Books (Spines Only) Titles in white lettering; tiny highlights for worn corners.
- Chess Knight Practice shiny edges and form with controlled highlights.
- Diamond-Rain Pattern Repeat shapes and vary brightness. A whole vibe.
- Galaxy Swirl Dots, curved streaks, and a bright center. It’s basically delicious chaos again.
- Leaf Skeleton (Veins) Draw the veins bright; let the black page be the leaf.
- Goldfish in Dark Water Highlight scales and fins; leave most of the body implied.
- Flower Crown Wreath Botanical loops + tiny highlights. Great for relaxing repetition.
- Lightning Bolt Study Bright jagged lines with faint branching. Instant drama, minimal effort.
- Old Street Lamp Bright bulb glow with fading dots outward. Classic nighttime scene.
- Bird Feather Pattern Border Use it to frame a page. Makes the sketchbook feel “designed.”
- Abstract Topographic Lines Curvy contour lines like a map. Add thicker “peaks.”
- Simple Zodiac Wheel Symbols, dots, circles. Mysterious even if you don’t know your rising sign.
How to Keep White Ink Clean (So It Doesn’t Turn Into a Smudge Festival)
White ink shows every smudge because it’s basically the loudest thing in the room. These habits saved my pages:
- Work top-to-bottom (or left-to-right) so your hand isn’t dragging through fresh ink.
- Use a scrap paper “hand shield” under your palm.
- Let layers dry before adding brighter passes.
- Test fixatives first if you plan to spray. Some sprays are made for dry media, and inks can react differently depending on the brand and paper.
Common Problems (And How I Un-ruined My Own Pages)
“My gel pen is skipping like it’s allergic to work.”
Often it’s the paper texture, dried ink at the tip, or the pen needing a quick warm-up on scrap paper. A bolder nib can help, too, because it lays down more ink more easily.
“My whites aren’t bright enough.”
Try layering, switching to a thicker tip, or using a paint marker for the brightest highlights. Also, some black papers are more absorbent, which can dull inksmooth black paper tends to keep lines crisp.
“Everything looks flat.”
Add three levels of brightness: faint lines (far), medium lines (mid), and bright thick highlights (closest). Black paper makes this value range look extra dramaticuse it.
Mini Gallery Strategy: How to Make 47 Drawings Feel Like a Series
If you want your sketchbook (or social feed) to look cohesive, repeat a few “rules” across pages:
- Pick 3–5 recurring motifs (moons, botanicals, stars, line borders).
- Use consistent spacing and margins.
- Repeat a signature technique (stippling halos, neon outlines, or fine hatching).
- Alternate “busy pages” with minimalist pages so your eyes can breathe.
500 More Words: The Actual Experience of Filling That Black Sketchbook
The first page was the hardest, not because black paper is complicated, but because gifts from your kid come with invisible emotional paperwork. A black sketchbook isn’t just paperit’s a tiny, silent challenge. My daughter didn’t say, “I want you to draw more.” She didn’t have to. The sketchbook did the talking. I opened it and immediately thought, What if I mess this up? Which is hilarious, because “messing up” is literally how sketchbooks work.
I started small: a few stars, a moon, some dots. The ink looked brighter than I expected, and that little hit of contrast was enough to trick my brain into feeling confident. Confidence, in my case, is a fragile creature, so I fed it immediately with an easy win: a simple mandala. I didn’t even plan it. I just kept repeating shapes until it looked intentional. My daughter walked by, glanced at the page, and said, “That’s actually cool.” I considered framing the sentence.
Over the next couple of months, the sketchbook became my weird little reset button. Some days I’d do a full drawing; other days I’d just test texturesdots, cross-hatching, tiny highlights. I learned fast that black paper rewards patience. If you rush, the ink can skip, smear, or look uneven. If you slow down and layer, the page suddenly feels like velvet and your lines feel like light. It’s dramatic in a way that makes you want to whisper, “Behold,” to absolutely nobody.
I also learned that the “right” pen is the one that behaves on your paper. One gel pen looked amazing for crisp linework but struggled with big filled areas. A paint marker was perfect for stars and bold lettering, but too intense for delicate shading. So I started mixing tools: gel pen for details, paint marker for punchy highlights, and white pencil for soft glow. The mix made my drawings look more intentionaland honestly, it made me feel more like I had a plan, even when I was improvising.
The best part wasn’t the technique, though. It was the rhythm of it. I’d sit down, open to a blank black page, and the page wouldn’t demand perfection. It just demanded a first mark. Once that mark existed, the fear stopped being theoretical. It became something I could work around with dots and lines and tiny bright edges. And every time I finished a page, I felt like I’d made something out of nothinglike I’d pulled a small light out of a dark space. Corny? Maybe. True? Absolutely.
Now the sketchbook is thick with little “moments” instead of masterpieces: experiments, patterns, mini-scenes, and a bunch of drawings that exist because my daughter handed me a gift and accidentally reminded me that creativity doesn’t need a grand reason. Sometimes it just needs a black page and a stubborn white pen.
Conclusion: Try It, Even If You “Aren’t an Artist”
A black sketchbook is one of the easiest ways to make yourself feel inspired again. The contrast is instantly rewarding, the learning curve is fun, and the results look dramatic even when the drawing is simple. Start with stars, botanicals, or borders. Layer your whites. Embrace the weirdly magical feeling of drawing light instead of shadow. And if a pen skipscongrats, you’re officially doing art.