Table of Contents >> Show >> Hide
- What Is a Pavilion Shed (and Why Build One)?
- Before You Build: Planning, Permits, and Reality Checks
- Tools and Materials Checklist
- Step-by-Step: Pavilion Shed Plans You Can Actually Build
- Step 1: Site selection and layout
- Step 2: Choose and build the foundation
- Option A: Gravel pad + skids (DIY favorite)
- Option B: Concrete piers (good on slopes and frost areas)
- Option C: Concrete slab (most durable, most commitment)
- Step 3: Frame the floor (if building a raised shed)
- Step 4: Frame the enclosed shed walls
- Step 5: Build the pavilion bay (posts, beam, and bracing)
- Step 6: Frame the roof (the part that makes grown adults whisper “uh-oh”)
- Step 7: Roof sheathing, underlayment, drip edge, and shingles
- Step 8: Wrap, siding, trim, and openings
- Step 9: Finish the pavilion bay so it’s actually usable
- Step 10: Safety basics (because roofs are not trampolines)
- A Simple Example Plan: 12' x 20' Pavilion Shed (12' x 12' Enclosed + 12' x 8' Pavilion)
- Budget and Timeline (What to Expect)
- Common Mistakes (and How to Avoid Them)
- Final Thoughts
- of Real-World Experience: Lessons Builders Learn the Fun Way
A shed is supposed to be simple: four walls, a roof, and a smug sense of accomplishment.
A pavilion shed is that… plus an extra covered area that makes your backyard feel like it
has a tiny resort. It’s the structure version of “I came for storage, but I stayed for the vibes.”
In this guide, you’ll get practical, buildable pavilion shed planshow to choose the right foundation,
frame a sturdy shed, add a pavilion-style covered bay, and finish it so it lasts. We’ll keep it
DIY-friendly, code-aware, and just funny enough to get you through your third trip to the hardware store.
What Is a Pavilion Shed (and Why Build One)?
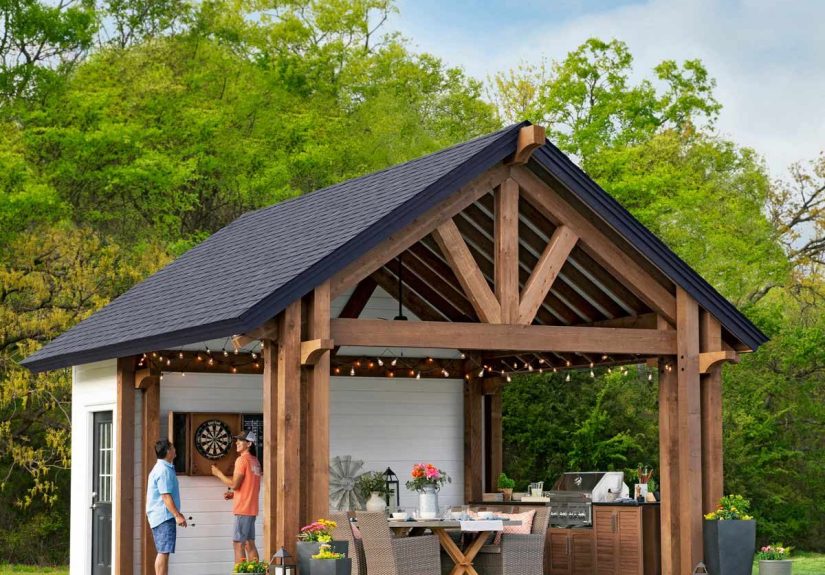
A pavilion shed is a hybrid: an enclosed shed for storage plus a partially open, roofed section supported
by posts. Think “shed with a covered porch,” but more useful. The pavilion bay can store firewood, park a
mower out of the rain, shelter bikes, or hold a workbench where you can pretend you’re “just organizing.”
- More function per footprint: You get dry, covered space without fully enclosing it.
- Better airflow: Great for gear that hates trapped humidity (lawn tools, wet boots, etc.).
- Looks intentional: A pavilion roofline and posts instantly upgrade “box in the yard” to “backyard feature.”
Before You Build: Planning, Permits, and Reality Checks
1) Check permits, setbacks, and local rules
Many U.S. jurisdictions follow versions of the International Residential Code (IRC), which may exempt
some small, detached accessory structures from permitsoften around 200 sq ft in many code editions.
But local amendments can be stricter (some places use 120 sq ft), and zoning setbacks still apply even if a
permit isn’t required. Translation: call or check your local building department before you buy lumber.
2) Pick a footprint that matches how you actually live
The best shed size is the one that fits your yard and your future stuff. If you’re thinking “I’ll keep it minimal,”
that’s adorableyour future self will own at least three rakes, a pressure washer, and one mysterious box labeled “CABLES???”
Common pavilion shed footprints:
- 10′ x 16′ total: 10′ x 10′ enclosed + 10′ x 6′ pavilion bay
- 12′ x 20′ total: 12′ x 12′ enclosed + 12′ x 8′ pavilion bay (my “sweet spot” for usefulness)
- 12′ x 16′ total: 12′ x 10′ enclosed + 12′ x 6′ pavilion bay
3) Choose a roof style that makes sense for your climate
Pavilion sheds typically look best with a gable roof (classic peak) and extended overhangs over the pavilion side.
In snow areas, a steeper pitch helps shedding. In windy areas, connections and uplift resistance matter more than ever.
If you’re unsure, go conservative: a simple gable roof with solid sheathing and good fastening beats fancy geometry every time.
Tools and Materials Checklist
Tools
- Measuring tape, framing square, speed square, chalk line
- Circular saw (or miter saw + circular saw combo)
- Drill/driver, impact driver (your wrists will send thank-you notes)
- Level (4′ recommended) and a long straightedge/string line
- Hammer or nail gun (optional, but speeds things up)
- Post hole digger/auger (if using piers), shovel, rake, tamper
- Ladders + safety gear (gloves, eye/ear protection)
Materials (typical, adjust to your plan)
- Foundation: crushed stone/gravel, concrete blocks/piers or slab materials, landscape fabric
- Floor framing: pressure-treated lumber for anything close to ground; joists/rim boards
- Wall framing: 2×4 studs (or 2×6 in colder climates or for heavier loads), plates, headers
- Pavilion posts: 4×4 or 6×6 posts (6×6 feels “real pavilion” and resists wobble)
- Sheathing: plywood/OSB for walls and roof; subfloor panel (if raised floor)
- Roofing: underlayment, drip edge, starter strip, shingles (or metal panels)
- Fasteners/connectors: structural screws, galvanized nails, joist hangers, hurricane ties/straps
- Siding/trim: panels, lap siding, or engineered siding; corner boards; fascia; soffit as desired
Pro tip: Use the right-rated pressure-treated lumber where it mattersespecially skids, rim boards
near grade, and anything that could get splashed or sit in damp conditions. Look for labels indicating appropriate use
(like ground-contact ratings when needed).
Step-by-Step: Pavilion Shed Plans You Can Actually Build
Step 1: Site selection and layout
Pick the flattest practical spot with good drainage. Avoid low areas where water puddlesyour shed will not appreciate
being turned into a seasonal amphibian habitat.
- Mark the footprint with stakes and string.
- Square it using the 3-4-5 method (or measure diagonals until they match).
- Plan door swing and pavilion opening so you’re not trapped by fences, trees, or future regret.
Step 2: Choose and build the foundation
Foundation choice is about drainage, level, and load. The “best” foundation is the one that stays
square and dry in your yard.
Option A: Gravel pad + skids (DIY favorite)
A compacted gravel pad drains well and is forgiving. You build a level pad, set treated skids, then build the floor on top.
Great for many backyard sheds.
- Excavate organic topsoil until you reach firm soil.
- Add landscape fabric to slow weeds and keep gravel from sinking into soil.
- Fill with crushed stone, wet lightly, and compact in lifts.
- Level carefully (this is where sheds are born or cursed).
Option B: Concrete piers (good on slopes and frost areas)
Piers can reduce excavation and help on uneven sites. Local frost depth rules matter here, so check requirements.
Use proper post bases and keep wood off direct concrete contact when specified.
Option C: Concrete slab (most durable, most commitment)
A slab gives you a solid, long-lasting base, especially for heavier storage. It’s also the least “oops, let’s move it later.”
If you want a super-clean interior floor and maximum stiffness, this is it.
Step 3: Frame the floor (if building a raised shed)
For a raised shed, build a floor frame like a tiny deck: rim boards, joists, and a subfloor panel.
Many builders use joists at 16″ on center for stiffness, especially for heavier gear.
- Assemble the floor frame on a flat surface if possible.
- Square the frame by measuring diagonals.
- Install joists with hangers or toenailing (hangers are cleaner and more consistent).
- Attach subfloor panels, leaving small gaps at panel edges per manufacturer guidance to allow expansion.
Keep it square now, and your walls and roof won’t turn into a geometry pop quiz later.
If the floor is out of square, everything above it will be out of square in a more dramatic and expensive way.
Step 4: Frame the enclosed shed walls
Frame walls on the floor deck (or slab) and tilt them up. Typical studs are 16″ or 24″ on center, depending on design and sheathing.
Add headers over doors/windows, and plan for ventilation (gable vents or high/low vents help).
- Build the back wall first, then side walls, then the front wall.
- Plumb and brace each wall before moving on.
- Double top plates (common practice) help tie walls together and give better nailing surfaces.
- Add sheathing to lock everything squarethis is your structure’s “backbone.”
Step 5: Build the pavilion bay (posts, beam, and bracing)
The pavilion portion is where your shed becomes a “pavilion shed.” Most designs use posts at the outer pavilion edge
supporting a beam, with the roof extending over this open area.
Simple pavilion layout: posts aligned with shed wall framing, creating a clean load path from roof → beam → posts → foundation.
- Set posts plumb and firmly anchored (post bases/anchors vary by foundation type).
- Use a built-up beam (often multiple plies of dimensional lumber) sized for span and load.
- Add diagonal bracing if your design needs racking resistancepavilions love to sway if under-braced.
Design note: If you want the pavilion area to feel airy, keep it open on at least two sides.
If you want it to act as a windbreak, add partial walls or slatted panels.
Step 6: Frame the roof (the part that makes grown adults whisper “uh-oh”)
A gable roof is common, approachable, and strong. You can build rafters on site or use prefab trusses depending on span,
budget, and comfort level. Roof framing varies by region (snow/wind loads), so consider local requirements.
- Rafters: more DIY-friendly for smaller spans; requires accurate cuts and consistent layout.
- Trusses: fast and consistent; great for larger sheds; often easier than cutting 20 perfect rafters.
For the pavilion extension, the roof simply continues past the enclosed wall line to cover the pavilion bay.
Use solid support at the transition (ridge board/beam details vary), and make sure your overhang framing is planned,
not improvised at sunset with one screw left.
High-wind reality check: Roof-to-wall connections matter. Many builders use metal ties/straps
(often called hurricane ties) and follow manufacturer installation guidance so uplift forces have a defined path.
Step 7: Roof sheathing, underlayment, drip edge, and shingles
Install roof sheathing with the correct panel orientation (strength axis across supports), stagger seams, and maintain small panel gaps.
Fastening schedules can vary by panel and conditions (wind zones, engineered diaphragms), so follow manufacturer and code guidance.
- Sheath the roof and leave recommended expansion gaps at edges.
- Install underlayment, overlapping courses to shed water properly.
- Add drip edge at eaves and rakes to direct water away from fascia and into gutters (or away from wood).
- Install starter strip, then field shingles per manufacturer instructions.
- Cap the ridge and seal exposed fasteners as required.
Roofing is where small mistakes turn into big leaks, so slow down here. Water is patient. It will find your shortcut.
Step 8: Wrap, siding, trim, and openings
Use a weather-resistive barrier behind siding where appropriate, then install siding and trim.
Around doors and windows, flashing details matterespecially on the pavilion side, where wind-driven rain can sneak in sideways.
- Install corner trim and fascia for clean lines.
- Consider a wider door (48″) if you plan to store bulky equipment.
- Add vents or a small gable vent to reduce moisture buildup.
Step 9: Finish the pavilion bay so it’s actually usable
The pavilion section shines when it’s intentionally finished, not “left open and hoped for the best.”
Consider:
- Gravel or pavers under the pavilion to control mud splash.
- Hooks and rails for hoses, cords, and ladders.
- A dedicated firewood rack with airflow (wood likes to dry, not stew).
- Simple lighting (solar or hardwired) so you’re not searching for tools like it’s a thriller movie.
Step 10: Safety basics (because roofs are not trampolines)
Use ladder safety rules, stable footing, and appropriate PPE. If you’re using an extension ladder, set it at the proper angle
(the “4-to-1 rule”) and extend it above the landing point when accessing a roof edge, per standard safety guidance.
Also: if you feel rushed, that’s your cue to pause.
A Simple Example Plan: 12′ x 20′ Pavilion Shed (12′ x 12′ Enclosed + 12′ x 8′ Pavilion)
Here’s a practical layout that balances storage with covered outdoor space. Adjust for local load requirements and your preferences.
Budget and Timeline (What to Expect)
Costs vary wildly by region, size, and finishes. As a broad rule, pavilion sheds cost more than basic sheds because posts,
beams, and extra roofing add material and labor. The upside: you’ll use the pavilion space every week, not just when you
can’t find the string trimmer.
- Basic DIY build time: 2–5 weekends (site + foundation takes longer than you think)
- Budget range: depends on materials, doors/windows, and roof type; plan extra for hardware and fasteners
- Where people underestimate: gravel volume, roofing accessories, trim/paint, and “just one more tool”
Common Mistakes (and How to Avoid Them)
- Skipping drainage: If water collects under your shed, rot and settling follow. Grade and gravel matter.
- Building out of square: Fix it at the foundation/floor stage. Later fixes are… creative and expensive.
- Under-bracing the pavilion: Open structures need smart bracing to resist racking.
- Cheap fasteners outdoors: Use corrosion-resistant fasteners where exposure is likely.
- Ignoring wind uplift: In windy areas, tie the roof to the walls and the walls to the foundation.
- Forgetting airflow: A “sealed” shed without ventilation can trap moisture and ruin stored items.
Final Thoughts
A pavilion shed is one of those backyard projects that pays you back. You get storage, shelter, and a covered zone that
becomes the default “set it here for a minute” spotexcept it stays dry and looks great doing it.
Build it square, build it level, connect it like wind exists (because it does), and your pavilion shed will outlast
at least three lawnmowers and one ambitious organizing phase.
of Real-World Experience: Lessons Builders Learn the Fun Way
Ask anyone who’s built a shed (or three) and you’ll hear the same plot twist: the shed itself is not the hard partthe
ground is. People start out pumped, cutting lumber like a pro, and then reality shows up wearing muddy boots.
The first “experience” most DIYers collect is learning that a yard can look flat while secretly leaning just enough to
make a door swing open like it’s haunted. The cure is unglamorous: strings, levels, compacted base material, and patience.
The reward is a shed that doesn’t slowly migrate across your yard like it’s trying to escape.
The second real-world lesson is that pavilion sections are honest: they reveal whether you built square and braced well.
An enclosed shed can hide minor sins behind sheathing and siding. A pavilion bayopen on multiple sideswill happily show
you every wobble. Builders often discover that what felt “solid enough” before the roof went on becomes noticeably springy
once the structure faces wind. This is where diagonal bracing, stout posts, and properly sized beams stop being “optional
upgrades” and start being “why the pavilion doesn’t shimmy when someone sneezes.” If you want your pavilion shed to feel
like a permanent backyard feature (not a pop-up event tent with opinions), overbuild this part a little.
Another common experience: your roof will teach you humility. Cutting rafters isn’t hard onceit’s hard twenty times in a
row. The first rafter is a prototype. The second is “pretty good.” The third is where you realize your pencil line was
basically a suggestion. Seasoned builders lean on a story stick, templates, and a strict “measure twice, cut once” policy
that becomes “measure three times because wood is expensive.” Many also learn to stage materials: stack sheathing where
you’ll install it, pre-sort shingles, and keep fasteners accessible. The less you climb up and down ladders, the faster
(and safer) the job goes.
Then there’s the “hardware store time warp.” You go in for nails and come out with a new drill bit set, two extra clamps,
and a snack you didn’t plan. Builders joke about it, but the practical takeaway is real: plan your fasteners and connectors
early, because the right bracket or tie can save hours later. Roof-to-wall connections, joist hangers, post basesthese
details feel boring until the day you’re trying to fix a squeak or strengthen a wobbly corner. Do it right once, and future
you gets weekends back.
Finally, the most satisfying experience: once the pavilion shed is done, it starts getting used immediately. The pavilion
bay becomes the default staging area for garden work. Wet tools dry out. Firewood stays covered. A folding chair appears
“temporarily” and then lives there forever. That’s the magic of a pavilion shed: it doesn’t just store thingsit improves
how you move through your yard. You’ll wonder how you lived without it… and then you’ll start planning a matching one.