Table of Contents >> Show >> Hide
- Before You Start: Pick Your Glow (Solar vs. LED vs. Candle)
- Tools & “Super Cheap” Supply List
- Project #1: The Easiest “Looks Expensive” Solar Mason Jar Lantern
- Project #2: Dollar-Store Style Wire-Handle Jar Lantern (No Solar Required)
- Project #3: Punched Tin Can Luminary Lantern (Upcycled + Wind-Friendly)
- Project #4: Paper Bag Luminaries That Don’t Look Like a Kid’s Craft (Promise)
- Project #5: The Thrift-Store Hurricane Lantern (Fancy on a Budget)
- Quick Upgrades That Make Cheap Lanterns Look “Custom”
- Hanging & Placement Ideas for Maximum Patio Glow
- Safety & Weather Tips (So Your DIY Doesn’t Become “DIY… Oops”)
- Troubleshooting: Common Patio Lantern DIY Problems
- Wrap-Up: Cheap Lanterns, Big Patio Energy
- Experience Notes: What Actually Happens When You Live With DIY Patio Lanterns (Real-World Lessons)
Patio lighting is one of those “small change, huge mood” upgrades. The problem? Outdoor lanterns can get weirdly expensive for something whose main job is to sit there and glow politely. The good news: you can DIY budget-friendly patio lanterns with stuff you probably already have (or can grab for pocket change), and the results can look intentionally stylednot “I panicked in the craft aisle.”
In this guide, you’ll get a handful of quick patio lantern DIY projects that are:
- Cheap (think: thrifted, dollar store, or upcycled materials)
- Fast (most are 15–60 minutes, not “a weekend plus emotional damage”)
- Flexible (solar, LED, or candle options)
- Patio-proof (tips for wind, rain, and “my dog knocked it over”)
Before You Start: Pick Your Glow (Solar vs. LED vs. Candle)
Choosing the light source is the difference between “romantic patio vibe” and “why is nothing working?” Here’s a quick breakdown:
Solar (Best for: low effort, no outlets)
Solar is the MVP for patios without convenient power. It’s also great if you want lanterns you can place anywheretabletop, steps, hanging hookswithout extension cords doing gymnastics across your deck.
- Pros: No wiring, automatic on/off, usually weather-friendly
- Cons: Needs real sun exposure (shade and covered patios can be tricky)
Battery LED (Best for: dependable brightness)
Battery-powered LEDs (especially fairy lights or flameless candles) are predictable and bright. If you want a “party-ready” look on demand, this is your lane.
- Pros: Works anywhere, consistent light, safe and cool
- Cons: Batteries need replacing/charging
Real Candles (Best for: occasional ambianceuse smart safety)
Candle lanterns can look amazing, but wind and open flame are not always besties. If you go this route, use a hurricane-style glass cover or choose flameless candles for the same cozy flicker without the stress.
Tools & “Super Cheap” Supply List
You don’t need a workshop. You need basic tools and a willingness to pretend hot glue is a personality trait.
Basic tools
- Scissors
- Hot glue gun (or strong outdoor-rated adhesive)
- Wire cutters (if using wire handles)
- Small screwdriver (for some solar lights)
- Optional: spray paint, paintbrush, rubbing alcohol for cleaning
Cheap materials that work great
- Mason jars or any glass jars (pasta sauce jars = totally acceptable)
- Solar path lights (the “stake in the ground” kind)
- Battery fairy lights or LED tealights
- Wire (18-gauge-ish is a sweet spot for handles)
- Twine, rope, or jute for an instant “rustic” upgrade
- Tin cans (washed), paper lunch bags, or old glass vases
- Sand, small rocks, or gravel (for stability)
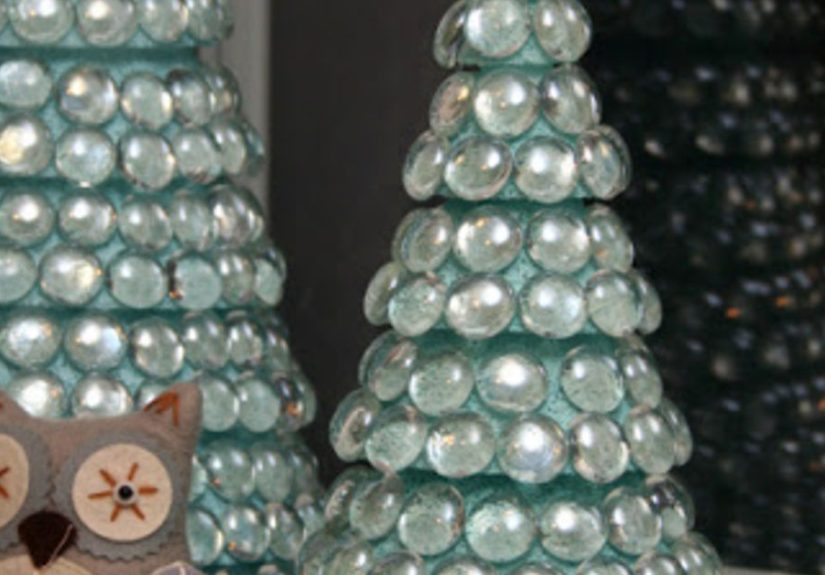
Project #1: The Easiest “Looks Expensive” Solar Mason Jar Lantern
Best for: patios, steps, garden edges, outdoor dining tables
Time: 15–30 minutes (plus charging time in sunlight)
Cost: super low if you already have jars; still budget-friendly if you don’t
Why this works
This is the classic solar mason jar lights hack: you take a basic solar path light, remove the solar top, and mount it into a jar. The jar turns the light into a lantern, and the glass helps diffuse the glow so it feels warm instead of “flashlight under the chin.”
What you need
- 1 glass jar with lid ring (mason jar ring helps, but not required)
- 1 solar path light (the stake style)
- Optional: frosted spray paint, sea glass, pebbles, or Epsom salt (for diffusion)
- Outdoor adhesive or hot glue (use carefully with heat and weather)
Step-by-step
- Test the solar light first. Cover the solar panel with your hand to see if it turns on. (Better to discover a dud now than after you’ve emotionally bonded with it.)
- Disassemble the path light. Most unscrew or pop apart. Remove the stake portion so you’re left with the solar “cap” and the light.
- Prep the jar. Clean and dry it. If you want a softer glow, lightly frost the outside with frosted spray paint (thin coats).
- Create diffusion (optional but pretty). Add a layer of pebbles, sea glass, or even a little Epsom salt. This also adds weight so the lantern won’t tip easily.
- Mount the solar cap. If your jar has a lid ring, try fitting the solar top into the ring. If not, you can glue the solar cap to the underside of a jar lid or create a snug “collar” using weather-resistant foam tape.
- Charge it. Place the lantern in direct sun for a full day, then enjoy the automatic glow at night.
Make it look designer (cheaply)
- “Mercury glass” vibe: Lightly mist the inside with mirror-effect spray (optional) or add silver/clear beads.
- Coastal vibe: Use sea glass + a wrap of rope around the neck.
- Modern vibe: Skip twine, use matte black spray paint on the lid and a clean label-free jar.
Project #2: Dollar-Store Style Wire-Handle Jar Lantern (No Solar Required)
Best for: hanging from hooks, shepherd’s poles, pergolas, fences
Time: 20–40 minutes
Cost: very low (wire + jar + LED tealight)
What you need
- Glass jar (wide-mouth is easier)
- Wire (strong enough to hold the jar’s weight)
- LED tealight or a small bundle of battery fairy lights
- Optional: beads, rope wrap, mini carabiner
Step-by-step
- Measure your handle. Cut a long piece of wire for the handle plus two shorter pieces for “support loops.”
- Create a neck wrap. Wrap a short piece of wire around the jar neck (below the lid threads). Twist tight with pliers and leave two “ears” for attaching the handle.
- Add the handle. Hook the long wire onto one ear, arch it over the top, and hook it onto the other ear. Twist securely.
- Stabilize the base. Add a little sand or pebbles at the bottom so it doesn’t sway like it’s auditioning for a music video.
- Drop in the light. LED tealight for “flicker,” fairy lights for “sparkle.”
Placement tip
Hang these at different heights in a cluster (three is a magic number) to make your patio look styled. It’s basically instant ambiancelike your backyard just put on a blazer.
Project #3: Punched Tin Can Luminary Lantern (Upcycled + Wind-Friendly)
Best for: patio steps, tabletops, garden borders
Time: 45–90 minutes (depending on pattern and patience)
Cost: nearly free (it’s literally a can)
Why it’s patio-smart
Punched metal lanterns handle wind better than lightweight paper lanterns, and they throw fun light patterns. Plus, you get to dramatically say, “Yes, I made that from a bean can,” which is always satisfying.
What you need
- Clean tin can (labels removed)
- Water + freezer
- Nail and hammer (or a punch tool)
- LED tealight (recommended)
- Optional: spray paint
Step-by-step
- Clean and de-label. Wash the can and remove the label glue (warm soapy water helps).
- Fill with water and freeze. Freezing keeps the can from denting while you punch holes.
- Plan your pattern. Simple dots, stars, stripes, a monogramanything works. Use a marker or tape a paper pattern on the can.
- Punch holes. Carefully tap the nail to create holes along your design.
- Thaw and dry. Dump the ice, dry thoroughly, and sand any sharp edges at the rim.
- Paint (optional). Matte black looks modern; metallics look festive; white looks coastal.
- Add a light. Use a flameless LED tealight inside for safe, steady glow.
Project #4: Paper Bag Luminaries That Don’t Look Like a Kid’s Craft (Promise)
Best for: parties, walkways, special dinners on the patio
Time: 20–30 minutes for a set
Cost: extremely low
What you need
- Plain paper lunch bags
- Sand (or gravel)
- LED tealights (do not use real flames in paper bags)
- Optional: hole punch, stencils, markers
Step-by-step
- Add 2–3 inches of sand to each bag for weight.
- Place an LED tealight in the center.
- Fold the top edge down once for a clean “finished” look.
- Optional: punch simple patterns (moons, dots, stars) for extra glow effects.
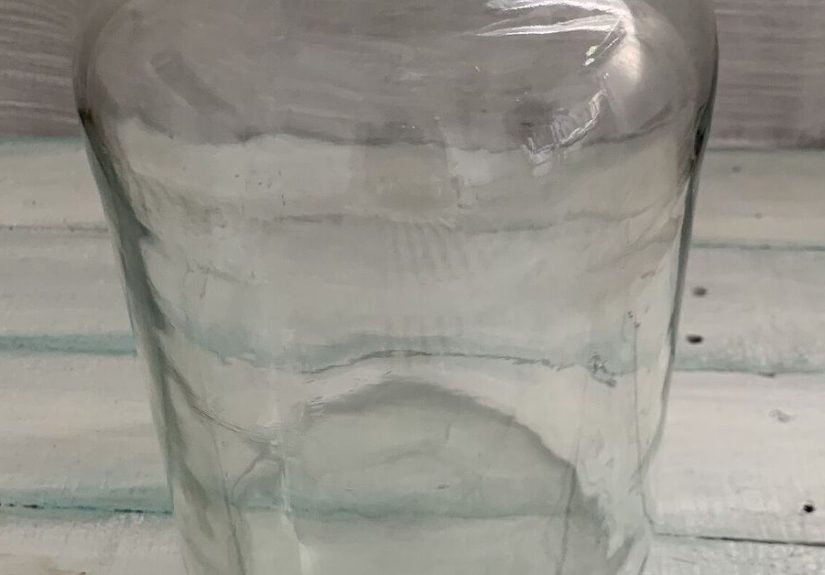
Project #5: The Thrift-Store Hurricane Lantern (Fancy on a Budget)
Best for: outdoor dining table centerpiece, front stoop, patio corners
Time: 10–20 minutes
Cost: low (thrifted vase + candle/LED)
What you need
- Clear glass vase or tall cylinder (thrift stores are full of these)
- LED pillar candle or flameless candle
- Optional: a small tray, stones, greenery clippings
How to assemble
- Place the LED candle inside the glass cylinder.
- Add stones or sand around the base for stability.
- Set it on a tray with greenery or seasonal accents (pinecones, citrus, eucalyptus).
Design tip: Group three cylinders of different heights together. It looks curated, like you own matching dinner plates and not 14 random forks.
Quick Upgrades That Make Cheap Lanterns Look “Custom”
1) Frost the glass
Frosted spray paint instantly softens harsh points of light and hides mismatched jar logos. Thin coats are your friend.
2) Add texture at the neck
Wrap twine, rope, or jute around the jar neck. Secure with hot glue. This is the DIY equivalent of adding a belt to an outfit: unnecessary, but it ties everything together.
3) Use mixed materials
Glass + metal wire, or tin can + leather strap handle, or wood base + glass cylinder. The contrast makes it look intentional.
4) Use warm white lights
For cozy patios, warm white reads “inviting.” Cool white reads “parking lot… but make it personal.”
Hanging & Placement Ideas for Maximum Patio Glow
- Entry path: Line steps with jar lanterns or paper luminaries (LED only).
- Dining zone: Use hurricane-style lanterns as centerpieces; add a few tiny jar lanterns around the perimeter.
- Perimeter glow: Hang wire-handle jar lanterns from fence hooks or pergola beams.
- Corner cozy: Put 1–2 larger lanterns near seating to “anchor” the space visually.
Safety & Weather Tips (So Your DIY Doesn’t Become “DIY… Oops”)
Use LED for paper, plastic, and tight spaces
Flameless candles and LED lights are safer, especially inside jars, bags, or lanterns without good ventilation.
Keep real flames protected
If you choose real candles, use a glass hurricane cover and place lanterns on stable, non-flammable surfaces away from curtains, dry leaves, and foot traffic.
Prevent tipping
Add sand, gravel, or stones in the base of jars and bags. A tiny weight makes a huge difference outdoors.
Plan for rain
Solar caps and battery packs do better when shielded from direct water. If your lanterns will be out all season, choose more weather-resistant components and bring them inside during storms.
Troubleshooting: Common Patio Lantern DIY Problems
“My solar lantern barely lights up.”
- Make sure it’s charging in direct sun (not under a covered patio roof).
- Clean the solar panel (dust and pollen are sneaky).
- Swap rechargeable batteries if the solar unit is old.
“My jar lantern looks too bright and harsh.”
- Frost the jar or add diffusion (sea glass, pebbles).
- Use fewer fairy lights or choose a lower-lumen LED tealight.
“My hanging lantern swings too much.”
- Add weight (stones/sand) to the bottom of the jar.
- Shorten the hanging length or use two support points.
Wrap-Up: Cheap Lanterns, Big Patio Energy
With a handful of jars, a couple of solar path lights, or a string of LEDs, you can build cheap outdoor lanterns that make your patio feel warm, welcoming, and “on purpose.” Start with one project (solar mason jar lanterns are the easiest win), then layer in a few more pieces. The magic is in the mix: different heights, different textures, consistent warm glow.
Experience Notes: What Actually Happens When You Live With DIY Patio Lanterns (Real-World Lessons)
Here’s the stuff you only learn after your lanterns have survived a few weekends, a few weather surprises, and at least one person saying, “Wait… you made those?”
1) Covered patios are solar-light tricksters. The first time you set solar lanterns under a roof, you’ll expect them to charge anywaybecause the sky is right there, and you can see the sun, and the sun can see you, so obviously this should work. But solar lights are picky. They want direct sunlight, not “bright vibes.” The fix that consistently works is simple: charge them in a sunny spot during the day, then move them where you want at night. If you’re using multiple lanterns, rotating them becomes part of the routinelike swapping out throw pillows, but with less judgment from visitors.
2) Weight is the secret ingredient. A lantern that looks cute but tips over the second a breeze shows up is basically patio décor cosplay. Adding a small layer of sand or pebbles inside jars makes everything feel sturdier. This also matters if you’re hanging lanterns from hooks: weight reduces wild swinging, so your lantern doesn’t spend the whole evening doing interpretive dance above your guests’ heads.
3) Warm white lighting hides a multitude of DIY sins. If your jar is slightly scratched, your wire twist isn’t perfectly symmetrical, or your thrifted glass cylinder has a mysterious tiny chip (it builds character), warm light makes everything look intentional. Cool white light is less forgivingit can highlight every fingerprint and make your patio feel like it’s being inspected. If you want that cozy look, stick with warm LEDs or warm solar units and call it a design choice.
4) The “cluster effect” makes cheap look curated. One lantern can look like an object. Three lanternsespecially at different heightslook like styling. Hanging a trio of jar lanterns in a corner instantly creates a focal point, and suddenly your patio has a “moment.” If you’re short on time, build one style of lantern (like wire-handle jars), then repeat it in a small group. It’s the easiest way to get that Pinterest-y feel without building a whole new personality.
5) Flameless candles win for everyday life. Real candles are gorgeous, but they require babysittingwind, safety, and the “who left it burning?” problem. Flameless LED candles give you the same flicker and none of the stress. They’re especially good in tin can luminaries and jar lanterns because you don’t have to worry about heat inside a tight space. If you host often, flameless candles become the default because you can turn them on, enjoy the glow, and not spend the night doing fire safety math.
6) Your best lantern materials are usually already in your house. Pasta sauce jars, pickle jars, salsa jarsglass is glass, and once the labels are off, nobody can tell what used to live inside. Some of the best-looking lanterns come from mismatched jars unified by the same light style (all warm fairy lights, or all LED tealights) and the same finishing touch (twine wrap, frosted glass, or matte-painted lids). The result looks cohesive, even when the jars started as a chaotic collection from your recycling bin.
In short: the “super cheap” part isn’t the compromiseit’s the strategy. DIY patio lanterns look best when you lean into simple repetition, warm lighting, and practical stability. Do that, and your patio will glow like you hired someone… who accepts payment in jars and good intentions.