Table of Contents >> Show >> Hide
- Meet the Raspberry Pi Zero 2 W
- Performance: How Fast Is the Zero 2 W Really?
- Connectivity and Features
- What Can You Actually Do with a Raspberry Pi Zero 2 W?
- Pricing, Availability, and Kits
- Strengths and Limitations
- Getting Started: What You Need
- Future-Proofing and Production Use
- Hands-On Experiences and Project Ideas with the Zero 2 W
- Conclusion: A Tiny Board with Serious Ambitions
When the original Raspberry Pi Zero arrived, it felt like a magic trick: a full Linux computer for the price of a fast-food lunch.
Now Raspberry Pi has pulled off a sequel that fans have been begging fora tiny board that keeps the same $15 spirit but adds
real horsepower. Say hello to the Raspberry Pi Zero 2 W.
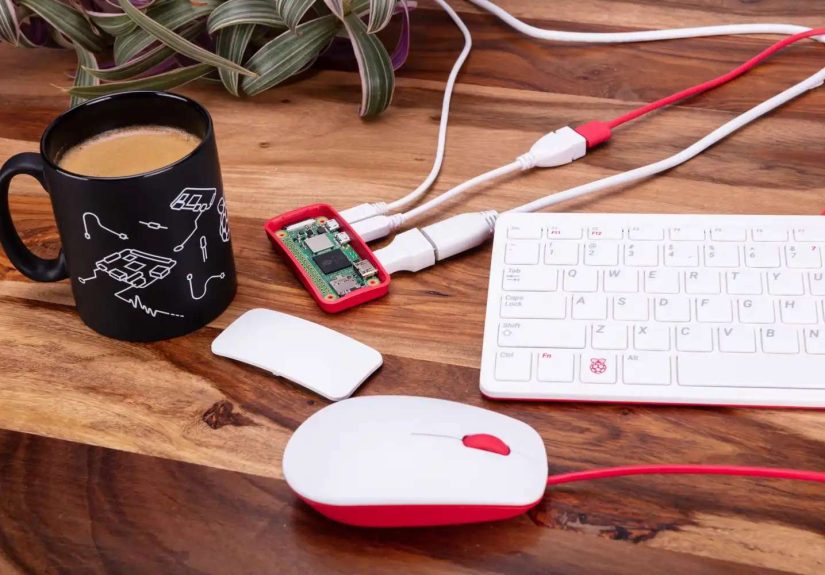
This new Zero 2 W model takes the familiar gumstick-sized form factor and quietly hides a quad-core 64-bit processor inside.
In practical terms, that means it’s not just a cute little board for blinking LEDsit’s a capable mini-computer that can handle
retro gaming, smart home hubs, compact robots, network tools, and more, without wheezing on every task.
Meet the Raspberry Pi Zero 2 W
A big upgrade in a very tiny package
At the heart of the Raspberry Pi Zero 2 W is a custom system-in-package (SiP) called RP3A0. Inside that SiP lives a
Broadcom BCM2710A1 SoC with a quad-core Arm Cortex-A53 CPU running at 1 GHz, paired with 512 MB of LPDDR2 SDRAM.
That’s the same CPU architecture used in the Raspberry Pi 3 family, squeezed into the Zero footprint.
Compared with the original single-core Zero and Zero W, the Zero 2 W delivers around five times the CPU performance in many workloads.
Boot times drop from “go make coffee” to “look away for a second and it’s ready,” and multi-threaded tasks like compression,
web browsing benchmarks, or emulation finally have breathing room.
Key hardware specs at a glance
- Processor: Broadcom BCM2710A1, quad-core 64-bit Arm Cortex-A53 @ 1 GHz
- Memory: 512 MB LPDDR2 SDRAM
- Wireless: 2.4 GHz 802.11 b/g/n Wi-Fi, Bluetooth 4.2, Bluetooth Low Energy (BLE)
- Storage: microSD card slot for OS and data
- Video: mini HDMI port (up to 1080p) plus composite video via test points
- Connectivity: single USB 2.0 OTG port, CSI-2 camera connector
- GPIO: unpopulated 40-pin HAT-compatible header footprint
- Power: 5 V DC via micro-USB, recommended up to 2.5 A for accessories
- Form factor: 65 mm × 30 mm, same footprint as the original Zero series
The board keeps the classic Zero layout, so most existing Zero cases and accessories still fit. That means you can upgrade a
lot of old projects by swapping in the new boardwith care for power and thermalswithout re-engineering your enclosure.
Performance: How Fast Is the Zero 2 W Really?
From “cute toy” to “actually usable”
On paper, moving from one CPU core to four is a big deal. In real-world tests, the Raspberry Pi Zero 2 W lives up to the hype.
Benchmarks like 7-Zip, synthetic CPU tests, and browser benchmarks show roughly 4–6× improvements versus the original Zero and Zero W
in multi-threaded workloads. That translates into:
- Noticeably faster boot times for Raspberry Pi OS
- Smoother web browsing in lightweight desktop setups (as long as you don’t open lots of tabs)
- More responsive emulators for classic consoles
- Better performance for Node-RED, Home Assistant, and other IoT services
With the quad-core CPU, the Zero 2 W can even function as a minimal desktop if you’re patient and realisticthink
one or two browser tabs, a text editor, and a terminal. The main limiter isn’t the CPU anymore; it’s the 512 MB of RAM.
Open too many heavy apps and the system will start swapping and slowing down quickly.
Thermals and power draw
Despite the extra cores, the Zero 2 W is surprisingly well-behaved thermally. Under sustained CPU load at stock clocks, tests show it
staying comfortably under typical throttling thresholds, especially with even a small airflow or a basic heatsink.
For most embedded and hobby projects, you won’t need elaborate coolingthough tossing on a tiny heatsink never hurts and
looks satisfyingly “pro.”
Power consumption remains modest. At idle, it sips power, making it an excellent choice for battery-powered projects or
always-on low-power services such as network monitors, small VPN endpoints, or MQTT brokers.
Connectivity and Features
Wireless, camera support, and GPIO
The “W” in Zero 2 W still stands for “Wireless,” and the new model refines that feature set. You get:
- 2.4 GHz Wi-Fi (802.11 b/g/n) for network connectivity
- Bluetooth 4.2 and BLE for wireless peripherals and IoT devices
- A metal RF shield over the wireless section, improving radio performance and compliance
There’s a CSI-2 camera connector along the edge of the board, so you can pair the Zero 2 W with the official Raspberry Pi Camera
modules or third-party options. That combination is perfect for compact security cameras, wildlife cams, or time-lapse photography rigs.
Along one side, you’ll find the familiar unpopulated 40-pin GPIO header footprint. Solder on a header and you unlock:
- Digital I/O pins for sensors, buttons, and LEDs
- I²C and SPI for talking to displays and advanced sensors
- UART for debugging or talking to other microcontrollers
- 5 V and 3.3 V power rails for accessories
The single USB OTG port still demands a little creativity. You’ll likely use a USB OTG adapter or hub if you want to attach
a keyboard, mouse, and USB storage at the same time. That’s normal in Zero-land, but worth planning for.
What Can You Actually Do with a Raspberry Pi Zero 2 W?
Retro gaming in your pocket
One of the most popular uses for the Zero 2 W is retro gaming. With a quad-core CPU, it can comfortably handle 8-bit and 16-bit
consoles and do a decent job with some early 3D systems, depending on the emulator and settings. Pair the board with:
- A small HDMI display or your TV
- A couple of USB or Bluetooth controllers
- An SD card loaded with a retro gaming OS like RetroPie or similar
The result is an ultra-portable retro console that’s small enough to tape to the back of a screen or hide inside a custom 3D-printed shell.
Tiny smart home brain
Because the Zero 2 W is low-power and Wi-Fi enabled, it makes an excellent smart home node. You can run:
- Home Assistant or a lightweight automation stack for a room or apartment
- MQTT brokers to tie together ESP32/ESP8266 sensors
- Custom scripts for controlling lights, fans, or blinds via GPIO-driven relays
The 512 MB RAM means you should keep expectations realisticthis is more of a “satellite brain” than a full house-wide serverbut
for a handful of smart devices, it’s perfect.
Cameras, robots, and weird little gadgets
The Zero 2 W shines wherever you need computing power in a tight space:
- Wi-Fi camera: Use the CSI connector with a camera module to build a security cam, bird-feeder cam, or baby monitor.
- Compact robot controller: Drive motors and servos through a driver board while the Pi handles navigation and logic.
- Portable dashboard: Add a small display, and you’ve got a system monitor, crypto ticker, or weather station.
- Network tools: Turn it into a Pi-hole ad-blocking DNS server, a VPN endpoint, or a Wi-Fi test probe.
If your idea starts with “It’d be cool if this everyday object were secretly a computer,” the Zero 2 W is basically the hardware embodiment
of that thought.
Pricing, Availability, and Kits
Officially, Raspberry Pi positions the Zero 2 W as a $15 board, making it one of the most affordable Linux computers you can buy.
In reality, retail prices can float a bit higher depending on region, demand, and whether you’re buying bare boards or full kits
with power supplies, SD cards, and cases.
In the United States, you’ll typically see:
- Board-only Zero 2 W pricing slightly above MSRP at many retailers
- Basic kits that add a power supply, case, and pre-flashed SD card
- Starter and “Max” kits that bundle larger microSD cards, cables, and sometimes GPIO headers or accessories
Because Raspberry Pi products are popular and global component supply can fluctuate, availability may swing between “everywhere” and “sold out.”
If you’re planning a project or class, it’s wise to buy ahead or consider mixing in other Pi models if Zero 2 W stock is tight.
Strengths and Limitations
What the Zero 2 W does really well
The Zero 2 W hits a sweet spot for a lot of makers and tinkerers:
- Excellent performance per dollar for CPU-bound tasks compared to the original Zero
- Tiny size for projects with tight space constraints
- Low power draw, ideal for battery and always-on applications
- Full Raspberry Pi ecosystem support same OS family, documentation, and how-tos
If you’ve ever wished a microcontroller board like an Arduino or ESP32 could run Linux and heavier software, the Zero 2 W is
the “hold my beer” answerstill small, but far more capable.
Where you should be careful
The Zero 2 W isn’t perfect, and it’s better to know its limits before you design around it:
- Only 512 MB RAM: Great for single-purpose appliances, but not ideal for heavy desktops or stacks of Docker containers.
- No USB-C, no USB 3.0, no Ethernet jack: You get a single micro-USB 2.0 OTG port. USB networking dongles are an option, but they add clutter.
- Single display output: One mini HDMI port, so no multi-monitor setup here.
- Limited I/O bandwidth: For serious storage or high-speed interfaces, a Raspberry Pi 4 or 5 is a better fit.
Think of the Zero 2 W as a smart, tiny specialist, not a full-blown workstation. Design your project around one main job,
and it will perform wonderfully.
Getting Started: What You Need
If you’re new to Raspberry Pi or just new to the Zero line, here’s a quick checklist to get a Zero 2 W up and running:
- Raspberry Pi Zero 2 W board
- 5 V power supply with a micro-USB connector, capable of at least 2 A for safety
- MicroSD card (at least 16 GB recommended) with Raspberry Pi OS or another compatible image
- Mini HDMI to HDMI cable or adapter if you want to use a monitor
- USB OTG adapter and (optionally) a USB hub for keyboard, mouse, and storage
- GPIO header and soldering tools if you plan to use pins for electronics projects
Once you’ve imaged the SD card with Raspberry Pi Imager or a similar tool, it’s the usual Pi story: insert the card, plug in HDMI and USB,
connect power, and watch the little board boot into a full Linux environment.
Future-Proofing and Production Use
Raspberry Pi has committed to keeping the Zero 2 W in production for years, making it attractive not just for weekend tinkering but also
for small-scale commercial products, art installations, and long-term deployments. The combination of documented specs, a stable platform,
and a huge community means you’re not betting on a mystery board that disappears after a year.
For makers, educators, and hardware experimenters, that stability is just as important as clock speed. You can build a course,
a workshop kit, or even a small commercial device around the Zero 2 W without worrying that it will vanish next season.
Hands-On Experiences and Project Ideas with the Zero 2 W
The spec sheet is fun, but the real joy of the Raspberry Pi Zero 2 W shows up once you actually build things with it.
Here are some lived-in, hands-on impressions and project patterns that capture what it’s like to work with this tiny powerhouse.
Upgrading old Zero projects
If you’ve ever built a project on the original Zero or Zero Wmaybe a little status display, an early smart home controller,
or a homemade retro consoleyou probably remember waiting. Waiting for it to boot. Waiting for a browser tab to load. Waiting
for a menu to render. Swapping the old board for a Zero 2 W often feels like someone quietly pressed the “fast forward” button on your project.
In many cases, the upgrade is as simple as:
- Powering down your project and removing the original Zero.
- Dropping in the Zero 2 W (same mounting points, similar connectors).
- Booting the existing SD card or re-imaging if you want a clean start.
Suddenly, your temperature logger can also host a small web dashboard. Your art installation can overlay animations instead of
static images. Your retro console can run slightly newer systems without chopping everything down to 5 frames per second.
Building “invisible computers”
One of the most delightful ways to use a Zero 2 W is to hide it. Stick it inside objects that don’t look like gadgets:
- A picture frame that quietly runs a rotating gallery from a network share
- A bookshelf “mood light” that changes color based on the weather or time of day
- A potted plant that reports soil moisture and reminds you when it’s thirsty
In all of those cases, the physical space is tight, and the device might run 24/7. The Zero 2 W’s small footprint and low power
draw make it a natural fit. You get just enough CPU to handle networking, logic, and simple graphics without turning your decor into a space heater.
A better brain for portable projects
The Zero 2 W pairs nicely with lithium-ion batteries, power banks, or custom battery packs, especially for portable builds:
- Handheld emulators with small screens and gamepad controls
- Wearable badges for conferences or events with live updating LEDs and messages
- Field-deployable sensors that log environmental data and sync when they see Wi-Fi
In these scenarios, the original Zero could feel underpowered if you asked it to do too many things at oncelog data, run a web
interface, handle a display, manage wireless connections. The Zero 2 W’s extra cores give you margin, so a background process
doesn’t completely freeze the user interface.
Lessons learned from using the Zero 2 W
After spending time working with the Zero 2 W, a few practical lessons float to the top:
- Plan your RAM budget. Keep your projects focused. One main application plus a few helper services works great; a full stack of heavy apps does not.
- Use headless setups when possible. Running without a full desktop and instead using SSH or a lightweight web UI keeps performance snappy.
- Pay attention to power and cabling. A stable 5 V supply and solid USB cables reduce weird crashes and Wi-Fi dropouts.
- Keep backups of your SD card. The Zero 2 W invites experimentation, which also means more chances to break things in fun and exciting ways.
The overall experience feels like what the original Zero always wanted to be: small and affordable, yes, but genuinely powerful enough
to anchor serious little projects. For many makers, the Zero 2 W has become the new default “glue computer” for everything from
home labs to art pieces.
Conclusion: A Tiny Board with Serious Ambitions
The Raspberry Pi Zero 2 W doesn’t look dramatic at first glanceit’s just another small green PCB with a scattering of chips and connectors.
But under that familiar layout is a meaningful leap forward: quad-core processing, better wireless, and a performance jump that transforms
what the Zero line can realistically do.
If you need full-blown I/O bandwidth, lots of RAM, or multiple displays, you’re still better off with a Raspberry Pi 4 or 5.
But if your dream project is compact, power-efficient, and focuseda retro handheld, a pocketable server, a hidden smart gadgetthen the
Zero 2 W hits a very compelling balance of price, performance, and size.
In short, Raspberry Pi didn’t just release a new toy. It released a tiny, affordable building block for the next wave of creative,
weird, and wonderful DIY hardware. And that’s exactly what the maker world was hoping for.