Table of Contents >> Show >> Hide
- Why Sweater Napkin Rings Work (And Why Gold Makes Them Look Expensive)
- Supplies You’ll Need
- Step-by-Step: Old Sweater to Gold Napkin Rings
- Step 1: Pick the best sweater section
- Step 2: Decide your ring size
- Step 3: Make (or choose) a sturdy base ring
- Step 4: Add the gold to the base (the “expensive” layer)
- Step 5: Cut the sweater pieces
- Step 6: Attach sweater to the base
- Step 7: Hide the seam with a gold “finishing move”
- Step 8: Let everything cure (yes, actually)
- Design Variations (Because One Set Is Never Enough)
- Troubleshooting: Common Problems and Fixes
- Styling Ideas: How to Make the Whole Table Look Intentional
- FAQ
- Common “Experience Notes” From People Who Make These (500+ Words)
- Conclusion
You know that lonely sweater in the back of your closet? The one that’s too itchy, too stretched out, or mysteriously smells like “college”? Congratulations: it just got promoted to tablescape hero.
In this tutorial, you’ll turn an old sweater into gold-accented napkin rings that look boutique, feel cozy, and cost about the same as a fancy coffee (or less, if you already own glue and mild optimism). We’ll keep it practical, beginner-friendly, and just fancy enough that guests will assume you own matching serving ware.
Why Sweater Napkin Rings Work (And Why Gold Makes Them Look Expensive)
Knit sweaters have built-in textureribbing, cable patterns, fluffy yarnswhich means your napkin rings already have “designer detail” without you doing anything complicated. Adding gold (in the form of a painted base, gilding wax, metallic ribbon, or tiny hardware) creates contrast: cozy + shiny = instantly elevated.
The trick is simple: build a sturdy ring, wrap it with sweater fabric, and add gold in a way that won’t crack, flake, or turn your dinner napkins into a glitter crime scene.
Supplies You’ll Need
Core materials
- Old sweater (wool, acrylic, cottonanything with a knit texture works)
- Scissors (fabric scissors if you have them)
- Measuring tape or ruler
- Adhesive: fabric glue, hot glue, or needle + thread
- Ring base (choose one): wooden napkin rings, cardboard tube rings, or thick cardstock rolled into a ring
Gold options (pick your favorite “shine strategy”)
- Metallic spray paint (for the base ring)
- Gilding wax / metallic wax (for highlights and a luxe rub-on finish)
- Metallic fabric paint (for gold stripes or edges on the sweater itself)
- Gold ribbon, cord, or elastic trim (easy, clean, and very forgiving)
- Gold beads, buttons, charms, or tiny bells (optional, but delightfully extra)
Nice-to-have tools
- Clips or clothespins (for holding seams while glue sets)
- Fusible interfacing/fusible fleece (for extra stability)
- Craft knife (if cutting cardboard tubes)
- Small brush or cotton swabs (for wax application)
Step-by-Step: Old Sweater to Gold Napkin Rings
Step 1: Pick the best sweater section
For the easiest napkin rings, look for sweater parts that already behave nicely:
- Ribbed cuffs (they resist fraying and look polished)
- Chunky knit sleeves (great texture, hides seams well)
- Hem band (often thicker, great for “plush” rings)
Avoid very loose, ladder-prone knits unless you plan to line themthose can unravel faster than a group text after one person says “we need to talk.”
Step 2: Decide your ring size
Most napkin rings have an inner diameter around 1.5–2 inches. If you’re using thick linen napkins or you like a looser, draped fold, go closer to 2 inches. For slimmer cloth napkins, 1.5 inches is usually plenty.
Step 3: Make (or choose) a sturdy base ring
You need structure so the sweater doesn’t sag or stretch over time. Choose one:
Option A: Wooden napkin rings (quickest, sturdiest)
These are ideal if you want a professional feel. You’ll wrap them with sweater fabric and use gold as an accent or as the base color.
Option B: Cardboard tube rings (budget-friendly, surprisingly good)
Cut a toilet paper tube (or paper towel tube) into rings about 1.25–1.75 inches wide. If your cardboard feels flimsy, double it: nest two rings together or wrap the ring with a layer of tape before covering it with sweater fabric.
Option C: Rolled cardstock (clean edges, customizable size)
Cut a strip of thick cardstock about 1.5 inches tall and long enough to form a ring. Overlap the ends and glue them. This option is great when you’re trying to match a specific napkin thickness or style.
Step 4: Add the gold to the base (the “expensive” layer)
This is where your napkin rings go from “cute craft” to “wait… did you buy these?”
Gold Method 1: Spray paint the base ring
- Work outside or in a well-ventilated area. Protect the surface with paper or cardboard.
- Apply multiple light coats instead of one heavy coat (drips are the enemy of elegance).
- Let the rings dry completely before wrapping with fabric.
Pro tip: If you want a softer, vintage gold, use a darker underlayer (like brown or black) on the base first, then do gold lightly over it. It creates depth without screaming “I JUST DISCOVERED METALLIC PAINT!”
Gold Method 2: Use gilding wax / metallic wax for highlights
Gilding wax is perfect if you want a rubbed, “lived-in luxe” finish. It’s also great for touching up little details: seams, raised texture, or embellishments.
- Use a cotton swab or small brush and apply a thin layer.
- Buff gently with a soft cloth to bring out shine.
- Build up slowly until it looks right (wax rewards patience, like sourdough starters and toddlers).
Gold Method 3: Metallic fabric paint on sweater details
If you’d rather keep the base plain and make the sweater itself “gold,” fabric paint is your friend. You can:
- Paint a thin gold stripe along the top edge
- Stencil tiny dots or a minimalist pattern
- Dry-brush gold across raised knit texture for a subtle shimmer
Step 5: Cut the sweater pieces
For most rings, cut sweater sleeves into sections about 2.5–3 inches long. If you’re using a cuff, you can cut just above the cuff so you keep that finished edge.
Two easy cuts:
- “Cuff tube” cut: cut off a cuff section and slide it over the ring base (fast, neat)
- “Wrap strip” cut: cut a rectangle strip and wrap it around the base ring (best for bulky rings)
Step 6: Attach sweater to the base
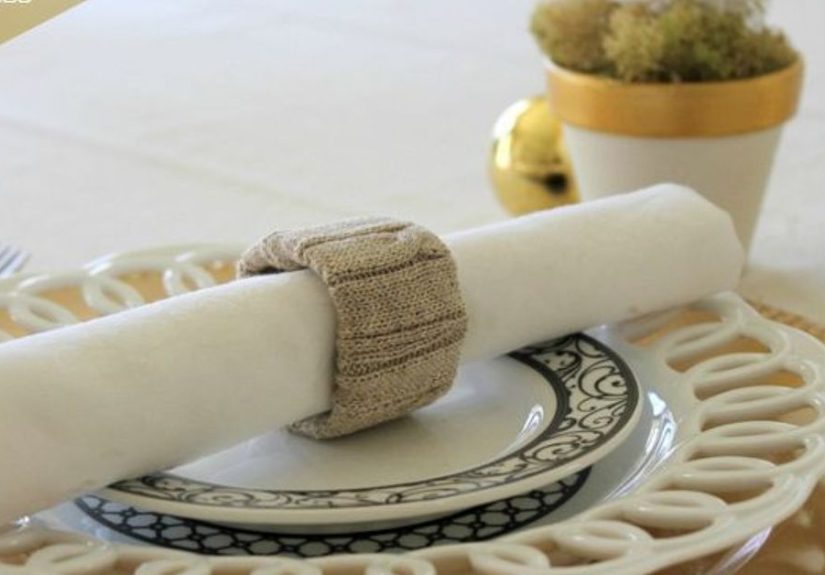
Technique A: Slide-on cuff (cleanest look)
- Slide the sweater cuff over the ring base like you’re dressing a tiny, fashionable cylinder.
- Fold the excess to the inside and glue or stitch it down.
- If the cuff is loose, add a line of fabric glue inside the ring and press the cuff into place.
Technique B: Wrap strip (best for custom fit)
- Wrap the sweater strip around the ring base, pulling it snug (not stretched thin).
- Overlap the ends on the inside of the ring and glue or stitch.
- Fold top and bottom raw edges inward and secure.
Glue tip: Use thin, even layers of fabric glue and clamp with clips while drying. It helps prevent lumps and keeps the seam crisp.
Step 7: Hide the seam with a gold “finishing move”
This is the easiest way to make your napkin rings look polished:
- Wrap a narrow gold ribbon around the seam line
- Glue a gold cord in a spiral for texture
- Add a gold button (bonus points if it’s vintage)
- Attach a mini name tag with gold string for dinner parties and holidays
Step 8: Let everything cure (yes, actually)
If you used fabric glue, let the rings dry fullyideally overnightbefore you start sliding napkins through them. If you used hot glue, give it time to cool completely so it doesn’t shift under pressure.
Design Variations (Because One Set Is Never Enough)
1) Minimalist gold edge
Keep the sweater neutral (cream, gray, camel) and add a thin gold ribbon around the top edge. This style works for modern tables and makes patterned napkins look intentional instead of “laundry day.”
2) Cozy cabin glam
Use chunky cable knit and pair with a gold wax highlight on a wooden base. Add a tiny sprig of faux greenery or a small pinecone charm for winter hosting.
3) Wedding-ready neutrals
Wrap rings in a soft beige sweater and attach a gold monogram charm or a tiny tag. It’s personalized, photogenic, and doesn’t require you to learn calligraphy (unless you want to).
4) “I love color but also gold”
Use a bright sweater (rust, emerald, navy) and keep the gold accent simple: one band of metallic trim. This gives you color without chaos.
Troubleshooting: Common Problems and Fixes
The sweater is fraying or unraveling
- Use cuffs or hem bands when possible.
- Seal raw edges with fabric glue or do a quick whip stitch.
- Line the inside with tape or interfacing for extra stability.
The ring feels too tight for thick napkins
- Increase the ring diameter (use a larger cardboard ring or wider overlap).
- Use a wrap strip instead of a cuff so you can customize the fit.
- Try a looser napkin fold (fan folds and drapes look great with sweater texture).
Gold paint looks streaky or drippy
- Use multiple light coats rather than one heavy coat.
- Let each coat flash-dry before adding the next.
- For a softer gold, do a light top coat over a darker base.
The seam looks bulky
- Trim the overlap inside the ring.
- Use a seam cover: gold ribbon, cord, or a button.
- Switch from hot glue to fabric glue for a flatter finish.
Styling Ideas: How to Make the Whole Table Look Intentional
Sweater napkin rings shine (literally) when they’re part of a cohesive moment. A few easy pairings:
- Neutral napkins + gold rings + greenery: classic holiday hosting without overthinking
- Patterned napkins + simple rings: keep the ring understated so the pattern can breathe
- Gold accents repeated once more: gold flatware, gold candleholders, or a gold-edged menu card
And if you’re using place cards, tuck them under the ring or tie them on with a gold cord. Guests love anything that looks like you planned it, even if you were gluing at midnight.
FAQ
Can I wash sweater napkin rings?
It depends on your adhesive and gold finish. If you used washable fabric glue and kept gold paint off the fabric, gentle spot-cleaning is usually fine. If you painted the fabric or used wax heavily, treat them like delicate décor: wipe clean and store carefully.
Is hot glue okay for fabric?
Yesespecially for décor items. But fabric glue often creates a flatter seam and can feel more “finished.” If you’re making these for a big event, fabric glue plus clips while drying is the calmest route.
What’s the fastest version of this project?
Use sweater cuffs + wooden rings + gold ribbon seam covers. You can finish a set quickly, and the result still looks high-end.
Common “Experience Notes” From People Who Make These (500+ Words)
When crafters talk about turning an old sweater into gold napkin rings, the stories tend to follow a predictable arc: confidence, then a mild glue incident, then pride. Below are the most common experiences and lessons people reportso you can skip the messy parts and go straight to the “wow, you made these?” compliments.
First, many people discover that sweater choice matters more than expected. The soft, slightly felted knits behave like a dreamedges stay put, the fabric stretches gently around the ring, and seams disappear into the texture. On the other hand, loose knits can act like they’re auditioning for a magic trick: one snip and suddenly you’re holding a string that’s suspiciously longer than the sleeve you started with. The common fix is simple: use cuffs (they’re already finished), seal raw edges with a thin line of fabric glue, or add a backing ring that gives the knit something stable to cling to.
Another frequent experience: people underestimate how much structure helps. Without a firm base, a sweater ring can stretch out over timeespecially if you’re using thick linen napkins and pulling them through with enthusiasm. Crafters who start with cardboard tube rings often end up reinforcing them (nesting two rings together, or wrapping the cardboard in tape) and then say something like, “Okay wow, now it feels store-bought.” The rings don’t need to be indestructible; they just need to stay round when someone slides a napkin through like they’re starting a lawnmower.
Gold finishes bring their own learning curve. A common report is that spray paint looks amazinguntil it doesn’t. People who rush the coats get drips, which then look like the napkin rings are sweating under the pressure of hosting. The most consistent “success story” comes from going slow: light coats, proper drying, and painting the base before the sweater goes on. That way, the gold looks crisp and the fabric stays soft.
Gilding wax tends to inspire the most dramatic reactionsusually delight. Many people say it feels like “cheating” because the shine appears quickly and the finish looks expensive. The shared lesson is to apply wax sparingly. A little goes far, and buffing gently makes it glow instead of looking muddy. People also note it’s worth keeping wax on the base ring or on embellishments rather than coating large areas of fabricunless you specifically want a metallic textile effect.
The most repeated practical tip is about seams. Almost everyone has a moment where the inside overlap looks bulky and they worry the napkin will snag. The easy fix is to hide the seam with a gold ribbon band, a thin cord wrap, or a single decorative button. That seam cover becomes a design feature, and suddenly the “problem” is the reason the rings look intentional.
Finally, people consistently report that these napkin rings become a weirdly satisfying tradition. Once a set exists, it’s easy to make more for different seasons: cream sweater + gold for winter, rust sweater + coppery gold for fall, pastel knit + soft champagne gold for spring brunches. The crafting experience shifts from “I’m trying to be thrifty” to “I have a signature table style,” which is the best possible upgrade for something that used to be a stretched-out sweater.
Conclusion
Turning an old sweater into gold napkin rings is the kind of DIY that checks every box: it’s budget-friendly, sustainable, fast enough to finish before guests arrive, and fancy enough to spark compliments. Start with a sturdy ring base, wrap it neatly with sweater fabric, and use gold strategicallypainted bases, wax highlights, or simple metallic trim. The result is cozy-meets-glam table décor that looks curated, not crafty.