Table of Contents >> Show >> Hide
- 1. Start with the Right Milk
- 2. Acidify the Milk with Starter Culture
- 3. Coagulate the Milk with Rennet
- 4. Cut and Cook the Curd to Control Moisture
- 5. Drain the Whey, Salt the Curd, and Press the Cheese
- 6. Age and Ripen for Flavor, Texture, and Character
- Why These Six Steps Matter Together
- Real-World Cheesemaking Experiences: What the Process Actually Feels Like
- Conclusion
- SEO Tags
Cheesemaking looks romantic from a distance. There is milk, there is magic, and somehow a humble liquid turns into a glorious wedge that belongs on a wooden board next to grapes nobody actually eats. But behind every good cheese is a process that is equal parts science, patience, and knowing when to stop poking the curd like an overexcited detective.
Whether you are curious about artisan production, planning to try small-batch cheese at home, or simply want to understand why cheddar, feta, brie, and gouda all behave so differently, it helps to know the basic sequence. Most cheeses, no matter how fancy their labels sound, are built on the same essential framework. The differences come from how each step is handled: the milk, the starter culture, the rennet, the curd size, the moisture, the salt, the pressure, and the time spent aging.
In other words, cheesemaking is not one single recipe. It is a carefully controlled series of decisions. Get those decisions right, and you end up with smooth mozzarella, crumbly feta, tangy chèvre, or a firm cheddar with serious personality. Get them wrong, and you may create something that tastes like a damp apology.
This guide breaks down the six important steps in cheesemaking in a clear, practical way. Along the way, you will also see why each step matters, how it affects texture and flavor, and what real cheesemakers are actually controlling behind the scenes.
1. Start with the Right Milk
Every cheese begins with milk, and that first decision shapes everything that follows. Cow’s milk, goat’s milk, and sheep’s milk all behave differently because they contain different balances of fat, protein, and minerals. Even within cow’s milk, the final cheese can vary depending on whether the milk is raw, pasteurized, standardized, or homogenized.
For beginners, pasteurized milk is usually the friendliest option because it offers more consistency and a lower food safety risk. That is one reason many home cheesemaking resources and dairy educators recommend starting there. Raw milk cheeses do exist and can be extraordinary, but they require tighter control and, in the United States, are subject to specific aging regulations. So, if you are learning the craft, this is not the time to audition for the role of “reckless dairy outlaw.”
Milk quality matters just as much as milk type. Clean, fresh milk with a good protein structure gives the cheesemaker a better chance of forming a stable curd and getting the desired yield. Poor milk quality, by contrast, can lead to weak coagulation, off flavors, and moisture problems later in the process.
This first step is also where temperature management begins. Cheesemakers warm milk to a target range that suits the cheese style and the starter culture they plan to use. A soft goat cheese and a hard cheddar are not treated the same way because the goal is not the same. Before the cheese even starts forming, the maker is already steering texture, acidity, and moisture.
Why this step matters
If the milk is inconsistent, every step after that becomes harder to control. Great cheese does not begin in the aging room. It begins in the vat.
2. Acidify the Milk with Starter Culture
Once the milk is prepared, cheesemakers add a starter culture. This is one of the most important moments in the entire process because the culture begins acidification. In plain English, the bacteria consume lactose, the sugar in milk, and produce lactic acid.
That acid does a lot of heavy lifting. It helps prepare the milk proteins for coagulation, influences how the curd shrinks and releases whey, supports the final texture, and plays a big role in flavor development. It also helps keep unwanted microbes from taking over the party.
Different starter cultures produce different results. Some work best at moderate temperatures and are used for cheeses like cheddar or gouda. Others prefer warmer conditions and are used for cheeses such as mozzarella or Swiss-style varieties. Culture selection is not random. It is one of the tools cheesemakers use to create a cheese’s identity.
This stage is sometimes called ripening the milk, which sounds poetic, but really means giving the bacteria time to get to work before adding the coagulant. The milk’s acidity does not drop instantly. It changes over time, and that timing affects everything from curd strength to moisture retention.
If acid develops too slowly, the cheese may end up bland, weak, or too wet. If acid develops too quickly, the cheese can become brittle, sour, or chalky. So yes, there is a reason experienced cheesemakers keep such a close eye on pH. They are not being dramatic. They are preventing dairy chaos.
Example in practice
A high-moisture cheese might need a very different acid profile than an aged hard cheese. The amount of acid produced, and when it is produced, changes how the curd behaves and how the final cheese matures.
3. Coagulate the Milk with Rennet
After acidification has started, the cheesemaker adds rennet or another coagulant. This is the step where milk transforms from a liquid into a soft gel. The coagulant acts on casein, the main milk protein involved in cheese structure, helping it form a network that traps fat and water. That gel is what eventually becomes curd.
Coagulation is one of the most satisfying moments in cheesemaking because it feels almost theatrical. One minute you have a pot of milk. A while later, you have a trembling mass that looks like something between pudding and science fiction. But this is also a step that rewards patience. A weak, underdeveloped curd can shatter during cutting and lose too much fat and protein into the whey.
The strength of the gel depends on several factors, including milk composition, temperature, acidity, and the amount of rennet used. Some cheesemakers also use calcium chloride, especially with pasteurized milk, to improve coagulation. The goal is not simply to make the milk solid. The goal is to make it solid in the right way.
A clean break test is often used to judge readiness. If the curd splits neatly rather than smearing or collapsing, it is generally ready for the next step. Cut too soon and the curd is fragile. Wait too long and you may retain more moisture than planned. In cheesemaking, timing is never a side issue. Timing is the whole game wearing a dairy apron.
Why coagulation matters
This is the moment structure begins. Texture, moisture, and yield all depend on how well the curd is formed before it is disturbed.
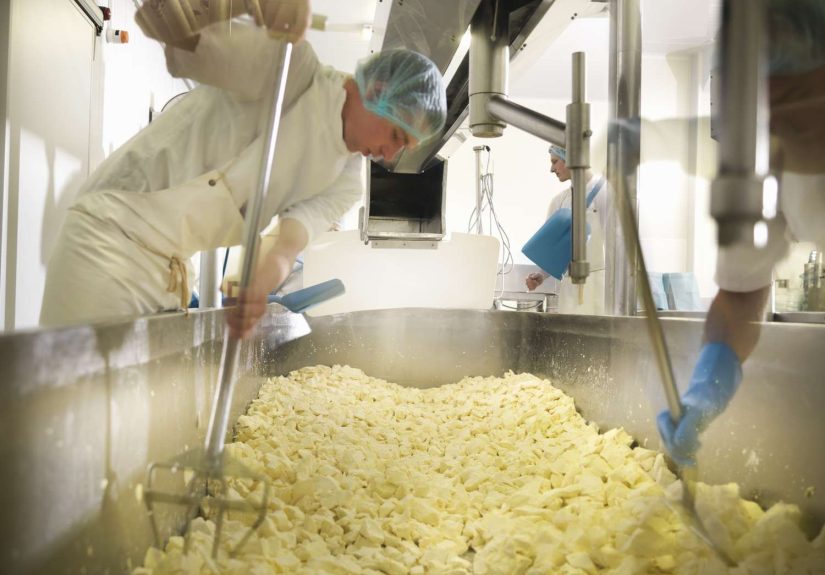
4. Cut and Cook the Curd to Control Moisture
Once the milk has coagulated, the curd is cut. This may sound like a simple mechanical step, but it is actually one of the most powerful ways to control the finished cheese. Cutting increases the surface area of the curd, which allows whey to escape. The smaller the pieces, the more whey they release, and the drier the cheese becomes.
This is why curd size matters so much. Larger curds tend to retain more moisture, which is useful for soft or fresh cheeses. Smaller curds help create firmer, drier cheeses that can handle pressing and long aging. A cheesemaker deciding between large cubes and fine cuts is not just choosing a shape. They are choosing a future texture.
After cutting, many cheeses are gently stirred and heated. In cheesemaking, “cooking” the curd does not mean frying anything, despite what your panini press may secretly believe. It means slowly raising the temperature while stirring so the curd contracts and expels more whey. Heat and acid work together here, encouraging the curd to shrink and become firmer.
This stage is especially important for low-moisture cheeses. A cheddar, alpine-style cheese, or Parmesan-style cheese needs far more whey removal than a soft-ripened or fresh cheese. In practical terms, that means more control during cutting, stirring, heating, and draining.
Cheesemakers also watch the firmness of the curd at the moment of cutting. A firmer curd can retain more moisture, while a softer curd at cut can lead to lower-moisture outcomes. Even small changes can shift the final body and texture of the cheese. That is why serious cheesemaking often looks calm on the outside and wildly mathematical on the inside.
Quick comparison
Feta or fresh mozzarella generally keeps more moisture than aged cheddar or Parmesan. The difference is not accidental. It is engineered during curd handling.
5. Drain the Whey, Salt the Curd, and Press the Cheese
After the curd reaches the desired firmness, the whey is drained away. This separates the solid cheese-making material from the liquid portion. In some cheeses, the curds are ladled directly into molds. In others, they are stirred, matted, milled, washed, or held for further acid development before molding. The route depends on the cheese style.
Next comes salting, which may happen in several ways. Some cheeses are dry salted, with salt mixed directly into the curds. Others are brined in salt water. Some receive surface salt. Salt is far more than seasoning. It helps control moisture, influences the rate of acid development, improves texture, and slows unwanted microbial growth. In short, salt is doing enough jobs here to demand a raise.
Pressing often follows, especially for firmer cheeses. Pressure compacts the curds into a unified mass, helps remove additional whey, and shapes the cheese into its final form. Depending on the style, pressing can be light and brief or heavy and extended. A softly molded bloomy rind cheese is not treated like a dense cheddar wheel, and thankfully, neither one holds a grudge.
This phase is where the cheese starts to look like cheese instead of an oddly lumpy dairy experiment. The curds knit together, the body becomes more cohesive, and the structure stabilizes. If the moisture is too high, the cheese may become pasty or unstable. If it is too low, the texture may turn dry and overly firm.
What happens here
Drainage removes whey, salt fine-tunes flavor and microbial control, and pressing gives the cheese shape and density. Together, these actions determine whether the final cheese will be supple, sliceable, crumbly, or sturdy enough to survive a cheese board and an opinionated cracker.
6. Age and Ripen for Flavor, Texture, and Character
Fresh curd is only the beginning. Aging, also called ripening or curing, is where many cheeses develop the flavor, aroma, and texture people actually fall in love with. During this stage, enzymes from the rennet, the milk, and the microorganisms continue to break down proteins and fats. That slow transformation creates everything from buttery notes and nutty complexity to earthy rinds and sharp finishes.
Some cheeses are eaten fresh and barely aged at all. Others need weeks, months, or even years to reach their best form. High-moisture cheeses typically age differently from low-moisture cheeses, and temperature and humidity conditions matter tremendously. Too much drying can crack or toughen the cheese. Too much moisture can invite spoilage or undesirable growth.
This is also where rind management enters the picture. Depending on the style, the cheese may be brushed, turned, washed, or otherwise cared for during aging. Surface-ripened cheeses depend heavily on what happens on the outside, while internal ripening may dominate in other styles.
Aging is part science and part restraint. You cannot rush a cheese into becoming complex by staring at it intensely, although many people have tried. Good ripening conditions allow the cheese to gradually move from salty, rubbery fresh curd into something balanced, aromatic, and memorable.
For cheesemakers, this final step is both thrilling and humbling. You can control a great deal, but you also have to wait and let the cheese become itself. That may be the most important lesson in the whole craft.
Why These Six Steps Matter Together
The six important steps in cheesemaking are not separate boxes to check. They are connected. Better milk supports better acidification. Better acidification supports stronger coagulation. Better coagulation allows smarter curd cutting. Better curd handling improves drainage and salting. Better moisture control makes aging more successful.
That is why cheese styles can differ so dramatically while still following the same basic roadmap. The cheesemaker is not reinventing the process every time. Instead, they are adjusting a set of variables with impressive precision. Moisture, acid, temperature, time, salt, and pressure all interact to produce the final result.
So the next time you enjoy a wedge of cheddar, a spoonful of ricotta, or a round of brie, remember this: cheese is not just milk that got lucky. It is a carefully managed transformation.
Real-World Cheesemaking Experiences: What the Process Actually Feels Like
Anyone who has ever tried cheesemaking for the first time learns very quickly that recipes are neat, but real curds are moody. On paper, the steps look straightforward. Warm the milk, add the culture, add the rennet, cut the curd, drain the whey, salt, press, age. In practice, cheesemaking feels more like learning a musical instrument. You can read about it all day, but eventually you have to listen, watch, touch, and respond in real time.
One of the most common experiences beginners describe is surprise at how subtle the changes are. Milk does not suddenly announce, “I am now properly acidified.” The curd does not flash a neon sign when it is ready to cut. Instead, the cheesemaker learns to notice texture, aroma, resistance, and timing. The milk looks slightly different. The curd pulls away more cleanly. The whey turns a clearer shade. Those tiny clues become the language of the vat.
Another unforgettable lesson is how much patience matters. People often expect the dramatic moment to be the rennet addition, but the real challenge is waiting without meddling. New cheesemakers want to stir too soon, cut too early, heat too quickly, or press too aggressively. The cheese usually punishes that enthusiasm with crumbly curd, excess moisture, fat loss, or strange texture. Cheesemaking has a gentle but firm way of rewarding calm behavior.
There is also the emotional experience of realizing that mistakes are part of the craft. A wheel may come out too dry. A fresh cheese may be more tangy than expected. A rind may develop unevenly. Yet even imperfect batches teach useful lessons. Many cheesemakers remember the first time they understood, not from a book but from experience, how curd size changes moisture or how salt alters texture over the next day. That hands-on learning tends to stick.
Perhaps the best part is that cheesemaking creates a rare connection between science and satisfaction. You measure pH, temperature, and timing, but you also get to smell warm milk, hold fresh curds, and watch a living food evolve. By the time you cut into a finished cheese, you are not just tasting dairy. You are tasting every decision you made along the way. That is what keeps so many people hooked. One batch becomes two, then five, then suddenly you are discussing humidity levels with the seriousness of a cave manager.
Conclusion
The six important steps in cheesemaking form the backbone of nearly every cheese style: choose and prepare the milk, acidify with culture, coagulate with rennet, cut and cook the curd, drain and salt the curd while shaping it, and finally age the cheese with intention. Each step influences the next, and every small adjustment changes the final flavor, body, moisture, and character.
That is the beauty of cheesemaking. It is technical without being cold, traditional without being static, and precise without losing its charm. It asks for patience, but it pays back in flavor.