Table of Contents >> Show >> Hide
- Meet the Mystery Groove on Your Iron
- What the Button Groove Actually Does
- Other Hidden Features Built into Your Iron
- How to Actually Use the Groove on Your Iron
- Common Mistakes People Make with the Button Groove
- How a Good Groove Helps You Iron Faster
- Hidden Engineering: Not All Grooves Are the Same
- How to Keep That Groove Clean and Working Well
- Everyday Experiences with the Iron Groove: Real-World Wins
- Final Thoughts: Give the Groove Some Credit
If you’ve ever stared at the bottom of your clothes iron and thought, “Huh, wonder what that little trench is for,” you’re not alone. Most of us plug in the iron, mutter about wrinkles, and never question the design. But that skinny channel that runs along the edge of the soleplate? It’s not a random styling choice. It’s working harder than you are on Monday morning.
That little groove on your iron has a name it’s often called a button groove or soleplate groove and once you start using it properly, your shirts, collars, and button plackets will suddenly look a lot more like they came from the dry cleaner and a lot less like they survived a suitcase incident.
Meet the Mystery Groove on Your Iron
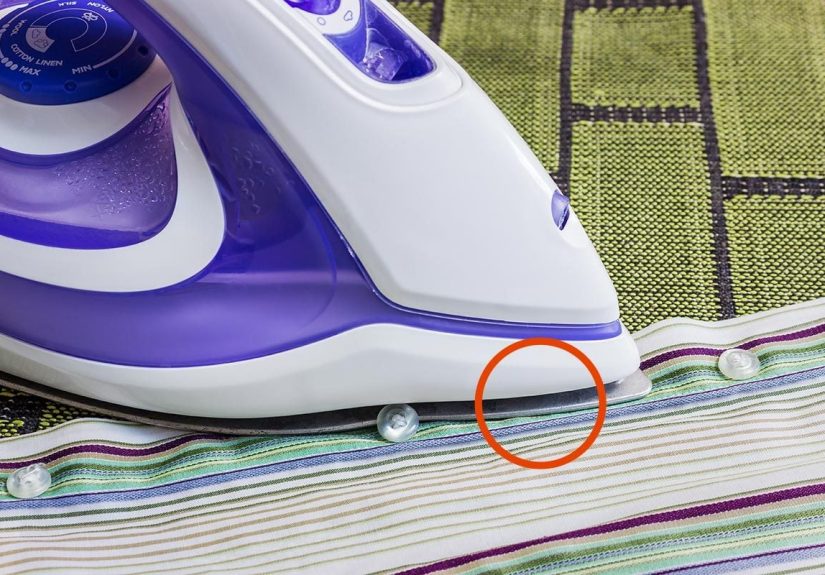
Flip your iron over and take a look at the soleplate the flat metal (or ceramic) bottom that gets hot and does the actual pressing. On many modern irons, you’ll notice a shallow groove or channel running around part or all of the perimeter. Sometimes it’s subtle, sometimes it’s clearly a little “step” in the metal.
Appliance makers and laundry experts agree: that groove is not cosmetic. It’s engineered specifically to help you deal with one of the trickiest parts of ironing buttons, seams, and tight spots. Many brands literally advertise it as a “button groove” and highlight it as a feature for ironing around garment buttons and along seams.
In other words, that little groove is the secret passageway that lets your iron slide right up to the toughest, fiddliest parts of a shirt without sacrificing your buttons in a puff of melted plastic.
What the Button Groove Actually Does
So what job is this tiny detail actually doing? More than you’d expect from a millimeter-deep channel.
1. It Protects Your Buttons from Heat Damage
When you press a dress shirt or blouse, buttons are the enemy of smooth, flat fabric. If you try to iron straight over them, you risk cracked, flattened, or even melted buttons especially plastic ones. The groove gives those buttons a safe place to sit while the rest of the soleplate glides by.
Instead of the hot metal smashing into the button, the button drops into the groove while the hot edge of the soleplate presses the fabric right up to its base. You get a crisp result around every button without that awful “I just ruined my favorite shirt” feeling.
2. It Lets You Iron Under and Around Buttons and Seams
The groove also lets the iron reach into tricky, narrow areas: the placket (the strip where the buttons are sewn), the edge of a collar, the sides of pockets, and tight seams. The raised edge on one side of the groove lifts the button or seam, while the flatter portion of the soleplate presses the fabric right next to it. That’s how you get a perfectly smooth shirt front instead of a row of micro-wrinkles between each button.
On many irons, the groove runs nearly the full length of the soleplate, so you can press button-up shirts in one long, satisfying pass instead of doing short, awkward, stop-and-go moves around each button.
3. It Helps Keep Fabric from Bunching
The groove also acts like a tiny track that guides the fabric. As you move the iron along a placket or seam, the groove helps keep the edge of the fabric aligned. That reduces bunching and twisting, which means fewer new wrinkles created while you’re busy trying to remove old ones.
Other Hidden Features Built into Your Iron
Once you realize the groove is on purpose, it’s easier to see that the rest of your iron is filled with similar “small but mighty” details. A few worth appreciating:
- Pointed or “precision” tip: Designed for slipping between buttons, pressing pleats, and reaching into corners of collars and waistbands.
- Steam vents placement: Those tiny holes aren’t random. Their patterns help distribute steam across the fabric evenly, especially toward the front where you first contact wrinkles.
- Curved or contoured soleplate: Slightly curved edges help the iron glide without dragging or catching on fabric.
- Heel rest and cord design: Built to keep the iron stable when upright and keep the cord out of your way (and away from your arm).
- U-shaped or channelled grooves for steam flow: On some steam irons, a special groove helps move steam across the plate so the entire soleplate can smooth wrinkles more efficiently.
Put all those together with the button groove, and your iron starts to look less like a boring appliance and more like a precision tool.
How to Actually Use the Groove on Your Iron
If you’ve never intentionally used the groove before, don’t worry there’s no test. But learning to use it on purpose makes ironing noticeably faster and neater. Here’s a simple approach.
Step-by-Step: Using the Button Groove on a Shirt
- Start with the placket: Lay the shirt front flat on the board with the buttons facing up.
- Line up the groove: Position the iron so that the groove on the soleplate runs directly along the line of buttons. The buttons should align with the groove.
- Press, don’t smash: Glide the iron slowly along the placket. Each button will drop into the groove as you pass, while the hot outer edge of the soleplate presses the fabric around it.
- Use short strokes for tight areas: Near the collar or bottom of the placket, use smaller strokes and gently pivot the iron so the groove still tracks along the button line.
- Flip and finish: For extra crisp results, flip the shirt so the buttons face down on a thick, padded ironing board and press again. The buttons will press into the padding while the groove and plate smooth the fabric.
You can use similar moves for cuffs, pockets with buttons, and even decorative metal snaps (just be sure your heat setting matches the fabric.
Beyond Shirts: Other Clever Uses for the Groove
- Collars: Run the groove along the stitched edge of the collar to get a sharp, tailored look without flattening the shape.
- Pants waistbands: Use the groove to track along belt loops and button closures on dress pants or chinos.
- Uniforms and workwear: Items with lots of snaps, epaulettes, or decorative buttons are much easier to press when you let the groove do the navigating.
- Kids’ clothes: Tiny shirts mean tiny button spacing. The groove helps you press those miniature plackets without burning your fingers or mangling the buttons.
Common Mistakes People Make with the Button Groove
Even a clever feature can’t save you if you fight against it. Here are some of the most common ways people misuse their iron’s groove:
Ironing Directly Over Buttons
If you ignore the groove and plow straight over buttons, you’re putting stress on the stitching and on the button itself. Over time, that can lead to loose buttons, cracks, or heat damage. Use the groove to slide around them instead of treating them like speed bumps.
Using the Wrong Angle
The groove only lines up correctly if your iron is oriented along the placket or seam. If you come in at a diagonal, the groove can’t do its job and the soleplate may push against the buttons. Rotate your iron so the groove runs parallel to the row of buttons.
Too Much Pressure, Not Enough Glide
Pressing down too hard can force the iron into the buttons instead of letting them nest into the groove. Use firm but gentle pressure and let the weight of the iron and the heat do most of the work. Think “glide and guide,” not “scrub and shove.”
Ignoring the Fabric Care Label
The groove doesn’t override fabric science. If you set your iron too hot for a synthetic shirt, you could still damage buttons, threads, or the fabric itself. Always match your heat setting (and steam setting) to the garment.
How a Good Groove Helps You Iron Faster
Manufacturers often talk about full-length button grooves or precision button grooves because they know it’s a time-saver. When that groove runs nearly the entire length of the soleplate, you can make long passes from collar to hem instead of doing multiple short strokes between buttons.
If you iron regularly especially work shirts, school uniforms, or dress clothes a well-designed button groove means:
- Fewer stops and starts.
- Less risk of catching on buttons or seams.
- More consistent, professional-looking results.
- Less frustration, fewer do-overs.
It’s a classic example of a small design detail that makes a big difference in everyday use.
Hidden Engineering: Not All Grooves Are the Same
Take a closer look at different irons and you’ll notice small variations in how the groove is shaped:
- Depth: Deeper grooves tend to cradle buttons more securely, which is handy for thicker buttons on dress shirts and coats.
- Length: A groove that runs from the pointed tip all the way to the back of the soleplate gives you more flexibility in how you approach seams and plackets.
- Placement: Some grooves hug only one side of the plate, while others trace both sides. This can change which hand position feels more natural.
- Multi-purpose channels: On some steam irons, a shaped groove helps move steam along the soleplate while also serving as a button groove.
You don’t have to become an iron engineer, but paying attention to the groove design can help you choose a model that fits how you actually iron: lots of shirts, lots of uniforms, or mostly quick touch-ups.
How to Keep That Groove Clean and Working Well
Like any part of your iron, the groove can collect gunk. Starch build-up, melted fibers, and mineral deposits can all settle into that channel and make it less effective. A dirty groove can snag fabric instead of guiding it.
Simple Groove-Cleaning Routine
- Unplug and cool: Always unplug the iron and let it cool completely before cleaning.
- Wipe the soleplate: Use a slightly damp cloth with a mild dish soap solution to remove light residue.
- Detail the groove: Dip a cotton swab or soft cloth-wrapped toothpick in the soapy water or a mix of water and white vinegar. Run it along the groove to lift out any residue.
- Tackle stubborn spots: For scorch marks, make a paste of baking soda and water, gently rub it into the groove, then wipe clean with a damp cloth.
- Dry thoroughly: Make sure the soleplate and groove are completely dry before plugging the iron back in.
A few extra seconds of maintenance keep that button groove sliding smoothly instead of acting like a tiny, sticky railroad track.
Everyday Experiences with the Iron Groove: Real-World Wins
The button groove might not be headline material, but if you ask people who iron a lot parents, uniform wearers, crafters, and anyone who loves a crisp shirt you’ll hear the same theme: once you know what the groove is for, you can’t un-know it. You start using it constantly.
A Parent vs. School Uniforms
Imagine a parent tackling a weekly lineup of school uniforms: button-up shirts, pleated skirts, and a blazer or two. Before discovering the groove, ironing those shirts meant carefully tiptoeing around each button, constantly adjusting the fabric, and re-pressing spots where the iron caught and dragged. Once they start using the groove, the job changes. The iron glides along the placket, every button neatly dropping into the groove. The parent can press the entire front of a shirt in just a few passes. The buttons stay intact, the placket is sharp, and they’ve shaved precious minutes off the Sunday-night prep routine.
The Office Worker with Last-Minute Wrinkles
Picture someone pulling a shirt out of the closet at 7:32 a.m. and realizing the front is creased. There’s no time for a full “launder and press,” so out comes the iron. Instead of wrestling with each button, they align the groove with the button row and run a quick pass from collar to hem. The buttons settle into the groove, the fabric smooths out instantly, and the shirt suddenly looks meeting-ready. In under two minutes, the crisis is averted and the coffee can finally be reheated in peace.
The Craft and Quilting Enthusiast
Even outside of office wear, the groove has fans. Crafters and quilters often work with narrow seams, buttoned pillow covers, and decorative plackets. Using the groove lets them press right up to bulky buttons or thick seam intersections without distorting the fabric. On projects like buttoned cushion covers or handmade shirts, the groove becomes a precision tool: it stabilizes the buttons while the soleplate flattens the fabric around them, giving those DIY projects a polished, professional finish.
The “I Thought It Was Just a Design Detail” Crowd
Then there are the people who stumble onto the groove’s purpose by accident usually through a tip online or a conversation with a laundry pro. Once they try it, it feels like unlocking a cheat code. They go back through their closet, experimenting on shirts, dresses, and jackets, often surprised that a feature they ignored for years turns out to be the reason their new iron suddenly feels “better” than their old one.
Many of these new converts report the same benefits:
- They iron faster because they make longer passes and fewer micro-adjustments.
- They ruin fewer buttons and see less frayed stitching along plackets.
- The front of their shirts looks smoother and more even no random creases between buttons.
- They’re less tempted to “just wear it wrinkled,” because ironing doesn’t feel like such a chore.
Small Feature, Big Payoff
The best part of all these experiences is that you don’t have to buy a complicated gadget or learn some elaborate hack. The groove is already there, built directly into your iron. All you have to do is aim it where your buttons and seams are and let it do its job. It’s a simple change in how you hold and move the iron but it can transform the quality of your ironing and the amount of time you spend doing it.
Final Thoughts: Give the Groove Some Credit
Most of us think of ironing as the very definition of low-tech, but your iron’s design is more thoughtful than it looks at first glance. That little groove around the edge of the soleplate is a quiet overachiever: it protects your buttons, helps your iron glide along seams and tight spots, and makes it easier to get crisp, professional-looking results in less time.
Next time you’re standing at the ironing board, don’t ignore the small details. Line up that groove with your buttons, let it guide you along seams and collars, and enjoy the feeling of your iron working smarter instead of harder. For something so tiny, that little groove really does have a big job.