Table of Contents >> Show >> Hide
- The “Disassembly Report” That Made Us Respect Every Screw
- Gas Grill Anatomy: The 5 Systems Hiding in Plain Sight
- What the 415 Parts Teach You (That the Owner’s Manual Won’t)
- A Practical “Parts Map”: What Usually Fails First (and Why)
- How to Grill Better Using What You Now Know
- If You Want to Do Your Own Teardown (Without Losing Your Mind)
- Conclusion: The 415-Part Punchline
- Experience Notes: What a 415-Part Grill Teardown Feels Like (and What You Learn Along the Way)
A gas grill looks like the simplest machine on your patio: twist knob, click-click, flame, hero music. Then you take one apart and realize it’s less “simple machine” and more “metal onion” with layers of brackets, fasteners, tubes, shields, and little pieces whose entire job is to keep one other little piece from becoming a tiny, spicy lawsuit.
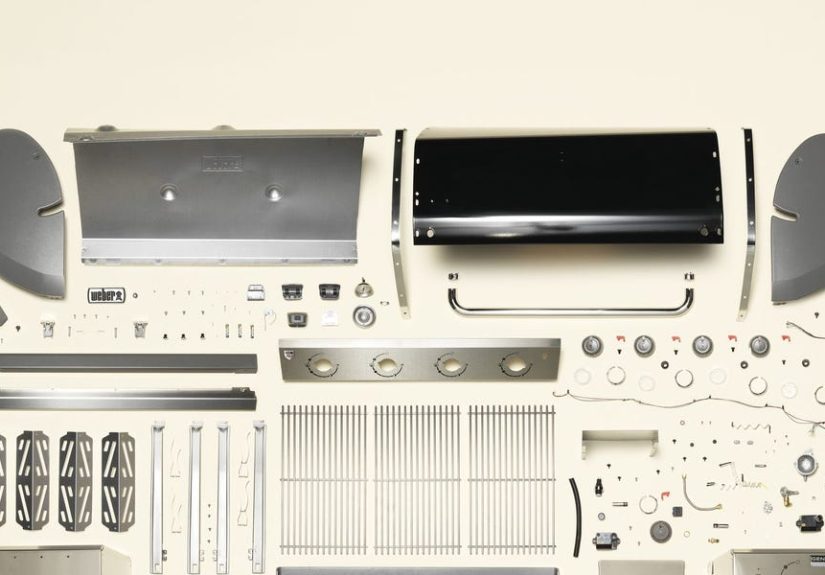
In one famously meticulous teardown, a single premium gas grill was separated into 415 individual parts in just under four hoursa number that feels impossible until you see how many screws it takes to keep a lid aligned, a firebox sealed, and a grease system pointed away from your shins.[1]
The “Disassembly Report” That Made Us Respect Every Screw
Here’s the headline data from that teardownbecause every good story needs a scoreboard:
- Number of parts: 415[1]
- Time to disassemble: 3 hours, 52 minutes[1]
- Model: Weber Genesis II LX E-440[1]
- Produced: Palatine, Illinois[1]
That’s not “a grill.” That’s an outdoor cooking system with a support group. And the real takeaway isn’t just the number 415it’s what those parts reveal about how gas grills actually work, why they fail, and how to keep yours from turning into a flare-up factory.
Gas Grill Anatomy: The 5 Systems Hiding in Plain Sight
When you zoom out, most gas grillsfancy or basicare built around the same core systems. The 415 parts simply prove that each system is made of many tiny “please don’t rattle” decisions.
1) Fuel Delivery: From Liquid Propane to a Controlled Blue Flame
Propane in a standard 20-pound cylinder is stored as a liquid under pressure. When you open the tank valve, propane flows through the regulator and hose, pressure drops, and the fuel becomes a gas that can be metered and burned.[1]
The math behind why a “small” tank lasts so long is surprisingly satisfying: a 20-pound propane cylinder holds roughly 430,000 BTUs of energy.[6] How long that lasts depends on your grill’s BTU rating and how hard you run it, but real-world rules of thumb commonly land in the roughly 18–20 hour range for typical grilling patterns (less on full blast, more at moderate heat).[7]
Inside the grill, the gas path typically looks like this:
- Tank → regulator → hose (pressure control and delivery)[1]
- Manifold (a shared “gas highway” feeding multiple burners)[1]
- Valves + knobs (precise flow control per burner)[4]
- Venturi tubes (mix gas with air for clean combustion)[3]
- Burner tubes with ports (where gas-air mixture exits and burns)[1]
That venturi step matters. Burners need oxygen. Venturi tubes help pull in air and blend it with fuel so you get a stable flame instead of a lazy, yellow “candlestick of regret.”[3]
2) Ignition: The Little Click That Starts a Summer
Modern grills usually ignite via a spark systemsometimes piezo, sometimes battery-powered. The result is the same: a controlled spark at the burner ignites the gas when you turn the knob and trigger the igniter.[1] When ignition gets finicky, it’s often not the “whole grill” failing. It’s one small component: a worn electrode, a corroded wire, a dead battery, or a dirty burner port.
3) Heat Management: How a Grill Turns Flames into Even Cooking
Flames alone don’t make a great grill. Great grilling is about managing heatdirect heat for searing, indirect heat for thicker cuts, and consistent temperatures so food cooks predictably.
In the 415-part teardown, the cooking surface sat above a set of heat-taming components that do two big jobs: distribute heat more evenly and protect burners from drippings.[1]
On many Weber gas grills, that role is played by Flavorizer® bars: V-shaped metal bars positioned above the burners. Their function is delightfully practical: they help disperse heat, protect burners, reduce flare-ups, and catch/vaporize drippings to boost “grilled flavor.”[2]
Beneath that, many grills use additional heat deflectors or “radiants” to even out temperature and help keep lower areas cooler.[1] These parts are not glamorous, but they’re a big reason one side of your grill doesn’t cook like the surface of the sun while the other side cooks like a suspiciously warm plate.
4) Grease Management: The System That Quietly Prevents Disaster
If you want to understand why grills have so many parts, follow the grease.
As food cooks, grease drips through the grates. Some of it hits those heat-distribution parts, where it can vaporize (flavor), while the rest is routed away into a tray and a disposable drip pan.[1] This isn’t just about cleanlinessit’s about keeping pooled grease from overheating.
The U.S. Consumer Product Safety Commission (CPSC) emphasizes how real the risks can be: grills should be used outdoors, kept away from structures, and maintained to prevent leaks and fires.[5] Grease buildup is one of the classic “it was fine until it wasn’t” situations.
5) Structure & Hardware: The Fastener Multiverse
The part count explodes because a grill is basically a small appliance living outdoors. It needs a sturdy frame, wheels, doors (sometimes), a cabinet, shelves, and a lid that opens and closes cleanly for years. Every moving or load-bearing connection becomes a bracket, a bushing, a washer, a spacer, a screw, and a nut that’s somehow both “standard” and “impossible to find at 9:07 p.m. on a Saturday.”
When a teardown yields 415 parts, a huge chunk of that number is hardware: fasteners, clips, pins, and small structural pieces that keep the grill rigid and aligned.[1] It’s not overengineering. It’s engineering that assumes your grill will be bumped, wheeled around, baked, rained on, and occasionally used as an emotional support table at parties.
What the 415 Parts Teach You (That the Owner’s Manual Won’t)
Lesson #1: “Uneven Heat” Is Usually a Maintenance Problem, Not a Personality Trait
When grills heat unevenly, the culprit is often a partially clogged burner, a blocked venturi, or grease and debris interfering with airflow and combustion.[3] The CPSC specifically recommends checking the venturi tube at least annually for blockage by insects, spiders, or food drippings and clearing it if needed.[5]
Translation: sometimes your grill isn’t “getting old.” Sometimes your grill has been quietly hosting a spider condo in a key airflow component.
Lesson #2: Your Grill Has Multiple “Safety Systems,” Even If It Never Brags About Them
Safety on a gas grill is less about one magic feature and more about a chain of “do the boring thing correctly” steps. The CPSC advises checking hoses for cracks and leaks, keeping hoses away from hot surfaces, and performing leak checksespecially after reconnecting a propane cylinder.[5]
A simple leak test is famously low-tech: open the gas supply and apply a soapy solution to connection points; bubbles can indicate a leak.[5] It’s the rare moment in adult life where “just add soap” is actually expert advice.
Another safety detail that’s easy to forget until you need it: if the flame goes out, shut off the gas, open the lid, and wait several minutes for gas to dissipate before restarting.[5] This is why grills have lids, vents, and proceduresbecause propane is not impressed by optimism.
Lesson #3: Flavor Is a Mechanical Process, Not a Mystery
People love debating charcoal versus gas like it’s a philosophical question. But the gas-grill side has its own flavor engineering. Catching drippings and vaporizing them back into the cooking area is a deliberate design choiceone that components like Flavorizer bars are built to do.[2]
It won’t recreate the exact smoke profile of charcoal, but it absolutely creates a distinct grilled characterand it does it with repeatability. That’s why gas grills are so good at weeknight cooking: predictable heat, quick startups, and consistent results.
A Practical “Parts Map”: What Usually Fails First (and Why)
Here’s a reality-based guide to the parts that most often cause headachesplus what the failure tends to look like.
Burners
Burners take heat, moisture, drippings, and corrosion. Even high-quality materials eventually wear. If you see weak flame, uneven flame patterns, or sections that won’t light, burners and burner ports are worth inspecting and cleaning.[3]
Ignition Components
When you hear endless clicking but no ignition, the issue is often an electrode gap, grime, wire corrosion, or a dead battery (if your system uses one). These are usually small fixesnot “buy a new grill” problems.
Heat Distribution Parts (Flavorizer Bars / Heat Deflectors / Radiants)
These pieces live in the splash zone. They catch drippings, take heat, and can corrode. When they degrade, you may see more flare-ups and less even cooking. On Weber-style setups, the bars specifically help protect burners and reduce flare-ups while dispersing heat.[2]
Grease Tray & Drip Pan System
This is where “maintenance” stops being optional. Grease systems are designed to route drippings away from heat. If the tray is overfilled, you’re effectively storing fuel directly under a heat source. Keep it clean, keep it moving, keep it boring.
Hose, Regulator, and Connections
The CPSC advises checking hoses for cracking and brittleness and performing leak tests at connections using a soapy solution.[5] If you smell gas, treat it like a real problembecause it is.
How to Grill Better Using What You Now Know
Create Heat Zones Like a Person Who’s Seen the Inside of a Grill
“Two-zone cooking” is basically using one area for direct heat and one for indirect. It’s especially useful for thicker cuts, chicken pieces, or anything that benefits from finishing gently after searing. A multi-burner gas grill makes this easy: you can run one burner high and another low (or off), then use the lid as your heat-trapping friend.[1]
Preheat Like You Mean It
Plenty of grilling guides recommend preheating long enough to get the grates properly hot for searing and easier releasethen adjusting burners based on what you’re cooking. Some beginner guides emphasize giving the grill ample preheat time before cooking so temperatures stabilize and you’re not chasing heat mid-meal.[10]
Cook Safely, Not Just Deliciously
If you’re cooking burgers, poultry, or other proteins for a crowd, “looks done” isn’t a food-safety plan. USDA food safety guidance includes safe minimum internal temperatures like 160°F for ground meats and 165°F for poultrymeasured with a food thermometer.[8]
And the safety story isn’t only about temperature. USDA grilling guidance also stresses basics like keeping cold foods cold until they’re ready to cook and avoiding cross-contamination during prep.[9] (Your cutting board does not care that it’s “just a little chicken juice.”)
If You Want to Do Your Own Teardown (Without Losing Your Mind)
You don’t have to dismantle a grill into hundreds of parts to benefit from teardown thinkingbut if you’re repairing, deep-cleaning, or refurbishing, here’s a method that works.
Tools That Save Your Sanity
- Magnetic trays (because screws teleport)
- Painter’s tape + marker (label everything)
- Zip-top bags (group fasteners by subsystem)
- Phone camera (your future self will send thank-you texts)
- Brushes/pipe cleaners for burner/venturi cleaning (as recommended for clearing blockages)[5]
The “Subsystem” Order
- Start with cooking surfaces: grates, warming rack, heat bars/deflectors.
- Move to grease management: scrape, remove tray, replace drip pan.
- Inspect burners and venturi: look for clogs, spider webs, corrosion.[5]
- Check gas path connections: hose/regulator fittings and leak test if you disconnected anything.[5]
- Finish with cosmetics: shelves, doors, knobsbecause it’s easier when the “hot stuff” is already handled.
If that sounds like a lot, remember: you’re not doing it for sport. You’re doing it so your grill works like it did on day onewithout mysterious flare-ups, uneven heat, or that one burner that refuses to participate.
Conclusion: The 415-Part Punchline
The joke is that a gas grill feels simpleuntil you take it apart and discover it’s a small outdoor appliance designed to produce controlled fire while managing grease, airflow, corrosion, stability, and user behavior. The punchline is that the complexity is the point.
Once you understand the hidden systemsfuel delivery, ignition, heat management, grease routing, and structureyou stop treating your grill like a magic box and start treating it like what it is: a well-designed machine that rewards basic care with years of better meals.
Experience Notes: What a 415-Part Grill Teardown Feels Like (and What You Learn Along the Way)
If you’ve never tried taking a gas grill apart beyond “remove grates, scrape, pretend it’s fine,” a full teardown is a weirdly emotional experience. Not because it’s dangerous (if you shut off fuel, disconnect properly, and follow safety guidance), but because it reveals how many tiny choices stand between you and a burger that tastes like summer.
The first phase feels like confidence: lid up, grates out, heat bars lifted like you’re unveiling a secret stage. You’ll think, “Okay, I get it. This is manageable.” Then you hit the hardware layer and discover that grills breed fasteners the way rabbits breed rabbits. There are screws that hold shelves, screws that hold brackets that hold shelves, and screws whose only job appears to be “exist at a slight angle so you question your life decisions.”
The sensory part is oddly memorable. You learn the difference between “seasoned grill aroma” and “old grease that has achieved sentience.” You find carbonized flakes that look like they came from a tiny volcano. You also notice how heat and grease travel: the parts directly above burners tend to be stained and baked on, while the grease tray area tells a story about whether maintenance happened monthly, annually, or never.
The most surprising lesson is how often the “big problem” is caused by a small, cheap thing. Ignition trouble? Could be a dirty electrode. Uneven heat? Often a clogged burner port or blocked venturi. That’s why safety and maintenance recommendations focus on simple checks: look for hose wear, check for leaks with soapy solution, clear venturi blockages, and keep children away from the hot exterior.[5] None of that is glamorous, but it’s what keeps a grill working like a grill instead of like a campfire with mood swings.
Organization becomes your superpower. The smartest teardown move isn’t a fancy toolit’s labeling. You start grouping fasteners by “left shelf,” “burner bracket,” “cabinet support,” and “mystery screw from another dimension.” Without labels, reassembly becomes an interpretive dance. With labels, it becomes a puzzle you can actually finish.
You also gain respect for the heat-management parts. Flavorizer bars (or similar heat tents/radiants) stop being “those metal triangles” and become the reason your grill doesn’t flare up every time you cook thighs. They’re designed to disperse heat, protect burners, reduce flare-ups, and vaporize drippings for flavor.[2] In teardown mode, you can see the engineering logic: shape, angle, spacingall of it nudges heat and grease to behave.
The final phase of a teardown is the best kind of satisfaction: the kind you can taste later. When you reassemble (or even just clean and refresh key parts), preheating feels faster, flames look more even, and hot spots become less dramatic. You’ll grill with more intention: set up heat zones, let the grill come up to temperature, and cook to safe internal temps with a thermometer instead of vibes.[8]
And yes, after staring at hundreds of parts, you may look at your grill and think: “You know what? You’re not just a box of fire. You’re a carefully organized conspiracy against raw chicken.” Which is, frankly, the healthiest relationship you can have with propane.