Table of Contents >> Show >> Hide
- What “Wild Herbs In Black” Actually Is
- Why Black Clay Makes Herbs Look So Dramatic
- The Core Techniques Behind Botanical Black Clay Tiles
- Foraging Wild Herbs for Art (Without Becoming the Villain)
- The 5 Pics: Herbs That Look Incredible on Black Clay
- Surface Finishes: The Secret Sauce (Also Known as “The Wash”)
- Care and Display: Keeping Your Herbs “Wild” but Your Walls Safe
- Common Mistakes (So You Don’t Learn Them the Hard Way)
- Experience Section: My (Totally Realistic) Weekend Making Wild Herbs in Black
- Conclusion
Every so often, the internet hands us a creative idea that makes you stop mid-scroll and say, “Wait… why is this so beautiful?” Wild Herbs In Black is one of those moments: delicate plant forms, pressed and preserved as if nature decided to dress up in its most dramatic outfit and attend a fancy, slightly haunted gallery opening.
The concept is simple (and secretly genius): take wild herbs, capture their texture and pattern, and set them against black clay so the shapes pop like botanical X-rays. The result feels equal parts science museum, gothic wallpaper, and “I definitely have my life together” home décoreven if you made it while wearing sweatpants and sipping cold coffee.
What “Wild Herbs In Black” Actually Is
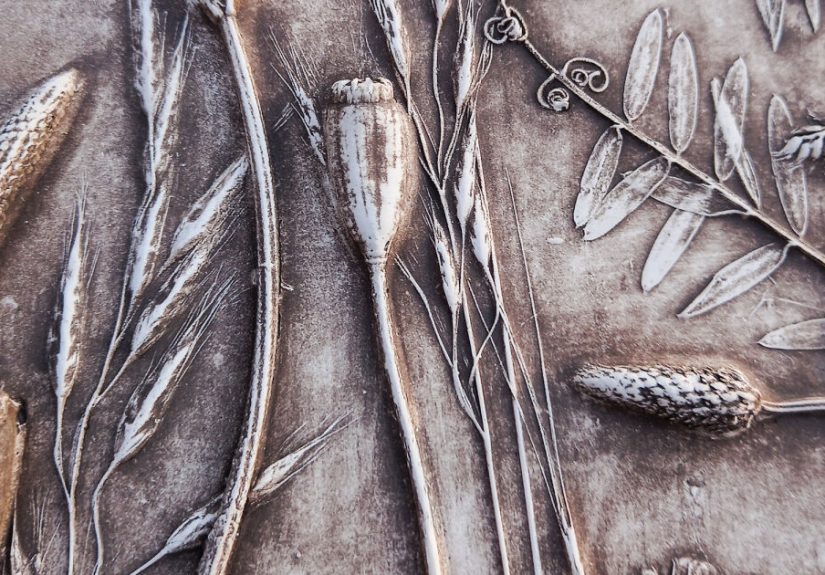
The original “Wild Herbs In Black (5 Pics)” that inspired this title was shared as a small set of images showing botanical impressions on a black clay tilewild herbs rendered as crisp, subtle relief, like an old plaster wall that nature quietly signed. The maker described working with different clays, but said black clay is “special” because it emphasizes the plant pattern and produces a striking, graphic look. In other words: black clay is the best wingman your herbs will ever have.
From a technique standpoint, this style lives at the intersection of ceramic texture work (pressing plants into clay, using molds, or casting) and botanical composition (choosing stems, leaves, and seed heads that read clearly). It’s not just “press leaf, done.” The magic comes from decisions: which plants, what orientation, how deep the press, how much negative space, and how the surface is toned or washed to make details legible.
Why Black Clay Makes Herbs Look So Dramatic
Black backgrounds do what they always do: they make everything look more intentional. (That’s why restaurants put fries in little black cups now. Suddenly it’s “artisanal,” not “I’m hungry.”) On black clay, the ribs of a leaf, the lace of a flower umbel, and the tiny hairs on a stem become the star of the show.
In ceramics, “black clay” can mean a clay body that fires dark due to its materials and colorants. For example, some commercially available clay bodies get their dark color from a combination of manganese and iron and can fire nearly black in oxidation. The practical takeaway is that the final look depends on your clay body, your firing, and your surface treatmentso yes, it can feel delightfully unpredictable, like baking, but with more kiln shelves.
The “gothic” effect isn’t just the color
Black clay also hides minor handling marks and visually compresses the surface, which can make fine botanical textures read more crisply. Add a light wash, a contrasting slip, or a gentle rub-back on high points and you get that “old plaster wall” vibe: soft, aged, and rich with detail without screaming for attention.
The Core Techniques Behind Botanical Black Clay Tiles
There are a few common ways artists create botanical tiles like this. You don’t need to do all of thempick the approach that fits your tools, patience level, and willingness to clean plaster dust off your socks.
1) Direct press into a clay slab
- Roll a slab (even thickness matters more than your pride).
- Arrange herbs like you’re styling a tiny botanical photoshoot.
- Press evenly using a brayer, rib, or flat boardfirm but not “I’m making a fossil.”
- Lift plants carefully so the texture stays crisp.
- Refine edges and let the tile dry slowly to reduce warping.
2) Make a texture mold first, then cast impressions
A popular strategy is to press flowers and herbs into clay to create a bisque-fired texture mold. This can capture fine detail that’s difficult with plaster molds (especially for delicate plant material). A bonus: once you have a mold, you can repeat the pattern with variations, which is great if you’re making a set for a wall installation or you simply enjoy the idea of becoming the CEO of Leaf Impressions.
One practical tip from ceramic educators: wildflowers and herbs can wilt quickly, so some artists transport cut flowers in cold water (even ice water) to keep them fresh until they’re pressed. Fresh plant material often yields better texture because it’s less brittle and can be positioned more cleanly.
3) Slip casting and plaster/gypsum molds
If your workflow involves casting, gypsum (plaster) molds matter because they absorb water. When liquid clay (slip) contacts a plaster mold, the mold draws water out and a clay layer builds against the surface. This basic “plaster absorbs water” principle is why casting is even possibleand why mold condition, dryness, and cleanup all affect final surface quality.
Foraging Wild Herbs for Art (Without Becoming the Villain)
The “wild” part sounds romantic until you remember: nature has rules. Sometimes they’re legal rules. Sometimes they’re “don’t yank up rare plants because you saw a cool tile on the internet” rules. Ideally, you follow both.
Know where you’re allowed to gather
- National parks: In general, gathering/removing plants or plant parts is prohibited unless specifically authorized (for example, certain traditional gathering frameworks for federally recognized tribes). For most visitors, assume “don’t collect.”
- National forests: Some “casual collecting” may be allowed without a permit in certain places when consistent with local rules and land management plans. The keyword is consistentalways check the specific forest’s guidance.
- City parks, preserves, private land: Rules vary wildly. If it’s not yours, don’t assume it’s yours. Ask first.
Ethical harvesting keeps your art from becoming a crime documentary
The best botanical tiles come from plants that are abundant and already dropping leaves/seed heads, or from clippings you can gather without damaging the plant. For art purposes, you usually need only a few stemsnot a whole armload like you’re opening a medieval apothecary.
Safety: “herb” doesn’t automatically mean “harmless”
If you’re collecting for art, you’re handling plantssometimes plants with irritating sap, toxic berries, or look-alikes that can cause serious harm if misidentified. Poison-control experts routinely emphasize that you should only eat wild plants if you’re 100% sure of identification. Even if you’re not eating them, that same caution mindset is useful: wear gloves, wash hands, and keep unknown plants away from kids and pets.
The 5 Pics: Herbs That Look Incredible on Black Clay
Below are five “picture prompts” you can use as a mini gallery. These aren’t meant to be a strict recipethink of them as design studies. The key is contrast: choose plants with crisp edges, interesting veins, or tiny repeating textures that read well in relief.


Surface Finishes: The Secret Sauce (Also Known as “The Wash”)
If you want that aged-plaster, softly gothic look, surface finishing matters as much as the imprint. A light contrasting wash can settle into recessed details and then be wiped back from high points, making the plant pattern readable without looking like a high-contrast comic book.
Artists often experiment with slips, underglazes, oxides, or tinted clay “toning” to get exactly the mood they want. The catch is that ceramics involves variablesclay body, bisque temperature, glaze chemistry, and firing atmosphereso testing is not optional if you care about predictable results. (If you don’t care about predictable results, welcome. You’re among friends.)
Care and Display: Keeping Your Herbs “Wild” but Your Walls Safe
Botanical tiles look great as standalone wall art, a set of three in a vertical stack, or a grid that feels like a museum specimen drawer. If the tile is unglazed, it will read more matte and stone-like; if glazed, you can amplify contrast but you’ll also change the vibe from “ancient wall fragment” to “fancy backsplash energy.”
For hanging: use a secure mounting method rated for the tile’s weight and consider felt pads or spacers so it sits cleanly off the wall. If you’re displaying multiple tiles, keep spacing consistentnothing ruins goth elegance like crooked math.
Common Mistakes (So You Don’t Learn Them the Hard Way)
- Over-pressing: Smashes detail and makes everything look like a pancake fossil.
- Using wilted plants: They tear, curl, and refuse to behave (relatable, but unhelpful).
- Drying too fast: Tiles warp. Slow drying is boring but effective.
- Collecting the wrong plants: Legal issues, ethical issues, or “that plant was itchy” issues.
- No test tiles: If you change a clay body or wash, test first. Always.
Experience Section: My (Totally Realistic) Weekend Making Wild Herbs in Black
I started the project the way all great projects begin: by convincing myself it would be “quick.” Just a simple botanical tile. A little black clay. A few wild herbs. Thirty minutes, tops. (This is the same delusion that powers people who say they’ll “just organize one drawer.”)
First, I took a walk to find plants with interesting texture. Not “big and leafy,” but characterthings with veins, serrations, tiny flower clusters, and stems that make clean lines. I also tried to be respectful: I picked from abundant patches, took only what I needed, and avoided anything that looked protected, rare, or suspiciously like it might ruin my day with a rash. The funny part about foraging for art is that you suddenly notice how incredibly designed plants already are. You’re not improving them. You’re just trying not to mess them up.
Back home, I laid everything out like a tiny botanical crime scene on my table. Mint leaves? Great veins. Yarrow? Delicate and feathery. A random stem with little seed heads? Unexpectedly perfect. Then came the black clay, which immediately made everything look more seriouslike my kitchen had been upgraded to an art studio with a strict dress code.
The pressing phase was surprisingly emotional. Too light, and you lose the detail. Too hard, and you crush the plant into a sad smear. I learned quickly that a flat board helps distribute pressure and keeps the imprint crisp. I also learned that plants have opinions. Some lie down obediently. Others curl up like they’re auditioning for a role as “Leaf #3” in a ballet.
My favorite moment was lifting the plants off the slab and seeing the imprint for the first time. It’s that instant reward: suddenly the tile looks like something you might find in an old buildingexcept it’s your building, and the “old plaster wall” effect is happening right next to your sink.
Then came the cleanup and finishing, also known as “the phase where you realize ceramics is a sport.” I tested a light wash on a corner and wiped it back. The raised edges caught the light; the recessed veins stayed darker. It was subtle, not loud, and it made the pattern feel deeperlike the tile had a history. I did a second test with a heavier wash, immediately regretted it, and went back to subtle. The tile taught me something annoying but true: restraint often looks better.
By the end, I had a handful of tiles that looked cohesive but not identical. That’s the charm: each imprint is a collaboration between plant structure, your hands, and the unpredictable quirks of clay. I also had black clay under my fingernails and a new respect for anyone who casually says, “Oh yeah, I make botanical bas-relief tiles.” That’s not a hobby. That’s a personality.
Would I do it again? Absolutely. Because once you see wild herbs held in blackgraphic, delicate, and strangely timelessyou start noticing the world in textures. Leaves become patterns. Stems become linework. And suddenly your next walk feels like a design hunt, not just a walk. Which is a very fancy way of saying: nature is still the best artist in the room.
Conclusion
Wild Herbs In Black works because it uses contrast to spotlight what’s already extraordinary: the engineering of a leaf vein, the lace of a flower head, the geometry of a stem. Whether you’re admiring someone else’s work or making your own black clay tiles, the idea is the sameslow down, choose thoughtfully, and let the plants do what they do best: show off.