Table of Contents >> Show >> Hide
- What Is 18" Wide Cane Webbing?
- Why 18" Cane Webbing Is So Popular
- Common Types of 18" Wide Cane Webbing
- Best Uses for 18" Wide Cane Webbing
- How to Choose the Right 18" Wide Cane Webbing
- How to Install 18" Wide Cane Webbing
- Common Mistakes to Avoid
- How to Care for 18" Cane Webbing
- Is 18" Wide Cane Webbing Good for Beginners?
- Buying Tips for 18" Cane Webbing
- Design Ideas Using 18" Wide Cane Webbing
- Real-World Experience: What Working With 18" Wide Cane Webbing Teaches You
- Conclusion
Some materials walk into a room quietly and still manage to steal the show. 18" wide cane webbing is one of them. It is airy but strong, vintage but current, simple but surprisingly stylishbasically the interior design equivalent of linen pants that somehow look elegant at brunch and practical at the hardware store.
Whether you are repairing a chair seat, building cabinet doors, upgrading an IKEA-style sideboard, refreshing a radiator cover, or adding texture to a headboard, 18-inch cane webbing is a favorite size for DIYers because it is wide enough for many small-to-medium furniture panels but still easy to handle. It usually comes in rolls or sheets made from natural rattan cane, often in open mesh, radio weave, square weave, herringbone, or close-weave patterns.
This guide explains what 18" cane webbing is, where it works best, how to choose the right type, how to install it, how to care for it, and what real-world lessons can save you from the classic DIY moment of staring at a wrinkled panel while whispering, “Well, that looked easier online.”
What Is 18" Wide Cane Webbing?
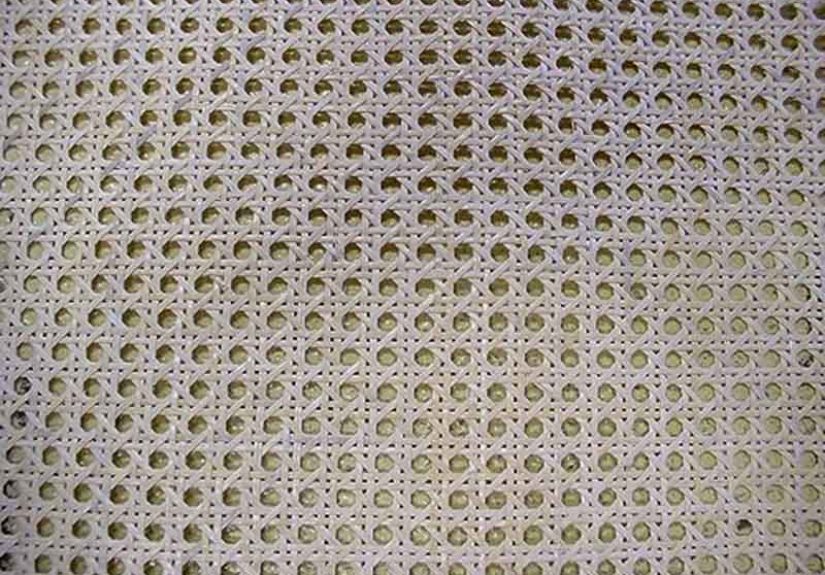
Cane webbing is a pre-woven sheet material traditionally made from the outer skin of rattan. Rattan is a climbing palm known for its flexibility, strength, and natural warmth. Once processed into thin strips, it can be woven into decorative and functional panels used in furniture, cabinetry, lighting, baskets, screens, and architectural accents.
The “18" wide” part refers to the width of the webbing roll or sheet. In practical terms, that means the material measures about 18 inches from side to side, while the length may vary depending on the supplier. Some rolls are sold by the linear foot, while others come pre-cut in lengths such as 2 feet, 3.28 feet, 5 feet, 7 feet, or longer.
This width is especially useful because many furniture panels, cabinet inserts, and chair backs fall within the 12-to-18-inch range. You can trim the webbing down for smaller projects, but you cannot magically stretch a too-narrow roll widerunless your toolbox includes wizardry, which most local hardware stores still refuse to stock.
Why 18" Cane Webbing Is So Popular
There are wider cane webbing options, including 24", 36", and even larger rolls. There are also narrower sizes for small craft projects. But 18" wide cane webbing hits a sweet spot for several reasons.
It Fits Many Furniture Projects
An 18-inch width is ideal for cabinet door inserts, nightstand panels, drawer fronts, small bench backs, chair repairs, decorative trays, wall panels, and lampshades. It provides enough surface coverage without requiring a huge roll that becomes awkward to soak, flatten, cut, or store.
It Is Easy to Cut and Customize
Most natural cane webbing can be trimmed with sharp scissors or a utility knife. For neat results, measure carefully and cut slightly larger than the opening. In many installation projects, especially chair seats and cabinet frames with grooves, leaving extra material around the edge helps you press the cane into place securely.
It Adds Texture Without Visual Clutter
Cane webbing has a breezy, woven pattern that makes furniture feel lighter. Solid wood doors can sometimes look heavy, especially on dark cabinets or bulky storage pieces. Replacing a center panel with cane webbing introduces shadow, texture, and airflow. Translation: your cabinet suddenly looks like it has a vacation home in Palm Springs.
It Works With Many Design Styles
Natural cane webbing is often associated with mid-century modern furniture, coastal interiors, bohemian rooms, Japandi design, farmhouse updates, and vintage restoration. However, it also works beautifully in contemporary spaces when paired with clean lines, matte black hardware, warm oak, painted cabinetry, or simple neutral fabrics.
Common Types of 18" Wide Cane Webbing
Not all cane webbing looks the same. Before buying, compare the weave pattern, color, strand thickness, and material type.
Open Mesh Cane Webbing
Open mesh is the classic cane pattern most people picture first. It has a repeating octagonal or open-hole design and is commonly used for chair seats, chair backs, cabinet doors, and decorative panels. It allows airflow and light to pass through, making it useful for radiator covers, media cabinets, and storage doors where ventilation matters.
Radio Weave Cane Webbing
Radio weave has a tighter, more geometric look. It is often chosen for furniture panels and decorative doors because it feels refined and slightly more modern. If open mesh is breezy and casual, radio weave is the one wearing loafers and pretending it did not spend 45 minutes choosing them.
Close-Weave Cane Webbing
Close-weave styles have less open space and more coverage. They are good when you want texture but prefer to hide what is behind the panel. For example, a close weave may be better for cabinet doors where you do not want every stored item visible.
Herringbone and Specialty Weaves
Herringbone, twill, Danish-style, and decorative patterns can add a more custom look. These are often chosen for statement furniture pieces, high-end restorations, or design-forward projects where the cane pattern itself becomes part of the visual personality.
Best Uses for 18" Wide Cane Webbing
One reason cane webbing remains so popular is that it can make ordinary furniture look custom without requiring advanced carpentry. Here are some of the best ways to use it.
Cabinet Door Inserts
Cane webbing is excellent for replacing wood, glass, or hardboard panels in cabinet doors. It works well on media consoles, entryway cabinets, pantry doors, linen cabinets, and built-ins. The woven surface softens hard lines and helps furniture look more handcrafted.
Chair Seat and Back Repair
Many vintage chairs use pressed cane webbing secured into a groove with reed spline. If the old cane is broken, sagging, or brittle, an 18-inch sheet may be enough for smaller chairs. Always measure the opening first, then add extra material for trimming and installation.
Drawer Fronts and Nightstands
Adding cane webbing to drawer fronts gives a plain piece more texture. This is especially popular in bedroom furniture makeovers. A simple nightstand can go from “college apartment leftover” to “boutique hotel side table” with paint, new hardware, and cane panels.
Headboards and Wall Panels
For a soft, natural look, cane webbing can be used inside a wood frame to create a headboard or decorative wall feature. Because 18 inches is not extremely wide, multiple strips may be needed for larger projects. Aligning the weave carefully is key so the seams look intentional rather than accidental.
Radiator Covers and Ventilated Panels
Open cane webbing allows airflow, which makes it useful for decorative radiator covers or vented cabinet fronts. Always use heat-safe construction methods and avoid placing natural cane too close to excessive heat or moisture.
How to Choose the Right 18" Wide Cane Webbing
Before ordering, check more than just the width. A beautiful roll can still be wrong for your project if the weave, length, or installation method does not match your frame.
Measure the Opening Carefully
Measure the height and width of the area you want to cover. For panels that fit into a groove, add extra cane around the edges. For surface-mounted panels, allow enough overlap for staples, glue, trim, or molding. Measure twice, order once, and avoid the special heartbreak of being half an inch short.
Check the Weave Scale
A large open weave looks dramatic but may not suit tiny drawer fronts. A fine weave can look elegant on small pieces but may feel too busy across a large panel. Match the pattern scale to the furniture size.
Choose Natural or Bleached Cane
Natural cane usually has warm golden tones, while bleached cane is lighter and more uniform. Natural color variations are normal and part of the charm. If you need an exact match for a vintage chair, ordering a sample is smart.
Buy Extra Material
Always order more than the exact measurement. Cane can crack if cut too close to the edge, and mistakes happen. A little extra gives you room for pattern alignment, trimming, and the occasional “oops” that every DIY project politely pretends not to have.
How to Install 18" Wide Cane Webbing
Installation depends on the project. A chair seat with a routed groove uses a different method than a cabinet door where the cane is stapled or glued behind a frame. Still, the basic process follows a familiar rhythm: measure, cut, soak, position, secure, dry, and trim.
Tools and Materials You May Need
- 18" wide cane webbing
- Measuring tape
- Sharp scissors or utility knife
- Warm water and a tub or tray
- Reed spline for grooved frames
- Caning wedges or a blunt tool
- Wood glue or clear-drying adhesive
- Staple gun for surface-mounted panels
- Clamps, painter’s tape, or small trim pieces
- Sandpaper and finish, if needed
Step 1: Cut the Cane Webbing
Lay the cane webbing flat and mark your cut lines. For grooved chair seats or cabinet doors, cut the piece larger than the opening so you have enough material to press into the groove. For surface-mounted panels, leave enough overlap for fastening behind the frame.
Step 2: Soak the Webbing
Natural cane webbing becomes more flexible when soaked. Many installers soak cane in warm water before pressing it into a frame. The soaking time can vary depending on the material thickness and project type, but the goal is simple: the cane should become pliable, not mushy. Think flexible pasta, not sad oatmeal.
Step 3: Position the Pattern
Place the damp cane over the opening and align the weave. This step matters more than people expect. A crooked pattern on a cabinet door is very noticeable, especially if the furniture has clean square lines. Center the pattern before attaching anything permanently.
Step 4: Secure the Cane
For grooved frames, press the cane into the channel and secure it with reed spline. The spline wedges the cane into the groove and helps hold it firmly as it dries. For cabinet doors without grooves, the cane can be stapled or glued to the back of the frame, then covered with wood trim for a clean finish.
Step 5: Let It Dry Fully
As natural cane dries, it tightens. This is one of the reasons soaking is useful. Do not panic if the cane looks slightly relaxed while damp. Give it time to dry naturally, and it should become firmer. Avoid blasting it with high heat, which can dry the fibers too quickly.
Step 6: Trim the Excess
Once the cane is secure and dry, trim the excess carefully with a sharp blade. Work slowly near the frame to avoid cutting into the visible panel. This is not the moment for heroic speed. This is the moment for calm hands, good light, and maybe a cup of coffee placed far away from the project.
Common Mistakes to Avoid
Ordering Exactly the Same Size as the Opening
If your opening is 18 inches wide, an 18-inch roll may not give you enough edge allowance. You may need wider webbing or a different installation method. Always account for overlap, grooves, trimming, and alignment.
Skipping the Soak
Dry cane is more brittle and harder to shape. Soaking helps the webbing flex into grooves and around corners. Skipping this step can lead to cracks, uneven tension, or a panel that refuses to behave like it has ever heard of cooperation.
Using Too Much Glue
Glue can help, but too much adhesive may seep through the weave and leave visible marks. Use a light, controlled amount, especially on decorative cabinet panels.
Ignoring Grain and Pattern Direction
Cane webbing has a visual direction. Before cutting, decide which way the pattern should run. On multiple doors or drawers, keep the orientation consistent for a polished look.
Installing It Too Tight While Wet
Cane naturally tightens as it dries. Pulling it extremely tight while wet can create stress on the fibers or frame. Aim for smooth, even placement rather than aggressive stretching.
How to Care for 18" Cane Webbing
Cane webbing is durable, but it is still a natural material. Treat it kindly and it will reward you with years of texture, warmth, and compliments from guests who suddenly want to know if you “do furniture.”
Dust Regularly
Use a soft brush, microfiber cloth, or vacuum brush attachment to remove dust from the woven openings. Dust can settle into the pattern, especially on cabinet doors and headboards.
Clean Gently
For light grime, wipe with a slightly damp cloth and mild soap. Avoid soaking installed cane, especially if it is attached to wood. Too much moisture can weaken fibers, loosen glue, or encourage mildew.
Avoid Harsh Chemicals
Bleach, abrasive cleaners, and strong solvents can damage natural cane. Gentle cleaning is best. Cane webbing is not a kitchen countertop; it does not need to be scrubbed like it owes you money.
Control Humidity
Very dry air can make cane brittle over time, while excessive moisture can cause swelling or mildew. Indoor furniture does best in stable conditions. Keep cane pieces away from constant dampness, direct water exposure, and intense heat sources.
Refresh the Finish Carefully
Some cane webbing can be finished with clear varnish, urethane, or stain-compatible topcoats, depending on the look you want. Test on a scrap piece first, because cane absorbs finish differently than solid wood.
Is 18" Wide Cane Webbing Good for Beginners?
Yes, but choose the right project. A flat cabinet insert is easier than a full chair-seat restoration. A decorative tray is easier than a curved furniture panel. Beginners should start with a simple square or rectangular frame, use extra material, and practice cutting on a small offcut before working on the final piece.
If you are replacing pressed cane in a chair, study the groove, spline size, and old installation method before removing everything. Chair caning is satisfying, but it requires patience. Cabinet panels are more forgiving because trim can hide the back side. Chairs, unfortunately, have a way of revealing every shortcut the moment someone sits down.
Buying Tips for 18" Cane Webbing
When shopping, look for clear product details. A good listing should tell you the width, length, weave type, material, color, and intended use. If the product is natural rattan, expect slight color variations. If you need multiple rolls for one visible project, buy them together to improve the chance of a consistent tone.
For chair repair, also check whether you need reed spline, wedges, glue, and removal tools. For cabinet projects, decide whether the webbing will be inserted into a groove, stapled behind a frame, or sandwiched between trim pieces. The best cane webbing in the world cannot save a project from vague measuring and wishful thinking.
Design Ideas Using 18" Wide Cane Webbing
Modern Media Console
Use open cane webbing on sliding or hinged media cabinet doors. The cane helps conceal electronics while allowing airflow and remote-control signals to pass more easily than solid wood.
Entryway Shoe Cabinet
Cane panels add ventilation to shoe storage while keeping the cabinet stylish. Pair natural cane with white, black, sage green, or warm walnut finishes.
Bathroom Linen Cabinet
Use cane webbing on upper cabinet doors to create a spa-like texture. Just avoid direct water spray and keep the room well ventilated.
Vintage Chair Revival
Replace damaged cane on a thrifted chair and refinish the wood frame. The result can look expensive even if the chair originally came from a dusty garage corner with questionable lighting.
DIY Room Divider
Frame several cane panels together to create a folding screen. With 18-inch webbing, narrow panels are easy to build and move.
Real-World Experience: What Working With 18" Wide Cane Webbing Teaches You
After working with cane webbing, one lesson becomes clear quickly: this material rewards patience. It looks simple when rolled up, but the final result depends on careful preparation. The difference between a professional-looking panel and a slightly chaotic one often comes down to measuring, soaking, aligning, and drying.
The first practical experience most DIYers notice is that cane webbing changes personality after soaking. Dry cane feels stiff and a little stubborn. Damp cane becomes flexible, easier to press into grooves, and more willing to lie flat. This is especially helpful when working with 18" wide material because the sheet is still small enough to handle in a sink, tray, or shallow tub. Wider rolls can feel like wrestling a decorative sea creature.
Another experience worth remembering is that alignment matters more than expected. On a small drawer front, a slightly crooked weave may not be obvious. On a pair of cabinet doors, it can stand out immediately. The human eye loves straight lines, and it will absolutely notice when one cane panel leans like it heard a suspicious noise. Before securing the webbing, step back and check the pattern from a normal viewing distance.
Cutting also teaches humility. Cane strands can fray if the scissors are dull or if the cut runs too close to the final visible area. A smart approach is to cut oversized first, install carefully, then trim the excess after the panel is fixed. This gives you room to correct tiny shifts. It also reduces the chance of discovering that your “perfect cut” was perfect only in your imagination.
For cabinet doors, many DIYers find that stapling the cane to the back of a frame and covering the edges with thin trim is beginner-friendly. It hides the raw edge and gives the front a clean appearance. For chairs, the process is more technical because the cane often needs to sit inside a groove and be locked in with reed spline. That method creates a strong, traditional finish, but it is less forgiving. Removing old spline, cleaning the groove, choosing the right spline size, and pressing the new webbing evenly all matter.
One of the most satisfying parts of using 18" wide cane webbing is how quickly it transforms furniture. A plain cabinet can look custom in a weekend. A tired chair can regain its original charm. A simple frame can become a wall accent that looks like it came from a boutique home store. The material has a natural warmth that paint alone cannot create.
Still, cane webbing is not the right choice for every surface. It is not ideal for areas that take heavy abuse, constant moisture, or rough daily impact. A cane cabinet door in a living room may age beautifully. A cane panel on a mudroom bench where backpacks, shoes, pets, and chaos collide every day may need more protection. Use it where texture and airflow matter, but avoid treating it like plywood in a woven costume.
The biggest lesson is to respect the material. Cane is strong because of its woven structure, but it is still natural fiber. It expands, tightens, absorbs moisture, and responds to its environment. Work with those qualities instead of fighting them. Soak it before installation, let it dry naturally, clean it gently, and keep it away from extreme conditions.
When used thoughtfully, 18" wide cane webbing offers an impressive balance of beauty and practicality. It is affordable enough for small experiments, stylish enough for visible furniture, and flexible enough for many home projects. It brings craftsmanship into a room without shouting. And in a world full of flat, mass-produced surfaces, a little woven texture can make a home feel warmer, softer, and more personal.
Conclusion
18" wide cane webbing is one of the most useful sizes for furniture repair, cabinet upgrades, and decorative DIY projects. It offers natural texture, ventilation, vintage charm, and modern versatility in one roll. Choose the right weave, measure generously, soak before installation, secure it properly, and care for it gently. Do that, and this humble woven material can turn an ordinary project into something that looks thoughtful, warm, and custom-made.
Note: This article is prepared for web publishing in standard American English and is based on current cane webbing product details, furniture repair practices, DIY installation guidance, and natural rattan care recommendations.