Table of Contents >> Show >> Hide
- Before You Cut: Safety, Layout, and Tool Choice
- Way 1: Cut Flagstone With a Hammer and Chisel
- Way 2: Cut Flagstone With an Angle Grinder or Circular Saw
- Way 3: Cut Flagstone With a Wet Saw or Masonry Saw
- Which Flagstone Cutting Method Should You Choose?
- Troubleshooting Flagstone Cuts
- Extra Experience: Lessons From Cutting Flagstone in Real Projects
- Conclusion
Flagstone is gorgeous, rugged, and just irregular enough to make every patio project feel like a puzzle designed by a mountain. Whether you are building a walkway, trimming stones around a fire pit, or fitting a patio edge against a wall, sooner or later you will need to cut flagstone. The good news: you do not need a secret mason handshake. The better news: there are several ways to do it, depending on your tools, budget, patience, and tolerance for dust.
This guide explains three practical ways to cut flagstone: by hand with a hammer and chisel, with a diamond-blade grinder or circular saw, and with a wet saw or masonry saw. Each method has its own personality. The chisel is quiet and traditional, the grinder is fast and flexible, and the wet saw is the neat overachiever who brings a spreadsheet to the barbecue.
Before you begin, remember that flagstone is not one single material. It can be sandstone, bluestone, slate, limestone, quartzite, or another flat natural stone. Some pieces split cleanly along their natural layers; others act like they were personally offended by your pencil line. The key is choosing the right cutting method for the stone and the project.
Before You Cut: Safety, Layout, and Tool Choice
Cutting flagstone is simple in concept: mark the stone, weaken the line, and remove the waste. In practice, it involves sharp edges, flying chips, loud tools, and fine stone dust. Wear safety glasses, hearing protection when using power tools, sturdy gloves, long pants, and a proper respirator when dust may be produced. Natural stone can contain crystalline silica, and cutting, grinding, or sawing it can release very fine particles. Wet cutting and dust control are not fancy extras; they are the difference between a clean project and a backyard dust storm starring your lungs.
Set up outdoors on stable ground. Place the flagstone on compacted sand, plywood, a rubber mat, or a sturdy work surface that fully supports the stone. Do not balance a slab on two lonely bricks and hope physics is feeling generous. Flagstone can crack unexpectedly if unsupported.
For marking, use chalk, a wax pencil, painter’s tape, or a masonry pencil. Dry-fit your stones first, then mark the pieces that need trimming. If you are building a patio or walkway, lay out as much of the pattern as possible before cutting. This helps you avoid creating odd slivers, sharp “talon” pieces, and joints that look like a map drawn during an earthquake.
Way 1: Cut Flagstone With a Hammer and Chisel
The hammer-and-chisel method is ideal for small adjustments, rustic edges, and projects where you only need a few cuts. It is also the most budget-friendly method. You will not get a perfectly factory-straight edge, but that is often the point. Flagstone looks best when it still looks like stone, not like it was printed by an office machine.
Best For
Use this method for shaping natural edges, trimming thin to medium flagstone, making a few cuts, or removing small corners. It works especially well on softer or layered stones such as some sandstone and slate. It is less reliable on very hard quartzite or thick, dense slabs.
Tools You Need
- Masonry chisel, cold chisel, or brick-set chisel
- Drilling hammer, mason’s hammer, or small sledgehammer
- Chalk or masonry pencil
- Safety glasses and gloves
- Stable work surface or compacted sand bed
Step-by-Step Method
First, mark the cut line on the top of the flagstone. For a straight cut, use a straightedge. For a natural curve, mark the shape lightly and avoid sharp inside corners, which tend to crack.
Second, score the line. Hold the chisel upright or slightly angled and tap along the mark. Do not try to split the stone with one heroic blow. That is how you turn a patio stone into decorative gravel. Use light, repeated taps to create a shallow groove along the line. If possible, score the underside as well.
Third, place the scored line over a slight support edge or a bed of sand that lets the waste side break away. Set the wider brick-set chisel into the groove and strike more firmly. The stone should split along the weakened line. If it refuses, score deeper and try again.
Finally, dress the edge. Chip off high spots with the chisel and use lighter taps to soften the cut. A slightly irregular edge usually blends better with surrounding flagstone than a surgical-straight line.
Pro Tips for Hand Cutting
Read the stone before you strike it. Many flagstones have visible layers, grain, or hairline cracks. Cut with the natural bedding plane when possible. If the stone already has a crack near your intended line, do not ignore it. The crack has ambitions, and it may not share yours.
For a cleaner split, score both sides. For a more natural edge, nibble away gradually rather than forcing a full break. If you are trimming a visible patio edge, practice on a scrap piece first. Chiseling is part skill, part rhythm, and part accepting that stone has a vote.
Way 2: Cut Flagstone With an Angle Grinder or Circular Saw
A power saw fitted with a diamond masonry blade is a major upgrade when you need cleaner cuts or more speed. An angle grinder is excellent for curves, notches, and trimming edges. A circular saw with a diamond blade is better for longer straight cuts, especially on flatter pieces.
Best For
Use this method for medium-size projects, straight cuts, edge trimming, curves, and stones that are too hard or stubborn for a chisel alone. It is also useful when you want to score a line with a saw and then finish the break with a hammer and chisel.
Tools You Need
- Angle grinder or circular saw
- Diamond blade rated for stone or masonry
- Clamps or a non-slip work surface
- Respirator, eye protection, gloves, and hearing protection
- Outdoor extension cord rated for the tool, if electric
- Water control setup only if the tool is designed for wet use
Step-by-Step Method
Start by marking the cut line clearly. If dust or water may erase the line, apply painter’s tape and draw the line on the tape. Secure the flagstone so it cannot slide. A moving stone is bad; a moving stone under a spinning diamond blade is a tiny action movie you do not want to star in.
Fit the saw or grinder with a diamond blade designed for stone. Do not use a wood blade, and do not assume any old masonry blade is ideal for natural stone. Let the tool reach full speed before touching the stone.
Make a shallow first pass along the line. Do not push hard. The blade should cut; your job is to guide. For thick stone, make several passes, deepening the cut gradually. Back the blade out periodically to reduce heat and stress. If dry cutting, work in short bursts and control dust as much as possible. If wet cutting, use only tools and electrical protection designed for wet conditions.
For a straight break, cut a groove on the top and, if practical, flip the stone and score the underside. Then place the waste side over an edge and tap it with a hammer. The stone should break along the saw line. For curves, use the grinder to make several small relief cuts into the waste area, then chip away the sections and smooth the edge.
Common Mistakes to Avoid
Do not force the blade. Pushing too hard overheats the blade, wears out the tool, and increases the chance of chipping. Do not cut unsupported stone; vibration can crack it in the wrong place. Do not dry cut near open doors, windows, pets, kids, or the neighbor’s freshly washed car. Dust travels, and it has no manners.
Also avoid tiny filler pieces when designing your layout. If you need a narrow sliver, adjust the surrounding stones instead. Thin pieces crack easily and tend to look awkward. A good flagstone layout uses cuts to improve the pattern, not to punish the installer.
Way 3: Cut Flagstone With a Wet Saw or Masonry Saw
For the cleanest cuts and the best dust control, a wet saw or masonry saw is the top choice. Water cools the blade, reduces airborne dust, and helps produce smoother cuts. This is the method to consider when you have many stones to cut, thick slabs to trim, or a project where accuracy matters.
Best For
Use a wet saw for repeated straight cuts, patio borders, walkway edges, steps, coping, and thicker flagstone that a small grinder cannot handle efficiently. A tabletop wet saw works for smaller or thinner pieces. A larger masonry saw or cut-off saw may be needed for heavy stone.
Tools You Need
- Wet tile saw, masonry saw, or concrete cut-off saw
- Diamond blade suitable for natural stone
- Water supply or saw reservoir
- Eye protection, hearing protection, gloves, and non-slip footwear
- GFCI protection for electric tools used near water
Step-by-Step Method
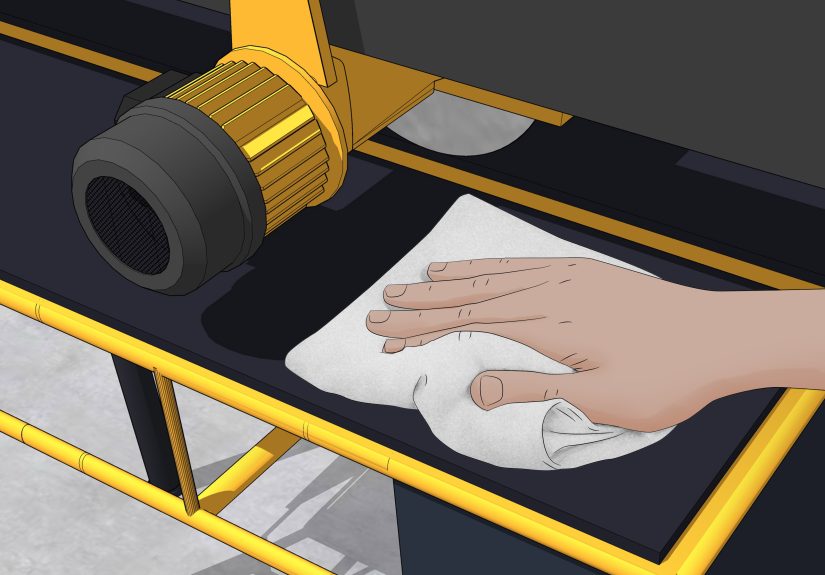
Mark the cut line, then position the stone on the saw table or sled. Make sure the flagstone sits flat and stable. If the stone rocks, shim or reposition it before cutting. Let the water flow over the blade before the stone contacts it.
Turn on the saw and let the blade reach full speed. Feed the stone slowly and steadily. Keep your hands away from the blade path and maintain firm control. Do not rush the cut. A wet saw rewards patience with a clean edge; rushing rewards you with chips, noise, and regret.
For thick flagstone, you may need to cut from one side, flip the stone, and finish from the other side. Keep the line aligned carefully so the cuts meet. After cutting, rinse slurry off the stone before it dries. Stone slurry can harden into a stubborn film if left sitting, and nobody wants to scrub patio rocks like they are fine china.
Why Wet Cutting Is Often Worth It
Wet cutting is cleaner, cooler, and usually more accurate. It also helps reduce silica dust exposure, which is a serious concern when cutting stone, concrete, brick, block, or mortar. For one-time DIY projects, renting a wet saw or masonry saw often makes more sense than buying one. Prepare your layout first, mark all cuts, then rent the saw and cut everything in one efficient session.
Which Flagstone Cutting Method Should You Choose?
If you only need to trim a few pieces and want a natural edge, choose the hammer and chisel. It is inexpensive and surprisingly satisfying once you find the rhythm. If you need more control, curved cuts, or faster trimming, choose an angle grinder or circular saw with a diamond blade. If you need many accurate cuts or want better dust control, rent or use a wet saw.
In many real projects, the best answer is a combination. Use a saw to score a long line, then split with a chisel. Use a grinder to rough in a curve, then dress the edge by hand. Use a wet saw for border stones and a hammer for tiny natural adjustments. Masons mix methods because stone is variable. DIYers should feel free to do the same.
Troubleshooting Flagstone Cuts
The Stone Breaks in the Wrong Place
This usually happens because the stone was unsupported, the score line was too shallow, or the stone had a hidden crack. Support the slab better, score both sides when possible, and avoid forcing thick stone with one blow.
The Edge Looks Too Perfect
A saw-cut edge can look out of place beside natural flagstone. Lightly chip the edge with a chisel to create a more organic profile. Do not overdo it; you are aging the edge, not auditioning for a demolition crew.
The Cut Is Chipping
Use a sharper diamond blade, slow down the feed rate, and make shallow passes. Chipping often comes from forcing the blade or using a blade that is wrong for the stone.
There Is Too Much Dust
Move outdoors, use wet cutting where appropriate, add dust collection if possible, and wear a respirator. Avoid dry sweeping afterward; use wet cleanup or a vacuum rated for fine dust.
Extra Experience: Lessons From Cutting Flagstone in Real Projects
The first thing experience teaches you about cutting flagstone is that the layout matters more than the cut. Beginners often focus on the tool, but pros spend more time arranging stones before making sawdustor more accurately, stone dust. If you dry-fit the patio first, you can rotate pieces, swap awkward shapes, and reduce the number of cuts. That saves time, blades, and your emotional stability.
A useful habit is to create “families” of stones. Put large anchor pieces in high-traffic areas, medium stones around them, and small pieces only where they make visual sense. If you leave all the cutting until the end, you may discover that every remaining gap needs a weird triangle the size of a tortilla chip. Instead, adjust as you go. A patio should look intentional, not like leftover pieces were forced into witness protection.
Another lesson: do not chase perfect joints. Flagstone is naturally irregular, and that is its charm. A slightly varied joint can look beautiful when filled with stone dust, polymeric sand, gravel, moss, or mortar, depending on the installation style. What looks like a large gap during dry layout may look balanced once the joint material is installed. Step back often and view the project from standing height. Your knees may be six inches from the stone, but your guests will not inspect it with a magnifying glass unless they are very strange guests.
When using a grinder, relief cuts are your friend. For curves and notches, make several cuts into the waste area like slices in a pie crust. Then tap out the small sections and refine the curve. This is much easier than trying to force one sweeping curve with a small blade. It also reduces the chance of cracking the good side of the stone.
For thick flagstone, patience beats power. A heavy slab may need scoring from both sides, multiple saw passes, and a controlled break. If you try to muscle through it, the stone may split diagonally and produce a custom shape known professionally as “well, that’s unfortunate.” Keep the blade cool, support the stone fully, and let the tool do the work.
Finally, plan cleanup before you cut. Wet cutting produces slurry; dry cutting produces dust. Both need attention. Keep a rinse bucket, brush, hose, and cleanup area ready. Rinse stones before slurry dries, and keep dust away from doors, windows, vehicles, and garden beds. The cutting itself may be the dramatic part, but cleanup is what keeps the finished project from looking like a quarry sneezed.
Conclusion
Learning how to cut flagstone gives you more control over patios, walkways, garden paths, fire pit areas, and landscape borders. The hammer-and-chisel method is affordable and great for natural edges. The grinder or circular saw method adds speed and flexibility. The wet saw method delivers the cleanest cuts and the best dust control for larger jobs.
The smartest approach is not always the most powerful one. Match the tool to the stone, the cut, and the finish you want. Mark carefully, support the slab, use the correct diamond blade, and protect yourself from chips, noise, and silica dust. With a little patience, flagstone cutting becomes less intimidating and more like solving a very heavy puzzleone that looks fantastic when you finally set the last piece in place.
Note: If your flagstone is very thick, expensive, structural, or part of steps or coping where a clean fit is critical, consider renting professional-grade equipment or hiring a qualified stone mason. Stone is patient, but it is not forgiving.