Table of Contents >> Show >> Hide
- Why Cleaning and Organizing Our Closet Matters
- Step 1: Prepare Before You Pull Everything Out
- Step 2: Empty the Closet and Clean the Space
- Step 3: Declutter Clothes Without Regret
- Step 4: Donate, Sell, Repair, Recycle, or Toss Responsibly
- Step 5: Organize the Closet by Real-Life Use
- Small Closet Organization Ideas That Actually Work
- Seasonal Closet Rotation
- How to Keep the Closet Organized After Cleaning
- Common Closet Organizing Mistakes to Avoid
- A Practical Closet Cleaning Checklist
- Personal Experience: What Cleaning and Organizing Our Closet Taught Me
- Conclusion
- SEO Tags
Note: This publication-ready article is written in standard American English and synthesized from reputable U.S. cleaning, organizing, home-care, donation, and sustainability guidance.
Cleaning and organizing our closet sounds simple until we open the door and discover a small civilization living between the sweaters, mystery tote bags, and that one shirt we keep “just in case” we are invited to a themed barbecue in 2031. A closet is supposed to make life easier. It should help us get dressed faster, protect the clothes we love, and keep the bedroom from looking like laundry is staging a peaceful protest.
The good news is that closet organization is not about becoming a minimalist monk or buying forty matching acrylic bins. It is about building a system that fits real life. A truly organized closet works on a Monday morning when you are half-awake, on laundry day when everything comes back at once, and during seasonal changes when winter coats suddenly seem to multiply like rabbits.
This guide walks through how to clean, declutter, and organize your closet from top to bottom. We will cover practical closet cleaning tips, smart storage ideas, clothing donation decisions, small closet organization, and the habits that keep everything from collapsing back into chaos. Yes, your closet can become calm. No, it does not have to look like a boutique owned by a candle company.
Why Cleaning and Organizing Our Closet Matters
A cluttered closet does more than steal space. It steals time, energy, and occasionally your favorite black pants, which somehow disappear into a shadow realm behind the luggage. When everything is crammed together, clothes wrinkle, shoes get scuffed, accessories vanish, and mornings become a treasure hunt nobody requested.
Cleaning and organizing your closet also helps you make better decisions about what you own. When you can see your clothes clearly, you are less likely to buy duplicates, keep items that do not fit, or forget pieces you actually enjoy wearing. A clean closet makes your wardrobe feel bigger without adding a single new hanger.
There is also a hygiene benefit. Closets collect dust, lint, pet hair, dead skin cells, and sometimes moisture. Regular cleaning helps reduce musty odors and keeps surfaces, floors, and stored items fresher. If your closet shares a wall with a bathroom, laundry room, basement, or exterior wall, checking for dampness is especially important. Moisture is the villain in many home storage stories, and it rarely announces itself politely.
Step 1: Prepare Before You Pull Everything Out
The fastest way to turn a closet project into a domestic emergency is to remove everything without a plan. Suddenly the bed is buried, the floor is gone, and you are standing in a pile of scarves questioning every purchase since 2014.
Before you begin, choose a realistic time window. A small reach-in closet may take a few hours. A walk-in closet or shared closet may need a full day or several focused sessions. If your schedule is tight, organize by category instead of doing everything at once: shoes today, hanging clothes tomorrow, top shelves on Saturday. Progress is still progress, even when it arrives wearing sweatpants.
Gather Your Closet Cleaning Supplies
Before opening the closet floodgates, collect a few basics: trash bags, donation bags or boxes, a laundry basket, microfiber cloths, a vacuum, an all-purpose cleaner or mild soap solution, labels, and a measuring tape. If you plan to add bins, shelf dividers, hooks, or drawer organizers, measure first. Buying storage before decluttering is like buying a bigger suitcase before deciding what trip you are taking.
It also helps to set up four sorting zones: keep, donate, repair, and discard or textile recycle. The repair pile is important because many clothes are not useless; they just need a button, a zipper fix, or a quick hem. The textile recycling pile is for items too worn or stained for donation but potentially recyclable through local programs.
Step 2: Empty the Closet and Clean the Space
Once you are ready, remove everything from the closet. Yes, everything. That includes the shoes hiding in the back, the reusable bags stuffed into other reusable bags, and the box labeled “miscellaneous,” which is usually a polite word for “I gave up.”
Emptying the closet allows you to see the full space and clean areas that are normally blocked. Start at the top and work down. Dust shelves, rods, hooks, walls, baseboards, and light fixtures. Vacuum or sweep the floor thoroughly, paying attention to corners where dust bunnies build tiny empires. Wipe hard surfaces with a cleaner appropriate for the material, then let everything dry completely before putting clothes back.
Watch for Moisture, Odors, and Mold
If you notice a musty smell, water stain, or visible mold, pause the organizing project and handle the moisture problem first. Mold thrives where moisture lingers, and simply hiding it behind a storage bin will not solve the issue. Clean small hard-surface spots carefully, dry the area completely, and investigate leaks, poor ventilation, or damp items. Porous materials that are moldy may need to be discarded because mold can work its way into fibers and padding.
For everyday closet cleaning, disinfecting is usually unnecessary unless someone in the home has been sick or a contaminated item was stored inside. Routine cleaning with soap or detergent removes dirt and many germs from surfaces. The practical rule is simple: clean first, disinfect only when needed, and never mix cleaning chemicals unless you are auditioning for a cautionary label.
Step 3: Declutter Clothes Without Regret
Decluttering is where closet organizing becomes emotional. Clothes are not just fabric. They are memories, hopes, former jobs, past sizes, vacation fantasies, and occasionally evidence of a questionable trend we all agreed to pretend never happened.
Start by sorting items into categories: jeans, workwear, casual tops, dresses, coats, workout clothes, pajamas, undergarments, shoes, bags, belts, scarves, and accessories. Grouping similar items together makes patterns obvious. You may discover you own eleven gray T-shirts, six pairs of nearly identical black leggings, or enough tote bags to open a tote bag museum.
Ask Better Decluttering Questions
The classic “Have I worn this in the last year?” question can be helpful, but it should not be the only test. Life changes. Some pieces are seasonal, formal, sentimental, or connected to temporary circumstances. Instead, ask a more complete set of questions:
- Does this fit my body comfortably right now?
- Do I like how I feel when I wear it?
- Is it in good condition?
- Does it match my actual lifestyle?
- Would I buy this again today?
- Is keeping it worth the closet space it uses?
That last question is powerful. Closet space is not free. Every item you keep charges rent in the form of visual clutter, maintenance, and decision fatigue. If a dress makes you feel fabulous, let it stay. If a jacket makes you feel like you are borrowing clothes from a stressed magician, thank it and move on.
Use the Try-On Test
When you feel unsure, try the item on. This prevents fantasy organizing, where we keep clothes for an imaginary version of ourselves who attends more garden parties, has no laundry limitations, and enjoys wearing pants that pinch. Stand, sit, move around, and check whether the item works with pieces you already own. If it needs a perfect situation to be useful, it may not deserve prime closet real estate.
Step 4: Donate, Sell, Repair, Recycle, or Toss Responsibly
Once you have edited your wardrobe, decide where each item should go. Gently used clothing, shoes, and accessories in clean, wearable condition can often be donated. Before donating, inspect items honestly. If you would feel embarrassed handing it directly to another person, it probably should not go in a donation bag.
Donation centers generally appreciate items that are clean, dry, safe, and resellable. Wash clothing first, pair shoes together, empty pockets, and avoid donating stained, torn, mildewed, or heavily worn items. A donation is helpful when it saves someone else money or supports a nonprofit. It is not helpful when it turns a thrift store into your personal trash valet.
Higher-value pieces may be worth selling through consignment shops, resale apps, or local marketplaces. Items needing simple fixes can go into a repair basket, but set a deadline. A “repair pile” without a date is just clutter wearing a tiny halo. For worn-out textiles, search for local textile recycling options, brand take-back programs, or community collection events.
Step 5: Organize the Closet by Real-Life Use
Now comes the satisfying part: putting things back. The best closet organization system is not the one that photographs well. It is the one you can maintain when you are running late and holding coffee.
Place everyday items at eye level and within easy reach. Store less-used items higher up, lower down, or toward the back. Keep special-occasion clothing, off-season garments, and sentimental pieces separate from daily clothes. If your closet is small, this one decision can create breathing room immediately.
Organize Clothes by Category and Color
Category comes first. Group shirts with shirts, pants with pants, dresses with dresses, and jackets with jackets. Once categories are in place, color-ordering within each group can make the closet easier to scan. You do not have to create a perfect rainbow unless that brings you joy. Even a simple light-to-dark order can make the space feel calmer.
Use Matching Hangers for Instant Visual Calm
Uniform hangers are one of the easiest closet upgrades. Slim velvet hangers save space and keep slippery clothes from sliding to the floor. Wood hangers are sturdy for coats and suits. Padded hangers can protect delicate garments. The key is consistency. A closet with fifteen types of hangers looks busier than it actually is, like a tiny plastic orchestra tuning up.
Give Every Item a Home
Every item should have a specific place. Belts can go on hooks or a belt hanger. Scarves can be folded in a bin or hung on a scarf organizer. Bags can sit upright on shelves with dividers or be stuffed lightly to keep their shape. Jewelry should be visible enough to use, not tangled in a drawer like it is training for a wrestling match.
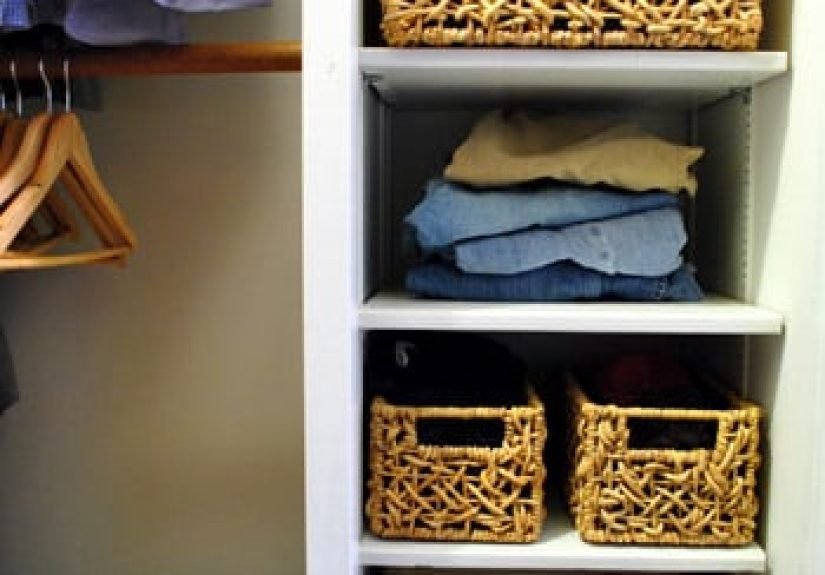
Small Closet Organization Ideas That Actually Work
Small closets require strategy, not despair. The secret is to use vertical space, door space, shelf space, and floor space intentionally. Most closets have wasted space above the rod, below short hanging clothes, or behind the door.
Use Vertical Space
Add a second hanging rod if you mostly hang shirts, pants folded over hangers, skirts, or children’s clothes. Use the top shelf for labeled bins containing off-season clothing, travel accessories, extra bedding, or sentimental items. Shelf dividers help keep stacks of sweaters from leaning sideways like tired pancakes.
Use the Closet Door
An over-the-door organizer can hold shoes, scarves, hats, gloves, hair tools, small bags, or accessories. Door hooks are useful for robes, tomorrow’s outfit, or the jacket you wear most often. Just avoid turning the door into a vertical junk drawer. If the organizer bulges like a suitcase before vacation, edit it.
Use the Floor Wisely
The closet floor should not become a clothing swamp. Use a shoe rack, boot tray, rolling bin, or low drawer unit. Keep long hanging items on one side so the other side can hold short items above storage. If you share a closet, divide floor space clearly so one person’s sneakers do not slowly invade the other person’s territory like soft-soled settlers.
Seasonal Closet Rotation
Seasonal rotation is one of the best ways to maintain closet organization. Keep current-season clothing in the most accessible spots and move off-season items into breathable garment bags, labeled bins, or under-bed storage. Before storing anything, wash or dry-clean it. Stains and body oils can set over time, and pests are more attracted to dirty fabric.
When the season changes, treat rotation as a mini closet audit. Ask what you actually wore, what still fits, what needs repair, and what can leave. This habit prevents major closet cleanouts from becoming overwhelming. Instead of one giant annual battle, you do a few smaller tune-ups.
How to Keep the Closet Organized After Cleaning
The real test of closet organization is not how it looks on day one. It is how it looks three weeks later. Maintenance matters more than perfection.
Keep a Donation Box Nearby
Place a small donation bag, box, or basket in or near the closet. When you try something on and immediately take it off because it feels wrong, do not put it back on the hanger. Drop it into the donation container. This turns decluttering into a habit instead of a dramatic seasonal event with background music.
Follow the One-In, One-Out Rule
When you buy a new sweater, consider letting go of an old one. The one-in, one-out rule keeps the closet from expanding beyond its limits. It also makes shopping more intentional because every new item has to earn its place.
Do a Weekly Ten-Minute Reset
Once a week, spend ten minutes returning items to their homes, rehanging clothes, straightening shoes, and removing anything that does not belong. Ten minutes is enough when the system is simple. If maintenance takes an hour, the system is too complicated or the closet is holding too much.
Common Closet Organizing Mistakes to Avoid
The first mistake is buying organizers before decluttering. Storage products are useful only when they solve a real problem. Otherwise, they become expensive clutter containers.
The second mistake is keeping too many “someday” clothes. Someday clothes are items for a hypothetical lifestyle, size, event, or personality. Keep a few meaningful or practical pieces if you truly want to, but do not let someday take over today’s closet.
The third mistake is hiding things too well. If you cannot see it or access it, you probably will not use it. Clear bins, labels, open baskets, and logical categories help your future self find things without conducting a full investigation.
The fourth mistake is overloading hangers, shelves, and drawers. Clothes need breathing room. A closet packed to maximum capacity will never feel organized because removing one shirt creates a fabric avalanche. Aim for a little empty space. Empty space is not wasted; it is what allows the system to function.
A Practical Closet Cleaning Checklist
Use this checklist whenever your closet starts whispering, “Do not open me.”
- Set a realistic time window for the project.
- Gather bags, boxes, cleaning supplies, labels, and a measuring tape.
- Remove everything from the closet.
- Dust shelves, rods, corners, doors, and baseboards.
- Vacuum or sweep the floor.
- Wipe hard surfaces and let them dry completely.
- Sort clothing and accessories by category.
- Try on uncertain items.
- Create keep, donate, sell, repair, recycle, and discard piles.
- Return only useful, loved, and wearable items.
- Use matching hangers, bins, dividers, hooks, and labels where helpful.
- Place daily items within easy reach.
- Store off-season and occasional items separately.
- Schedule a weekly ten-minute reset.
Personal Experience: What Cleaning and Organizing Our Closet Taught Me
The first time I seriously cleaned and organized our closet, I made the classic beginner mistake: I thought enthusiasm was a plan. I opened the doors, pulled everything out, and within twenty minutes the bedroom looked like a department store had sneezed. There were shirts on the bed, shoes under the chair, belts in a pile, and one lonely glove that had apparently been waiting years for closure.
What surprised me most was not how much we owned. It was how much of it we were not using. Some clothes did not fit. Some fit but made us feel uncomfortable. Some belonged to old jobs, old routines, or old versions of ourselves. A few items still had tags, which is always a humbling little receipt from your past self saying, “Good luck explaining this.”
The biggest turning point was sorting by category. When all the jeans were together, decisions became easier. When all the jackets were together, it was obvious which ones we wore and which ones were simply taking attendance. Shoes were even more revealing. We found pairs that needed cleaning, pairs that needed repair, and pairs that had survived purely because they were hiding behind boots.
Cleaning the empty closet also changed the mood of the project. Dusting shelves, wiping the rod, vacuuming corners, and letting the space air out made the closet feel new before we bought a single organizer. It reminded us that organizing is not just about arranging stuff. It is also about caring for the space that holds the stuff.
We learned not to rush donation decisions, but also not to turn every item into a court case. If something was clean, wearable, and no longer right for us, it went into the donation bag. If it needed a small repair and we genuinely loved it, it went into a repair basket with a deadline. If it was worn out, stained, or unusable, we looked for textile recycling options instead of pretending a thrift store would be thrilled to receive a T-shirt with the structural integrity of a coffee filter.
Storage became easier after decluttering. We did not need fancy systems for everything. Matching hangers made the biggest visual difference. A few bins on the top shelf handled seasonal items. A shoe rack cleared the floor. Hooks held belts and everyday bags. Shelf dividers stopped sweaters from forming a leaning tower of knitwear. Labels helped because nobody wants to open four identical bins just to find gloves.
The most useful habit, though, was keeping a donation bag inside the closet. It made letting go feel casual. When a shirt did not work anymore, we did not rehang it out of guilt. We dropped it in the bag. When the bag filled, it left the house. That one small habit prevented clutter from rebuilding in silence.
Another lesson was that shared closets need shared rules. It helps to divide zones clearly. One person gets the left side, the other gets the right side, or each person gets specific shelves and drawers. Without boundaries, one person’s “temporary pile” can slowly become everyone’s problem. Closet peace is real, and it is built with labels, respect, and not stealing the good hangers.
Now our closet is not perfect, but it works. We can see what we own. Getting dressed is faster. Laundry is easier to put away. The floor is no longer a mystery landscape. Best of all, the closet no longer feels like a place where decisions go to nap. It feels useful, clean, and calm, which is exactly what a closet should be.
Conclusion
Cleaning and organizing our closet is not a one-time makeover. It is a practical reset that helps us understand what we own, what we use, and what deserves space in our daily lives. The process starts with a clean empty closet, continues with honest decluttering, and succeeds when every item has a clear home.
You do not need a luxury closet system to create order. You need visibility, access, categories, good habits, and a willingness to stop storing clothes for a fictional future version of yourself. Start small if you need to. Clean one shelf, sort one category, or fill one donation bag. Every step makes the closet easier to use.
A well-organized closet gives back time, space, and peace of mind. It helps mornings run smoother, keeps clothes in better condition, and makes the whole room feel lighter. And when you can open the closet door without bracing for impact, that is not just organizing. That is personal growth with hangers.