Table of Contents >> Show >> Hide
- Why Turn a File Cabinet Into Tool Storage?
- Choose the Right File Cabinet for the Job
- Tools and Materials You May Need
- Step 1: Empty, Clean, and De-office the Cabinet
- Step 2: Decide Your Tool Stash Layout
- Step 3: Add Paint for Protection and Personality
- Step 4: Upgrade the Inside of the Drawers
- Step 5: Add Pegboard, Hooks, or Magnetic Strips
- Step 6: Make It Mobile With Casters
- Step 7: Label Everything Like Future You Matters
- Smart Storage Ideas for Different DIY Personalities
- Safety and Common-Sense Tips
- Budget Breakdown: How Much Does It Cost?
- Mistakes to Avoid
- Experience Notes: What This Project Teaches You
- Conclusion
Somewhere in America, right now, an old metal file cabinet is sitting in a garage, basement, office corner, or thrift store aisle wondering what went wrong. Once upon a time, it held important documents, tax folders, warranty papers, and maybe one mysterious envelope labeled “misc.” Now it is dented, dusty, and one bad decision away from the curb.
Good news: that cabinet is not finished. It is simply waiting for its second act. With a little cleaning, a few smart upgrades, and the confidence of someone who has watched exactly enough DIY videos to be dangerousbut not too dangerousa file cabinet can become a hardworking tool stash for the garage, shed, workshop, or backyard zone.
This project is budget-friendly, practical, and oddly satisfying. Instead of buying a brand-new tool chest, you can repurpose a file cabinet into a garage tool organizer that stores hand tools, garden gear, hardware, paint supplies, extension cords, drill bits, and all those small parts that otherwise disappear into the Bermuda Triangle behind the workbench.
The best part? You do not need to be a professional carpenter. You need a sturdy cabinet, a plan, a few materials, and the wisdom to measure twice before drilling into metal like a caffeinated raccoon.
Why Turn a File Cabinet Into Tool Storage?
A filing cabinet already has the bones of a good storage system. It is usually made of metal, comes with deep drawers, has a compact footprint, and was designed to carry weight. That makes it a natural candidate for a DIY tool stash.
Traditional tool chests are excellent, but they can be expensive. A used file cabinet, on the other hand, can often be found at yard sales, office liquidations, thrift stores, online marketplaces, or even hiding in your own home. Repurposing one also keeps bulky furniture out of the landfill, which gives your garage a glow-up and your conscience a tiny high five.
File cabinet tool storage works especially well for people who want a flexible system. You can keep the cabinet upright for drawers and small tools, flip it on its back to create vertical bins for rakes and shovels, mount pegboard on the sides, add casters for mobility, install drawer liners, or build a wood top so it doubles as a mini workbench.
Choose the Right File Cabinet for the Job
Not every file cabinet deserves a promotion to tool commander. Before you start sanding, painting, and naming it “The Fortress of Fixing Things,” inspect it carefully.
Look for a Solid Metal Body
A metal cabinet is usually the best choice for garage tool storage because it can handle dents, dust, and normal workshop abuse. Check for rust, deep bends, cracked welds, or drawer slides that feel like they are grinding gravel. Light surface rust is manageable. A cabinet that looks like it survived a pirate shipwreck may be more trouble than it is worth.
Test the Drawers
Open and close every drawer. They should slide without sticking too badly. If the cabinet tips forward when multiple drawers are open, plan to add weight to the bottom, anchor it, or use it in a way that reduces tipping risk. Tool storage can get heavy quickly, especially when wrenches, sockets, fasteners, and drill accessories move in like they own the place.
Think About Size
A two-drawer file cabinet can become a compact tool station for a small garage or apartment workshop. A four-drawer cabinet gives you more room for categories: measuring tools in one drawer, screwdrivers and pliers in another, fasteners in a third, and painting or sanding supplies in the fourth. Lateral file cabinets offer wider drawers, which are great for saws, clamps, and long hand tools.
Tools and Materials You May Need
You can keep this project simple or dress it up like a garage celebrity. Here are common supplies for a clean, useful conversion:
- Used metal file cabinet
- Degreaser or mild cleaner
- Rags or shop towels
- Sandpaper or sanding block
- Rust-inhibiting primer
- Spray paint or enamel paint made for metal
- Drawer liners or rubber matting
- Labels or label tape
- Small bins, trays, jars, or drawer dividers
- Pegboard and hooks, if adding side storage
- Casters, preferably locking casters, if making it mobile
- Plywood or lumber for reinforcement or a top surface
- Bolts, washers, nuts, and screws
- Drill with metal-rated bits
- Safety glasses and work gloves
If cutting, drilling, or modifying metal is outside your comfort zone, ask for help from someone experienced. Eye protection is not optional. Metal shavings are tiny villains.
Step 1: Empty, Clean, and De-office the Cabinet
Start by removing every hanging rail, folder frame, divider, mystery paper clip, and ancient label that says “Accounts 1998.” Take the drawers out if possible. This makes cleaning easier and lets you inspect the inside.
Use a mild cleaner or degreaser to remove dust, oil, and grime. Garages are not exactly spa environments, so give the cabinet a serious wipe-down. If there is adhesive residue from old labels, use a scraper carefully and clean the area afterward.
Check the bottom and corners for rust. Sand rough spots until the surface is smooth. You do not need a museum-quality restoration, but paint sticks better to a clean, lightly scuffed surface than to dirt and wishful thinking.
Step 2: Decide Your Tool Stash Layout
Before adding hardware, think about how you actually use tools. A smart DIY file cabinet tool stash should match your habits, not the fantasy version of you who alphabetizes socket sets while drinking herbal tea.
For Hand Tools
Keep the cabinet upright and use the drawers. Add rubber liners so tools do not slide around every time you open a drawer. Use dividers for screwdrivers, pliers, measuring tapes, utility knives, hex keys, and small clamps. Shallow trays are great for frequently used items.
For Hardware
Small screws, nails, washers, anchors, and bolts need boundaries. Use labeled jars, divided organizers, or small bins inside drawers. Do not toss everything into one “fastener drawer” unless you enjoy spending 20 minutes looking for one 1-inch screw while questioning your life choices.
For Garden Tools
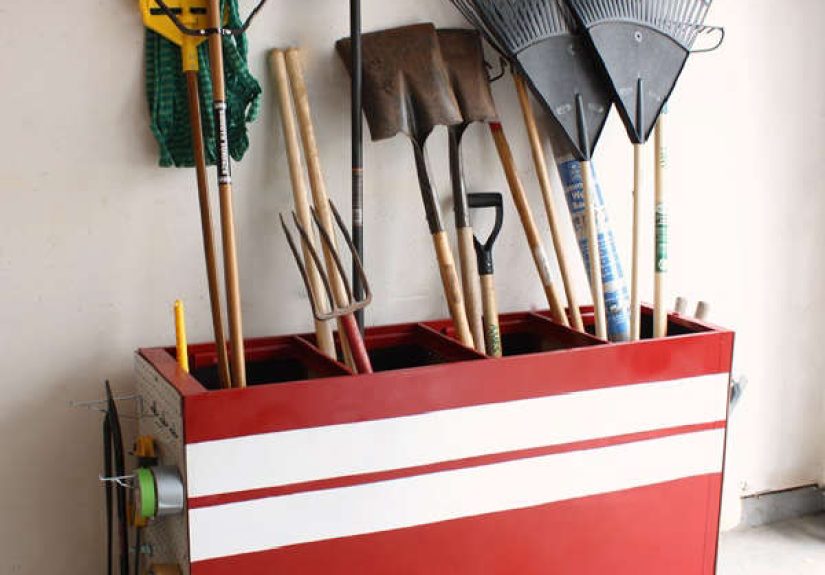
If you want to store long-handled tools, consider flipping the cabinet on its back so the drawer openings face up. Remove the drawers and use the compartments as vertical bins for rakes, shovels, brooms, hoes, and pruning tools. Add a wood base and casters, and you have a mobile yard tool bin that rolls out when the lawn starts making demands.
For Power Tool Accessories
Store drill bits, batteries, chargers, sanding discs, and small attachments in divided containers. If the cabinet has a lock, use it to secure sharp tools, blades, and items that should not be handled by younger kids.
Step 3: Add Paint for Protection and Personality
Paint is not just cosmetic. A good primer and metal-friendly paint help protect the cabinet from rust and make it easier to clean. Plus, a fresh color tells the world, “This is not office furniture anymore. This is a tool fortress.”
Sand glossy areas lightly, wipe away dust, and apply a primer designed for metal. Once dry, add thin coats of paint rather than one thick, drippy coat. Spray paint works well for metal cabinets, but use it in a well-ventilated area and follow the product directions. Let the finish cure before loading the drawers.
Classic black, gray, navy, and red all look at home in a garage. Bright colors make the cabinet easier to spot and add personality. Racing stripes are optional, but they do make a rake storage bin feel 11 percent faster.
Step 4: Upgrade the Inside of the Drawers
A bare metal drawer will hold tools, but a lined and divided drawer will actually organize them. Rubber drawer liners reduce sliding and noise. Foam inserts can be cut to shape if you want every tool to have a dedicated parking spot. Small bins keep categories separated.
One smart approach is to build each drawer around a task:
- Fix-it drawer: screwdrivers, pliers, adjustable wrench, tape measure, utility knife.
- Fastener drawer: screws, nails, anchors, washers, bolts, picture-hanging hardware.
- Drilling drawer: drill bits, driver bits, countersink bits, small clamps, safety glasses.
- Finishing drawer: sandpaper, brushes, painter’s tape, putty knife, small drop cloth.
- Garden drawer: gloves, pruners, twine, plant labels, hose washers, kneeling pad.
The goal is simple: when you need a tool, you should find it before your patience leaves the building.
Step 5: Add Pegboard, Hooks, or Magnetic Strips
The sides of a file cabinet are valuable real estate. Attach pegboard to one or both sides to hold small tools, paint keys, garden gloves, measuring tapes, scissors, or shop brushes. If the cabinet is metal, magnetic strips or magnetic cups can also work for lightweight items.
Hooks are useful for extension cords, safety glasses, dust masks, and small hand tools with hanging holes. Keep heavier items inside the cabinet or on properly supported hooks. The side panels should help with access, not turn the cabinet into a leaning tower of bad ideas.
A small clipboard or laminated checklist on the side can also be helpful. Use it to track consumables like sandpaper, screws, blades, batteries, and painter’s tape. Nothing says “DIY tragedy” like starting a Saturday project and discovering you own 400 wall anchors but zero drill bits that fit.
Step 6: Make It Mobile With Casters
Adding casters can turn your file cabinet tool stash into a rolling garage cart. This is especially helpful in a shared garage where work happens in different zones: driveway repairs, lawn care, woodworking, painting, or bike maintenance.
Use casters rated for the combined weight of the cabinet and tools. Locking casters are strongly recommended so the cabinet stays put while you work. If the cabinet bottom is thin, add a plywood base to distribute weight and create a stronger mounting surface.
Place heavier tools low to improve stability. Avoid opening multiple loaded drawers at once, especially on a rolling cabinet. Gravity may be a law of physics, but it also has a mischievous sense of humor.
Step 7: Label Everything Like Future You Matters
Labels are not fussy. Labels are kindness. They help everyone in the household know where things belong, and they make cleanup faster. Use simple labels such as “Screwdrivers,” “Drill Bits,” “Garden Gloves,” “Painting Supplies,” “Electrical,” “Plumbing,” and “Fasteners.”
If you use bins inside drawers, label those too. Clear bins are helpful, but labels still save time. The goal is to make returning tools so easy that even the person who usually leaves the tape measure on top of the dryer has no excuse.
Smart Storage Ideas for Different DIY Personalities
The Weekend Fixer
If you mostly handle small home repairs, keep your cabinet simple. One drawer for basic hand tools, one for fasteners, one for drill accessories, and one for painting supplies may be enough. Add a small work surface on top and keep a flashlight, pencil, and notepad nearby.
The Gardener
Use a flipped cabinet as a vertical tool bin. Store rakes, shovels, brooms, and hoes upright. Add pegboard to one side for hand trowels, pruning shears, gloves, and twine. Add casters so you can roll the whole setup toward the yard, then back into the garage when finished.
The Maker or Crafter
A file cabinet can store adhesives, clamps, measuring tools, cutting mats, small hardware, and finishing supplies. Use drawer dividers to separate materials. Add a butcher-block-style top or plywood surface for a compact project station.
The Auto Detailer
Use the cabinet for microfiber towels, wax pads, brushes, spray bottles, tire gauges, and small car-care tools. Keep chemicals upright and in their original containers, and avoid storing anything that could leak into drawers.
Safety and Common-Sense Tips
A DIY file cabinet tool stash should make your workspace safer, not more chaotic. Keep sharp tools covered or stored securely. Put heavy items in the lowest drawers. Do not overload drawer slides beyond what they can reasonably handle. If the cabinet is tall and narrow, consider anchoring it to a wall or placing it where it cannot easily tip.
Store paints, solvents, and chemicals according to their labels, and keep them away from heat, sparks, and children. Do not use a file cabinet as a storage spot for propane tanks or anything flammable that requires special handling. A garage can get hot, cold, damp, and dusty, so choose storage locations wisely.
If you add electrical charging for batteries nearby, keep cords tidy and avoid overloading outlets. A small charging shelf above or beside the cabinet can work well, but the setup should stay dry, ventilated, and easy to inspect.
Budget Breakdown: How Much Does It Cost?
The cost depends on how fancy you get. A basic cleanup and drawer organization project may cost very little if you already own paint, bins, and liners. A more complete makeover with casters, pegboard, primer, paint, hooks, and plywood can cost more, but it is still often cheaper than buying a large rolling tool chest.
Here is a realistic budget range:
- Used file cabinet: free to $50
- Cleaner, sandpaper, and rags: $10 to $20
- Primer and paint: $15 to $40
- Drawer liners and dividers: $15 to $50
- Pegboard and hooks: $20 to $60
- Casters and mounting hardware: $25 to $80
- Plywood or lumber: $15 to $60
If you are thrifty, this can be a weekend project under $75. If you want a polished mobile tool station, plan for more. Either way, you get custom storage built around your tools instead of forcing your tools to fit a generic box.
Mistakes to Avoid
Skipping the Declutter
Do not organize tools you no longer use. Before loading the cabinet, sort duplicates, broken tools, mystery hardware, and dried-out supplies. Keep the useful items. Donate or recycle what you can. Toss what is unsafe or unusable.
Making Every Drawer a Junk Drawer
A drawer without a purpose becomes a junk drawer by sunset. Assign categories before loading tools. If a tool does not fit a category, decide whether it deserves a new category or a new home.
Ignoring Weight
Files are heavy, but tools can be heavier. Spread weight evenly. Put dense items low. Do not overload one drawer with every wrench you own unless the drawer slides are ready for combat.
Forgetting Workflow
Store frequently used items at waist or chest height. Seasonal or rarely used supplies can go lower or higher. The best organizer is the one you actually use.
Experience Notes: What This Project Teaches You
Turning a file cabinet into a tool stash sounds like a small project, but it teaches a surprisingly big lesson: organization is not about buying more containers. It is about giving every useful thing a logical place to live. The first time you open a drawer and immediately find the right screwdriver, you may feel a strange calm. Do not worry. That is just the sound of your garage becoming less dramatic.
One of the most satisfying parts of this project is how quickly the cabinet changes identity. At first, it looks like office furniture that got lost on the way to a spreadsheet meeting. After cleaning, painting, lining the drawers, and adding labels, it becomes a real workshop asset. The transformation is visual, but it is also practical. Suddenly, drill bits stop rolling around in coffee cans. Gloves stop hiding under bags of mulch. Tape measures stop multiplying in random corners like tiny yellow rabbits.
Another experience worth mentioning is that the cabinet will reveal your habits. If you keep tossing the same tool on top instead of putting it in a drawer, that tool probably needs a more convenient spot. Add a hook. Add a magnetic strip. Add a small tray on the top surface. Good DIY storage should adapt to real behavior. Otherwise, it becomes a museum exhibit titled “The Place I Intended to Put Things.”
Mobile versions are especially useful. A cabinet on locking casters can roll to the driveway for car work, to the garden gate for yard cleanup, or beside a workbench for weekend repairs. That mobility changes how you work because you spend less time walking back and forth for one more thing. Anyone who has made six trips across the garage for a pencil, a bit, a screw, a washer, another screw, and then the pencil again will appreciate this deeply.
The project also encourages smarter shopping. Once your tools are sorted, you can see what you already own. You may discover three hammers, five tape measures, seventeen nearly empty boxes of screws, and no working utility knife blades. Organization prevents duplicate buying and helps you restock only what you need. Your wallet may not applaud, but it will quietly stop crying.
There is also a creative confidence boost. Repurposing a cabinet proves that storage does not have to come from a matching showroom set. A little imagination can turn secondhand furniture into a custom garage solution. The scratches and dents do not ruin the result; they add character. This is a tool stash, not a luxury sedan.
For families, shared homes, or busy garages, the biggest benefit may be communication. Labels and categories make it easier for everyone to return items. When the pruning shears have a labeled drawer and the drill bits have a bin, cleanup becomes less of a treasure hunt. Even kids can understand broad categories, though sharp tools and power tool accessories should stay secured and age-appropriate.
The final experience is simple pride. You rescued something old, solved a real problem, saved money, reduced clutter, and built a storage system that fits your space. That is the heart of good DIY. It is not perfection. It is usefulness with personality. And maybe a few paint drips on the garage floor, because every great project leaves a tiny signature.
Conclusion
A file cabinet may not look exciting at first glance, but with the right upgrades, it can become one of the most useful storage pieces in your garage or workshop. Whether you keep it upright for hand tools, flip it into a yard tool bin, add casters for mobility, or dress it up with pegboard and paint, the result is practical, affordable, and genuinely satisfying.
The secret is to design around your real tools and your real habits. Clean the cabinet well, protect the metal, divide the drawers, label categories, keep heavy items low, and leave room for the supplies you use most. Do that, and your old filing cabinet will stop holding paperwork from the past and start holding the tools that help you build, fix, plant, repair, and improve what comes next.
In other words, give that tired cabinet a second chance. It has drawers. It has structure. It has seen things. And now, at long last, it is ready to become the tool stash your garage has been waiting for.