Table of Contents >> Show >> Hide
- What Is DIY Photo Plate Wall Art?
- Why This Project Works So Well
- Supplies You May Need
- Choosing the Right Photos and Plates
- How to Make DIY Photo Plate Wall Art
- How to Design the Wall Layout
- How to Hang Plates Safely
- Styling Ideas for Different Rooms
- Common Mistakes to Avoid
- Why DIY Photo Plate Wall Art Feels So Special
- The Experience of Making DIY Photo Plate Wall Art
- Final Thoughts
- SEO Tags
Some people build a gallery wall with matching frames and a level so precise it could land a spaceship. And then there are the rest of us, standing in the kitchen holding a thrifted plate, a stack of old photos, and a dangerous amount of creative confidence. That, frankly, is where the magic begins.
DIY photo plate wall art is one of those rare home projects that feels personal, looks expensive, and can still be done on a realistic budget. It blends memory-making with wall décor, which means your favorite snapshots do not have to live their entire lives trapped in your phone beside blurry screenshots and one accidental photo of your shoe. Instead, they can become part of a warm, layered, conversation-starting display that feels custom because it actually is.
Whether you want a sentimental family wall, a vintage-inspired dining nook, or a creative craft project that does more than gather dust in a drawer, this idea has range. Better yet, it works with many decorating styles: cottage, farmhouse, eclectic, traditional, grandmillennial, and even modern spaces that need a little soul. In other words, this is not just a craft. It is a tiny rebellion against boring walls.
What Is DIY Photo Plate Wall Art?
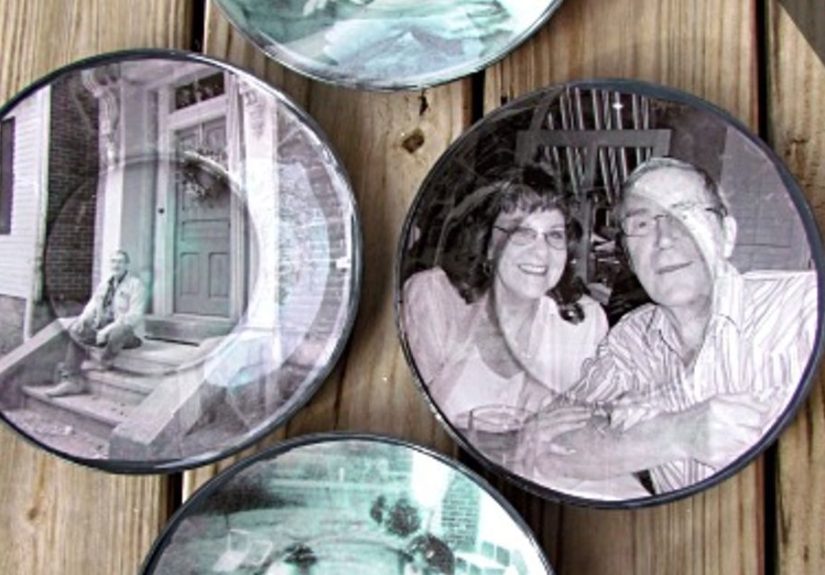
DIY photo plate wall art is exactly what it sounds like: decorative plates customized with photos and displayed on a wall as a curated art arrangement. The finished look can be romantic, playful, nostalgic, dramatic, or delightfully quirky depending on the photos, plates, and layout you choose.
There are two especially popular directions for this project. The first is a reverse decoupage style, usually on clear glass plates, where the photo or printed design is applied to the back so the front stays smooth and polished. The second is a decorative transfer style, where copied images are transferred or sealed onto a plate meant purely for display. Both approaches can look beautiful. The main difference is the finish, the materials, and how “vintage keepsake” versus “art-craft statement” you want the result to feel.
Why This Project Works So Well
Photo plate wall décor has staying power because it solves two decorating problems at once. First, it fills blank wall space with shape and texture. Plates naturally add curves, layering, and a collected feel that framed prints sometimes cannot. Second, it turns personal photos into something more artistic than a standard frame wall. The round format crops images in an unexpected way and makes even familiar pictures feel fresh.
It is also incredibly flexible. You can use black-and-white family portraits for a timeless look, travel photos for a memory wall, botanical prints mixed with personal snapshots for a softer design, or old recipe cards and handwritten notes among the plates for extra personality. The result feels less like you bought décor and more like your home slowly told the truth about who lives there.
Supplies You May Need
For the plate art itself
- Clear glass or decorative plates
- Laser or dry-toner photo copies of your images
- Scissors
- Foam brush or soft craft brush
- Decoupage medium or photo transfer medium
- Soft cloth, brayer, or smoothing tool
- Rubbing alcohol or glass cleaner for prep
- Wax paper or parchment paper for your work surface
For the wall display
- Plate hangers, adhesive disc hangers, plate racks, or other appropriate hanging hardware
- Measuring tape
- Pencil
- Level
- Painter’s tape
- Paper templates if you want to map the arrangement first
One important reality check before the glitter cannon goes off: if you seal, decoupage, or paint a plate, think of it as decorative art unless your method specifically keeps food away from the design area. For example, reverse decorating on the back of a clear glass plate can preserve the eating surface, while many top-coated craft finishes are meant for display only. This project is happiest on a wall anyway, so let it live its best decorative life.
Choosing the Right Photos and Plates
The best DIY photo plate wall art starts with editing, not gluing. Choose photos with strong contrast, clear subjects, and emotional value. Tiny faces in a crowded group shot often disappear once cropped into a round shape. Close-up portraits, buildings, pets, flowers, and travel details usually work better.
Black-and-white photos are especially forgiving. They create a cohesive gallery, feel slightly nostalgic, and help mixed plate styles look more intentional. Sepia tones can work too if you want a softer antique vibe. If you prefer color, keep the palette somewhat consistent. Otherwise, your wall can quickly drift from “charming and collected” into “garage sale with Wi-Fi.”
As for plates, you have options:
- Clear glass plates: Great for reverse decoupage and layered photo effects.
- White ceramic plates: Crisp, classic, and perfect for clean, minimal displays.
- Vintage thrifted plates: Full of character and ideal for eclectic or cottage-style rooms.
- Mixed plate sets: Best when united by a common color, theme, or photo treatment.
If you are shopping secondhand, inspect every plate for cracks, chips, and instability before turning it into wall art. Minor flaws may still work for decorative display, but anything fragile should be handled with extra caution and hung securely.
How to Make DIY Photo Plate Wall Art
Method 1: Reverse decoupage on clear glass plates
This is a beginner-friendly favorite because the decorated side sits on the back of the plate, while the front stays smooth and glossy. It gives the finished piece a polished look that feels surprisingly upscale for a project you made while wearing old sweatpants and eating crackers over the craft table.
- Clean the plate thoroughly. Remove fingerprints, grease, and dust so the adhesive bonds evenly.
- Print your photo copy to size. Test the crop before attaching anything. Round plates are not forgiving to last-minute optimism.
- Cut the image carefully. You can trim into a circle, oval, or organic shape depending on the style you want.
- Apply your medium to the back of the plate or image, depending on the product instructions. Work in a smooth, even layer.
- Place the photo on the back of the plate. Smooth gently from the center outward to reduce bubbles and wrinkles.
- Add background layers if desired. Fabric, scrapbook paper, or paint can hide the edges and give the back a finished look.
- Seal and let cure fully. Do not rush drying time. Craft glue has a long memory and will punish impatience.
- Add a plate hanger only when the plate is completely dry.
Method 2: Photo transfer look for decorative display plates
If you want a more artistic, vintage, or slightly weathered effect, a transfer-style finish can be gorgeous. This method often relies on a toner copy and a transfer medium rather than a traditional photo print. The result tends to look more integrated with the plate surface instead of simply sitting behind it.
- Choose a copied image, not an original photo. This is a project for copies, not irreplaceable prints.
- Use a toner-based print whenever the medium requires it. Check your chosen transfer product first.
- Apply the transfer medium evenly. Thin patches can lead to missing spots later.
- Press the image onto the plate and smooth it out gently.
- Allow the project to dry fully. Yes, fully. Not “probably fine.” Fully.
- Reveal the image according to the product process. Some methods involve dampening and rubbing away the paper backing.
- Seal only if the product and finish call for it. Keep the piece decorative rather than functional.
How to Design the Wall Layout
The arrangement is where good craft turns into good décor. Before hanging anything, lay your plates on the floor and experiment. Take a photo of the arrangement once it looks right. That simple move saves a surprising amount of second-guessing later.
Start with one of these layout ideas:
1. Center-out cluster
Place your strongest or largest photo plate in the middle and build outward. This works well over a buffet, console, bed, or dining bench.
2. Organic gallery cluster
Mix plate sizes and leave the layout slightly imperfect on purpose. This style feels collected, relaxed, and full of charm.
3. Symmetrical arch
Use plates to form an arch over a bed, mirror, or sideboard. This looks elegant and surprisingly designer-ish without requiring a trust fund.
4. Mixed-media wall
Combine photo plates with framed prints, small mirrors, handwritten recipe cards, or vintage finds. This creates a layered wall with real personality.
When transferring the design to the wall, mark the key points lightly in pencil and use a level for spacing. Painter’s tape or paper templates can help you avoid making ten holes because your “eyeballing” phase got a little too ambitious.
How to Hang Plates Safely
Beautiful plate wall? Wonderful. Beautiful plate wall that suddenly performs a dramatic swan dive at 2:13 a.m.? Less wonderful.
Use hardware that matches the plate size, weight, and value. Traditional spring-style plate hangers are widely used for secure wall display. Adhesive disc hangers can offer a more hidden look. Some lightweight displays may work with removable hanging systems when used exactly as directed, but fragile, valuable, or irreplaceable pieces deserve extra caution and a more secure setup.
Whatever method you choose, remember these basics:
- Check the plate’s diameter and weight before choosing hardware.
- Do not assume one hanger fits all just because optimism is free.
- Test the hold before building the full wall.
- Avoid risky placement above beds, cribs, or anywhere a fall could cause harm.
- Follow drying and waiting times for adhesive products exactly.
- Double-check alignment and stability after each plate goes up.
Styling Ideas for Different Rooms
Kitchen or breakfast nook
This is the classic location. Use family recipe photos, old market snapshots, botanical prints, or heritage-style black-and-white portraits. Mix photo plates with patterned thrifted china for a collected look.
Dining room
Go dramatic with larger plates, moody vintage photography, and a tighter layout over a sideboard. A formal room can handle stronger contrast and more symmetry.
Hallway or stair wall
Create a memory path with vacation images, childhood photos, wedding shots, or pet portraits. Keep the palette consistent so the wall reads as intentional, not chaotic.
Bedroom
An arched arrangement over the bed can look soft and romantic, especially with muted colors, florals, or sepia portraits.
Home office or craft room
Use inspirational quotes, family snapshots, postcards, and creative prints. This is where playful plate mixing can really shine.
Common Mistakes to Avoid
- Using low-contrast photos: If the image is muddy on paper, it will not improve on a plate by sheer force of hope.
- Skipping surface prep: Dust, oil, and fingerprints sabotage adhesion.
- Rushing dry time: Wrinkles, lifting, and cloudy finishes often begin with impatience.
- Ignoring scale: Tiny images on oversized plates can look lost.
- Overcrowding the wall: Plates need breathing room to read as art.
- Choosing hanging methods based only on convenience: The easiest option is not always the safest one.
Why DIY Photo Plate Wall Art Feels So Special
There is something unusually warm about seeing memories displayed on an object as familiar as a plate. Frames can feel formal. Canvas can feel expected. But a photo plate wall has whimsy, texture, and story. It feels handcrafted in the best possible way. It suggests that the people in the home have taste, history, and maybe a soft spot for flea markets and sentimental projects. Honestly, excellent company.
And because you can keep adding to it over time, this kind of wall art does not have to be finished in one weekend. Start with three plates. Add two more after your next trip. Tuck in an heirloom dish from a grandparent, a copied wedding photo, or a snapshot of the dog looking suspiciously noble. Over time, the wall becomes less of a décor feature and more of a visual autobiography.
The Experience of Making DIY Photo Plate Wall Art
Making DIY photo plate wall art is one of those projects that tends to surprise people. It looks simple at first. You gather a few plates, print a few photos, clear off the table, and tell yourself this will be a calm afternoon craft. Then the real experience begins. You start sorting through old images and suddenly you are no longer just making wall décor. You are editing memories.
That is part of what makes this project so enjoyable. Every choice feels personal. You are not just deciding between a floral plate and a white one. You are deciding whether the wall should tell a story about family, travel, childhood, pets, or everyday moments that felt ordinary at the time but now feel golden around the edges. A blurry birthday photo may not win any photography awards, but on the right plate it can become the heart of the whole arrangement.
The hands-on process is satisfying too. Cleaning the plates, trimming the images, smoothing paper into place, and watching the design come together has a pleasantly old-school rhythm. It is slower than scrolling, quieter than shopping, and much more memorable than adding another generic print to a cart at midnight. There is also a small thrill in using humble materials to make something that looks layered and thoughtful. A thrift-store plate and a copied photo can end up looking like a boutique find with a backstory.
Of course, it is not all cinematic sunshine and perfectly styled craft tables. There is usually one plate that makes you reconsider every life choice. One image goes on crooked. One bubble appears from nowhere like it pays rent there. One layout that looked genius on the floor suddenly looks confused on the wall. But that is also part of the charm. These moments force you to adjust, improvise, and let the project become a little more human. Perfectly polished walls can be pretty, but handmade walls are often more lovable.
Another great part of the experience is how easy it is to make the project social. Families can create plates from old vacation photos. Friends can make memory plates for dorms, apartments, or gifts. Kids can help choose the images. Grandparents can contribute copied photos that would otherwise stay hidden in albums. The project creates conversation while you make it, and then keeps the conversation going after it is hung.
Once the plates are finally on the wall, there is a very specific kind of satisfaction that kicks in. The room feels warmer. The wall feels intentional. People notice it immediately because it is not standard store-bought décor. They step closer. They ask questions. They point to a plate and laugh or tell a story. That reaction is the real payoff. DIY photo plate wall art does not just decorate a room. It makes the room more personal, more welcoming, and more alive.
In the end, that is the best experience this project offers. It turns decorating into remembering, crafting into storytelling, and a blank wall into something with emotional weight. Not bad for a plate, a photo, and a little creative chaos.
Final Thoughts
DIY photo plate wall art is creative, affordable, deeply personal, and surprisingly stylish when done with care. It invites you to use photos in a less expected way, gives vintage and plain plates a second life, and creates a display that feels collected instead of copied. Whether you build a dramatic plate wall in the dining room or a small memory cluster in a hallway, the project offers that sweet spot every DIY lover is chasing: meaningful, beautiful, and actually worth doing.
So go ahead. Rescue those photos from your camera roll. Rescue those plates from the cabinet. And rescue that blank wall from living such a dull, undecorated existence.