Table of Contents >> Show >> Hide
- What Is an Electronic Dice Project?
- Why Electronic Dice Works So Well for Beginners
- The Core Lesson: Microcontrollers Connect Code to the Real World
- Essential Parts of an Electronic Dice Build
- What the Code Actually Teaches
- A Simple Example of Dice Logic
- Common Beginner Mistakes and What They Teach
- Why This Project Builds Real Programming Confidence
- Ways to Upgrade the Electronic Dice
- Educational Value: Small Project, Big Lessons
- Practical Experience Notes: What Building Electronic Dice Really Feels Like
- Conclusion
Every great electronics journey needs a first “aha!” moment. For some people, it is blinking an LED. For others, it is making a tiny speaker chirp like an anxious robot cricket. But few beginner projects are as friendly, visual, and secretly educational as electronic dice. Press a button, watch LEDs dance, and suddenly a microcontroller feels less like a mysterious black chip and more like a very small assistant with excellent timing and questionable casino skills.
An electronic dice project takes the familiar idea of rolling a six-sided die and rebuilds it with code, wires, LEDs, resistors, and a microcontroller such as an Arduino, ATtiny85, Raspberry Pi Pico, ESP32, or similar development board. The concept is simple: a button acts as the “roll,” the program generates a number from one to six, and the LEDs display a dice face pattern. Under the hood, however, this tiny project introduces many of the core ideas of microcontroller programming: digital input, digital output, timing, randomness, button debouncing, circuit layout, and debugging.
That is why electronic dice is more than a blinking toy. It is a compact classroom. It gives beginners a project that is easy to understand, cheap to build, and satisfying to show off. Nobody needs a lecture on what dice do. The moment the LEDs light up in a pattern of dots, the project explains itself. That makes it perfect for students, hobbyists, makers, teachers, and anyone who has ever looked at a breadboard and thought, “This looks like a tiny city designed by a caffeinated squirrel.”
What Is an Electronic Dice Project?
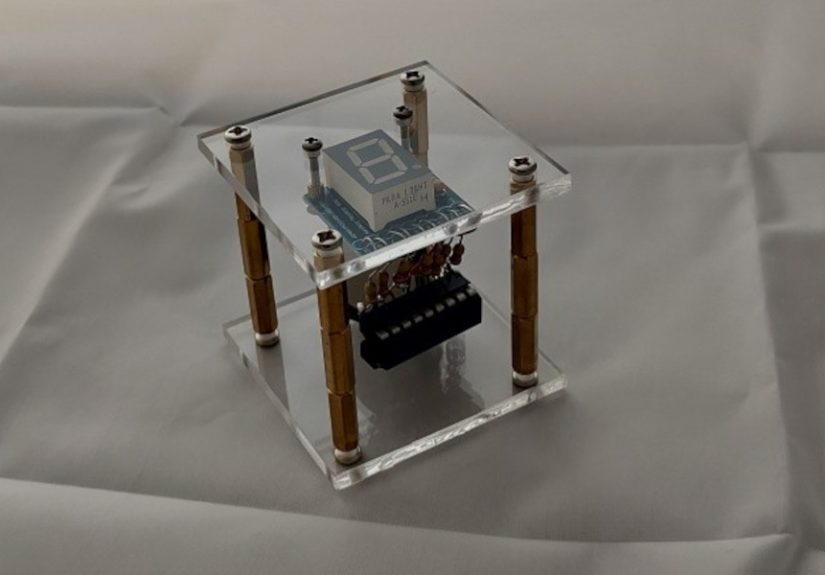
An electronic dice is a digital version of a physical die. Instead of tossing a cube across the table and hoping it does not roll under the sofa, the user presses a button. A microcontroller reads that button press, chooses a pseudo-random number, and lights up LEDs arranged like the pips on a traditional die. The output can also be shown on a seven-segment display, an OLED screen, an RGB LED matrix, or even a small LCD, but classic LED pips are the most beginner-friendly version.
A basic build usually includes a microcontroller board, six or seven LEDs, current-limiting resistors, one pushbutton, jumper wires, and a breadboard. Some versions use seven LEDs because the center dot appears in the one, three, and five patterns. Other versions use fewer output pins by pairing LEDs or using clever wiring. More advanced builders may shrink the project onto an ATtiny microcontroller or design a custom printed circuit board. That is the beauty of the project: it begins as a beginner activity and grows with the learner.
Why Electronic Dice Works So Well for Beginners
The best beginner electronics projects do three things: they are understandable, they are forgiving, and they give instant feedback. Electronic dice checks all three boxes. The user knows what should happen. If the LEDs do not light correctly, the error is usually visible. If the button does not respond, there are only a few likely suspects: wiring, input configuration, code logic, or button bounce. The project is small enough to troubleshoot without needing a detective board, a magnifying glass, and dramatic music.
Compared with abstract programming exercises, electronic dice makes code physical. A variable becomes a number you can see. A condition becomes a pattern of lights. A loop becomes repeated behavior. A button press becomes input from the real world. This is the doorway into embedded systems, where software does not simply print words on a screen; it controls devices, reads sensors, drives motors, and responds to humans who press buttons with great confidence and zero patience.
The Core Lesson: Microcontrollers Connect Code to the Real World
A microcontroller is a small computer built to control hardware. Unlike a laptop or desktop computer, it usually does not run a full operating system for everyday use. Instead, it runs a focused program that interacts with electrical signals. It can turn pins on and off, measure voltage, communicate with sensors, control displays, and react to switches.
In an electronic dice project, the microcontroller has a simple job: wait for a button press, generate a dice value, and display the result. But that simple job teaches a powerful idea. Microcontroller programming is not only about writing code correctly. It is about understanding what the code does to actual components. When the program sets an output pin HIGH, an LED may turn on. When it sets the pin LOW, the LED turns off. When the program reads an input pin, it is checking whether the outside circuit is presenting a high or low voltage.
Essential Parts of an Electronic Dice Build
Microcontroller Board
Popular beginner boards include the Arduino Uno, Arduino Nano, Raspberry Pi Pico, ESP32 development boards, and small AVR chips such as the ATtiny85. For a first project, an Arduino-style board is often the easiest because it has a friendly programming environment, lots of examples, and enough pins for several LEDs and a button. A Raspberry Pi Pico is also a strong choice, especially for learners who want to explore MicroPython.
LEDs and Resistors
LEDs are the dice pips. Each LED should use a current-limiting resistor so the LED and microcontroller pin are protected. This is not decorative politeness; it is electronics hygiene. Without proper resistance, an LED can draw too much current and fail. Beginner kits often include 220-ohm or 330-ohm resistors, which are common choices for simple LED experiments, though exact values depend on supply voltage and LED type.
Pushbutton
The pushbutton is the user input. Press it, and the dice rolls. The button circuit may use a pull-up or pull-down resistor so the input pin has a stable value when the button is not being pressed. Without a stable reference, an input pin can float, producing unpredictable readings. Floating input pins are like cats near keyboards: technically present, but not reliable.
Breadboard and Jumper Wires
A solderless breadboard lets beginners build the circuit without permanent soldering. It is ideal for testing, changing, and fixing mistakes. Jumper wires connect the microcontroller pins to the LEDs, resistors, and button. Breadboards also teach an important practical skill: layout matters. A neat circuit is easier to debug than a colorful spaghetti sculpture.
What the Code Actually Teaches
1. Digital Output
The first major programming concept is digital output. Each LED is connected to a microcontroller pin configured as an output. The program turns specific pins on or off to create dice patterns. For example, rolling a six may light the top-left, middle-left, bottom-left, top-right, middle-right, and bottom-right LEDs. Rolling a one lights only the center LED.
This teaches beginners how software controls hardware. The line of code may look harmless, but it changes voltage on a pin and produces visible light. That connection between code and physical action is the heart of embedded programming.
2. Digital Input
The button introduces digital input. The microcontroller reads the pin connected to the button and decides whether the user has pressed it. Beginners learn that a button is not simply “clicked” in the way a computer mouse is clicked. Electrically, it opens or closes a circuit. The program must interpret that circuit state correctly.
3. Button Debouncing
Mechanical buttons do not always change cleanly from off to on. When pressed, the contacts can bounce for a tiny amount of time, causing the microcontroller to detect multiple transitions. To humans, it was one press. To the microcontroller, it may look like a hyperactive tap dance. Debouncing solves this by waiting briefly, checking the input again, or using a timing method to confirm that the button state is stable.
Debouncing is an excellent early lesson because it shows that real-world signals are messy. Code that works perfectly in theory may behave strangely when connected to a physical switch. Learning to handle that mess is part of becoming a good microcontroller programmer.
4. Pseudo-Random Numbers
Electronic dice also introduces pseudo-random number generation. Most beginner microcontroller environments provide a function that can return a number in a range. The dice program may request a number from one to six. In many systems, this number is pseudo-random, meaning it is generated by an algorithm rather than true physical randomness.
For a classroom dice project, pseudo-random behavior is usually good enough. However, learners can also explore seeding, which changes the starting point of the pseudo-random sequence. Some beginner examples use noise from an unconnected analog input as a seed, though advanced discussions of randomness can go much deeper. For this project, the key idea is simple: the dice should not show the same predictable sequence every time.
5. Arrays and Patterns
A clean dice program often stores LED patterns in arrays. Instead of writing long, repetitive code for every roll, the program can define which LEDs belong to each dice face. This introduces data organization, lookup tables, and cleaner logic. Beginners see why structured code matters: it is easier to change one pattern in a table than to chase repeated instructions through the program like a raccoon in a garage.
A Simple Example of Dice Logic
The logic of electronic dice can be explained without drowning in syntax. A typical program follows this flow:
- Set LED pins as outputs.
- Set the button pin as an input.
- Wait for the button to be pressed.
- Debounce the button press.
- Generate a number from one to six.
- Turn on the LEDs that match that dice face.
- Hold the result until the next roll.
In simplified pseudocode, it looks like this:
This is small enough for a beginner to understand, but it contains the same thinking used in larger embedded systems: initialize hardware, read inputs, process logic, update outputs, and repeat.
Common Beginner Mistakes and What They Teach
The LED Is Backward
LEDs have polarity. If the LED is installed backward, it may not light. This teaches component orientation, a basic but vital electronics skill. It also teaches humility. Every maker eventually learns that “I checked everything” often means “I checked everything except the thing that is wrong.”
No Resistor on the LED
Skipping the resistor may damage the LED or stress the microcontroller pin. The lesson here is current control. Beginners start to understand that voltage is only part of the story. Current matters too, and components have limits.
The Button Reads Randomly
If the input pin is floating, the dice may roll by itself or ignore the button. This teaches pull-up and pull-down resistors, internal pull-up options, and stable logic levels. It is also a great reminder that “nothing connected” is not the same as “definitely off.”
The Dice Rolls Multiple Times
If one press causes several rolls, the likely cause is button bounce or code that does not wait for release. This teaches debouncing and state management. Suddenly, timing becomes important. The microcontroller is fast enough to notice things humans cannot.
Why This Project Builds Real Programming Confidence
Electronic dice gives beginners a complete development cycle in miniature. They write code, upload it, test the hardware, observe behavior, find bugs, make changes, and test again. That loop is exactly how real embedded development works. The project may be playful, but the workflow is professional.
It also encourages experimentation. What if the LEDs animate before showing the final roll? What if the dice “shakes” through random patterns for half a second? What if two buttons control two dice? What if the output appears on a seven-segment display instead of LEDs? Each variation introduces new lessons: timing, multiplexing, display control, functions, memory usage, or power management.
Ways to Upgrade the Electronic Dice
Add a Rolling Animation
A rolling animation makes the project feel more alive. The LEDs can flash through random patterns quickly before settling on the final value. This teaches loops, delays, and user experience. Even tiny embedded systems benefit from good feedback.
Use a Seven-Segment Display
A seven-segment display can show the number directly. This version teaches segment mapping and display logic. It is slightly less charming than traditional dice pips, but it is a great bridge toward clocks, counters, scoreboards, and measurement displays.
Build It on an ATtiny85
After prototyping on a larger board, learners can move the project to a smaller microcontroller. This teaches pin limitations, compact circuit design, and efficient code. Suddenly every pin matters. The project becomes less like building with a full toolbox and more like packing for a weekend trip using only one sock drawer.
Design a Custom PCB
A custom printed circuit board turns the project into a polished object. This introduces schematic design, board layout, footprints, traces, and manufacturing files. The same dice project that started on a breadboard can become a pocket-sized gadget or classroom kit.
Educational Value: Small Project, Big Lessons
Teachers and mentors often look for projects that are approachable without being shallow. Electronic dice is ideal because the goal is obvious, the parts are inexpensive, and the learning outcomes are rich. Students can work through electrical polarity, resistance, pin modes, input states, randomness, functions, arrays, and debugging without feeling like they are trapped in a textbook swamp.
The project also supports different learning speeds. A beginner can build the basic version and feel successful. A more advanced student can optimize the code, reduce pin usage, add sleep mode for battery power, or create a better random seed. A design-minded learner can focus on layout, enclosure, and user interaction. Everyone starts with the same dice, but nobody has to stop at the same finish line.
Practical Experience Notes: What Building Electronic Dice Really Feels Like
The first time you build electronic dice, the project seems almost too simple. Six LEDs, one button, a handful of resistors, and a board that promises to obey your code. Then you press the button, and nothing happens. This is the ancient maker ritual known as “staring at the circuit until it confesses.” Usually, the problem is not dramatic. Maybe one LED leg is in the wrong breadboard row. Maybe the ground rail is not connected. Maybe the button is rotated in a way that makes the circuit permanently open. The fix is small, but the lesson is huge: electronics rewards patience more than panic.
One of the most valuable experiences is learning to test in pieces. Instead of wiring the entire dice and uploading a full program immediately, it helps to blink one LED first. Then blink all LEDs one at a time. Then read the button and print its state to the serial monitor. Then combine the button and LEDs. This step-by-step method may feel slower, but it is actually faster because it prevents mystery bugs from forming a tiny union and demanding benefits.
Another memorable moment comes from button bounce. Many beginners assume a button press is clean and simple. The microcontroller disagrees. It may register several presses in a fraction of a second, causing the dice to flicker or roll multiple times. Adding debounce logic feels like discovering that hardware has personality. The button is not broken; it is just mechanically honest. Real switches bounce, and good code handles it.
The random number lesson is also eye-opening. At first, using a random function feels magical. Then you notice the same sequence may appear after every reset if the generator starts from the same seed. This is where learners discover the difference between “random enough for a toy” and “random enough for serious security,” which are absolutely not the same thing. For electronic dice, the goal is playful unpredictability, not cryptographic perfection. Still, the concept plants an important seed for future programming.
The best part of the project is the final polish. Adding a rolling animation changes the dice from a technical demonstration into a tiny product. A quick LED shuffle before the final number makes the device feel responsive and intentional. This teaches an underrated lesson: embedded programming is not only about making hardware work. It is about making hardware communicate clearly with the person using it.
By the end, electronic dice stops being “just LEDs.” It becomes proof that you can control the physical world with code. You pressed a button, the microcontroller listened, the program made a decision, and the LEDs answered. That loop is the foundation of countless real devices, from thermostats and toys to lab equipment and smart home gadgets. Not bad for a project that began as a digital replacement for a cube people usually throw across a table.
Conclusion
Electronic dice is one of the smartest beginner projects for learning microcontroller programming because it is simple on the surface and surprisingly rich underneath. It teaches digital inputs, digital outputs, LED control, button wiring, debouncing, pseudo-random numbers, code structure, and troubleshooting. It also gives learners something fun to use when they are done, which is always better than a project that only produces a blinking light and an emotional shrug.
For anyone starting with Arduino, Raspberry Pi Pico, ATtiny, ESP32, or another beginner-friendly microcontroller, electronic dice is a perfect next step after blinking an LED. It turns theory into interaction. It turns wiring into feedback. Most importantly, it turns “I have no idea what this chip does” into “I made a tiny machine that rolls dice.” That is a small sentence with a big spark behind it.

![What Does a World With Zero Search Results Looks Like? [New Data]](https://business-service.2software.net/wp-content/uploads/2026/06/what-does-a-world-with-zero-search-results-looks-like-new-data-QHIlaxzP-thumb.jpg)