Table of Contents >> Show >> Hide
- First, Make Sure You Are Working With an Actual Excel Table
- How to Add a Row to a Table in Excel on Windows
- How to Add a Row to a Table in Excel on Mac
- How to Add a Row to a Table in Excel for the Web
- What Happens to Formulas and Formatting?
- Common Problems When Adding Rows in Excel Tables
- Best Practices for Adding Rows to Excel Tables
- Real-World Example: Adding a New Record to a Sales Table
- Experience Section: What Adding Rows in Excel Tables Actually Feels Like in Real Life
- Final Thoughts
Adding a row to a table in Excel sounds like one of those tasks that should take two seconds and exactly zero emotional damage. And most of the time, it does. But Excel has a tiny talent for making simple things feel oddly dramatic when you are working fast, using a different device, or dealing with a table that behaves more like a moody spreadsheet celebrity than a humble grid of data.
The good news is that adding a row to a table in Excel on Windows, Mac, and Excel for the web is actually pretty easy once you know which kind of “table” you are dealing with. If your data has been turned into a real Excel table, not just a bunch of cells pretending to be organized, Excel gives you several smart ways to add rows while preserving formulas, formatting, filters, and that satisfying striped-table look people secretly love.
In this guide, you will learn how to insert a new row inside an Excel table, how to add a row at the bottom, how to add multiple rows at once, and what to do when Excel refuses to cooperate like a stubborn office printer with trust issues.
First, Make Sure You Are Working With an Actual Excel Table
Before you add a row to a table in Excel, it helps to make sure your data is really a table and not just a regular worksheet range with nice borders and big dreams.
An Excel table is a special data structure that comes with built-in filtering, automatic formatting, structured references, and easier expansion. In plain English, it is smarter than a normal range. When you add rows to it, Excel usually keeps the table formatting and often extends formulas automatically too.
If your data is not already a table, select any cell in your data range and use Format as Table from the Home tab. Pick a style, confirm the range, and make sure the header option is correct. Once that is done, you are ready to add rows the easy way.
How to Add a Row to a Table in Excel on Windows
If you are using Excel on Windows, you have several ways to add a new row to a table. Some are mouse-friendly. Some are keyboard-friendly. Some are perfect when your coffee is still hot and you are feeling efficient.
Method 1: Right-Click Inside the Table
This is the most straightforward method for most users.
- Click a cell in the table row near where you want the new row.
- Right-click that cell.
- Choose Insert.
- Select Table Rows Above.
Excel inserts the new row above the row you selected. So if you want a new row between row 8 and row 9 of your table, click somewhere in row 9 and insert above. Excel loves “above.” It is very committed to the concept.
Method 2: Use the Home Tab
If right-click menus are not your thing, or your mouse is acting like it wants a vacation, use the ribbon instead.
- Click a cell in the table.
- Go to the Home tab.
- Open the Insert menu in the Cells group.
- Choose the row insertion option that applies to the selected table row.
This is handy when you are already working from the ribbon and want a more visual route.
Method 3: Add a Row at the Bottom of the Table
Need to add a new record at the end of the table? Excel makes that delightfully simple.
- Click the last cell in the last row of the table.
- Press Tab.
Excel creates a new blank row at the bottom of the table and moves the active cell into it. It is one of the nicest little Excel tricks around. Fast, clean, and weirdly satisfying.
You can also start typing in the first empty row directly below the table. In many modern Excel table setups, the table expands automatically to include that new row. That is especially useful for data entry tasks like expense logs, sales trackers, inventory lists, and student records.
Method 4: Insert Multiple Rows at Once
If you need more than one row, Excel does not make you insert them one by one like it is 1998.
- Select the same number of existing rows as the number of rows you want to add.
- Right-click the selection.
- Choose Insert and insert table rows above.
For example, if you select three table rows, Excel inserts three new rows. This is perfect when you know a batch of new records is coming and you want room prepared in advance.
Method 5: Use a Keyboard Shortcut
Windows users who love shortcuts can use row insertion shortcuts to speed things up. In a regular sheet, selecting a row and inserting is quick. In a table, shortcut behavior may depend on what is selected, but it is still a strong time-saver for power users who live by the keyboard and probably judge everyone else a little.
If you use shortcuts often, remember this rule: what you select matters. Select a single cell, and Excel may ask how to shift cells. Select the whole row or a table row, and Excel behaves much more predictably.
How to Add a Row to a Table in Excel on Mac
Excel for Mac is very capable, but the menus and shortcut behavior can feel slightly different from Windows. The easiest reliable method on Mac is the context menu.
Method 1: Control-Click the Row
- Click a cell in the table row near where you want the new row.
- Hold Control and click, or use a two-finger click on the trackpad if that is your setup.
- Choose Insert.
- Pick the option to add the row.
Just like on Windows, the new row is typically inserted above the selected row. So choose the row below your intended insertion point if you want the new one to land in the correct spot.
Method 2: Add a Row at the End of the Table
Mac users can also use the bottom-of-table trick.
- Click the rightmost cell in the last row of the table.
- Press Tab.
That creates a new row at the end of the table. If your goal is simple data entry, this is often the fastest method on a Mac too.
Method 3: Add Multiple Rows
The multi-row approach works similarly on Mac:
- Select as many row headings or table rows as the number of rows you want to add.
- Control-click the selection.
- Choose Insert.
This is useful when you are preparing a project tracker, budget sheet, or class attendance log and need several blank entries ready to go.
A Quick Note About Mac Shortcuts
Some Mac keyboards support row-insertion shortcuts, but shortcut behavior can vary depending on your keyboard layout, system settings, and whether the plus sign requires an extra key combination. That is why the context menu is usually the most dependable method for everyday users. It may not feel glamorous, but it works, and working is beautiful.
How to Add a Row to a Table in Excel for the Web
Excel for the web is much better than it used to be. It handles table editing well, especially for basic tasks like adding rows, entering records, and maintaining shared lists.
Method 1: Right-Click in the Table
- Open your workbook in Excel for the web.
- Make sure the file is in Editing mode, not just viewing mode.
- Click a cell in the row near where you want the new row.
- Right-click the cell.
- Choose the insert option for a new row.
This is the easiest web-based method when you need to place a row in the middle of an existing table.
Method 2: Type Below the Last Table Row
Excel for the web also supports the wonderfully lazy-and-efficient method of simply typing below the table.
- Click the first empty cell directly below the last table row.
- Type your new entry.
- Press Enter.
Excel usually expands the table automatically to include the new row. This is one of the best options for quick data entry in shared spreadsheets.
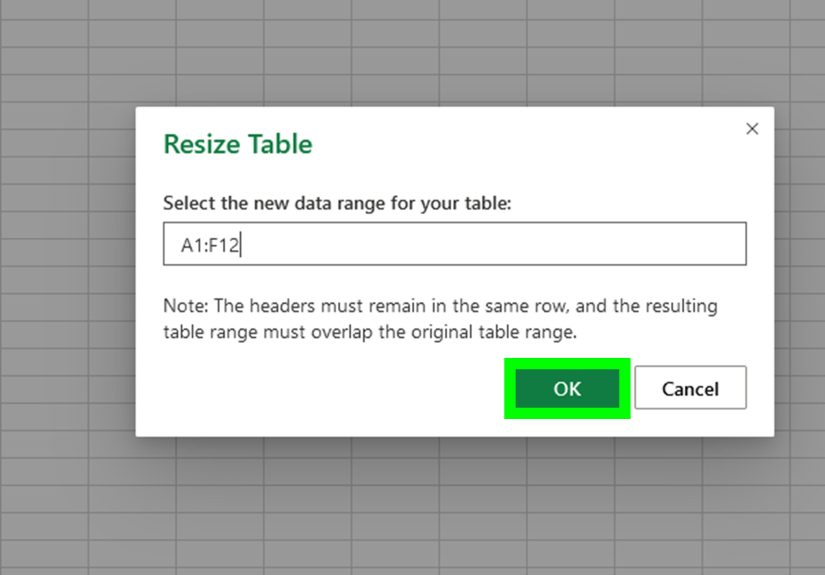
Method 3: Resize the Table When Needed
If your table does not automatically include the row you want, you may need to resize it.
- Click inside the table.
- Open the table design controls if available.
- Use Resize Table.
- Adjust the range so the new row is part of the table.
This is especially helpful when you pasted data nearby, inserted content outside the current table boundary, or inherited a spreadsheet built by someone who feared consistency.
What Happens to Formulas and Formatting?
One reason Excel tables are so useful is that they are better than normal ranges at staying organized as they grow. When you add a row to a table, Excel typically continues the table formatting automatically. If your table uses calculated columns, formulas can extend into the new row as well.
That means if you have a sales table with columns for Quantity, Price, and Total, a formula in the Total column often fills into the new row without extra copying. That is one of the biggest reasons people use tables in the first place: less repetitive work, fewer accidental mistakes, and a much smaller chance of muttering at your monitor.
Common Problems When Adding Rows in Excel Tables
The New Row Is Not Inside the Table
If you type below a table and the table does not expand, check whether the row is truly adjacent to the table. Blank lines, merged cells, odd formatting, or interruptions in the table structure can confuse Excel.
When that happens, use the insert option from inside the table or resize the table manually.
Excel Inserts the Row in the Wrong Place
This usually happens because Excel inserts above the selected row. The fix is easy: select the row below where you want the new row to appear.
Formulas Do Not Carry Down
If formulas are not appearing in the new row, the column may not be behaving like a proper calculated column. Re-enter the formula in the table column and make sure the data remains formatted as an Excel table rather than a plain range.
You Cannot Insert a Row
If Excel refuses to insert, the worksheet may be protected, the workbook may be shared with edit limitations, or the table may be blocked by data directly beneath it. Clearing space below the table or switching to editing mode in Excel for the web often solves the problem.
Best Practices for Adding Rows to Excel Tables
- Use real Excel tables, not just formatted ranges.
- Keep one blank row below a busy table only if you do not want auto-expansion triggered accidentally.
- Use structured column names so formulas remain easier to read.
- Avoid merged cells around your table if you want smooth row insertion.
- Choose one method and stay consistent when working with teams, especially in shared workbooks.
If your spreadsheet is part database, part to-do list, and part emotional support object, consistency matters even more.
Real-World Example: Adding a New Record to a Sales Table
Imagine you have an Excel table with these columns: Date, Customer, Product, Quantity, Unit Price, and Total.
You need to add a new sale.
On Windows or Mac, the fastest move is to click the last cell in the final row and press Tab. Excel jumps to a new blank row. Enter the new date, customer, and product info, and the Total formula may fill automatically if your table is set up correctly.
In Excel for the web, you can do nearly the same thing by typing in the row directly below the table or right-clicking to insert a row where needed. Either way, the table stays intact, the filters remain available, and the data stays neat.
That is the magic of using tables instead of random cell ranges that look organized until one tiny change turns them into spreadsheet spaghetti.
Experience Section: What Adding Rows in Excel Tables Actually Feels Like in Real Life
Anyone who works with Excel long enough eventually has a “why did the row go there?” moment. It usually happens during a busy day, while updating a tracker five minutes before a meeting, or while trying to look calm in front of coworkers who assume you naturally understand every spreadsheet ever made. That is why learning how to add a row to a table in Excel on Windows, Mac, and the web is more practical than it sounds.
In real-world use, tables become the backbone of everyday work. A student might use them for assignment tracking. A small business owner might use them for invoices or inventory. A manager might use them for team schedules. A freelancer might use them for client deadlines, payment dates, and that one column labeled “follow up again because apparently emails are decorative now.” In all of those situations, new rows get added constantly.
One of the best experiences people have after switching from plain cell ranges to actual Excel tables is the feeling that the sheet finally starts helping instead of merely existing. You add a row, and the formatting continues. You enter a formula once, and the new row often picks it up automatically. Filters stay in place. Headers stay clear. Suddenly the worksheet feels less like a digital junk drawer and more like a tool with manners.
Windows users often love the speed of right-clicking or using Tab at the end of a table because it fits naturally into fast data entry. Mac users tend to appreciate the same table behavior once they get used to Control-click or trackpad gestures. Web users usually discover that Excel online is surprisingly solid for shared lists, especially when several people need to update the same table without emailing five versions of the same file named “final,” “final2,” and “final_REAL.”
There are also the small frustrations that teach useful lessons. For example, many people think they are adding a row to a table when they are actually adding a row to a regular worksheet range. Then the banded formatting disappears, formulas do not fill down, and confusion arrives like an uninvited guest. That experience teaches the importance of converting data into a real table first. Once you do that, row insertion becomes much more predictable.
Another common experience is learning that Excel usually inserts above the selected row. This surprises beginners exactly once. After that, it becomes second nature. Need a row between two records? Select the lower one and insert above. Done. Tiny lesson, huge improvement.
Over time, adding rows to Excel tables becomes less of a command and more of a workflow habit. People who build budgets, logs, trackers, and reports start relying on the behavior. They expect the table to grow smoothly. They expect formulas to behave. They expect the data to stay readable. And when Excel tables are used properly, those expectations are usually met. That is what turns row insertion from a basic task into a small but meaningful productivity upgrade.
Final Thoughts
If you want to add a row to a table in Excel on Windows, Mac, or the web, the core idea is simple: work inside a real Excel table, then use the method that matches your setup. Right-clicking is dependable, the ribbon is easy to follow, and pressing Tab at the end of the last row is one of the fastest tricks in the whole program.
Once you understand how Excel tables expand, inserting rows becomes quick, clean, and far less annoying. And that is really all anyone wants from spreadsheet software: fewer surprises, more results, and maybe just enough order to stop the chaos from spreading to column G.