Table of Contents >> Show >> Hide
- Why Improvise a Spray Mop Instead of Buying One?
- What a Good DIY Spray Mop Needs
- Method 1: The Broom-and-Microfiber Hack
- Method 2: Upgrade a Flat Mop Into a Refillable Spray Mop
- Method 3: The Emergency No-Mop Version
- The Best DIY Spray Mop Cleaning Solutions
- Important Safety Rules for a Homemade Spray Mop
- How to Use Your DIY Spray Mop Like It Actually Knows What It’s Doing
- Common DIY Spray Mop Mistakes
- When a DIY Spray Mop Works Best
- Conclusion
- Real-Life Experiences With a DIY Spray Mop
If your spray mop broke, vanished into the same dimension as missing socks, or simply costs more than your patience allows, good news: you can improvise one with stuff you probably already have at home. A basic broom, a flat mop, a reusable cloth, and a spray bottle can team up and do a surprisingly solid impression of a store-bought spray mop. No dramatic music required.
The trick is not just making something that looks like a spray mop. The real goal is building a DIY setup that is light, reusable, floor-safe, and easy enough to use when a juice spill appears and starts acting like it pays rent. The best homemade version also uses a cleaner that matches your floor type, because tile, hardwood, laminate, and stone do not all enjoy the same chemistry experiment.
This guide walks through how to improvise a spray mop DIY style, what tools work best, what cleaning solutions make sense, what mistakes to avoid, and how to keep the whole setup simple instead of accidentally inventing a small floor-cleaning startup in your kitchen.
Why Improvise a Spray Mop Instead of Buying One?
A DIY spray mop is not just a budget hack. It is also convenient, flexible, and oddly satisfying. You get to control the cleaning solution, swap pads without hunting for brand-specific refills, and avoid tossing disposable pads into the trash every week.
Improvising your own spray mop can make sense when:
- Your regular spray mop is broken or leaking.
- You want a reusable cleaning setup with microfiber pads or towels.
- You want a gentler homemade floor cleaner.
- You need a quick cleaning tool for daily messes, not a full mop-and-bucket production.
- You are trying to clean small spaces, corners, apartments, dorms, or kitchens without dragging out half the laundry room.
In other words, this is the floor-cleaning version of making dinner from leftovers and somehow ending up with something better than expected.
What a Good DIY Spray Mop Needs
A solid homemade spray mop has three jobs: spray lightly, wipe efficiently, and avoid soaking the floor. That last one matters a lot. Too much moisture can leave streaks on tile, residue on vinyl, and real damage on hardwood and laminate.
Your DIY version should include:
- A flat cleaning head: a dust mop, sponge mop, flat mop, or even a broom with a rectangular head.
- A microfiber pad or cloth: washable, absorbent, and gentle on hard floors.
- A spray bottle: refillable and easy to aim.
- A gentle cleaner: matched to the floor type.
- A secure attachment method: hook-and-loop strips, clips, elastic bands, or even sturdy rubber bands in a pinch.
If you already own a broom and a spray bottle, congratulations. You are about halfway to your new cleaning career.
Method 1: The Broom-and-Microfiber Hack
This is the easiest way to improvise a spray mop DIY setup without buying anything special.
What You Need
- A clean broom with a flat or angled head
- One or two microfiber cloths, reusable mop pads, or thick cleaning towels
- Rubber bands, elastic hair ties, or clips
- A spray bottle filled with floor-safe cleaner
How to Assemble It
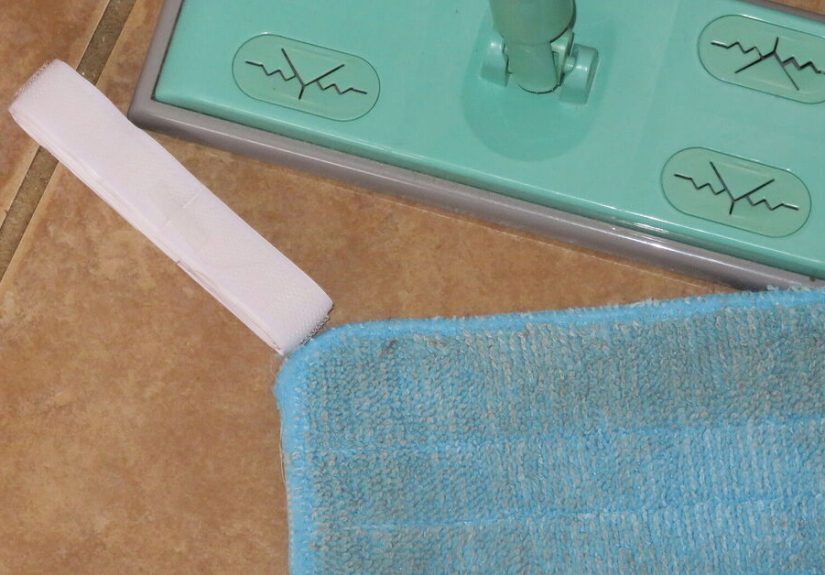
Lay the microfiber cloth flat on the floor. Place the broom head in the center of the cloth. Fold the edges up over the broom head and secure them with rubber bands or clips. The cloth should fit snugly enough that it will not slide around every time you push forward.
That is it. Seriously. Your broom is now moonlighting as a spray mop.
How to Use It
Sweep or vacuum first. This step matters more than people think. Mopping loose crumbs is just a fancy way of moving dirt into damp little noodles. After the floor is clear, lightly spray a small section of the floor and mop it using back-and-forth strokes. Work in sections rather than misting the entire room like you are blessing it.
Change or rinse the microfiber cloth when it gets visibly dirty. A grimy pad does not clean. It just redistributes yesterday’s chaos.
Method 2: Upgrade a Flat Mop Into a Refillable Spray Mop
If you already have a flat mop without a built-in reservoir, this is the better long-term DIY option. Instead of attaching the cloth to a broom, you simply pair your flat mop with a handheld spray bottle.
Why This Works Well
A flat mop already has the shape and swivel action that makes spray mops easy to use. Add a washable microfiber pad and a fine-mist spray bottle, and you get a refillable spray mop setup without being locked into expensive proprietary liquid cartridges.
Best Uses
- Kitchen cleanups
- Bathroom floors
- Quick daily mopping
- Small homes or apartments
- People who dislike hauling a bucket around like a reluctant pioneer
Method 3: The Emergency No-Mop Version
No broom? No flat mop? You can still improvise. Wrap a microfiber cloth around a long-handled squeegee, secure it tightly, and use a spray bottle for the cleaner. Is it glamorous? No. Will it get sticky footprints off the kitchen floor before guests arrive? Absolutely.
This version works best for temporary use, especially on tile or vinyl. Just make sure the cloth covers the edges well enough so you are not scraping the floor with hard plastic.
The Best DIY Spray Mop Cleaning Solutions
The cleaner matters almost as much as the mop. A homemade spray mop is only useful if the solution is effective and safe for the floor. The golden rule is simple: use as little product as necessary, and never assume one cleaner works for every surface.
For Tile and Vinyl Floors
A gentle mix of warm or distilled water with a tiny amount of dish soap works well for everyday cleaning. Some people also use diluted vinegar on certain tile and vinyl floors for cutting grease and grime, but it should be used carefully and never on natural stone.
A practical everyday mix is:
- 2 cups water
- 1 to 2 teaspoons mild dish soap
- Optional: a small splash of rubbing alcohol for faster drying
Keep the soap amount small. Too much turns your floor into a streaky soap opera.
For Laminate Floors
Laminate is picky about moisture. The floor should be damp-cleaned, not soaked. A light mix of water with a tiny drop of dish soap can work, and some homeowners use diluted vinegar very sparingly. Spray lightly and mop immediately so liquid does not sit on the seams.
Less is more here. Your goal is a whisper of moisture, not a mini monsoon.
For Sealed Hardwood Floors
Hardwood floors generally prefer a cleaner made for wood, or a very mild solution used sparingly. If you improvise a spray mop for hardwood, keep the pad only lightly damp, work in small sections, and avoid leaving standing moisture behind. Microfiber is your best friend because it picks up dirt while using less liquid.
If your floor finish is delicate, older, waxed, or you are not sure what type it is, skip the homemade chemistry and use a product labeled for sealed wood floors.
For Natural Stone
Do not use vinegar or other acidic cleaners on natural stone such as marble, granite, travertine, or slate. A pH-neutral cleaner is the safer option. This is one of those moments when improvisation should stop before it becomes an expensive lesson.
Important Safety Rules for a Homemade Spray Mop
Homemade does not mean careless. A few simple rules keep your DIY spray mop smart instead of sketchy.
- Never mix bleach with vinegar, ammonia, or other cleaners. Dangerous fumes are not an advanced cleaning technique.
- Label your spray bottle. Future You deserves to know what is inside.
- Test in an inconspicuous spot first. Floors can be dramatic.
- Do not oversaturate wood or laminate. Damp is good. Wet is trouble.
- Wash microfiber pads without fabric softener. Fabric softener can reduce absorbency.
- Store solutions safely away from children and pets.
Also worth noting: a homemade cleaning solution is for cleaning. If you need true disinfection, use an EPA-registered disinfectant according to label directions, including any required contact time.
How to Use Your DIY Spray Mop Like It Actually Knows What It’s Doing
1. Dry clean first
Sweep, vacuum, or dry mop before spraying anything. This prevents grit from scratching the floor and stops dirt from turning into muddy streaks.
2. Spray small sections
Work in sections about the size of a bath towel on the floor. This keeps moisture under control and makes the mop pad more effective.
3. Keep the pad clean
If the microfiber pad looks grimy, rinse it or swap it out. One pad can only do so much before it becomes part of the mess.
4. Let the floor dry fully
Fast-drying floors are usually happier floors. Good airflow helps, especially in kitchens and bathrooms.
Common DIY Spray Mop Mistakes
Most problems come from using the wrong cleaner or too much of it. Here are the biggest missteps:
- Using too much soap and leaving a sticky film
- Soaking laminate or hardwood
- Using vinegar on natural stone
- Skipping the pre-sweep step
- Using an old towel that pushes dirt around instead of trapping it
- Forgetting to wash the mop pad regularly
If your floor feels tacky after mopping, the usual culprit is residue. Reduce the soap, rinse the pad more often, and do one pass with plain water on a clean microfiber cloth.
When a DIY Spray Mop Works Best
An improvised spray mop is excellent for maintenance cleaning. It shines when you need to tackle daily dust, paw prints, light spills, and the mysterious kitchen splatter that appears even when nobody admits making it.
It is especially useful for:
- Busy kitchens
- Entryways
- Bathrooms
- Apartments and dorms
- Homes with pets or kids
- Anyone who wants a refillable spray mop alternative
For very dirty floors, heavy grease, or deep cleaning after a renovation, you may still want a traditional mop-and-bucket session or a floor cleaner designed for your surface. A DIY spray mop is great at keeping things under control, not always at rescuing a floor from total disaster.
Conclusion
Learning how to improvise a spray mop DIY style is one of those useful home tricks that feels both practical and slightly heroic. You do not need a fancy cleaning system with custom cartridges and dramatic advertising promises. You need a flat cleaning tool, a microfiber cloth, a refillable spray bottle, and the good sense to use the right cleaner for the right floor.
The best version is the one you will actually use. Maybe that is a broom wrapped in a microfiber towel. Maybe it is a flat mop paired with a homemade floor spray. Either way, the goal is the same: quick, controlled cleaning without oversaturating the floor or overcomplicating the process.
Keep it simple, keep it gentle, and remember that a mop does not have to be expensive to be effective. Sometimes the real cleaning upgrade is not a new gadget. It is finally realizing your broom had range all along.
Real-Life Experiences With a DIY Spray Mop
The first time I improvised a spray mop, it was not because I was feeling especially crafty. It was because the actual spray mop had stopped spraying, the floor had a suspicious sticky path across the kitchen, and guests were due to arrive in less time than it takes to watch one cleaning tutorial and feel judged by it. I grabbed a broom, wrapped a microfiber cloth around the head, secured it with two thick rubber bands, filled a spray bottle with water and a tiny bit of dish soap, and hoped for the best. It looked ridiculous. It also worked.
What surprised me most was not the cleaning power. It was the control. A bucket mop can sometimes leave the floor too wet, especially in small spaces. The DIY spray mop let me target exactly where the mess was. A few light sprays near the stove, a quick pass under the table, and done. No puddles. No dragging a sloshing bucket through the house like I was reenacting a very boring frontier movie.
Over time, I learned that the cloth matters a lot. Thin old rags technically work, but they do not glide well and tend to bunch up. A real microfiber cloth or reusable pad makes the whole setup smoother, more absorbent, and less streaky. I also learned that less cleaner is almost always better. The moment I got confident and added more soap, the floor dried with a tacky finish that basically announced, “You tried.” One rinse with plain water fixed it, but the lesson stuck.
Another useful discovery was that different rooms need different expectations. In the bathroom, the improvised spray mop was perfect for fast wipe-downs and frequent touch-ups. In the kitchen, it handled crumbs, drips, and daily traffic well, but only after I swept first. On laminate flooring, it was effective only when I used the lightest possible mist. The difference between “freshly cleaned” and “why does this look worse now?” was often just a few extra sprays.
I have also found that a homemade spray mop is one of the few cleaning tools that people are more likely to use consistently because it feels easy. There is no setup ceremony. No bucket. No refill cartridge hunt. No complicated parts. If something spills, you can be cleaning it in thirty seconds. That convenience changes habits. Floors stay cleaner not because the tool is magical, but because it removes the usual excuses.
The funniest part is that the improvised version often becomes the backup that turns into the favorite. What starts as a temporary fix ends up living in the laundry room full-time because it is light, washable, cheap, and weirdly dependable. It may never win a beauty contest, but it gets the job done. And honestly, that is a pretty solid life goal for both mops and people.