Table of Contents >> Show >> Hide
- Before You Start: Know What Kind of Pool Light You Have
- Pool Light Safety Rules You Should Not Ignore
- Step-by-Step: How to Change a Pool Light
- Step 1: Shut off the power and verify it is off
- Step 2: Remove the light from the pool wall
- Step 3: Inspect the fixture before opening it
- Step 4: Open the light housing
- Step 5: Remove the old bulb or old LED assembly
- Step 6: Install the new bulb or replacement light
- Step 7: Replace the gasket every time
- Step 8: Test the light briefly before final installation
- Step 9: Reinstall the fixture in the niche
- Step 10: Restore power and do a final check
- Special Note for Above-Ground Pool Lights
- What If the New Pool Light Still Does Not Work?
- Should You Upgrade to LED While You Are In There?
- Common Mistakes to Avoid
- Real-World Experiences and Lessons From Pool Owners
- Conclusion
A burned-out pool light has a special talent for making a perfectly good backyard feel like a movie set after the budget was cut. One night your pool looks like a glowing oasis. The next night it looks like a dark mystery nobody wants to solve after sunset.
The good news is that learning how to change a pool light is usually simpler than people expect. In many cases, you do not need to drain the pool. Most inground pool lights are designed so the fixture can be lifted out of its niche and brought onto the deck using extra cord that was left behind during installation. From there, the job is often a careful bulb or fixture swap, a fresh gasket, a watertight reassembly, and a quick test.
The bad news is that this project involves the two things homeowners should never take lightly: electricity and water. That means the process is easy only if you stay methodical, use the correct replacement parts, and stop the moment things look sketchy. If your light housing is cracked, badly corroded, full of water, or wired in a way you do not understand, this is the moment to summon a licensed electrician or pool service pro and preserve both your pool and your eyebrows.
This guide walks you through the full process in plain English, with the practical details that matter most: how to identify your light, which tools to gather, how to replace the bulb or fixture safely, when to upgrade to LED, and how to avoid the classic “I fixed it, and now it leaks” mistake.
Before You Start: Know What Kind of Pool Light You Have
Not every pool light is a simple screw-in bulb. That is the first important reality check. Some older lights use replaceable incandescent or halogen bulbs. Many newer systems use sealed LED assemblies, which means you replace the entire light fixture rather than just the bulb. If you order the wrong part, your “quick Saturday fix” can turn into a staring contest with a shipping confirmation email.
There are three details you need to confirm first
- Bulb-only or full fixture replacement: If your current light is a sealed LED unit, you may need a full replacement light instead of a bulb.
- Voltage: Pool lights are commonly 12V or 120V. Never guess. Match the replacement exactly.
- Size and model compatibility: Check the housing, face ring, or manufacturer markings. If markings are worn off, measure the face ring diameter and compare it to compatible models.
If you have an inground pool niche light, the fixture is usually held in place by a single pilot screw near the top of the face ring. If you have an above-ground return-jet style light, the process can be different because the light may be integrated with the return fitting. In that case, follow the instructions for your exact model rather than assuming it works like an inground niche light.
Tools and supplies to gather
- Correct replacement bulb or full replacement light
- New lens gasket or O-ring
- Screwdriver or nut driver that fits your fixture
- Non-contact voltage tester or multimeter
- Soft towel for the pool deck
- Clean, dry cloth or paper towel
- Pool-safe gasket lubricant if your manufacturer recommends it
- Work gloves and patience
That last tool is not sold in stores, but it is still essential.
Pool Light Safety Rules You Should Not Ignore
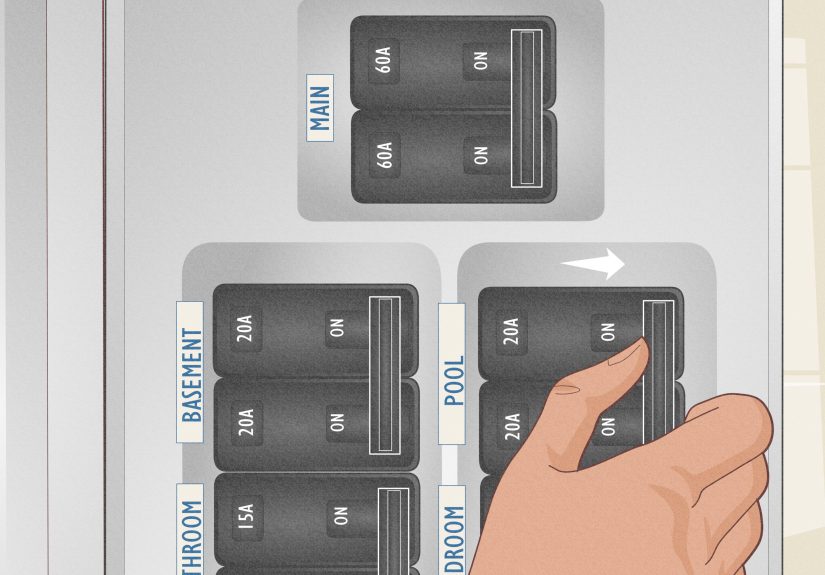
Before you touch a screw, cut power to the pool light at the circuit breaker. Then also turn off the wall switch that controls the light. After that, verify there is no power with a tester. Do not rely on memory. Do not rely on labels written in marker by someone in 2014. Do not rely on optimism.
Water, wet skin, and damp surfaces all increase electrical danger. That is why pool lighting repairs deserve more caution than swapping a lamp in your living room. If you cannot identify the correct breaker, if the light trips a GFCI, or if you suspect the pool’s electrical protection is outdated, stop and call a licensed electrician.
You should also stop immediately and bring in a pro if you notice any of the following:
- Cracked lens or cracked housing
- Heavy rust or corrosion inside the fixture
- Burned wires or damaged cord entry point
- Water inside the housing
- No slack cord to pull the light onto the deck
- Uncertainty about whether the fixture is 12V or 120V
Here is the rule of thumb: if the job becomes electrical troubleshooting instead of part replacement, it has officially graduated from DIY to “please call someone with a license.”
Step-by-Step: How to Change a Pool Light
Step 1: Shut off the power and verify it is off
Start at the breaker panel and turn off the breaker feeding the pool light. Then switch off the light control switch as well. Use a voltage tester to confirm power is truly off before you continue. This is not the part to rush, skip, or perform with theatrical confidence.
Step 2: Remove the light from the pool wall
Most inground pool lights are secured with a single pilot screw, usually at the 12 o’clock position on the face ring. Remove that screw carefully and set it somewhere safe. Then gently pry or lift the fixture out of the niche and bring it onto the deck. There should be enough extra cord wrapped behind the light to allow this.
Set the fixture on a soft towel to protect the lens and face ring from scratches. If the light does not come out easily, do not yank on the cord. Work slowly and check whether corrosion, calcium buildup, or a stuck ring is holding it in place.
Step 3: Inspect the fixture before opening it
If the housing feels unusually heavy or does not float when placed in the water, that may mean water got inside. Check the lens, housing, cord seal, and metal components for cracks, rust, or warping. If you see major damage, replacing only the bulb is usually not enough.
This inspection step matters because many “dead bulb” situations are really “failed gasket” situations wearing a fake mustache.
Step 4: Open the light housing
With dry hands and dry tools, remove the clamp, screws, or retaining ring that holds the lens assembly together. Then separate the face ring, gasket, and lens carefully. Older fixtures may resist because of corrosion or old gasket material, so go slow.
Once open, clean away any gasket residue and moisture. The sealing surfaces need to be clean and smooth before reassembly. If water gets into the housing during the repair, dry everything thoroughly before continuing.
Step 5: Remove the old bulb or old LED assembly
If your fixture uses a traditional replaceable bulb, unscrew it gently. Avoid twisting too hard if the socket is corroded. If the bulb is stuck, stop and inspect the socket rather than forcing it.
If your pool light uses a sealed LED module, follow the manufacturer’s instructions for replacing the entire assembly. Do not try to “retro-engineer” a sealed unit into a bulb-only repair. Pool lights are not the place for creative improvisation.
Step 6: Install the new bulb or replacement light
Install the new part that matches your existing system’s voltage, size, and compatibility requirements. For traditional bulbs, handle the glass with a dry cloth or paper towel if recommended, especially with halogen-style lamps. Oil and moisture from your fingers can shorten bulb life.
If you are upgrading from incandescent to LED, make sure the LED replacement is specifically designed for your fixture and voltage. Not every LED is universally compatible, even when the marketing copy sounds very confident about it.
Step 7: Replace the gasket every time
This is the step that saves you from doing the job twice. Install a new lens gasket or O-ring during reassembly. Reusing the old gasket is one of the most common causes of leaks after a bulb swap. Even if the old gasket looks “pretty okay,” that is not the same thing as watertight.
Seat the gasket evenly around the lens, and use only the lubricant specified or approved for your fixture. Then reassemble the lens, face ring, and clamp or screws, tightening everything evenly so the seal is consistent all the way around.
Step 8: Test the light briefly before final installation
Some pool owners do a very quick power test before putting the fixture back in place, just to make sure the new bulb actually works. If you do this, follow your product instructions, keep the test brief, and shut power back off before the final reinstall. If you are not comfortable with this step, skip it and wait until the fixture is fully reinstalled.
Next, submerge the assembled fixture and watch for steady streams of air bubbles. Persistent bubbling can indicate a sealing problem. If you see that, bring the light back out and inspect the gasket seating again.
Step 9: Reinstall the fixture in the niche
Wrap the cord neatly around the back of the housing, place the fixture back into the niche, and reinstall the pilot screw. Make sure the light sits flush and secure. A crooked fit can cause stress on the ring and make the whole setup look like it lost an argument with gravity.
Step 10: Restore power and do a final check
Turn the breaker and switch back on. Confirm the light operates normally and watch the fixture for a few minutes. If the light flickers, trips the breaker, or stops working again quickly, shut everything off and investigate before anyone swims.
Special Note for Above-Ground Pool Lights
If your above-ground pool light is built into the return fitting, the process may involve removing the bulb assembly from the return body rather than lifting a niche light onto the deck. Some models can allow water to flow once the assembly is removed, so these systems often require faster part swaps and model-specific handling. In plain English: above-ground lights can be easy, but they are their own species. Treat them accordingly.
What If the New Pool Light Still Does Not Work?
If you install a new bulb and the light still refuses to cooperate, one of these issues is often the real culprit:
- The replacement bulb is the wrong voltage or wrong style
- The socket is corroded
- The fixture has water damage
- The gasket leaked and moisture got inside
- The switch, transformer, junction box, or breaker has a problem
- A GFCI is tripping because of a fault
At that point, keep the power off and move into diagnosis mode only if you know what you are doing. Otherwise, call a pro. Saving money is great. Accidentally auditioning for an electrical safety poster is less great.
Should You Upgrade to LED While You Are In There?
In many cases, yes. LED pool lights typically use less energy, last longer, and offer brighter or color-changing options compared with older incandescent bulbs. They can also reduce how often you need to repeat this repair, which is excellent news for everyone who prefers pool season to screwdriver season.
That said, an LED upgrade only makes sense when the replacement is compatible with your existing fixture, niche, voltage, and control system. Some pools can accept an LED replacement bulb. Others require a full LED fixture. If you have an older system, double-check the part numbers before ordering.
Common Mistakes to Avoid
- Not shutting off both the breaker and the light switch
- Skipping voltage verification
- Reusing the old gasket
- Buying a bulb based on “it looks about right”
- Ignoring corrosion or water inside the fixture
- Overtightening screws and distorting the seal
- Assuming every LED replacement is universal
If you avoid those seven mistakes, you are already ahead of a surprising number of weekend repair stories.
Real-World Experiences and Lessons From Pool Owners
One of the most common experiences pool owners report is that the light replacement itself is not the hard part. The hard part is the surprise. People start the job thinking they are replacing a simple bulb, then discover a brittle gasket, a rusty clamp, worn markings on the housing, or a fixture that looks old enough to remember dial-up internet. That is why experienced pool owners often say the smartest move is spending extra time on identification before ordering parts. Knowing your model, voltage, and fixture style saves more frustration than any tool in the garage.
Another frequent lesson is how often the old gasket turns out to be the real villain. Many owners replace a burned-out bulb, put everything back together with the original gasket, and feel victorious for about three days. Then the light fogs up, stops working, or starts taking on water again. That experience teaches a simple truth: the gasket is not an optional side character. It is the bouncer at the door, and if it fails, water gets into the club.
Some pool owners also learn that the cord slack behind the light is either a blessing or an emotional event. In a properly installed inground niche light, there is usually enough extra cord to bring the fixture onto the deck. When that happens, the job feels surprisingly manageable. When the cord is too tight, the whole mood changes. Instead of a clean DIY repair, the project suddenly points toward junction boxes, wiring paths, and professional service. Many experienced homeowners say this is the exact moment to stop being brave and start being smart.
There is also the classic “while I’m here” moment. A lot of people begin by planning a bulb swap and end by deciding to upgrade to LED. The logic is easy to understand. If the fixture is already open, the old bulb is tired, and the pool gets plenty of evening use, a longer-lasting and more efficient option starts to look pretty attractive. Owners who make the switch often say the biggest improvement is not just lower energy use. It is the cleaner, brighter look at night and the simple pleasure of not thinking about the light again for a long time.
Above-ground pool owners often have a slightly different experience. Their lights may be integrated into the return fitting, which can make the replacement look less like a traditional pool light repair and more like a quick, careful parts swap with water management in the mix. People who have done these repairs often recommend reading the model-specific instructions twice, laying out all parts in order, and having a second person nearby if the assembly allows water to escape during the swap. In other words, teamwork can keep a simple repair from turning into a backyard comedy sketch.
Finally, many owners come away from the project with a deeper respect for pool electrical safety. A pool light can seem small compared with pumps, filters, and heaters, but it lives in the one place where you absolutely do not want an electrical fault. Experienced homeowners often say the repair taught them when DIY is perfectly reasonable and when it is worth calling a licensed electrician without guilt. That may be the best lesson of all. A successful repair is not just a working light. It is a working light that is safe, sealed, correctly matched, and ready for the next night swim without drama.
Conclusion
Changing a pool light is one of those projects that feels intimidating right up until you understand the system. Most of the time, the process is straightforward: turn off power, remove the fixture, replace the bulb or light, install a new gasket, check the seal, and put everything back together carefully. The key is respecting the safety side of the job and refusing to guess when something looks damaged, mismatched, or electrically questionable.
Do it right, and your reward is immediate: a brighter pool, safer night swimming, better backyard atmosphere, and one fewer broken thing on your home-maintenance list. Not bad for a repair that starts with one tiny screw and a healthy fear of doing anything dumb near water.