Table of Contents >> Show >> Hide
- Why Vinegar Works on Oven Grease
- Before You Start: Safety First
- What You Need to Clean an Oven With Vinegar
- Step-by-Step: How to Clean Your Oven With Vinegar
- How to Clean Greasy Oven Racks
- How to Clean the Oven Glass Door With Vinegar
- How Often Should You Clean Your Oven?
- Vinegar vs. Self-Cleaning: Which Is Better?
- Common Mistakes to Avoid
- How to Keep Your Oven Cleaner Longer
- Troubleshooting: When Vinegar Is Not Enough
- Experience Notes: What Actually Works When You Clean an Oven With Vinegar
- Conclusion
There are few household mysteries as dramatic as the inside of an oven. One week you are roasting vegetables like a responsible adult. A few months later, the oven floor looks like a crime scene involving cheese, sauce, and a very ambitious casserole. The good news? You do not need to declare the appliance a historical artifact. You can clean your oven with vinegar, baking soda, warm water, patience, and a little strategic scrubbing.
Vinegar is popular for oven cleaning because its mild acidity helps loosen greasy residue and food splatter. It is not magic, and it will not politely escort a decade of burnt lasagna out the door in five minutes. But when paired with steam, baking soda, dish soap, and the right waiting time, vinegar becomes a practical, inexpensive, low-fume way to tackle everyday oven grime.
This guide walks you through how to clean your oven with vinegar, how to remove stubborn baked-on grease, how to clean oven racks and glass, and how to prevent the whole mess from coming back like a sequel nobody asked for.
Why Vinegar Works on Oven Grease
Distilled white vinegar contains acetic acid, which helps break down greasy film and mineral residue. In an oven, vinegar works especially well when heat and steam help soften baked-on messes first. Think of it as giving the grime a long, uncomfortable spa day before you wipe it away.
Vinegar alone is best for light grease, fresh splatters, and deodorizing. For heavy buildup, it needs backup. Baking soda adds gentle abrasion and helps loosen stuck-on food. Dish soap helps cut oily residue. Warm water softens the mess. Together, these pantry basics can handle most oven-cleaning jobs without harsh fumes.
Before You Start: Safety First
Before cleaning, make sure the oven is turned off and cool unless you are using the vinegar steam method described below. Remove racks, trays, pizza stones, thermometers, and any forgotten pan that has been living in there rent-free.
Do not spray vinegar directly onto heating elements, oven vents, control panels, or electrical openings. Do not mix vinegar with bleach, ammonia, or commercial oven cleaners. Mixing cleaning products can create dangerous fumes. Also, check your oven manual if you have a self-cleaning, steam-cleaning, or specialty-coated oven interior.
What You Need to Clean an Oven With Vinegar
- Distilled white vinegar
- Baking soda
- Warm water
- Dish soap
- Spray bottle
- Oven-safe bowl or baking dish
- Microfiber cloths or old cleaning rags
- Non-scratch sponge
- Plastic scraper or old plastic card
- Rubber gloves
- Towels for the floor
Step-by-Step: How to Clean Your Oven With Vinegar
Step 1: Remove the Racks
Take out the oven racks and set them aside. This gives you room to work and prevents cleaner from pooling around the rack supports. If your racks are greasy, place them in a bathtub, large sink, or storage bin with hot water and a few drops of dish soap. Let them soak while you clean the oven interior.
Step 2: Clear Out Loose Crumbs
Use a dry cloth, paper towel, or small handheld vacuum to remove crumbs and loose burned bits from the oven floor. This step feels boring, but it matters. If you skip it, you will turn dry crumbs into greasy paste. Nobody needs oven mud.
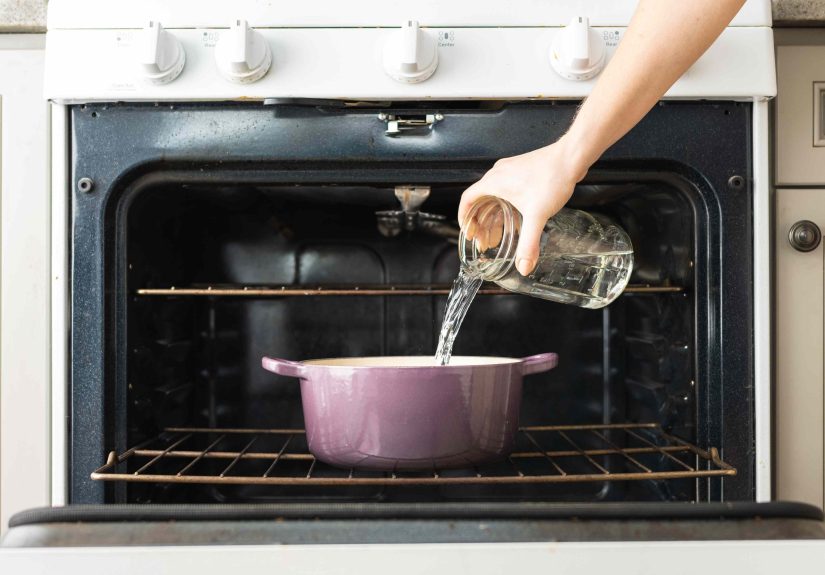
Step 3: Use Vinegar Steam to Soften Grease
Fill an oven-safe bowl or baking dish with water and add about one cup of distilled white vinegar. Place it on the center rack position or oven floor if your manual allows it. Heat the oven to about 450 degrees Fahrenheit for 20 to 30 minutes. For extra greasy ovens, let the steam work longer, then turn the oven off and keep the door closed until it cools enough to touch safely.
The steam helps loosen grease and dried splatter so you do not have to attack the oven like you are sanding a deck. Once the oven is warm but not hot, wipe the interior with a damp cloth.
Step 4: Apply Baking Soda Paste to Stubborn Grease
For the stubborn layer of grease that laughs at your first wipe, make a paste with baking soda and water. Start with one-half cup of baking soda and add water slowly until it becomes spreadable, like thick frosting. For greasy areas, add a few drops of dish soap.
Spread the paste over greasy patches, avoiding heating elements, vents, and the oven light. Focus on the floor, side walls, and door interior. Let the paste sit for at least 30 minutes. For serious buildup, let it sit overnight.
Step 5: Scrub Gently, Not Angrily
Use a non-scratch sponge or damp cloth to scrub the paste in small circles. A plastic scraper can help lift thick, baked-on spots. Avoid metal scrapers or harsh steel wool on the oven interior unless your manual specifically allows it. Scratching the oven surface can create future cleaning problems.
Step 6: Spray Vinegar to Remove Residue
Pour vinegar into a spray bottle and mist it lightly over any remaining baking soda paste. It will fizz. This is normal, mildly entertaining, and useful for loosening residue. Wipe everything away with a damp cloth. Repeat until the oven no longer feels gritty.
Step 7: Final Rinse and Dry
Wipe the oven interior with a clean damp cloth several times. This final rinse is important because leftover baking soda can leave a white film, and leftover vinegar can create an odor when the oven heats. Dry the interior with a towel, leave the door open for a while, then replace the racks.
How to Clean Greasy Oven Racks
Oven racks collect grease faster than a diner griddle. Soak them in hot water with dish soap for at least one hour. For heavier grime, sprinkle baking soda over the racks, spray with vinegar, let the fizzing settle, then soak them in hot water. Scrub with a brush or non-scratch pad, rinse well, and dry completely before returning them to the oven.
If you clean racks in the bathtub, place an old towel underneath them to protect the tub from scratches. It is much easier to wash a towel than explain mysterious metal lines in the bathtub.
How to Clean the Oven Glass Door With Vinegar
The oven door is where splatters go to become abstract art. To clean it, spread baking soda paste over the glass and let it sit for 20 to 30 minutes. Spray lightly with vinegar, then wipe with a damp microfiber cloth. For stuck-on grease, use a plastic scraper at a shallow angle.
Do not flood the door with liquid. Too much moisture can seep between glass panels. If grease is trapped between the panels, check your oven manual before attempting disassembly. Some doors are designed for access; others are designed to test your patience.
How Often Should You Clean Your Oven?
For regular home cooking, deep-cleaning the oven every three months is a practical rule. If you bake often, roast fatty meats, make pizza, or have a casserole lifestyle, monthly spot-cleaning will make deep cleaning easier. Wipe fresh spills once the oven cools. Fresh grease is annoying; old grease is a villain.
If your oven smokes when preheating, smells burnt, or leaves food tasting slightly like last month’s roast chicken, it is time to clean. Smoke usually means grease or food residue is burning off.
Vinegar vs. Self-Cleaning: Which Is Better?
Self-cleaning cycles use very high heat to burn residue into ash. They can be effective, but they also create odors and require ventilation. Many appliance guides recommend removing racks, wiping heavy spills first, and keeping the kitchen well ventilated. Homes with pet birds should be especially cautious because birds have sensitive respiratory systems.
Vinegar and baking soda are better for routine maintenance and moderate buildup. A self-cleaning cycle may be useful for severe messes if your oven manual recommends it. Do not use commercial oven cleaner before or during a self-clean cycle.
Common Mistakes to Avoid
Using Too Much Liquid
More vinegar does not mean more cleaning power. Too much liquid can drip into vents, seams, or the door. Use a light spray and wipe thoroughly.
Skipping the Waiting Time
Baking soda paste needs time to soften grime. If you apply it and immediately scrub, you are doing the paste’s job for it. Let chemistry clock in before your arms do.
Spraying Heating Elements
Avoid heating elements, igniters, fans, and vents. These areas are not the place for homemade cleaning experiments.
Mixing Cleaners
Never combine vinegar with bleach, ammonia, or random mystery cleaners under the sink. Use one method at a time, rinse well, and ventilate.
How to Keep Your Oven Cleaner Longer
- Place casseroles and pies on a baking sheet to catch drips.
- Use lids or foil tents when roasting splatter-prone foods.
- Wipe spills after the oven cools.
- Do a quick vinegar steam refresh after heavy cooking weekends.
- Avoid lining the oven floor with foil unless your manual says it is safe.
- Clean the oven door monthly so grease does not build up.
Troubleshooting: When Vinegar Is Not Enough
If grease remains after one round, repeat the baking soda paste method and let it sit longer. For very old buildup, apply paste overnight, wipe, then repeat on the worst spots. Add a small amount of dish soap to the paste for extra grease-cutting power.
If the oven still smokes after cleaning, check for hidden crumbs near the back, under rack supports, or around the broiler area. Also make sure all cleaning residue has been wiped away. Heat can make leftover cleaner smell stronger.
Experience Notes: What Actually Works When You Clean an Oven With Vinegar
Here is the honest part: cleaning an oven with vinegar works best when you treat it like a process, not a miracle. The first time I tried the vinegar method on a truly greasy oven, I expected one spray bottle and a heroic wipe to reveal a showroom finish. That did not happen. The oven looked slightly better, but the heavy brown film stayed put like it had signed a long-term lease.
The breakthrough came from using vinegar steam first. Heating a bowl of water and vinegar softened the greasy film enough that the first wipe actually removed something visible. It did not clean everything, but it changed the texture of the mess. The hard, glossy grease became duller and easier to loosen. That is when baking soda paste made a real difference.
The second lesson is that overnight waiting is underrated. A 20-minute paste treatment helps light splatters, but old grease needs time. When baking soda paste sits overnight, it dries slightly and grips the grime. The next morning, a damp cloth and plastic scraper can lift off layers that seemed permanent the night before. It feels less like scrubbing and more like peeling away bad decisions.
Dish soap is another small upgrade that matters. Vinegar and baking soda get all the attention, but a few drops of dish soap in the paste help with oily residue. This is especially useful on the oven door and around the lower corners where grease collects. The trick is not to add too much. A tiny amount improves cleaning; a large amount creates a rinsing marathon.
Microfiber cloths also make the job easier. Paper towels can shred when they hit gritty baking soda, and old sponges can smear grease around. A damp microfiber cloth grabs residue better and rinses clean. Keep two or three nearby: one for the first messy wipe, one for rinsing, and one for drying.
The most annoying part is removing the white baking soda film. The fix is simple but repetitive: wipe with clean water, rinse the cloth, and wipe again. A light vinegar spray can help dissolve leftover powder, but the final pass should be plain water. When you think you are done, run your fingers over a dry area. If it feels chalky, wipe again.
For prevention, the best habit is catching spills early. Once tomato sauce, cheese, or sugary pie filling burns onto the oven floor three or four times, it becomes much harder to remove. Let the oven cool, then wipe the spill the same day. Future you will be deeply grateful and possibly less dramatic.
One more experience-based tip: do not start this project right before dinner. Cleaning an oven properly takes downtime, drying time, and a few rounds of wiping. Start after cooking for the day, let the paste sit overnight, and finish in the morning. That schedule makes the job feel manageable instead of turning dinner into a sad sandwich eaten beside an open oven door.
In the end, vinegar is not a magic wand, but it is a reliable helper. Paired with steam, baking soda, dish soap, and patience, it can remove the greasy layer that makes your oven look older than it is. The process is affordable, low-odor, and practical for regular kitchen maintenance. And once the oven is clean, you may experience the rare domestic thrill of opening it just to admire the inside. No judgment. We have all been there.
Conclusion
Cleaning your oven with vinegar is one of the simplest ways to tackle grease without immediately reaching for heavy-duty chemicals. Start with vinegar steam to soften grime, use baking soda paste for stubborn buildup, wipe carefully, and rinse until the oven is residue-free. The method works best when you give it time, avoid sensitive oven parts, and keep up with small spills before they become baked-on legends.
A clean oven does more than look nice. It reduces smoke, helps prevent burnt odors, and makes cooking feel less like operating a tiny indoor barbecue pit. With vinegar, baking soda, dish soap, and a little patience, that greasy oven layer does not stand a chance.