Table of Contents >> Show >> Hide
- Before You Start: What Makes Photoshop Clouds Look Real?
- Method 1: Create Clouds with Photoshop’s Render Clouds Filter
- Method 2: Paint Clouds with Photoshop Brushes
- Method 3: Add Realistic Clouds with Photos, Sky Replacement, or Generative Fill
- Which Cloud Method Should You Use?
- Common Mistakes When Creating Clouds in Photoshop
- Pro Tips for Better Photoshop Clouds
- Practical Experiences: What Usually Works Best When Creating Clouds in Photoshop
- Conclusion
- SEO Tags
Clouds can turn a flat design into something cinematic, dreamy, dramatic, or delightfully over-the-top. In Photoshop, you can create clouds with a built-in filter, paint them with brushes, or blend real cloud imagery into your scene. Each method has its own personality: one is fast, one is artistic, and one is realistic enough to make your sky look like it paid rent in the photo.
This guide walks you through three practical ways to create clouds in Photoshop, from beginner-friendly steps to pro-level finishing touches. Whether you are designing a fantasy poster, improving a dull landscape photo, making soft cloud text, or building a dramatic sky background, these techniques will help you create natural-looking results without turning your canvas into a suspicious bowl of mashed potatoes.
Before You Start: What Makes Photoshop Clouds Look Real?
Before clicking filters or grabbing a brush, it helps to understand what clouds actually need: softness, variety, light direction, depth, and believable edges. Real clouds are rarely perfect cotton balls. They have broken edges, transparent wisps, thicker shadows, and highlights that follow the same light source as the rest of the image.
In Photoshop, the secret is not one magic button. The secret is layering. A cloud layer by itself may look artificial, but when you combine masks, opacity changes, blur, blend modes, gradients, and subtle color correction, the effect becomes much more convincing.
Recommended Photoshop Tools for Cloud Effects
You will use some combination of the following tools:
- Filter > Render > Clouds for instant cloudy texture.
- Difference Clouds for stronger, more dramatic patterns.
- Brush Tool with soft round or cloud brushes for hand-painted clouds.
- Layer Masks to hide unwanted cloud areas non-destructively.
- Blend Modes such as Screen, Soft Light, Overlay, and Multiply.
- Levels, Curves, Hue/Saturation, and Gaussian Blur for polishing.
- Sky Replacement or Generative Fill for photo-realistic skies in newer Photoshop workflows.
Method 1: Create Clouds with Photoshop’s Render Clouds Filter
The fastest way to create clouds in Photoshop is with the built-in Clouds filter. This method is perfect for backgrounds, mist, fog, smoke-like textures, abstract skies, fantasy scenes, and quick atmospheric effects. It is not always photo-realistic right away, but it gives you an excellent base texture that you can shape and refine.
Step 1: Create a New Layer
Open your Photoshop document and create a new blank layer above your background. Name it something obvious like “Cloud Texture” so your Layers panel does not become a mystery novel later.
Working on a separate layer is important because it keeps the effect editable. If the cloud texture looks too strong, you can reduce opacity, add a mask, change the blend mode, or delete the layer without damaging your original image.
Step 2: Choose Foreground and Background Colors
The Clouds filter uses your current foreground and background colors to generate a random cloudy pattern. For classic clouds, set the foreground color to white and the background color to a medium blue, gray, or very light cyan. For fog or smoke, use white and gray. For fantasy scenes, try lavender and pale pink, or deep navy and silver.
If you want a natural sky, avoid colors that are too saturated. Real skies usually have subtle transitions. Electric blue clouds can work in a sci-fi poster, but in a family beach photo they may look like the weather forecast was sponsored by a glow stick.
Step 3: Apply the Clouds Filter
With your cloud layer selected, go to Filter > Render > Clouds. Photoshop will instantly fill the layer with a randomized cloud texture. If you do not like the pattern, press Ctrl + F on Windows or Command + F on Mac to apply the filter again and generate a new version.
Because the result is random, you may need to try it several times until the cloud distribution feels natural. Look for areas with soft transitions and interesting movement rather than evenly spread blobs.
Step 4: Use Levels or Curves to Shape the Clouds
Go to Image > Adjustments > Levels or add a Levels adjustment layer clipped to your cloud layer. Move the black, gray, and white sliders to increase contrast. This helps separate fluffy cloud highlights from darker gaps in the sky.
If your clouds look too muddy, push the white slider slightly left. If the effect is too harsh, pull back the contrast or lower the layer opacity. A good cloud texture should feel soft, not like someone poured concrete into the atmosphere.
Step 5: Change the Blend Mode
Try changing the cloud layer’s blend mode to Screen, Soft Light, or Overlay. Screen is useful when you want the white parts of the cloud to show while darker areas disappear. Soft Light creates a gentler atmospheric effect. Overlay increases contrast and drama.
For fog, mist, or haze, reduce the layer opacity to around 15–50 percent and add a layer mask to fade the effect naturally. For fantasy or storm clouds, duplicate the cloud layer and experiment with Multiply or Overlay on the copy.
Step 6: Mask and Blur for a Natural Finish
Add a layer mask and use a soft black brush to hide clouds where they do not belong. If you are adding clouds to a photo, avoid covering important subjects, building edges, tree lines, or faces. Clouds across a person’s forehead usually look less “cinematic” and more “haunted weather incident.”
To soften the texture, apply Filter > Blur > Gaussian Blur with a small radius. You can also use Edit > Transform > Warp to stretch the cloud layer so it follows the perspective of your scene.
Best Uses for the Render Clouds Method
- Quick sky backgrounds
- Fog, smoke, and mist effects
- Fantasy posters and digital art
- Abstract cloudy textures
- Soft atmosphere behind text or products
Method 2: Paint Clouds with Photoshop Brushes
If you want more creative control, paint your clouds with brushes. This method is excellent for digital painting, surreal edits, cloud typography, custom shapes, and scenes where the clouds need to sit in specific places. Unlike the Render Clouds filter, brushes let you decide the size, flow, direction, and personality of each cloud.
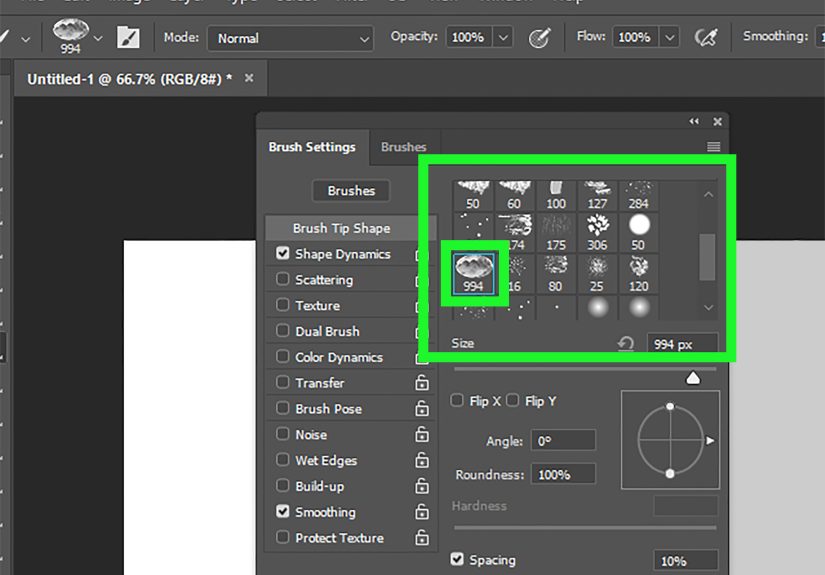
Step 1: Choose or Install Cloud Brushes
Photoshop includes many brush options, and you can also import cloud brush packs in ABR format. To load brushes, open Window > Brushes, use the panel menu, and choose Import Brushes. After loading the brush set, the new cloud brushes will appear in your Brushes panel.
If you do not have cloud brushes, start with a soft round brush. Set the hardness to 0 percent, reduce the flow, and build the cloud slowly with repeated strokes. A soft round brush can create surprisingly good clouds when combined with smudging, masking, and opacity changes.
Step 2: Create Separate Layers for Cloud Parts
Create one layer for the main cloud body, another for highlights, and another for shadows. This gives you control over each part of the cloud. You can blur one layer, erase another, or adjust color without flattening the entire effect.
For example, paint the main body in off-white, add warm highlights where the light hits, and use a pale gray-blue for shadow areas. This small color variation makes clouds look more dimensional than plain white paint.
Step 3: Paint the Basic Cloud Shape
Use a large brush to block in the general cloud shape. Do not worry about perfect edges. In fact, perfect edges are the enemy of natural clouds. Build the cloud with rounded clusters, broken gaps, and uneven spacing.
Try painting from large to small. Start with broad, soft forms, then add smaller puffs and wisps around the edges. Use lower opacity for distant clouds and higher opacity for closer clouds. This creates depth and keeps your sky from looking like a flat wallpaper pattern.
Step 4: Add Highlights and Shadows
Pick a light source. If the sun is on the left, the left side of your clouds should be brighter. Paint highlights with a soft white or warm cream color. Add shadows with a muted blue-gray or violet-gray. Keep shadows subtle unless you are creating storm clouds.
A common beginner mistake is making clouds pure white everywhere. Real clouds have volume. Even fluffy fair-weather clouds contain shaded areas, soft transitions, and slightly darker undersides.
Step 5: Use Smudge, Blur, and Masks
The Smudge Tool can pull out wispy edges, while Gaussian Blur can soften overly sharp strokes. A layer mask lets you gently remove parts of the cloud without erasing permanently. Use a low-flow brush on the mask to break up edges and make the cloud fade naturally into the sky.
For extra realism, vary brush size often. Rotate or flip brush tips when possible so repeated shapes do not become obvious. Repetition is the fastest way to make a cloud brush look like a stamp collection.
Step 6: Add Atmospheric Perspective
Distant clouds should usually be smaller, softer, lighter, and less contrasty. Clouds near the horizon often appear flatter and more compressed because of perspective. Larger clouds higher in the frame can have more texture and stronger contrast.
To create depth, add a subtle gradient to the sky behind the clouds. A slightly darker blue at the top and lighter blue near the horizon will help the clouds sit naturally in the composition.
Best Uses for the Brush Method
- Digital paintings and illustrations
- Cloud lettering and cloud-shaped objects
- Fantasy landscapes
- Soft decorative backgrounds
- Custom cloud placement in photo composites
Method 3: Add Realistic Clouds with Photos, Sky Replacement, or Generative Fill
When realism matters, use real cloud photography or Photoshop’s modern assisted tools. This method is ideal for landscape photography, real estate images, travel shots, product mockups, cinematic posters, and any project where fake clouds would be immediately noticed by viewers with functioning eyeballs.
Option A: Blend a Cloud Photo into Your Image
Start by placing a cloud photo above your original image. Go to File > Place Embedded and choose a high-resolution cloud or sky image. Resize it so the clouds match the perspective and scale of your scene.
Change the blend mode to Screen, Soft Light, or Normal depending on the image. If the sky in your original photo is plain blue or gray, Normal mode with a clean layer mask often works best. If you are adding only bright cloud details, Screen can help hide darker parts of the cloud layer.
Option B: Use a Layer Mask for Clean Blending
Add a layer mask to the cloud photo. Use a soft black brush to hide clouds from buildings, mountains, trees, people, and foreground objects. Zoom in around edges and take your time. Good masking is the difference between “beautiful sky replacement” and “clouds accidentally invaded the roof.”
For complex edges like trees, try Select > Color Range or Select and Mask to isolate the original sky. Refine the mask with feathering and contrast adjustments until the transition looks believable.
Option C: Use Sky Replacement
Photoshop’s Sky Replacement feature can automatically detect the sky area and replace it with another sky. Go to Edit > Sky Replacement, choose a sky preset or import your own cloud image, then adjust settings such as Shift Edge, Fade Edge, Brightness, Temperature, and Scale.
This is one of the fastest ways to add clouds to a dull photo. However, do not stop at the first result. After applying the replacement, inspect the horizon, reflections, color temperature, and lighting. If the new sky is warm and golden but the landscape is cold and blue, the image may feel disconnected. Add color grading or adjustment layers to unify the scene.
Option D: Use Generative Fill for Cloud Additions
In newer Photoshop versions, Generative Fill can add or modify image content from a text prompt. Select the area where you want clouds, click Generative Fill, and try prompts such as “soft white clouds in a blue sky,” “dramatic storm clouds,” or “subtle sunset clouds.”
Generative Fill is especially useful when you need clouds that match the existing composition. Still, treat the result like a starting point, not a final masterpiece delivered by a tiny robot artist. Check edges, lighting, repeated artifacts, and perspective. Use masks and adjustment layers to blend the generated clouds into the final image.
Color Match the Clouds
After adding real or generated clouds, match the color and brightness to the rest of the image. Use Curves to adjust contrast, Hue/Saturation to reduce overly strong color, and Color Balance to push the clouds warmer or cooler.
Look at the shadows in the original image. If the ground shadows are soft and cool, the clouds should not look like they came from a fiery sunset. If the light is golden, add warmth to the cloud highlights.
Add Depth with Blur and Grain
If your cloud layer is sharper than the original image, apply a small amount of blur. If your photo has visible grain or noise, add similar noise to the cloud layer so it does not look pasted on. Matching texture is one of the most overlooked steps in Photoshop compositing.
Best Uses for the Realistic Cloud Method
- Landscape photo enhancement
- Real estate and architectural images
- Travel photography
- Movie posters and dramatic composites
- Professional before-and-after sky edits
Which Cloud Method Should You Use?
The best method depends on your goal. If you need fast atmosphere, use the Render Clouds filter. If you want custom shapes or a painterly style, use brushes. If you need believable clouds in a real photo, use a cloud image, Sky Replacement, or Generative Fill.
| Method | Best For | Skill Level | Main Advantage |
|---|---|---|---|
| Render Clouds Filter | Textures, fog, mist, abstract skies | Beginner | Fast and built into Photoshop |
| Cloud Brushes | Digital art, fantasy scenes, custom clouds | Beginner to Intermediate | Creative control |
| Photo, Sky Replacement, or Generative Fill | Realistic photo editing | Intermediate | Most natural-looking results |
Common Mistakes When Creating Clouds in Photoshop
Using Clouds That Are Too White
Pure white clouds can look flat and artificial. Add soft gray, blue, or warm cream tones to create volume. Even bright clouds usually have shadow areas.
Ignoring the Light Source
If the sun is on the right side of the image, highlights should appear on the right side of the clouds. Mismatched lighting is one of the easiest ways to expose a composite.
Forgetting Perspective
Clouds near the horizon should usually be smaller and flatter. Large, detailed clouds at the horizon can make the sky look tilted or unrealistic.
Overusing One Brush
A repeated cloud brush pattern is easy to spot. Rotate brushes, resize them, flip them, and combine several brush types for a more organic effect.
Skipping Final Color Correction
Clouds must belong to the image. Use Curves, Color Balance, Hue/Saturation, and subtle blur or noise to make the cloud layer feel like part of the original scene.
Pro Tips for Better Photoshop Clouds
- Work non-destructively: Use separate layers, masks, and adjustment layers whenever possible.
- Use low opacity: Build clouds gradually instead of painting one heavy stroke.
- Vary edges: Mix soft fades with sharper highlights for natural detail.
- Study real skies: Use reference photos to understand shape, scale, and light.
- Match image quality: Add blur or noise if the clouds look too sharp or too clean.
- Do not overdo drama: Not every photo needs apocalypse-level storm clouds. Sometimes a few soft wisps are enough.
Practical Experiences: What Usually Works Best When Creating Clouds in Photoshop
When working on cloud effects, the biggest lesson is that subtlety almost always wins. Beginners often want to fill the entire sky with huge, bright, dramatic clouds because the effect is exciting. That is understandable. Photoshop gives you power, and power whispers, “Add more thunder.” But in many real projects, the best result comes from adding fewer clouds and blending them carefully.
For quick social media graphics, the Render Clouds filter is often enough. It creates instant atmosphere behind text, product images, or fantasy-style backgrounds. The trick is to avoid using the raw filter result as the final design. A plain Render Clouds layer can look generic. But if you blur it, mask it, lower the opacity, and combine it with a gradient, it becomes useful very quickly. For example, a soft white-and-gray cloud texture set to Screen can create fog around a subject, while a darker Difference Clouds texture set to Overlay can add stormy drama behind a headline.
For illustration work, brushes feel more natural. A good cloud brush gives you control over where the eye travels. You can place a bright cloud behind a character’s head to create contrast, add wisps near the edges of a scene for movement, or shape clouds around typography for a dreamy title effect. The most effective brush workflow is slow and layered: paint the broad form first, add highlights next, then use masks to break up the edges. The result looks much better than stamping one giant cloud and hoping nobody notices. Spoiler: people notice.
For photography, real cloud images usually deliver the most believable result. A dull sky can make a great landscape feel lifeless, but replacing it with the wrong sky can make the edit look fake. The cloud direction, sun angle, horizon line, color temperature, and sharpness all need to match. If the original scene was shot on a hazy afternoon, a crisp sunset sky with volcanic orange clouds will probably look strange unless the entire image is color graded to support it.
One practical habit that improves almost every cloud edit is zooming out. Clouds may look impressive at 200 percent, but viewers usually see the whole image first. Zoom out and ask: does the sky support the subject, or is it stealing the show? If the clouds are more interesting than the person, building, product, or landscape you are trying to feature, reduce the contrast or opacity.
Another useful habit is flipping the canvas horizontally for a moment. This makes repeated brush shapes and awkward cloud placement easier to spot. You can also temporarily add a black-and-white adjustment layer to judge brightness without being distracted by color. If the cloud values look natural in black and white, they will usually be easier to color match afterward.
Finally, save versions. Cloud edits are experimental by nature, especially when using random filters or Generative Fill variations. Keep one version with subtle clouds, one with more drama, and one with a clean sky. After a short break, compare them. The version that looked “too simple” at first is often the one that feels most professional. Clouds should create mood, depth, and motionnot shout from the sky like a weather-themed billboard.
Conclusion
Learning how to create clouds in Photoshop gives you a flexible skill for photo editing, digital painting, graphic design, and creative compositing. The Render Clouds filter is the quickest method for texture and atmosphere. Cloud brushes give you artistic control for custom shapes and painterly skies. Real cloud photos, Sky Replacement, and Generative Fill are best when your goal is realism.
The best cloud effects are rarely created in one step. They come from combining layers, masks, blend modes, color correction, and a good eye for light. Start simple, build slowly, and remember that natural clouds are beautifully imperfect. Once you understand the three methods in this guide, you can create anything from soft morning haze to dramatic storm skies without waiting for the actual weather to cooperate.
SEO Tags
Note: This article is written as original web-ready content in standard American English and synthesizes practical Photoshop techniques from current, real-world editing workflows and reputable Photoshop learning resources.