Table of Contents >> Show >> Hide
- What Is an Inside Corner in Crown Molding?
- Tools and Materials You’ll Need
- How to Cut Crown Molding Inside Corners: 15 Steps
- Step 1: Understand How the Crown Sits on the Wall
- Step 2: Decide Whether to Miter or Cope the Inside Corner
- Step 3: Make a Pair of Test Blocks
- Step 4: Measure the Wall Carefully
- Step 5: Cut the First Piece Square
- Step 6: Mark Studs and Plan Fastening Points
- Step 7: Position Crown Correctly on the Miter Saw
- Step 8: Cut a 45-Degree Inside Miter on the Piece to Be Coped
- Step 9: Darken the Profile Line with a Pencil
- Step 10: Back-Cut Along the Profile
- Step 11: Refine the Cope with a File or Sandpaper
- Step 12: Test-Fit Before Nailing
- Step 13: Cut the Other End to Length
- Step 14: Install the Coped Piece
- Step 15: Caulk, Fill, Sand, and Paint
- Common Mistakes When Cutting Crown Molding Inside Corners
- Pro Tips for Cleaner Crown Molding Inside Corners
- When Should You Use Corner Blocks Instead?
- Real-World Experience: What Cutting Crown Molding Inside Corners Teaches You
- Conclusion
Crown molding has a magical way of making a room look expensive, polished, and slightly smug about itself. But then comes the inside corner, and suddenly that elegant strip of trim turns into a geometry quiz wearing wood grain. The good news? Learning how to cut crown molding inside corners is not wizardry. It is a repeatable process built around accurate measuring, proper saw setup, careful coping, and a little patience.
The biggest mistake beginners make is assuming every inside corner is a perfect 90 degrees. In real houses, walls lean, drywall mud builds up, framing shifts, and corners develop personalities. That is why many finish carpenters prefer a coped joint for crown molding inside corners. Instead of cutting two matching 45-degree miters and hoping they meet like best friends, you install one piece square into the corner and shape the second piece to fit over its profile.
Note: Crown molding work often involves ladders, sharp blades, and power saws. Beginners should work with an experienced adult or qualified helper, wear eye and hearing protection, secure material properly, and follow the tool manufacturer’s safety instructions. A pretty ceiling line is not worth a preventable injury.
What Is an Inside Corner in Crown Molding?
An inside corner is where two walls meet inward, such as the corner of a bedroom, hallway, living room, or dining room. Crown molding sits at an angle between the wall and ceiling, so cutting it is trickier than cutting flat baseboard. You are not only dealing with the wall angle; you are also dealing with the crown’s spring angle, which is the angle at which the molding rests against the wall and ceiling.
For most DIY projects, inside corners are finished in one of two ways: a mitered joint or a coped joint. A mitered inside corner uses two angled cuts, usually around 45 degrees each. A coped joint uses one square-cut piece that runs into the corner and a second piece shaped to match the face profile of the first. For older homes, uneven drywall, or rooms that have seen a few decades of “character,” coping is usually the cleaner choice.
Tools and Materials You’ll Need
- Crown molding
- Tape measure
- Pencil
- Miter saw or compound miter saw
- Coping saw, jigsaw with proper blade, or rotary tool for fine trimming
- Scrap crown molding for test pieces
- Clamps or supports
- Fine sandpaper, file, or rasp
- Stud finder
- Finish nails or brad nailer
- Wood glue or construction adhesive where appropriate
- Paintable caulk
- Safety glasses and hearing protection
- Ladder or stable work platform
How to Cut Crown Molding Inside Corners: 15 Steps
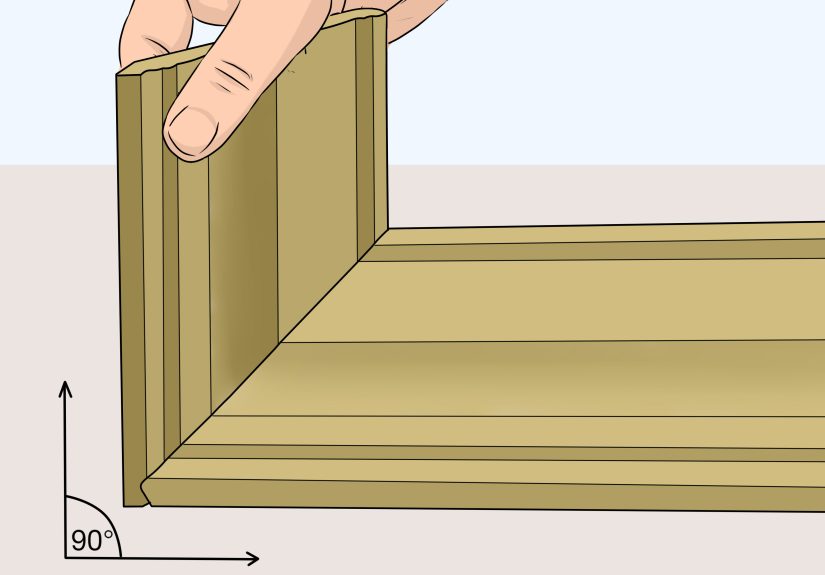
Step 1: Understand How the Crown Sits on the Wall
Before cutting anything, hold a short piece of crown molding against the wall and ceiling. Notice that it does not sit flat. The decorative face points outward, the top edge touches the ceiling, and the bottom edge touches the wall. Mark the top and bottom lightly on the back of a sample piece. This simple habit prevents the classic beginner mistake: cutting the piece upside down, backward, or both. Crown molding loves confusing people. Labeling removes its power.
Step 2: Decide Whether to Miter or Cope the Inside Corner
For a fast project in a very square room, a mitered inside corner can work. However, for the best-looking result, choose a coped joint. Coping gives the second piece a shaped end that nests tightly against the first piece. Because only the visible profile must fit perfectly, the joint can hide small wall-angle problems better than two rigid miters.
Step 3: Make a Pair of Test Blocks
Cut two short pieces of crown molding, each about 8 to 12 inches long. Use them as left and right inside corner templates. These little samples are worth their weight in avoided frustration. Label them “inside left” and “inside right,” then keep them near the saw. When your brain starts asking, “Which way does this go?” the templates will answer before you waste an eight-foot board.
Step 4: Measure the Wall Carefully
Measure from inside corner to inside corner at the point where the bottom edge of the crown will sit. Write the measurement down immediately. Do not trust your memory unless your memory also knows where you left your pencil. For long walls, measure twice and check whether the wall bows. A tiny measuring error can become a visible gap at the corner.
Step 5: Cut the First Piece Square
The first piece in a coped inside corner is usually cut square at the end that runs into the corner. This means a straight 90-degree cut. Install this piece first so its end butts cleanly into the wall. The second piece will be coped to fit over the face of this first piece. Think of the square-cut piece as the calm, reliable friend. The coped piece does the fancy dancing.
Step 6: Mark Studs and Plan Fastening Points
Use a stud finder to locate wall studs and ceiling joists where possible. Mark lightly below the crown line so you know where to nail. Crown molding should be fastened securely, especially at corners and long runs. If the molding is large or heavy, consider using backing blocks or nailing strips to give the fasteners more bite.
Step 7: Position Crown Correctly on the Miter Saw
For many cuts, crown molding is placed upside down on the miter saw, with the bottom edge against the saw fence and the top edge against the saw table. This position mimics the way the molding sits between the wall and ceiling. Some compound miter saws also allow cutting crown flat using specific bevel and miter settings, but beginners often find the “upside down and nested” method easier to visualize.
Step 8: Cut a 45-Degree Inside Miter on the Piece to Be Coped
Take the piece that will meet the installed square-cut molding and cut a 45-degree inside miter on its end. This cut is not the final joint. It simply reveals the molding’s profile, giving you a crisp line to follow with the coping saw. Make sure the long and short points face the correct direction for your corner. Your test blocks will help confirm the orientation before the blade touches the real piece.
Step 9: Darken the Profile Line with a Pencil
After the 45-degree miter cut, the decorative edge of the crown will be visible. Run a pencil along that profile line to make it easier to see. This line is your roadmap. Without it, coping can feel like cutting a mountain range during a foggy morning. With it, you have a clear path to follow.
Step 10: Back-Cut Along the Profile
Use a coping saw to cut along the pencil line. Angle the saw slightly backward so you remove extra material from the rear of the molding while keeping the front profile crisp. This is called back-cutting. The front edge is what people see; the back only needs to stay out of the way. Work slowly around curves, beads, coves, and small details. If the profile is ornate, make relief cuts in the waste area so small sections fall away more easily.
Step 11: Refine the Cope with a File or Sandpaper
Once the rough cope is cut, use a small file, rasp, or fine sandpaper to clean the edge. Do not over-sand the visible profile. Your goal is to remove bumps and high spots, not redesign the molding like an overenthusiastic sculptor. Test the cope against a scrap piece first, then against the installed square-cut piece.
Step 12: Test-Fit Before Nailing
Slide the coped piece into the inside corner and press it against the square-cut piece. Look for gaps along the profile. If the top touches but the bottom gaps, or the bottom touches but the top gaps, remove small amounts from the back side until the face closes tightly. A good cope often needs a few careful adjustments. This is normal, not failure.
Step 13: Cut the Other End to Length
Once the coped end fits, mark the other end of the molding to its final length. Cut it according to what the next joint requires: square for a butt joint, mitered for an outside corner, or scarf-cut for a long wall joint. Keep the coped end safe while cutting the opposite end. Dropping the finished cope on the floor is a special kind of DIY heartbreak.
Step 14: Install the Coped Piece
Position the coped piece so it fits tightly against the first piece. Nail into studs, joists, or backing where available. Start near the corner, but do not force the molding so hard that it twists or opens the joint. Work along the length of the piece, keeping the spring angle consistent. If the molding has to flex slightly to follow the wall, make gradual adjustments rather than bullying it into place.
Step 15: Caulk, Fill, Sand, and Paint
Even skilled trim carpenters use finishing materials. Fill nail holes with wood filler or spackle, sand lightly, and apply paintable caulk along small wall and ceiling gaps. Use caulk sparingly at the inside corner. A tight cope should not need a frosting-thick bead of caulk. Paint or touch up the molding after the filler dries. The final result should look crisp, intentional, and far more expensive than the actual cost of the trim.
Common Mistakes When Cutting Crown Molding Inside Corners
Cutting Both Pieces at 45 Degrees Without Checking the Corner
Many beginners assume two 45-degree cuts will always create a perfect inside corner. That only works if the walls form an exact 90-degree angle and the molding is held perfectly. In real homes, that is optimistic. A coped joint gives you more forgiveness and a better chance of a clean result.
Forgetting That Crown Is Installed at an Angle
Crown molding is not flat trim. If you cut it as though it sits flat against the wall, the angles will be wrong. Always keep the spring angle consistent, whether you are cutting the molding nested against the saw fence or flat with compound settings.
Skipping Test Pieces
Test pieces may feel like extra work, but they save time. They help you confirm saw direction, corner type, and profile orientation. A few scraps can prevent a full-length board from becoming expensive firewood.
Trying to Fix Huge Gaps with Caulk
Caulk is a finishing helper, not a miracle paste. Small gaps are normal, especially where walls and ceilings are uneven. Large gaps usually mean the cut, cope, or spring angle needs adjustment. Fix the fit first, then caulk lightly.
Pro Tips for Cleaner Crown Molding Inside Corners
Start with the least visible corner in the room. By the time you reach the main sightline, your technique will be sharper. Paint or prime the molding before installation if possible, especially if the room has high ceilings. Pre-finishing reduces overhead brushwork, which is nobody’s idea of a relaxing afternoon.
Use sharp blades and fine-tooth saws. A dull blade can splinter the face of the molding, especially on MDF or softwood profiles. Support long pieces at the saw so they do not sag during the cut. If the crown is wide, use crown stops, a jig, or temporary blocks to keep the molding in the same position for every cut.
When coping, remove material from the back, not the front. The front edge must remain clean because it forms the visible seam. If you accidentally cut past the profile line, the joint may show a notch. For painted trim, tiny errors can be repaired, but careful cutting is still faster than heroic patching.
When Should You Use Corner Blocks Instead?
Corner blocks are decorative blocks installed in inside or outside corners so crown molding can butt into them with square cuts. They are useful for beginners, very ornate molding, or rooms with wildly uneven corners. They also create a more traditional, built-up look. The tradeoff is style: some people love corner blocks, while others prefer the seamless appearance of coped crown molding.
Real-World Experience: What Cutting Crown Molding Inside Corners Teaches You
Cutting crown molding inside corners teaches patience in a way few home projects can. The first time you do it, you may feel as if the molding has joined forces with the miter saw to test your character. One cut looks backward. Another piece seems upside down. Then you hold it to the wall and realize the wall itself is not square. Welcome to finish carpentry, where the house is always part of the conversation.
One of the most useful lessons is that the room matters more than the math. A perfect 45-degree cut can still look wrong if the corner is 88 degrees or 92 degrees. That is why experienced installers rely on test pieces, coping, and repeated fitting. They are not guessing; they are responding to the actual room. In many homes, especially older ones, the best-looking corner is not the one cut according to a textbook. It is the one adjusted carefully until it fits the wall in front of you.
Another experience-based tip is to slow down before the final cut. Measuring is important, but crown molding rewards visual confirmation. Hold the piece in place. Check which edge touches the ceiling. Confirm which side needs the cope. Look at your template. Then cut. This extra minute can save a board, a mood, and possibly a dramatic speech about why DIY was invented by villains.
It also helps to install crown molding in a planned order. Many installers begin with a square-cut piece on one wall, then cope the adjoining pieces into it. In a simple rectangular room, you can work around the space so each inside corner has one receiving piece and one coped piece. If a wall is long enough to require two pieces, use a scarf joint rather than butting two square ends together. A scarf joint overlaps angled ends, which is easier to hide after filling and painting.
Painted crown molding is more forgiving than stained wood. With painted trim, tiny imperfections can be softened with filler, caulk, sanding, and touch-up paint. Stained wood requires tighter craftsmanship because filler and caulk are more visible. If this is your first crown molding project, painted MDF or primed pine can be a friendly starting point. It lets you learn the technique without making every small mistake feel permanent.
Finally, crown molding teaches you that “professional-looking” does not mean “perfect on the first try.” It means you test, adjust, refine, and finish cleanly. The visible result is a crisp line where wall meets ceiling. The invisible story is a pile of practice cuts, a few muttered words, and the satisfaction of seeing the last inside corner close neatly. That moment is worth the effort. It is the trim-carpentry version of a victory lap.
Conclusion
Learning how to cut crown molding inside corners is one of the most valuable finish-carpentry skills for upgrading a room. The essential idea is simple: install one square-cut piece into the corner, then cope the second piece so its profile fits tightly against the first. The process takes practice, but it solves many of the problems caused by imperfect walls and uneven corners.
For the cleanest result, label your molding, use test blocks, keep the spring angle consistent, cut a 45-degree miter to reveal the profile, back-cut carefully with a coping saw, and test-fit before fastening. Add light caulk, fill nail holes, and paint for a polished finish. Your first inside corner may not be flawless, but by the third or fourth, you will understand why coping is a favorite technique among people who make rooms look finished for a living.