Table of Contents >> Show >> Hide
- What Is a Rubber Band Ball?
- Supplies You Need
- Choosing the Right Rubber Bands
- How to Make a Rubber Band Ball: Step-by-Step Instructions
- How Long Does It Take to Make a Rubber Band Ball?
- Tips for Making a Perfectly Round Rubber Band Ball
- Creative Rubber Band Ball Ideas
- Common Mistakes to Avoid
- Is a Rubber Band Ball Safe for Kids?
- How to Use a Rubber Band Ball After You Make It
- My Experience Making a Rubber Band Ball
- Conclusion
- SEO Tags
A rubber band ball is the rare DIY project that asks for almost nothing and somehow gives you a tiny desk trophy, a fidget toy, a boredom buster, and proof that office supplies can have ambition. You do not need a workshop, a glue gun, a power tool, or the patience of a medieval monk. You need rubber bands, a small starter core, and a willingness to wrap, twist, rotate, repeat, and occasionally say, “Wait, why is this actually satisfying?”
This guide explains how to make a rubber band ball from scratch, including the best materials to use, step-by-step instructions, shaping tips, safety reminders, storage advice, and real-life experience from making one that does not turn into a lumpy rubber potato. Whether you want a quick craft for kids, a quirky office project, a stress-relieving desk accessory, or the beginning of your journey toward rubber-band greatness, this easy DIY tutorial will get you rolling.
What Is a Rubber Band Ball?
A rubber band ball is exactly what it sounds like: a ball formed by wrapping rubber bands around a small center until it becomes round, dense, and springy. The center can be made from crumpled paper, a small wad of rubber bands, aluminum foil, or another soft, compact object. As more bands are added, the ball becomes heavier, smoother, and more satisfying to hold.
The appeal is simple. A rubber band ball turns random loose rubber bands into something useful and oddly charming. It keeps desk drawers cleaner, gives your hands something to do during long calls, and creates a craft project that can grow over time. Today it might be golf-ball sized. Next month, it may be approaching “please stop storing this on the printer” territory.
Supplies You Need
Before learning how to make a rubber band ball, gather a few simple materials. You can start with what you already have at home or in the office.
Basic Materials
- Rubber bands in several sizes
- A small piece of paper, aluminum foil, or a few rubber bands for the core
- A clean, flat surface
- A small container or bag for extra rubber bands
- Optional: colorful rubber bands for decoration
Standard office rubber bands work well because they are stretchy, affordable, and easy to layer. Small bands are helpful at the beginning, while larger bands become more useful as the ball grows. Wider rubber bands add strength and coverage, while thinner bands help fill tiny gaps and smooth the surface.
Choosing the Right Rubber Bands
Not all rubber bands behave the same way. Some are thin and snappy, some are wide and sturdy, and some have been living in a drawer since the Jurassic period and will crumble the moment you stretch them. For the best rubber band ball, use bands that feel flexible and strong, not dry, cracked, or sticky.
Best Rubber Band Sizes for Beginners
For a small starter ball, use shorter rubber bands that can wrap tightly around the core. As the ball gets larger, move to medium and large bands. A good beginner mix includes:
- Small rubber bands: Best for the first few layers and small gaps
- Medium rubber bands: Best for building the main shape
- Large rubber bands: Best for wrapping around bigger balls
- Wide rubber bands: Best for adding firmness and coverage
- Colorful bands: Best for patterns, stripes, and personality
If your rubber bands are too loose, they will slide around and make the ball uneven. If they are too tight, they may snap, especially around sharp folds or a hard center. The sweet spot is a band that stretches firmly around the ball without looking like it is filing a workplace complaint.
How to Make a Rubber Band Ball: Step-by-Step Instructions
Now for the fun part. These easy DIY instructions work whether you are making a small rubber band ball in one afternoon or slowly building one over weeks.
Step 1: Make a Small Core
Start by creating the center of your ball. The easiest method is to crumple a small piece of paper into a tight ball. Use a piece about the size of a sticky note or half a sheet of scrap paper, depending on how large you want the beginning to be.
You can also start with several rubber bands twisted together into a small knot-like bundle. This creates a true all-rubber ball, but it is harder for beginners because the first few bands may slide around. Paper is easier, lighter, and more forgiving.
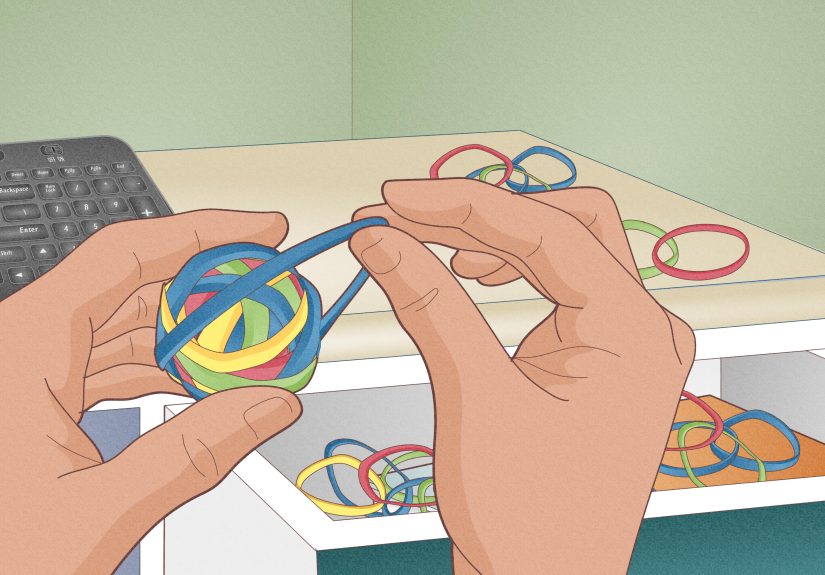
Step 2: Wrap the First Rubber Band Around the Core
Take one small rubber band and stretch it around the paper ball. Twist it if needed, then wrap it around again in a different direction. The first band should hold the core together tightly. Do not worry if it looks messy. Every rubber band ball has an awkward baby phase.
Step 3: Add More Bands in Different Directions
Add the second rubber band across the first one at a different angle. Then add a third band in another direction. The key is to rotate the ball as you work. Wrap one band vertically, the next horizontally, and the next diagonally. This prevents one side from getting bulky while another side stays flat.
Think of it like seasoning food. You do not dump all the salt in one corner of the soup. Spread the tension evenly, and your rubber band ball will grow round instead of turning into a weird little asteroid.
Step 4: Keep Building the Layers
Continue adding rubber bands one at a time. Pull each band snugly around the ball, twist it if necessary, and place it where the surface needs coverage. If you see a dent, wrap a band across that area. If one side sticks out too much, add bands to the opposite side to balance the shape.
After the first 20 to 30 bands, the ball should begin to feel more solid. At this stage, you can switch from small rubber bands to medium ones. Larger bands will be easier to stretch around the growing shape and will help build size faster.
Step 5: Shape the Ball as You Go
Every few minutes, roll the ball between your palms. This helps you feel lumps and flat spots. If the ball is uneven, do not panic. Add rubber bands across the low spots and avoid adding too many to high spots. With enough layers, small imperfections disappear.
If a rubber band slips off, remove it and try again at a different angle. If a band snaps, throw it away immediately. Broken bands can create little rubber fragments, and nobody wants a desk covered in tiny elastic confetti.
Step 6: Finish With Smooth Outer Layers
Once your ball reaches the size you like, choose a few clean, flexible rubber bands for the outside. Wrap them evenly around the surface to create a neat finish. You can use one color for a classic look or alternate colors for stripes, rings, or a chaotic rainbow masterpiece.
For a polished rubber band ball, use bands of similar size on the final layer. This gives the outside a cleaner pattern and helps hold loose bands in place.
How Long Does It Take to Make a Rubber Band Ball?
A small rubber band ball can take 10 to 20 minutes. A tennis-ball-sized version may take several hours, depending on the size and thickness of your bands. A large rubber band ball can take weeks, months, or years if you keep adding bands whenever you find them.
For most people, the best approach is to treat it as an ongoing project. Keep your rubber band ball in a desk drawer, craft box, or kitchen junk drawer. Whenever you get a rubber band from mail, produce packaging, office supplies, or takeout containers, add it to the ball instead of letting it wander into the mysterious drawer zone.
Tips for Making a Perfectly Round Rubber Band Ball
Rotate Constantly
The most important trick is rotation. Turn the ball after every band. If you keep wrapping in the same direction, the ball will become oval or lopsided. Alternating directions distributes pressure evenly.
Use Different Sizes
Small bands help with precision. Medium bands build structure. Large bands cover more area. A mix of sizes makes the process easier and creates a stronger ball.
Do Not Stretch Bands Too Far
A rubber band should be snug, not tortured. Overstretched bands are more likely to snap and may weaken faster over time. If a band feels like it is about to break, use a larger one.
Fix Lumps Early
Small lumps become big lumps if you ignore them. If one area looks raised, add bands around the surrounding lower areas. This balances the shape naturally.
Store Extra Bands Properly
Rubber bands last longer when stored in a cool, dry place away from direct sunlight and heat. Old, brittle bands are harder to use and can break while wrapping.
Creative Rubber Band Ball Ideas
Once you know the basic technique, you can make your rubber band ball more interesting. Try using colored bands to create rings, layers, or random patterns. Make a tiny rubber band ball as a keychain decoration, a medium one for your desk, or a larger one as an ongoing family challenge.
You can also make themed balls. Use only blue and green bands for an Earth-inspired look, black and orange for Halloween, red and green for Christmas, or whatever colors happen to be in your junk drawer. The rubber band ball does not judge. It simply absorbs elastic chaos.
Common Mistakes to Avoid
Starting With a Core That Is Too Large
A huge paper core makes the ball look big quickly, but it also makes the finished project feel light and less satisfying. Start small if you want a dense, bouncy rubber band ball.
Using Dry or Cracked Rubber Bands
Old rubber bands may snap during wrapping. Check each band before using it. If it looks powdery, cracked, sticky, or brittle, throw it away.
Wrapping in Only One Direction
This is the fastest way to create a rubber band egg. Alternate directions and angles to keep the ball round.
Ignoring Safety
Rubber bands can snap, sting, or become choking hazards for small children and pets. Keep loose bands and small rubber band balls away from toddlers, babies, dogs, and cats. Also, some people are sensitive or allergic to natural rubber latex, so use latex-free bands if needed.
Is a Rubber Band Ball Safe for Kids?
A rubber band ball can be a fun craft for older children, but adult supervision is important. Rubber bands should not go in the mouth, around fingers for long periods, or near the face when stretched. Small rubber bands and broken pieces can be choking hazards, especially for children under 3.
For family crafting, choose larger rubber bands, supervise the wrapping process, and store the finished ball out of reach when playtime is over. If anyone in the household has a latex allergy, choose latex-free rubber bands and wash hands after handling craft supplies.
How to Use a Rubber Band Ball After You Make It
Your finished rubber band ball can be more than a decorative desk oddity. Use it as a fidget object during brainstorming, a playful paperweight, a conversation starter, or a way to organize loose rubber bands. Some people lightly bounce small rubber band balls, but do this carefully and away from breakable objects. A dense rubber band ball can have more bounce than expected and less respect for coffee mugs than you would hope.
It also makes a simple classroom, office, or rainy-day project. Teachers can use it to demonstrate patterns, tension, elasticity, and patience. Parents can use it as a low-cost craft. Office workers can use it as evidence that the supply closet has not defeated them.
My Experience Making a Rubber Band Ball
The first time I made a rubber band ball, I expected it to be a five-minute craft. I was wrong in the best possible way. I started with a tiny crumpled paper core and a handful of rubber bands from mail bundles, broccoli stems, and the back of a desk drawer that had clearly been collecting office fossils. The first few minutes were not glamorous. The paper ball looked suspiciously like a mistake, and the first rubber band slid off twice before I realized I needed to twist it tighter and change directions.
After about 15 bands, something clicked. The ball started holding its shape. The rubber bands stopped behaving like rebellious noodles and began forming a real surface. I learned quickly that the angle matters. When I wrapped too many bands in the same direction, the ball developed a ridge. When I alternated directions, the shape became smoother. Rolling it between my palms helped me find flat spots, which I fixed by adding bands across those areas.
One of the most useful lessons was to sort the rubber bands by size before starting. At first, I grabbed any band I saw, which led to unnecessary wrestling. A large band on a tiny ball felt loose and sloppy. A tiny band on a bigger ball snapped with the drama of a soap opera exit. Once I used small bands first, medium bands next, and larger bands later, the whole process became easier.
I also discovered that color can make the project more fun. Plain tan rubber bands give a classic office look, but colored bands add personality. I tried placing several blue bands in a row, then a few green ones, and suddenly the ball looked intentional instead of like something that escaped from a stationery cabinet. If you are making this with kids, color patterns can keep them interested longer.
The most satisfying part is the slow transformation. A rubber band ball begins as a wrinkled little lump, then becomes a firm sphere with weight and bounce. It is oddly calming because the task is repetitive but not boring. Each band changes the shape a little. Each layer makes the ball stronger. It is the craft version of “just one more episode.” You tell yourself you will stop after five more bands, and then suddenly you are searching the kitchen for produce rubber bands like a treasure hunter with elastic priorities.
My biggest advice from experience is to avoid rushing. A neat rubber band ball is built by small corrections. Rotate often, check the shape, and use the right size band for the current stage. Do not worry if the first version looks uneven. Rubber band balls are surprisingly forgiving. Add enough layers, and most beginner mistakes disappear under fresh bands. The result is simple, useful, and strangely delightfula tiny monument to patience, recycling, and the human ability to turn office supplies into entertainment.
Conclusion
Learning how to make a rubber band ball is easy, inexpensive, and more enjoyable than it has any right to be. Start with a small core, wrap rubber bands in alternating directions, rotate often, and shape the ball as it grows. Use fresh, flexible bands, choose different sizes for different stages, and keep safety in mind around children, pets, and anyone with latex sensitivity.
Whether you make a tiny desk toy or keep building until your rubber band ball becomes the unofficial mascot of your home office, the process is simple and satisfying. Best of all, it turns everyday clutter into something playful. That is DIY magic: low cost, low stress, and just enough silliness to make the project memorable.
SEO Tags
Note: Keep rubber bands and small rubber band balls away from babies, toddlers, and pets. Use latex-free rubber bands if latex sensitivity or allergy is a concern.