Table of Contents >> Show >> Hide
- What Is a Shadow Box?
- Why Make a Shadow Box Video?
- Materials You Need to Make a Shadow Box
- Step 1: Choose a Theme Before You Start Filming
- Step 2: Plan the Layout
- Step 3: Prepare the Background
- Step 4: Attach the Items
- Step 5: Add Depth with Layers
- Step 6: Close and Display the Shadow Box
- How to Film a Shadow Box Video
- Common Shadow Box Mistakes to Avoid
- SEO Tips for Publishing a Shadow Box Video Article
- Real-World Experience: What I Learned Making a Shadow Box Video
- Conclusion
Note: This article is written for web publication in standard American English and is based on real DIY, craft, framing, and preservation guidance.
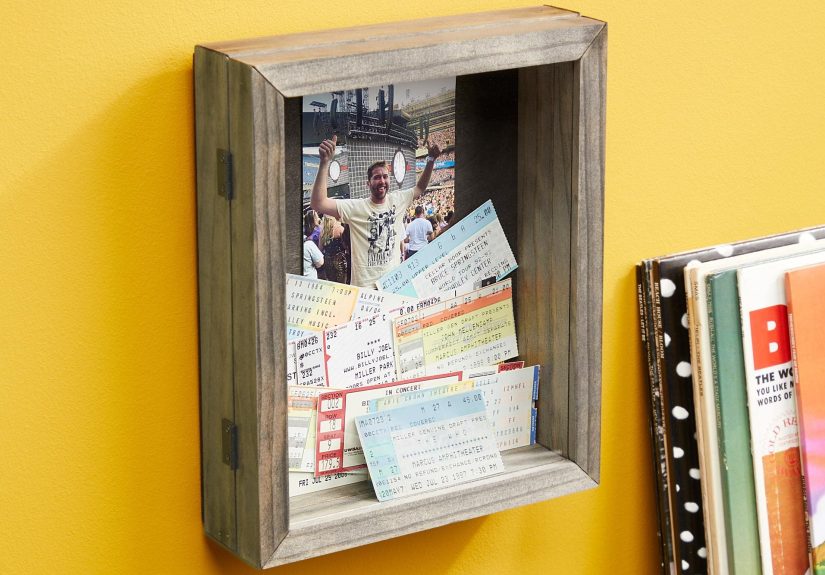
A shadow box is what happens when a picture frame gets ambitious. Instead of showing one flat photo, it creates a miniature stage for memories: ticket stubs, baby shoes, seashells, medals, dried flowers, graduation tassels, wedding keepsakes, travel souvenirs, or that one concert wristband you refuse to throw away because, emotionally, you are still in the front row.
But this guide is not only about how to make a shadow box. It is also about how to make a shadow box video that people actually want to watch. A good DIY shadow box tutorial should be clear, pretty, practical, and not filmed like a mysterious craft crime scene. Whether you are building a memory box for your wall, creating a layered paper shadow box with cardstock, or making a keepsake display for a gift, the process becomes much easier when you plan both the craft and the video before the glue gets involved.
In this in-depth guide, you will learn what materials to use, how to design the layout, how to assemble a shadow box frame, how to protect sentimental items, and how to film the project step by step. We will keep the process beginner-friendly, budget-conscious, and realistic. No need for a full workshop, dramatic lighting crew, or emotional montage set to ukulele musicunless that is your brand, in which case, carry on.
What Is a Shadow Box?
A shadow box is a deep frame used to display three-dimensional objects. Unlike a regular picture frame, it has enough depth to hold items with texture, thickness, and personality. The “shadow” part comes from the space between the glass, backing, and objects, which creates depth and visual interest.
People use shadow boxes for all kinds of displays, including military medals, sports memorabilia, wedding flowers, baby keepsakes, family photos, travel maps, vintage jewelry, craft paper art, and seasonal décor. A DIY shadow box can be sentimental, decorative, funny, elegant, rustic, modern, or wonderfully chaoticas long as the chaos is arranged nicely.
Why Make a Shadow Box Video?
A shadow box video turns a craft project into helpful content. Viewers love seeing the full transformation: an empty frame becomes a polished keepsake display. It is satisfying, useful, and visually friendly for platforms like YouTube, TikTok, Instagram Reels, Pinterest, and craft blogs.
More importantly, video solves a problem that photos often cannot. When people read “attach the backing,” they may wonder, “Attach it where? With what? Why is mine leaning like a tired bookshelf?” A video tutorial shows placement, spacing, layering, and mistakes in real time. That makes the DIY process less intimidating for beginners.
Materials You Need to Make a Shadow Box
Before filming, gather your supplies. Nothing ruins a smooth tutorial faster than leaving the camera running while you search for scissors under a pile of cardstock. The audience does not need five minutes of drawer archaeology.
Basic Supplies
- Shadow box frame with glass or acrylic front
- Foam board, mat board, cork board, or sturdy backing
- Scrapbook paper, fabric, cardstock, or painted background
- Photos, keepsakes, souvenirs, medals, paper flowers, or small objects
- Glue dots, double-sided tape, pins, or removable adhesive
- Ruler or measuring tape
- Pencil for marking placement
- Small scissors
- Optional: battery-powered fairy lights or LED strips
- Optional: labels, vinyl text, stickers, or printed captions
Safety and Preservation Supplies
- Clean cotton gloves for delicate photos or papers
- Acid-free paper or archival photo corners for valuable keepsakes
- Copies of original documents or photos when possible
- Adult supervision for cutting thick board, glass handling, or heat tools
If your shadow box contains irreplaceable items, avoid permanent glue directly on originals. Use copies for display and store originals safely. Sunlight and long-term light exposure can fade paper, fabric, ink, and photos, so do not hang the finished piece in direct sun. Your shadow box should preserve the memory, not slowly roast it like a sentimental marshmallow.
Step 1: Choose a Theme Before You Start Filming
A strong shadow box starts with a clear theme. Without one, the box may look like a junk drawer with a glass door. Pick one story and build everything around it.
Popular Shadow Box Ideas
- Travel shadow box: maps, postcards, shells, tickets, coins, and photos
- Wedding shadow box: invitation, dried bouquet pieces, boutonniere, ribbon, vows, or photos
- Baby memory box: hospital bracelet, baby photo, tiny socks, name card, and birth details
- Sports shadow box: medals, ribbons, team photo, jersey patch, or event bib
- Graduation shadow box: tassel, ceremony program, cap decoration, and senior photo
- Layered paper shadow box: cardstock scenes, cut paper layers, spacers, and optional lights
- Holiday shadow box: ornaments, miniature trees, faux snow, LED lights, and festive paper
For a video, choose a theme that looks good on camera. High-contrast colors, textured materials, and meaningful objects make the tutorial more engaging. A white ticket on a white background may be sentimental, but visually it has the personality of printer paper taking a nap.
Step 2: Plan the Layout
Remove the back of the shadow box and place it flat on your table. Arrange your items before attaching anything. This step is where the project becomes art instead of accidental storage.
Start with the largest item first. It might be a photo, invitation, map, fabric swatch, medal, or paper art layer. Then add medium objects around it. Finally, place the smallest details in open spaces. Try to create balance: if one side has a heavy object, add color or texture to the opposite side so the display does not look lopsided.
Layout Tips That Look Great on Video
- Use odd numbers of decorative items for a more natural arrangement.
- Leave empty space so the design can breathe.
- Layer flat pieces behind thicker objects.
- Use a background color that contrasts with the keepsakes.
- Take a photo of the final arrangement before gluing.
That last tip is important. Once you move items to attach them, the layout may vanish from your brain like a Wi-Fi signal in a basement. A quick phone photo saves the day.
Step 3: Prepare the Background
The background sets the mood. A linen backing gives the shadow box a soft, classic look. Scrapbook paper adds pattern. Painted foam board creates a custom color. Cardstock keeps the design clean and simple. Fabric can add warmth, especially for wedding, baby, or vintage displays.
Cut the background to fit the backing board. Use light adhesive around the edges, not a puddle of glue in the middle. Smooth it carefully so there are no wrinkles. If you are filming, record a close-up of this step because viewers like seeing the plain board turn into a polished base.
Step 4: Attach the Items
Different items need different attachment methods. Flat paper pieces can be held with photo corners, glue dots, or double-sided tape. Fabric can be pinned. Medals and ribbons can be attached to small hidden foam board pieces before being mounted. Lightweight objects may work with adhesive dots, while heavier items may need stronger support.
For valuable photos, certificates, letters, or irreplaceable documents, avoid tape, rubber cement, or hot glue directly on the original. Use a copy or attach the item with archival photo corners. This small choice can save future-you from saying, “Why did I glue Grandma’s letter to foam board?” Future-you deserves better.
Best Attachment Methods by Item
- Photos: photo corners, acid-free mounts, or copies with tape
- Medals: pins, foam backing, or stitched support
- Tickets and paper: removable adhesive or archival corners
- Fabric: pins, small stitches, or fabric-safe adhesive
- Small objects: glue dots, hidden supports, or tiny brackets
- Paper flowers: glue dots or low-temperature adhesive with care
Before closing the frame, gently lift the backing upright to test whether anything shifts. If a souvenir slides down like it is trying to escape, reinforce it before sealing the box.
Step 5: Add Depth with Layers
Depth is what makes a shadow box feel special. You can create it by placing objects at different heights. Foam board squares, mat board strips, folded cardstock, or small spacers can lift certain pieces forward.
For a layered paper shadow box, cut several cardstock designs and stack them with spacers between each layer. This creates a 3D scene with shadows and dimension. Many crafters use cutting machines for detailed paper layers, but simple hand-cut shapes can work for beginner designs. Think mountains, clouds, flowers, stars, hearts, leaves, or city skylines.
If you add lights, use battery-powered LEDs and keep the battery pack accessible. Do not permanently seal it behind the artwork unless you enjoy reopening finished projects with the energy of a raccoon breaking into a cooler.
Step 6: Close and Display the Shadow Box
Once everything is attached, clean the inside of the glass or acrylic. Dust has a magical ability to appear only after the frame is sealed. Place the backing into the frame, secure the clips, and inspect the front.
Hang the shadow box away from direct sunlight, damp areas, hot attics, and humid bathrooms. For sentimental paper items and photographs, lower light is better. If the shadow box contains delicate originals, consider displaying copies and storing the originals in an archival box.
How to Film a Shadow Box Video
Now let’s turn the craft into a video tutorial. The best DIY videos are easy to follow, visually clear, and edited tightly. You do not need fancy gear. A phone, decent lighting, and a clean workspace can do the job.
Use This Simple Video Structure
- Hook: Show the finished shadow box first.
- Materials: Display all supplies in one clean shot.
- Theme: Explain what the shadow box will represent.
- Layout: Show the arrangement before attaching items.
- Assembly: Record the background, mounting, layering, and closing steps.
- Reveal: Show the final piece on a wall, shelf, or table.
- Tip: End with one useful lesson learned.
The finished project should appear early in the video. People want to know what they are making before investing their time. A strong opening might be: “Today I’m turning vacation tickets, photos, and tiny souvenirs into a travel shadow box that looks like it came from a boutique instead of my very crowded kitchen table.”
Camera Angles That Work
- Overhead shot: Best for layout, measuring, and arranging pieces.
- Close-up shot: Best for texture, labels, glue dots, and small details.
- Side angle: Best for showing depth and layers.
- Final reveal shot: Best near a window with soft indirect light.
Keep the background simple. A plain table, craft mat, or neutral poster board works well. Busy surfaces compete with the project. The viewer came for the shadow box, not a visual tour of every pen you own.
Common Shadow Box Mistakes to Avoid
Using Too Many Items
Not every keepsake needs to go inside one frame. Edit your items. Choose the pieces that tell the story best. If you have too much, make a second shadow box or store extras safely.
Ignoring Frame Depth
Measure thick objects before choosing the frame. A deep seashell, corsage, toy car, or medal may need more space than expected. If the glass presses against the object, the frame is too shallow.
Using Weak Adhesive
Gravity is patient. It may wait three days, then drop your favorite keepsake to the bottom of the frame. Test attachments before sealing the box.
Forgetting About Light Damage
Photos, ink, fabric, and paper can fade over time. Keep the finished shadow box out of direct sunlight, especially if it includes valuable originals.
Filming Without a Plan
A DIY video does not need a Hollywood script, but it does need order. Write down your steps before recording. Your future editing self will send you a silent thank-you.
SEO Tips for Publishing a Shadow Box Video Article
If you are publishing your tutorial online, use natural keywords that match what people search for. Good keyword phrases include “how to make a shadow box,” “DIY shadow box,” “shadow box tutorial,” “memory shadow box ideas,” “shadow box frame,” “layered paper shadow box,” and “keepsake display box.”
Use your main keyword in the title, introduction, one or two headings, image alt text, and meta description. Do not repeat it until the article sounds like a robot trapped in a craft store. Search engines reward helpful content, and readers reward content that does not make them blink in confusion.
Real-World Experience: What I Learned Making a Shadow Box Video
The first lesson in making a shadow box video is that the craft always takes slightly longer than your optimistic brain predicts. On paper, it sounds simple: arrange items, attach items, close frame, become DIY legend. In real life, you will move one photo seven times because it is “almost right,” then realize the background paper has a wrinkle that only appears on camera. This is normal. Crafting is basically problem-solving with prettier supplies.
One helpful experience is to build the shadow box once without filming the final version. That does not mean completing the whole project twice. It means doing a dry layout, checking the colors, testing the depth, and seeing whether the items stay in place when the backing is lifted. When I skipped this step, a small souvenir slid behind a photo right before the final reveal. It looked less like a polished keepsake display and more like the box had eaten part of the vacation.
Lighting matters more than expensive equipment. A phone camera can capture a beautiful shadow box if the workspace is bright and evenly lit. Natural indirect light works especially well. Harsh overhead lighting can create glare on glass and acrylic, so it is often better to film with the front glass removed during assembly and then record the final reveal at an angle. Slightly tilting the frame helps reduce reflections. Otherwise, the audience may see your ceiling fan more clearly than the handmade masterpiece.
Another important experience is to keep your hands out of the way when filming close-ups. This sounds obvious until you review the footage and discover that your fingers blocked the most important step. Move slowly, pause between actions, and hold each finished stage still for a few seconds. These tiny pauses make editing much easier and give viewers time to understand what changed.
I also learned that labels can turn a good shadow box into a great one. A small printed date, location, quote, or name helps viewers understand the story. For example, a travel shadow box with a map, shell, and ticket is pretty. Add a small label that says “Maine Coast, Summer 2025,” and suddenly it feels personal and complete. In a video, labels also help the audience connect emotionally with the project.
The biggest lesson is not to chase perfection. A handmade shadow box should look intentional, not factory-made. Slight texture, layered paper edges, visible fabric grain, or a tiny bit of asymmetry can make the piece feel warm and real. The goal is to preserve a memory, not pass a museum installation exam. If the story is clear, the items are secure, and the finished frame makes someone smile, the project worked.
Conclusion
Learning how to make a shadow box video gives you two creative wins at once. You create a meaningful keepsake display and produce content that can help other people make their own. Start with a theme, choose the right frame depth, plan the layout, use safe attachment methods, protect valuable originals, and film each step clearly. Whether your project holds wedding flowers, baby memories, travel souvenirs, sports medals, or layered paper art, the best shadow box tells a story in a way a regular frame never could.
A shadow box is not just décor. It is a tiny museum of your life, minus the velvet ropes and suspiciously quiet security guard. Make it personal, make it sturdy, keep it out of harsh sunlight, and film the process so others can follow along. That is how a simple frame becomes a memory worth displayingand a video worth watching.