Table of Contents >> Show >> Hide
- Why Repurpose an Old Sewing Cabinet?
- Step 1: Inspect the Cabinet Before You Start
- Step 2: Gather Tools and Supplies
- Step 3: Remove the Sewing Machine and Hardware
- Step 4: Clean the Cabinet Thoroughly
- Step 5: Repair Damage and Fill the Sewing Machine Opening
- Step 6: Sand the Surface the Smart Way
- Step 7: Prime Before Painting
- Step 8: Choose the Right Finish
- Step 9: Paint or Stain in Thin Coats
- Step 10: Seal the Cabinet for Everyday Use
- Step 11: Upgrade the Hardware
- Step 12: Style the Finished Cabinet
- Design Ideas for Different Home Styles
- Common Mistakes to Avoid
- Budget-Friendly Tips for a Sewing Cabinet DIY Project
- of Real-Life Experience: What This Project Teaches You
- Conclusion
Note: This article is written as original, publication-ready web content and is based on practical DIY furniture refinishing, upcycling, painting, safety, and home organization guidance commonly used by U.S. home improvement experts.
An old sewing cabinet is one of those furniture pieces that seems to whisper, “I have stories.” Maybe it belonged to a grandmother who could hem pants faster than most people can find matching socks. Maybe you found it at a thrift store for the price of a fancy coffee. Or maybe it has been sitting in the garage for ten years, holding random screws, holiday ribbon, and one mysterious button that belongs to absolutely nothing.
The good news? That dusty little cabinet can become something beautiful, useful, and full of character. Repurposing an old sewing cabinet is a smart DIY project because it combines vintage charm, practical storage, and budget-friendly creativity. Instead of sending a solid piece of furniture to the landfill, you can turn it into a nightstand, bar cabinet, entryway table, craft station, bathroom vanity, plant stand, or compact desk. The cabinet already has a great shape; your job is simply to give it a new job description.
In this guide, you will learn how to make an old sewing cabinet gets re-purposed DIY-style, from planning and cleaning to sanding, painting, repairing, styling, and using it in real life. We will keep the process simple, realistic, and funbecause furniture flipping should not require a PhD in sawdust.
Why Repurpose an Old Sewing Cabinet?
Vintage sewing cabinets are popular with DIY furniture lovers for one big reason: they are usually small enough to handle, but interesting enough to become a statement piece. Unlike plain side tables, sewing cabinets often have hidden compartments, fold-out tops, carved legs, sturdy drawers, or a built-in opening where the sewing machine once lived. That little “problem area” is actually where the magic begins.
Repurposing old furniture is also a practical choice. New furniture can be expensive, and many modern pieces are made from lightweight materials that do not age gracefully. A vintage sewing cabinet may have scratches, chipped veneer, or outdated hardware, but it often has a stronger frame than budget flat-pack furniture. With patience and the right prep work, you can create a custom piece that fits your home instead of buying something generic that looks like it came from aisle seven of “Everyone Has This.”
Best Uses for a Repurposed Sewing Cabinet
Before grabbing sandpaper, decide what the cabinet should become. The purpose will guide your design, finish, hardware, and repairs. Here are some of the best old sewing cabinet repurpose ideas:
- Nightstand: Perfect beside a bed, especially if the cabinet has drawers for books, glasses, chargers, and late-night chocolate.
- Entryway table: Use it for keys, mail, dog leashes, and a small lamp.
- Mini bar cabinet: Add a tray, glassware, and bottle storage inside the former machine space.
- Bathroom storage cabinet: Great for towels, toiletries, and extra toilet paper if sealed properly against moisture.
- Craft station: Keep thread, paintbrushes, paper, glue, and tools organized in the drawers.
- Plant stand: Add a waterproof tray on top and place trailing plants for a cozy vintage look.
- Compact desk: Install a flat top and use the drawers for office supplies.
- Vanity table: Add a mirror, pretty hardware, and drawer organizers for makeup and accessories.
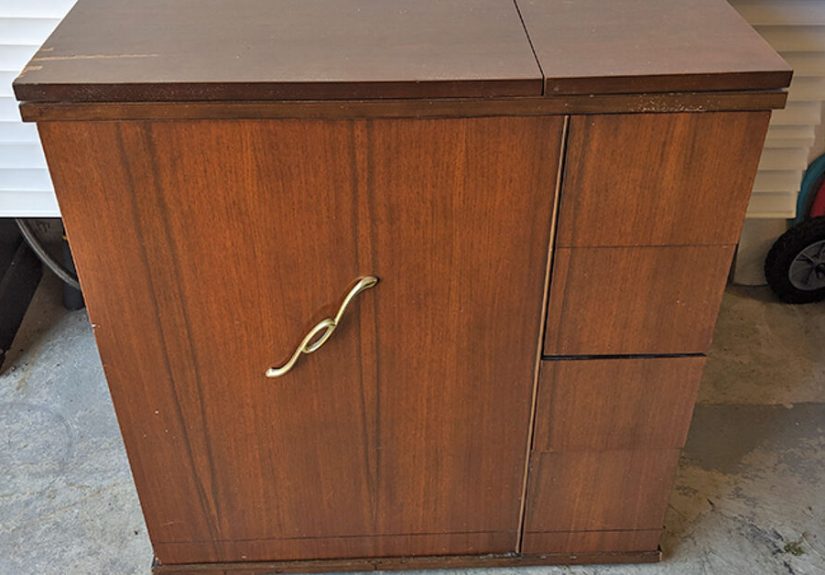
Step 1: Inspect the Cabinet Before You Start
Every good DIY furniture makeover begins with one glamorous activity: staring at the piece from every angle like a detective in a home improvement mystery. Look for loose legs, wobbly joints, cracked veneer, water damage, missing screws, broken hinges, sticky drawers, and old odors. Open every compartment. Remove anything hiding inside. Yes, even the old bobbin, the fossilized thread, and the paperclip that somehow survived four decades.
Check whether the sewing machine is still attached. If it is, decide whether you want to keep it for decorative value or remove it to create storage space. Many people remove the machine because it is heavy and limits how the cabinet can be used. However, antique machines can be valuable or sentimental, so avoid tossing one out without checking its condition, brand, and possible resale value.
Safety Check for Older Furniture
If the cabinet is very old or has an existing painted finish, be careful before sanding. Older paint may contain lead, especially on furniture made or painted before modern safety standards became common. Do not aggressively sand unknown old paint indoors. Use a lead test kit or consult a professional if you are unsure. Work in a well-ventilated area, wear eye protection, use gloves when handling cleaners or strippers, and wear a proper mask when sanding. DIY is more fun when your lungs are not part of the project.
Step 2: Gather Tools and Supplies
You do not need a huge workshop to repurpose a sewing cabinet, but having the right supplies makes the process smoother. A basic project usually requires:
- Screwdriver or drill
- Wood glue
- Clamps
- Wood filler or veneer repair putty
- Putty knife
- Sandpaper in medium and fine grits
- Tack cloth or microfiber cloth
- Degreasing cleaner or mild dish soap
- Primer suitable for wood, veneer, or laminate
- Furniture paint, stain, or topcoat
- Paintbrush, foam roller, or sprayer
- New hardware, if desired
- Optional plywood or solid wood panel for the top opening
- Protective finish such as polyurethane, polycrylic, wax, or furniture sealer
The most important supply is patience. Unfortunately, it is not sold by the gallon at the hardware store, but you will need it between coats of paint.
Step 3: Remove the Sewing Machine and Hardware
If the sewing machine is still inside the cabinet, remove it carefully. Many machines are attached with hinges or bolts. Support the weight before loosening anything because some vintage machines are surprisingly heavy. Once removed, store the machine safely if you plan to sell, restore, or display it later.
Next, remove the knobs, pulls, hinges, drawer stops, and any decorative hardware you do not want painted. Place all screws in a labeled bag. This tiny step can save you from crawling around the floor later, muttering things that would scandalize a Victorian seamstress.
Step 4: Clean the Cabinet Thoroughly
Old sewing cabinets often collect furniture polish, dust, oil, hand grime, and mystery residue. Paint and primer will not stick well to a dirty surface, so cleaning is not optional. Wipe the cabinet with a mild degreasing cleaner or warm water with a little dish soap. Avoid soaking the wood. Too much water can cause veneer to bubble or joints to loosen.
Use a toothbrush or small detail brush around carved areas, drawer corners, and hinges. After cleaning, wipe the piece with a damp cloth and allow it to dry completely. If the cabinet smells musty, place activated charcoal, baking soda, or coffee grounds inside the drawers for a few days. Sunshine and airflow also help, but do not leave veneer furniture baking outside for too long.
Step 5: Repair Damage and Fill the Sewing Machine Opening
The most noticeable feature of many old sewing cabinets is the large opening in the top where the machine once folded down. You have several options for dealing with it.
Option 1: Install a Solid Top Panel
Cut a piece of plywood, hardwood, or project board to fit the opening. Attach it from underneath with support cleats, brackets, or wood glue and screws. This creates a flat surface, making the cabinet useful as a desk, nightstand, or entry table. If you want a seamless look, fill the edges with wood filler, sand smooth, then paint the entire top.
Option 2: Turn the Opening Into Hidden Storage
Instead of permanently closing the top, add a hinged lid or removable tray. This keeps the original sewing cabinet personality while adding secret storage for craft supplies, remote controls, candles, or snacks you do not want to share. No judgment. Storage snacks are a lifestyle.
Option 3: Add a Decorative Insert
For a more creative look, insert cane webbing, beadboard, tile, metal mesh, stained wood, or a painted panel. This works beautifully if you want the piece to feel custom and modern without erasing its vintage roots.
Repair loose joints with wood glue and clamps. Fill dents, scratches, and missing veneer with wood filler. Let repairs dry fully, then sand until smooth. For large veneer chips, use a flexible filler or apply a veneer patch if you want a stained finish. Paint is more forgiving than stain, so if the surface is badly damaged, painting may be the friendliest option.
Step 6: Sand the Surface the Smart Way
Sanding helps remove shine, smooth repairs, and give primer something to grip. For most sewing cabinet makeovers, you do not need to sand down to bare wood unless you are staining. A scuff-sand is often enough for paint. Use medium-grit sandpaper first, then finish with fine-grit paper for a smoother surface.
Always sand in the direction of the wood grain when possible. Be gentle on veneer because it is thin and easy to sand through. After sanding, remove dust with a vacuum brush attachment and a tack cloth or microfiber cloth. Dust left behind can create a gritty finish, and nobody wants a nightstand that feels like toast crumbs.
Step 7: Prime Before Painting
Primer is the difference between a finish that lasts and a finish that chips when someone looks at it too aggressively. Use a bonding primer if the cabinet has a glossy finish, laminate areas, slick veneer, or old stain that might bleed through. If the wood has dark tannins or reddish tones, choose a stain-blocking primer.
Apply primer in a thin, even coat. Let it dry according to the product instructions, then lightly sand any rough spots. Wipe away dust before painting. This small step creates a cleaner, more professional-looking finish.
Step 8: Choose the Right Finish
Your finish should match how the cabinet will be used. A decorative piece in a guest room can handle a softer finish. A bathroom cabinet, bar cabinet, or entryway table needs more durability.
Painted Finish
Furniture paint, cabinet paint, chalk-style paint, and enamel paint are all common choices. Chalk-style paint gives a matte vintage look, but it usually needs a protective topcoat. Cabinet or trim enamel can be more durable for high-use surfaces. Use a brush for details and a foam roller for flat areas to reduce brush marks.
Stained Wood Finish
If the cabinet has attractive wood grain, consider stripping the old finish and applying stain. This takes more prep but can look beautiful, especially on mid-century or antique cabinets. Stain works best when the wood is in good condition and repairs are minimal.
Two-Tone Finish
A two-tone design is a stylish compromise. Paint the base and stain the top, or keep the drawers wood-toned while painting the frame. This gives the repurposed sewing cabinet a designer look without making it feel overdone.
Step 9: Paint or Stain in Thin Coats
Thin coats are the secret to a smooth finish. Thick paint may seem faster, but it can drip, wrinkle, stay tacky, or leave brush marks. Apply the first coat lightly and let it dry fully. Sand gently between coats if the surface feels rough. Most projects need two coats of paint, sometimes three if you are covering dark wood with a light color.
If staining, apply stain with a lint-free cloth or brush, following the grain. Wipe off excess stain so the surface does not become sticky. Let it dry completely before sealing. Drying time matters, so resist the urge to rush. Furniture can sense impatience.
Step 10: Seal the Cabinet for Everyday Use
A protective topcoat helps your DIY sewing cabinet makeover survive real life. Use polyurethane for a tough finish, water-based polycrylic for a clearer low-yellowing finish, wax for a soft vintage feel, or a furniture sealer recommended for your paint type. Apply thin coats and let each coat dry before adding another. Light sanding between coats can improve smoothness and adhesion.
For bathroom use, choose a moisture-resistant finish and avoid leaving standing water on the surface. For a bar cabinet, seal the top well because spills happen. For an entryway table, protect the top from keys, bags, and the daily chaos parade.
Step 11: Upgrade the Hardware
New hardware can completely change the personality of an old sewing cabinet. Brass knobs can make it elegant. Matte black pulls can make it modern. Ceramic knobs can make it cottage-style. Vintage glass knobs can make it charming without looking overly precious.
If the old hardware is original and attractive, clean it instead of replacing it. Soak metal hardware in warm soapy water, scrub gently, and polish if appropriate. If the screw holes do not match your new pulls, fill the old holes with wood filler, sand smooth, and drill new holes after painting.
Step 12: Style the Finished Cabinet
Once the cabinet is dry and reassembled, bring it inside and style it based on its new role. As a nightstand, add a lamp, a small dish, and a stack of books. As an entry table, use a tray for keys and a basket underneath for shoes or pet supplies. As a bar cabinet, add a mirrored tray, glasses, cocktail tools, and a small piece of art above it. As a craft station, use drawer dividers and label small containers so the cabinet stays organized after the first week of enthusiasm.
The goal is to make the repurposed sewing cabinet look intentional. When visitors say, “Where did you buy that?” you can casually reply, “Oh, I made it.” Then pause for applause. It may not come, but you deserve it anyway.
Design Ideas for Different Home Styles
Farmhouse Sewing Cabinet Makeover
Paint the base in warm white, soft gray, sage green, or navy blue. Add cup pulls or aged brass knobs. Distress the edges lightly for a relaxed look, but do not overdo it. A little distressing says “vintage charm.” Too much says “this cabinet fought a raccoon.”
Mid-Century Modern Cabinet
Keep clean lines, tapered legs, and natural wood tones if the cabinet has them. Use walnut stain, matte black hardware, and a simple flat top. Avoid heavy distressing or ornate details. Let the shape do the talking.
Boho Upcycled Cabinet
Add cane webbing, peel-and-stick wallpaper inside drawers, warm terracotta paint, or patterned contact paper. Style with plants, woven baskets, and textured decor.
Modern Cottage Look
Choose creamy white, dusty blue, muted green, or mushroom beige. Add beadboard to the top insert or inside panel. Finish with simple knobs and a small lamp for a cozy, useful piece.
Common Mistakes to Avoid
The first mistake is skipping prep. Paint will not hide dirt, loose veneer, or rough repairs. It will simply make them colorful. Clean, repair, sand, and prime before expecting a beautiful finish.
The second mistake is using the wrong product for the surface. Slick laminate, glossy varnish, and raw wood all need different prep. If you are unsure, use a quality bonding primer and test paint adhesion in a hidden spot.
The third mistake is forgetting scale. A sewing cabinet is usually compact, so do not overload it with oversized lamps, giant baskets, or heavy decor. Keep styling balanced.
The fourth mistake is ignoring stability. If the cabinet is tall, narrow, or used around children, consider anchoring it to the wall. Repurposed furniture should be charming, not dramatic in the falling-over sense.
Budget-Friendly Tips for a Sewing Cabinet DIY Project
A repurposed sewing cabinet can be very affordable if you use what you already have. Check your garage for leftover paint, primer, knobs, wood scraps, and sandpaper. Look for discounted hardware at thrift stores, salvage shops, estate sales, and clearance bins. A small cabinet does not require much paint, so sample-size containers may work for accent colors.
If you need a new top, ask the hardware store whether they have project panels or scrap cuts. For decorative drawer liners, use wallpaper remnants, contact paper, wrapping paper sealed with decoupage medium, or even leftover fabric. The best DIY projects often come from creative problem-solving rather than expensive shopping carts.
of Real-Life Experience: What This Project Teaches You
Repurposing an old sewing cabinet teaches you something that every DIYer eventually learns: furniture has opinions. You may begin with a confident plan, a neat supply list, and a color palette saved on your phone. Then you open the cabinet and discover one drawer sticks, one leg wobbles, the top has a mystery stain, and the old hardware is attached with screws that appear to have been installed by a very determined ancestor. This is normal. In fact, it is part of the charm.
The first experience many people have with this project is surprise. A sewing cabinet looks small, but it can involve several mini-projects at once: cleaning, repairing, filling, sanding, painting, sealing, and styling. It is not difficult, but it rewards patience. The moment you slow down, the work gets better. A rushed coat of paint looks rushed. A repaired corner that is sanded properly disappears under primer. A drawer that has been cleaned and waxed slides like it finally remembered its purpose in life.
Another useful lesson is that imperfections can become design choices. Maybe the veneer on the top is too damaged to stain, so you paint the base and add a stained wood insert. Maybe the missing sewing machine space becomes hidden storage. Maybe an ugly drawer interior becomes adorable after you line it with patterned paper. DIY is not always about restoring something to its original condition. Sometimes it is about listening to what the piece can realistically become.
One of the best parts of repurposing a sewing cabinet is the emotional connection. These cabinets often remind people of family homes, handmade clothes, school costumes, repaired jeans, and quiet afternoons when sewing machines hummed in the background. Even if the piece is not from your own family, it carries that sense of history. Giving it a new use feels less like decorating and more like rescuing a small piece of everyday life.
There is also a confidence boost that comes from finishing this kind of project. You learn how to use primer, how to judge when paint is dry, how to sand without destroying veneer, how to replace hardware, and how to solve unexpected problems. The next time you see a tired side table or scratched dresser at a yard sale, you will not think, “That is junk.” You will think, “That has potential.” This is both empowering and mildly dangerous, because soon your garage may contain three chairs, two nightstands, and a cabinet you swear you are fixing next weekend.
Finally, this project teaches sustainability in a hands-on way. Reusing an old sewing cabinet keeps furniture out of the landfill and reduces the need to buy something new. It also gives your home a one-of-a-kind piece with personality. Anyone can order a table online. Not everyone can point to a charming little cabinet and say, “I brought that back to life.” That is the real reward: a useful, beautiful piece of furniture and the satisfaction of knowing your own hands made it happen.
Conclusion
Learning how to make an old sewing cabinet gets re-purposed DIY is about more than painting a small piece of furniture. It is about seeing possibility where others see clutter. With cleaning, repairs, smart sanding, primer, a durable finish, and a clear purpose, an outdated sewing cabinet can become a nightstand, bar cabinet, entryway table, craft station, plant stand, or stylish storage piece.
The best makeover respects the cabinet’s history while giving it a practical role in today’s home. Keep the details you love, fix what needs help, and do not be afraid to add modern hardware, color, or creative inserts. A successful repurposed sewing cabinet should feel useful, personal, and just a little bit proud of itself. After all, it survived decades of thread, fabric, and basement storage. It deserves a second act.