Table of Contents >> Show >> Hide
- What Makes an Off-the-Shoulder Top Work?
- Choose Your Off-the-Shoulder Top Style
- Tools and Materials You Will Need
- How to Measure for an Off-the-Shoulder Neckline
- How to Make a Simple Elastic Off-the-Shoulder Top From Scratch
- How to Add a Ruffle to an Off-the-Shoulder Top
- How to Turn a Button-Down Shirt Into an Off-the-Shoulder Top
- How to Make a Foldover Knit Off-the-Shoulder Top
- Common Off-the-Shoulder Top Problems and Fixes
- Styling Ideas for Handmade Off-the-Shoulder Tops
- Experiences and Lessons From Making Off-the-Shoulder Tops
- Final Thoughts
An off-the-shoulder top is one of those garments that looks like it required a fashion degree, three cups of espresso, and a dramatic montage set to pop music. In reality, many versions are wonderfully approachable. The secret is not sewing wizardry. It is a comfortable elastic neckline, sensible fabric, and a willingness to test the fit before declaring victory over your sewing machine.
Whether you want a floaty peasant blouse, a romantic ruffle crop top, an upcycled button-down shirt, or a fitted knit style with a foldover neckline, you can make an off-the-shoulder top that stays where it belongs. This guide walks through the materials, measurements, construction methods, fitting fixes, and styling choices that turn a pile of fabric into a top worth wearing outside the house.
What Makes an Off-the-Shoulder Top Work?
The signature feature is a neckline that sits below the shoulders while still hugging the upper chest and back securely enough to move with you. Most woven off-the-shoulder tops achieve this with an elastic casing. The elastic gathers the fabric evenly and creates a soft, flexible neckline that can slip on without buttons, zippers, or an emotional support assistant.
A fitted knit version may use a foldover band instead of a gathered casing. Knit fabrics with good stretch recovery can mold gently to the body, while woven fabrics usually need elastic, a drawstring, or a shirred section for security.
Lightweight and medium-weight woven fabrics are especially popular for relaxed off-the-shoulder blouses. Linen, cotton lawn, chambray, cotton voile, rayon challis, double gauze, and lightweight crepe can provide the drape needed for a soft, breezy silhouette.
Choose Your Off-the-Shoulder Top Style
1. The Elastic Peasant Top
This is the friendliest option for beginners. It usually has a loose body, simple sleeves, and an elastic neckline. The shape is forgiving, the fit is adaptable, and minor imperfections often disappear into the gathers. That is not cheating. That is design intelligence.
2. The Ruffled Off-the-Shoulder Top
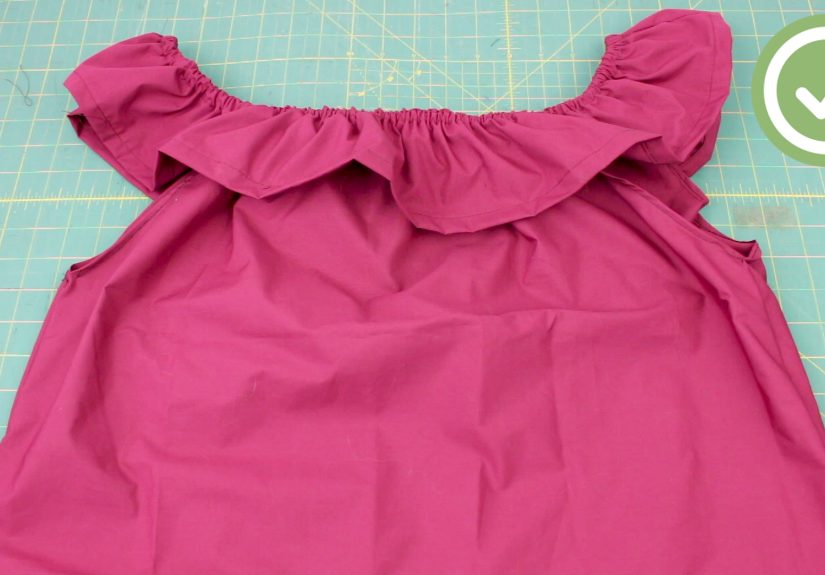
This version adds a flounce or ruffle around the neckline. The ruffle can be wide and dramatic for vacation energy, or narrow and subtle for an everyday blouse. A ruffle also helps disguise a neckline that is slightly less symmetrical than you imagined. Fashion is generous like that.
3. The Upcycled Button-Down Shirt
An oversized button-down can become an off-the-shoulder top with surprisingly little cutting. You remove or reshape the collar area, add an elastic casing, and let the original button placket do most of the hard work. Upcycling is ideal when you want a quick project without drafting a full garment pattern.
4. The Foldover Knit Top
A foldover knit top is more fitted and modern. Instead of a gathered neckline, it uses a wide doubled-over panel that frames the shoulders. Rib knit, stretch cotton, jersey, sweater knit, and stretch polyester can work well when they have enough recovery to return to shape after being stretched.
Tools and Materials You Will Need
- Fabric for the body of the top
- Elastic, usually 1/4-inch to 3/4-inch wide
- Matching all-purpose thread
- Fabric scissors or rotary cutter
- Measuring tape
- Tailor’s chalk or washable fabric marker
- Pins, clips, or both
- Safety pin, bodkin, or elastic threader
- Iron and ironing board
- Sewing machine with straight stitch and zigzag stitch
- Optional serger, pinking shears, or overcast stitch for seam finishing
For a basic woven off-the-shoulder top, choose fabric that feels soft against your upper arms and chest. Stiff quilting cotton can work, but it creates a more structured, puffed shape. Rayon challis, voile, linen blends, and double gauze tend to produce a softer drape. For ruffled designs, avoid very heavy fabrics unless your goal is to resemble an elegant lampshade.
How to Measure for an Off-the-Shoulder Neckline
The neckline is the make-or-break area. Too loose, and the top slowly migrates upward until it becomes a regular blouse with bad intentions. Too tight, and lifting your arms feels like negotiating with a tiny fabric bouncer.
- Wrap a measuring tape around the upper chest, shoulders, upper back, and underarm area where you want the neckline to sit.
- Keep the tape comfortably snug but not tight.
- Record that measurement.
- Cut a test piece of elastic about 1 to 3 inches shorter than the measurement, depending on the stretchiness of your elastic and the weight of your fabric.
- Overlap the elastic ends temporarily with a pin or clip and test it around your shoulders.
- Raise your arms, sit down, twist gently, and make a face in the mirror like you are judging a reality-show contestant.
The correct elastic length should provide light tension. It should hold the neckline in place without digging into the skin or restricting movement. Sewing guides for off-the-shoulder garments commonly recommend testing the elastic around the intended shoulder placement before permanently closing the casing.
How to Make a Simple Elastic Off-the-Shoulder Top From Scratch
Step 1: Cut the Main Body Pieces
For an easy sleeveless off-the-shoulder top, cut two rectangles: one for the front and one for the back. Each rectangle should be approximately half of your fullest bust measurement plus 2 to 4 inches of ease. Add more ease for a loose, floaty fit and less ease for a closer fit.
For the length, measure from the neckline position to your desired hem. Add approximately 2 inches for the hem and 1 1/2 to 2 inches for the neckline casing. For example, if you want a 17-inch-long crop top, cut your fabric about 21 inches long to allow for finishing.
Step 2: Finish the Side Seams
Place the front and back rectangles right sides together. Pin the side seams, then sew from the underarm area to the hem using your preferred seam allowance. A 1/2-inch seam allowance is easy for beginners and gives you a little room for fit adjustments.
Finish the raw seam edges with a serger, zigzag stitch, overcast stitch, or pinking shears. Press the seams open or toward the back. Pressing may seem boring, but it is the difference between “handmade chic” and “I sewed this during a power outage.”
Step 3: Create the Neckline Casing
Turn the top wrong side out. Fold the top raw edge down 1/2 inch toward the wrong side and press. Fold it down again by 1 inch to 1 1/2 inches, depending on the width of your elastic. Press again and pin in place.
Stitch close to the lower folded edge, leaving a 1- to 2-inch opening near one side seam. This opening will let you thread the elastic through the casing. Beginner off-the-shoulder tutorials commonly use this folded-and-stitched casing method, leaving an opening for elastic insertion before closing the seam.
Step 4: Insert the Elastic
Attach a safety pin or bodkin to one end of the elastic. Feed it through the casing slowly, keeping the opposite end pinned to the fabric so it does not disappear inside. If it vanishes into the casing, take a breath. Do not accuse the sewing machine. It is innocent this time.
Once both elastic ends emerge, overlap them by about 1 inch and sew them together securely with a zigzag stitch. Check that the elastic has not twisted inside the casing. Then sew the casing opening closed.
Step 5: Hem the Bottom Edge
Fold the lower raw edge up 1/2 inch and press. Fold it up again by 1/2 inch to 1 inch, press, and stitch around the hem. Try the top on before finalizing the hem length. A top that looks perfect while standing still can suddenly become “accidental beach cover-up” when you sit down.
How to Add a Ruffle to an Off-the-Shoulder Top
A neckline ruffle turns a simple elastic top into a more romantic statement piece. Cut a long rectangle for the ruffle. Its length should be about 1 1/2 to 2 times the finished neckline circumference. The greater the length, the fuller the ruffle.
For a 40-inch neckline, cut a ruffle strip between 60 and 80 inches long. The width depends on your desired drama level. A 6-inch-wide strip gives a small flounce, while a 10- to 12-inch strip creates a bold, vacation-ready ruffle.
- Sew the short ruffle ends together to create a loop.
- Hem the outer edge of the ruffle with a narrow hem, rolled hem, or baby hem.
- Place the raw edge of the ruffle along the neckline edge of the body, right sides together.
- Pin evenly, matching side seams and center points.
- Sew the ruffle to the top.
- Fold the neckline edge over the ruffle seam allowance to create the elastic casing.
- Insert elastic as described above.
Many ruffled off-the-shoulder patterns use the same approach: attach the ruffle first, then fold the neckline casing over the raw edge before threading the elastic through.
How to Turn a Button-Down Shirt Into an Off-the-Shoulder Top
Upcycling a button-down shirt is an excellent way to make an off-the-shoulder top without cutting out a full pattern. Start with a shirt that is one or two sizes larger than your normal size. The extra width gives you room for gathers and comfortable movement.
Step 1: Mark the New Neckline
Put the shirt on and mark where you want the neckline to sit. Usually, this is below the collarbone and across the upper arms. Remove the shirt and draw a smooth curved line from one upper sleeve area to the other. Keep the line even from front to back.
Step 2: Cut Away the Collar Area
Cut above your marked line, removing the collar and upper yoke area. Leave enough fabric to fold over twice for an elastic casing. If you are unsure, cut conservatively first. Fabric can always leave the party later. It cannot return after being cut.
Step 3: Sew the Elastic Casing
Fold the new neckline edge under twice, press, stitch, and leave a small opening. Thread elastic through the casing, test the fit, sew the elastic ends together, and close the opening. Tutorials from BERNINA’s WeAllSew show the same basic transformation: reshape a larger button-down, create a casing, and add elastic for the off-the-shoulder fit.
Keep the button placket functional if possible. It makes the top easier to put on, creates a nice vertical detail, and makes you look like you planned the whole thing from the beginning.
How to Make a Foldover Knit Off-the-Shoulder Top
For a sleek, fitted design, use a knit fabric with stretch and recovery. A rib knit or cotton-spandex jersey is easier to wear than a woven fabric because it moves with the body. Start with a fitted knit top pattern, or trace a well-fitting long-sleeve knit shirt.
Instead of cutting a traditional neckline, extend the top edge upward by several inches. Sew a wide knit band into a loop, attach it to the neckline, and fold it downward over the shoulders. This creates the foldover effect.
The key is choosing fabric that rebounds after stretching. A knit can be soft and stretchy but still fail if it bags out after a few minutes. Foldover off-the-shoulder patterns commonly recommend medium-weight knits such as jersey, stretch cotton, rib knit, or sweater knit for this reason.
Common Off-the-Shoulder Top Problems and Fixes
The Neckline Keeps Sliding Up
Your elastic is probably too long or too soft. Open a small section of the casing, shorten the elastic by 1/2 inch at a time, test again, and resew. Do not remove 3 inches immediately unless you enjoy sewing suspense.
The Neckline Feels Too Tight
Lengthen the elastic slightly. Also check whether the casing is too narrow, because cramped elastic cannot stretch smoothly. A wider casing often improves comfort and reduces bunching.
The Gathers Are Uneven
Before inserting elastic, divide both the neckline and the elastic into four equal sections with pins. Match center front, center back, and side points. This distributes the fullness evenly instead of creating one giant gather near your left armpit.
The Fabric Frays Inside the Casing
Finish the raw edge before folding the casing, use French seams where appropriate, or choose fabric that frays less aggressively. Lightweight woven fabrics can be beautiful, but some unravel like they are trying to escape responsibility.
The Sleeves Pull When You Raise Your Arms
For peasant-style tops, add more ease through the sleeve and upper body. Off-the-shoulder garments are not designed for Olympic volleyball, but you should still be able to reach for a coffee mug without rearranging your entire outfit.
Styling Ideas for Handmade Off-the-Shoulder Tops
A plain white linen off-the-shoulder top pairs beautifully with high-waisted jeans and sandals. A floral rayon ruffle top works well with denim shorts, wide-leg pants, or a midi skirt. A black foldover knit version can look polished with trousers and a blazer, especially when you want an outfit that says “business casual” while quietly whispering “I have excellent taste.”
For a balanced silhouette, pair a loose peasant top with fitted bottoms. If your top is cropped, high-rise skirts and pants create a clean proportion. For a bold look, use embroidered fabric, eyelet cotton, gingham, or a bright tropical print. For a calmer everyday version, choose a solid color with subtle texture, such as washed linen, rib knit, or cotton double gauze.
Experiences and Lessons From Making Off-the-Shoulder Tops
Making an off-the-shoulder top is one of those sewing projects that teaches several useful lessons without feeling like homework. The first lesson is that fit happens in motion, not just in front of a mirror. A neckline can look elegant while you stand still and become wildly optimistic the moment you lift your arms, hug someone, reach into a cabinet, or attempt the universal human movement known as “finding your phone in a tote bag.”
That is why a wearable test matters. Before stitching the elastic ends together permanently, try the garment on. Move around. Sit. Lift your arms. Turn sideways. Ask whether the neckline stays below the shoulders or slowly crawls upward. A tiny adjustment to elastic length can make the difference between a top that feels effortless and one that requires constant diplomatic negotiations.
Another common experience is discovering that fabric choice changes the personality of the exact same pattern. A crisp cotton version may feel playful and structured, with ruffles that stand proudly like they have an appointment. Rayon challis or viscose, on the other hand, creates a softer look with fluid gathers and a more relaxed drape. Linen can look beautifully natural, but it will wrinkle because linen believes wrinkles are part of its artistic mission.
Beginners often learn the value of pressing during this project. Pressing seam allowances, folded casing edges, hems, and ruffles takes a little extra time, but it gives the finished top cleaner lines. Skipping the iron may feel faster at first. Later, it often creates a top with wavy casing edges, uneven hems, and the general appearance of a garment that has been through a small weather event.
Elastic also teaches a useful sewing truth: measurements are a starting point, not a commandment. Two pieces of 3/8-inch elastic from different brands can behave differently. One may be firm and springy; another may be soft and relaxed. The fabric weight matters too. A heavy ruffle needs more support than a lightweight cotton lawn neckline. Testing the elastic before closing the casing is not an optional extra step. It is the part that saves the project.
Upcycling a button-down shirt can be especially satisfying because it changes how you look at old clothing. A shirt that feels boxy, outdated, or too large may have beautiful fabric, useful buttons, finished cuffs, and enough yardage for a completely different garment. Once you learn how to add an elastic casing, ordinary shirts begin to look less like closet clutter and more like future sewing experiments.
The most rewarding experience usually comes after wearing the finished top. Handmade clothing has small fingerprints of decision-making everywhere: the elastic tension you chose, the hem length you adjusted, the print you selected, the ruffle width you decided was “not too dramatic” before realizing that dramatic was exactly the point. Those choices make the piece personal.
So do not worry if your first off-the-shoulder top is not perfectly symmetrical or if the elastic needs a second attempt. That is not failure. That is garment fitting. Make the first version, learn what you like, then make a second one with better fabric, cleaner seams, and the confidence of someone who now understands the ancient mystery of the elastic casing.
Final Thoughts
Learning how to make off-the-shoulder tops gives you an easy route into garment sewing, pattern hacking, and wardrobe upcycling. Start with a simple elastic neckline, choose fabric with the right drape, and test the fit before sealing every seam. Once you understand the relationship between elastic, fabric weight, and neckline placement, you can create endless variations: ruffled summer blouses, cropped tops, peasant sleeves, polished knit designs, and transformed button-down shirts.
Note: Always test your elastic neckline before permanently closing the casing. A few minutes of fitting can save an entire afternoon of seam-ripping.