Table of Contents >> Show >> Hide
- Why MacBook Charger Cables Get Damaged
- The Golden Rule: Loose Loops Beat Tight Wraps
- How to Properly Wrap a MacBook Charger Step by Step
- Should You Wrap the Cable Around the MacBook Power Brick?
- Best Travel Method for a MacBook Charger
- Common MacBook Charger Wrapping Mistakes
- How to Store a MacBook Charger at Home
- USB-C, MagSafe, and Older MacBook Chargers: What Changes?
- When to Replace a MacBook Charger Cable
- Quick Damage-Free MacBook Charger Checklist
- Real-World Experience: What Actually Works Day After Day
- Conclusion
Wrapping a MacBook charger sounds like the kind of tiny life skill nobody teaches until your cable starts looking like it survived a squirrel attack. One day it is clean, white, and full of promise. The next day, the cable near the power brick is bent at a tragic angle, the insulation is wrinkled, and you are bargaining with the universe: “Just charge one more time, little buddy.”
The good news is that most MacBook charger damage is preventable. Whether you use a modern USB-C to MagSafe 3 cable, a USB-C charge cable, or an older MagSafe-style adapter, the basic rule is the same: never force the cable into tight bends, sharp kinks, or high-stress wraps. A charger cable is flexible, not immortal. Treat it like a garden hose, not a shoelace you are trying to strangle.
This guide explains how to properly wrap a MacBook charger, how to avoid fraying, how to store it for travel, and when to stop using a damaged cable. The goal is simple: keep your charger working longer, keep your MacBook safe, and stop donating money to the “I ruined another charger” fund.
Why MacBook Charger Cables Get Damaged
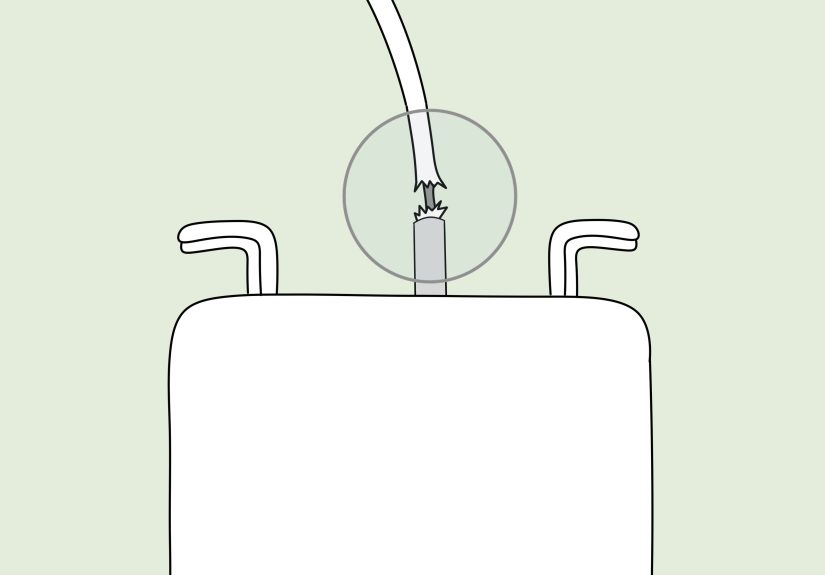
MacBook charger cables usually fail at stress points. The most common trouble spots are near the power brick, near the USB-C or MagSafe connector, and anywhere the cable is repeatedly bent in the same direction. Those areas take the most pulling, twisting, and compression during daily use.
Inside the smooth outer jacket of a charging cable are conductors, shielding, and other components that must remain intact for safe, consistent charging. When a cable is wrapped tightly around a charger brick, jammed into a backpack, yanked from the wall, or folded into a hard angle, those internal parts can weaken over time. The outside may look fine at first, but the damage can begin quietly.
Heat, moisture, dust, and pressure also contribute to cable wear. Leaving a charger loose in a bag with keys, pens, snacks, and the mysterious crumbs of 2019 is not ideal. A MacBook charger is a power accessory, not a backpack survival contestant.
The Golden Rule: Loose Loops Beat Tight Wraps
The safest way to wrap a MacBook charger is to create loose, natural loops. The cable should follow its own curve instead of being forced into a tiny coil. If the cable fights back, listen to it. Cables have a natural memory, and forcing them against that shape creates twisting and strain.
Think of the wrap as a soft circle, not a tight knot. A good loop should be wide enough that the cable does not flatten, kink, or sharply bend near either connector. For most MacBook cables, a loop about the size of your hand or larger is much safer than a tight spiral around the brick.
Many users wrap the cable directly around the power adapter because it looks neat. That method may be convenient, but it often creates a sharp bend where the cable exits the brick or connector. That bend is exactly where fraying tends to begin. A charger that looks “perfectly organized” but silently damages the cable is not organization; it is betrayal with clean lines.
How to Properly Wrap a MacBook Charger Step by Step
Step 1: Unplug by the Connector, Not the Cable
Before wrapping, unplug the charger correctly. Hold the plug or connector and pull gently. Do not yank the cable from halfway down the cord. Pulling by the cable adds stress to the internal wires and the connector joint. It can also loosen the connection over time.
If the charger is connected to your MacBook, remove the USB-C or MagSafe connector carefully. MagSafe is designed to detach more easily than many traditional connectors, but it still deserves gentle handling. USB-C connectors should be pulled straight out, not bent sideways like you are trying to remove a stubborn tooth.
Step 2: Let the Cable Relax
Lay the cable out loosely for a moment. If it is twisted, untwist it before wrapping. A twisted cable wrapped into a tight coil becomes a tiny stress machine. You may not see damage immediately, but repeated twisting can shorten the cable’s life.
Run your fingers gently along the cable to feel for hard bends, bumps, cuts, or rough spots. If you find fraying, exposed wire, discoloration, or inconsistent charging, do not ignore it. Damaged charging equipment can be unsafe and should be replaced rather than “temporarily trusted forever,” which is how many tech disasters begin.
Step 3: Create a Small Slack Loop Near the Brick
If your charger has a cable attached to a power brick, leave a small loop of slack where the cable exits the adapter. This is one of the most important damage-free tips. The loop prevents the cable from bending sharply at the base of the brick.
Do not begin wrapping immediately at the point where the cable meets the adapter. Give that area room to breathe. A soft curve is good. A 90-degree bend is bad. If the cable looks like it is doing a yoga pose called “The Emergency Room,” loosen it.
Step 4: Make Large, Loose Loops
Coil the cable in large loops using your hand as a guide. Keep the loops relaxed and consistent. Avoid pulling the cable tight as you coil. The goal is to manage the cable, not win an arm-wrestling match against it.
A simple circular coil works well for most people. For frequent travelers, the over-under method, sometimes called a roadie wrap, can be even better. This method alternates the direction of each loop to reduce twisting. It is popular with audio, video, and stage professionals because it helps cables lie flat and last longer.
Step 5: Secure the Coil Without Crushing It
Once the cable is loosely coiled, secure it with a soft Velcro strap, reusable cable tie, or elastic band. Do not cinch it tightly. The strap should keep the coil together without squeezing the cable jacket.
Avoid using thin rubber bands for long-term storage because they can press into the cable and may become sticky over time. Also avoid twist ties with bare wire edges that can scratch or indent the cable. A soft strap is inexpensive, easy to use, and much more civilized than letting your charger wrestle with your headphones in a drawer.
Should You Wrap the Cable Around the MacBook Power Brick?
Wrapping the cable around the power brick is common, especially with older Apple adapters that include fold-out wings. However, it should be done carefully. The problem is not the idea of wrapping; the problem is tight wrapping that forces sharp bends at the strain relief points.
If you use the brick’s cable wings, leave slack at the beginning of the wrap. Create a gentle loop before the cable turns around the adapter. Then wrap the cable with medium looseness, not maximum tension. The final result may be slightly bulkier, but it is much kinder to the cable.
For modern USB-C chargers with detachable cables, it is often better to unplug the cable from the adapter and coil the cable separately. This reduces stress on both ends and makes packing easier. Store the power brick and cable together in a pouch so they do not go on separate adventures.
Best Travel Method for a MacBook Charger
Travel is where chargers suffer. Backpacks compress cables, suitcases bend them, and airport panic turns everyone into a cable-folding goblin. A good travel method protects the cable from pressure, moisture, and repeated bending.
Use a Small Tech Pouch
A dedicated tech pouch is one of the easiest ways to protect a MacBook charger. Coil the cable loosely, place the power adapter beside it, and keep both away from keys, metal tools, cosmetics, and liquids. A pouch also prevents the cable from tangling with other cords.
Avoid Overpacking Around the Charger
Do not wedge the charger under heavy books, water bottles, camera gear, or that suspiciously dense snack bag you bought “just in case.” Pressure can flatten the cable or bend the connector. Place the charger in a side compartment or padded pocket when possible.
Keep Connectors Covered and Dry
Moisture and debris can affect charging performance. Keep the USB-C or MagSafe end clean and dry. If you travel often, consider a pouch with separate compartments so the connector does not rub against rough objects.
Common MacBook Charger Wrapping Mistakes
Mistake 1: Wrapping Too Tightly
The number one mistake is tight wrapping. Tight coils look tidy, but they increase stress. If you need to pull hard to finish the wrap, it is too tight.
Mistake 2: Folding the Cable in Half
Folding a cable creates a sharp bend. Doing it repeatedly in the same place can damage the internal conductors. Cables should be looped, not folded.
Mistake 3: Leaving No Slack at the Connector
The area near the connector is fragile compared with the middle of the cable. Always give connector ends a gentle curve. Sharp bends near the brick or plug are invitations to fraying.
Mistake 4: Using Tape as a Permanent Repair
Electrical tape may hide a small nick, but it is not a magic force field. If the cable is frayed, exposed, overheating, or charging inconsistently, replacement is safer. Tape can also stiffen the cable and move stress to a nearby spot.
Mistake 5: Tossing the Charger Loose Into a Bag
A loose charger can twist, snag, and bend during travel. Use a pouch, strap, or dedicated compartment. Your charger deserves better than living under a pile of receipts and breath mints.
How to Store a MacBook Charger at Home
At home, store the charger in a dry, cool place with the cable loosely coiled. Avoid bathrooms, kitchen counters, damp windowsills, and anywhere it might be exposed to spills. Apple power accessories should be kept away from liquids, oils, lotions, and wet conditions.
If you keep a charger at a desk, route the cable so it does not hang tightly off the edge. A cable dangling from a desk can create constant strain near the connector. Use cable clips or a desk cable holder to guide the cable gently.
Do not leave the adapter buried under blankets, pillows, or papers while charging. Power adapters can get warm during normal use, and they need airflow. A charger is not a hand warmer, even if it occasionally auditions for the role.
USB-C, MagSafe, and Older MacBook Chargers: What Changes?
The wrapping principles are similar across MacBook charger types, but the details vary slightly.
USB-C to MagSafe 3 Cable
Modern MacBook Air and MacBook Pro models often use USB-C to MagSafe 3 charging. This cable includes sensitive components and should be handled carefully. Avoid crushing, puncturing, dropping, or exposing it to liquids. When wrapping, pay special attention to both ends: the USB-C side and the magnetic MagSafe side.
USB-C Charge Cable
USB-C cables are detachable, which makes storage easier. Unplug the cable from the adapter before packing if possible. Coil it loosely, secure it with a soft strap, and avoid mixing it with heavy objects. For high-wattage MacBook charging, use a cable and adapter that support the power your MacBook needs.
Older MagSafe Chargers
Older MagSafe chargers often have a cable permanently attached to the power brick. These require extra care near the brick because the cable cannot be replaced separately as easily. Leave slack before wrapping around the adapter wings and never pull the cable tight around the brick.
When to Replace a MacBook Charger Cable
Knowing how to wrap a MacBook charger helps prevent damage, but it does not reverse serious wear. Replace the cable or charger if you notice fraying, exposed wire, burn marks, melting, a loose connector, intermittent charging, unusual heat, sparks, or a damaged plug.
Do not use a damaged or frayed charging cable. That advice may sound dramatic, but power accessories are not decorative string. A damaged cable can create charging problems and may present safety risks. If your charger only works when bent “just right,” that is not a clever workaround; it is a warning sign wearing a tiny hat.
Quick Damage-Free MacBook Charger Checklist
- Unplug by holding the connector, not the cable.
- Untwist the cable before wrapping.
- Leave slack near the power brick and connector.
- Use large, loose loops instead of tight coils.
- Secure the coil with a soft Velcro strap.
- Store the charger in a dry, padded pouch when traveling.
- Replace damaged, frayed, overheating, or unreliable cables.
Real-World Experience: What Actually Works Day After Day
After years of watching MacBook chargers live hard lives in backpacks, office drawers, coffee shops, airports, and hotel rooms with exactly one outlet behind the bed, one lesson becomes obvious: cable care is mostly about small habits. You do not need a fancy ritual. You need to stop doing the three things that quietly destroy chargers: tight wrapping, careless yanking, and messy storage.
The most reliable habit is the loose-loop method. It takes only a few extra seconds, but it changes everything. Instead of winding the cable tightly around the adapter and pulling the last few inches until they scream, you let the cable curve naturally. You leave a small slack loop near the brick, then coil the rest gently. The charger may not look as compact as a showroom photo, but it will be much happier in real life.
A small Velcro strap also makes a surprisingly big difference. Without a strap, people tend to tuck the end of the cable under another loop, which creates a pinch point. With a strap, the cable stays neat without being crushed. It is one of those boring accessories that becomes your favorite because it quietly prevents chaos. Like a label maker, but less likely to make you label your refrigerator shelves at midnight.
For travel, a tech pouch is worth it. I have seen chargers tossed directly into bags where they get bent under laptops, scraped by keys, and tangled with earbuds. A pouch solves most of that. The best setup is simple: one pocket for the power adapter, one loose coil for the cable, and no heavy items pressing against the connector. If the pouch is slightly structured or padded, even better.
Another lesson: never ignore early signs of damage. A cable that has a small kink near the connector is asking for gentler handling. A cable with exposed material, brown discoloration, or inconsistent charging is asking for retirement. People often try to extend charger life with tape, but tape is usually a short-term cover-up, not a true fix. If the cable is unsafe, replacing it is cheaper than risking damage to the MacBook, the adapter, or the outlet.
Desk setup matters too. Many charger cables fail because they hang off the edge of a table every day. The MacBook sits on the desk, the charger is on the floor, and gravity pulls constantly on the connector. Over weeks and months, that tension adds up. A simple cable clip, a better outlet location, or placing the power brick on the desk can reduce that strain.
The biggest mindset shift is to treat the charger as part of the computer, not as an afterthought. A MacBook charger is not just a cord; it is the device that keeps your laptop alive during deadlines, meetings, classes, flights, and late-night “just one more edit” sessions. Wrap it loosely, store it cleanly, keep it dry, and replace it when damaged. Your future self, sitting at 3% battery with an important file open, will be deeply grateful.
Conclusion
Properly wrapping a MacBook charger is not complicated, but it does require a little restraint. Avoid tight coils, sharp bends, and careless packing. Leave slack near the connector, use loose loops, secure the cable gently, and store it in a dry pouch when traveling. These small habits help prevent fraying, reduce strain, and keep your charger working longer.
The best charger wrap is not the smallest one. It is the one that protects the cable’s natural shape and avoids stress at the weak points. Treat your charger kindly, and it will be far less likely to betray you during a video call, a work deadline, or the exact moment your MacBook battery icon turns red and starts judging your life choices.