Table of Contents >> Show >> Hide
- Before You Start: Should You Punch a New Hole?
- Tools You Can Use to Punch a Hole in a Belt
- How to Measure the New Belt Hole Correctly
- How to Punch a Hole in a Belt With a Leather Hole Punch
- How to Punch a Hole in a Belt With a Drive Punch and Hammer
- How to Punch a Hole in a Belt Without Special Tools
- How to Make the New Hole Look Professional
- Common Mistakes to Avoid
- Can You Punch Holes in Faux Leather, Fabric, or Braided Belts?
- When to Visit a Cobbler or Leatherworker
- How to Care for the Belt After Punching
- Personal Experience: What Actually Works Best in Real Life
- Final Thoughts
Note: This guide is written for web publication and synthesizes practical leatherworking, belt-fitting, and leather-care guidance without inserting source links.
A good belt has one job: hold your outfit together without turning your waist into a negotiation table. But sooner or later, even the best belt starts acting dramatic. Maybe you lost a little weight, bought a vintage belt that almost fits, or discovered that the “perfect size” online was apparently measured by a wizard. Whatever the reason, learning how to punch a hole in a belt is one of those tiny life skills that feels surprisingly heroic.
The best method is to use a leather hole punch, because it creates a clean, round opening that looks like it came from the factory. But if you do not own special tools, do not panic. You can still make a neat belt hole with common household items such as a nail, awl, drill, or heated metal tool, as long as you measure carefully and protect the leather. The key is patience. Leather rewards careful hands and punishes “eh, close enough” energy.
This complete guide explains how to add a hole to a leather belt with professional tools and without them. You will also learn how to measure the new hole, avoid cracking the leather, clean up the edges, and decide when a belt is better left to a cobbler or leatherworker.
Before You Start: Should You Punch a New Hole?
Before grabbing a tool and giving your belt a tiny identity crisis, look at the belt’s condition. If the leather is full-grain or top-grain and still flexible, it can usually handle an extra hole. If it is cracked, peeling, laminated, or made from very thin bonded leather, punching may cause more damage. In that case, a tailor, shoe repair shop, or leatherworker can reinforce the area or tell you whether the belt is worth saving.
Also check the belt style. Casual leather belts usually have round holes. Dress belts and thicker western-style belts may use oval holes because the buckle tongue sits more comfortably and the leather bends less sharply. If your belt already has oval holes, try to match that shape. A round hole will still function, but it may look like the belt got one suspiciously homemade tooth.
Tools You Can Use to Punch a Hole in a Belt
Best Tool: Revolving Leather Hole Punch
A revolving leather punch, sometimes called a belt hole puncher, looks like pliers with a rotating wheel of hollow punch tubes. Each tube cuts a different hole size. This is the easiest and cleanest option for most belts because it punches through the leather and removes a small plug at the same time.
Choose a punch size that matches the existing belt holes. If you are unsure, start slightly smaller rather than larger. You can always widen a hole carefully, but you cannot un-widen it unless you have access to wizardry, which most hardware stores still do not stock.
Professional Option: Drive Punch and Hammer
A drive punch is a hollow steel tube with a sharp cutting edge. You place it over the mark and strike it with a mallet or hammer. Leatherworkers often use drive punches because they create clean, consistent holes, especially in thick leather. For belts, round and oval punches are both common.
This method needs a firm backing surface, such as scrap wood, a cutting mat, or a thick scrap of leather. Never punch directly on glass, tile, stone, or your kitchen table unless you are actively trying to create a second DIY project called “How to Explain This Dent.”
No Special Tools: Nail, Awl, Drill, or Screwdriver Alternative
If you do not have a leather punch, you can still add a belt hole. A nail and hammer can puncture the leather. A scratch awl can open and shape the hole. A drill can work if used slowly with backing material. A screwdriver is usually a poor choice because it tends to stretch and tear the leather rather than cut it cleanly.
The main difference between special tools and household tools is the quality of the cut. A real leather punch cuts out a clean piece of material. Household tools usually push fibers aside or tear them. That does not mean the belt is doomed, but it does mean you need to work slowly and finish the edges.
How to Measure the New Belt Hole Correctly
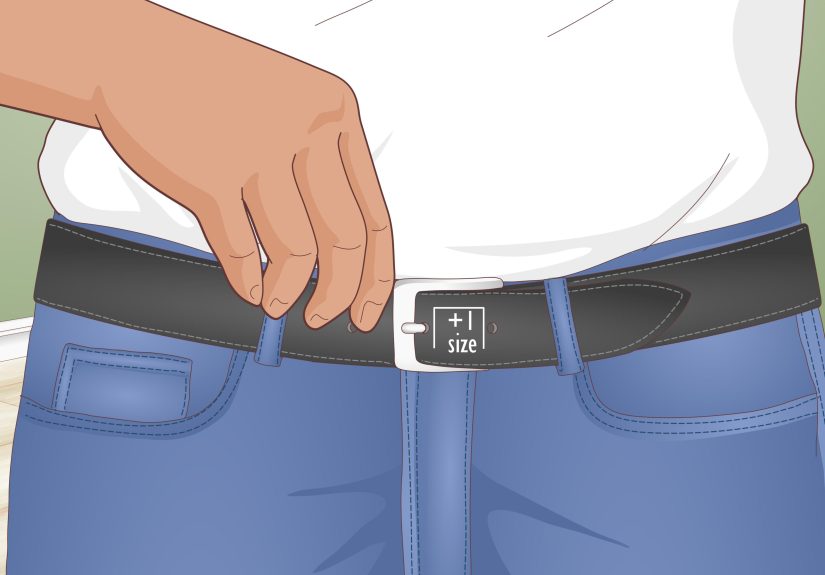
Measuring is the difference between a belt that fits and a belt that now has a random decorative dot. Start by putting the belt on with the pants you plan to wear most often. Pull it to the comfort level you want: snug enough to work, not so tight that sitting down becomes an Olympic event.
Use a pencil, chalk pencil, or fine-tip marker to mark where the buckle tongue naturally lands. If the belt is dark, use tailor’s chalk or a small piece of masking tape. Remove the belt and compare your mark with the existing holes. Most belt holes are spaced about 3/4 inch to 1 inch apart, but the smartest move is to copy your belt’s current spacing.
Measure from the center of the last existing hole to the center of your new mark. Keep the new hole aligned with the row. Use a ruler to check that the mark sits in the exact center of the belt’s width. A crooked hole may still work, but it will stare at you forever like a tiny judgmental eye.
How to Punch a Hole in a Belt With a Leather Hole Punch
Step 1: Match the Hole Size
Rotate the punch wheel until the tube closest to the existing hole size is in position. Test the size by holding the punch tube over an existing hole. The tube should match the hole opening, not the outer stretched area around it.
Step 2: Mark the Exact Center
Lay the belt flat with the finished side facing up. Mark the center of the new hole. If you are nervous, place a small piece of tape over the area and mark on the tape. This helps prevent visible marker mistakes.
Step 3: Position the Punch
Slide the belt between the punch tube and anvil. Center the punch tube directly over your mark. Check alignment from the top and side. This is the moment to be picky. Once punched, the hole is not taking questions from the audience.
Step 4: Squeeze Firmly
Press the handles together in one strong, steady motion. You should feel the punch cut through the leather. If the belt is thick, you may need to squeeze harder or rotate slightly while maintaining pressure. Avoid half-punching repeatedly because that can make the hole ragged.
Step 5: Inspect and Clean the Hole
Remove the belt and check both sides. If a small leather plug remains attached, pull it away gently. If the edge looks rough, smooth it with fine sandpaper, a wooden toothpick, or a small amount of leather conditioner rubbed around the opening.
How to Punch a Hole in a Belt With a Drive Punch and Hammer
A drive punch is excellent for thick belts and for matching oval holes. Place the belt on scrap wood or a thick cutting board. Put the punch directly over your mark, holding it straight up and down. Tap the top of the punch with a mallet or hammer. Increase force gradually until the punch cuts through the leather.
Do not use your best countertop as backing. Leather punches are designed to cut through material, and they do not politely stop because your furniture has sentimental value. After punching, push the leather plug out of the tool with a small dowel, paper clip, or awl.
How to Punch a Hole in a Belt Without Special Tools
Method 1: Nail and Hammer
This is the classic household method. Choose a nail close to the size of the existing belt holes. Place the belt finished-side up on scrap wood. Align the nail with your mark, then tap it through the leather with a hammer. Use controlled taps rather than one wild swing.
After the nail passes through, twist it slightly and pull it out. If the hole is too tight, use a slightly larger nail, an awl, or the smooth shaft of a screwdriver to gently round it. Do not force too aggressively, because stretching the leather can cause cracks around the hole.
Method 2: Scratch Awl
A scratch awl is better than a nail if you have one. Push the tip into the marked spot and rotate slowly while applying pressure. The goal is to open the leather fibers gradually. This method is useful for thinner belts, but it may struggle with very thick leather.
To improve the finish, work from both sides of the belt. Start from the front, then turn the belt over and open the same hole from the back. This helps prevent a messy exit wound on the finished side.
Method 3: Drill
A drill can create a belt hole, but it needs a careful approach. Use a small drill bit close to the hole size, place scrap wood under the belt, and clamp the belt if possible. Drill slowly from the finished side through to the back. High speed can heat the leather, grab fibers, and leave a fuzzy edge.
After drilling, remove loose fibers with small scissors or fine sandpaper. A drill is not as clean as a punch, but it works when the belt is thick and household tools are all you have.
Method 4: Heated Nail or Awl
Some people heat a nail or awl to melt or burn through synthetic belts. This can work on certain faux leather or plastic-like materials, but it is risky for real leather because heat can darken, harden, or scorch the surface. It can also smell like a craft project lost a battle with a campfire.
If you use heat, do it only in a ventilated area, keep the tool away from your skin, and test on an unseen area or scrap material first. For genuine leather, a cutting method is usually safer and cleaner than a burning method.
How to Make the New Hole Look Professional
The secret to a professional-looking belt hole is not just the hole itself. It is the finishing. Once the hole is made, inspect the edges. If they are fuzzy, lightly sand them with fine-grit sandpaper. If the leather looks dry, apply a tiny amount of leather conditioner around the hole with a cotton swab. Do not soak the belt. Leather likes moisture the way people like compliments: enough is wonderful, too much becomes uncomfortable.
If the new hole is slightly rough, using the belt a few times will naturally compress the edges. For a dress belt, you can polish the area lightly with a soft cloth. For a rugged casual belt, a slightly imperfect hole may blend in quickly, especially if the belt already has patina.
Common Mistakes to Avoid
Punching Too Close to the End
If you add a hole too close to the belt tip, the leather may stretch, tear, or look awkward when fastened. Keep the spacing consistent with the existing holes. If you need a hole far beyond the original row, the belt may simply be the wrong size.
Making the Hole Too Big
A large hole can make the buckle tongue slip or sit unevenly. Start small and enlarge only if necessary. The buckle should fit through the hole with a little resistance, not flop around like it has given up on structure.
Ignoring the Belt’s Center Line
A hole that is slightly off-center may put uneven stress on the leather. Over time, that area can stretch or tear. Always measure both the spacing and the width alignment.
Using a Dull Tool
Dull tools crush leather instead of cutting it. If your punch will not cut through cleanly, sharpen it, switch tools, or visit a repair shop. Fighting dull tools is how belts get ragged holes and humans get annoyed.
Can You Punch Holes in Faux Leather, Fabric, or Braided Belts?
Yes, but the method depends on the material. Faux leather may crack if punctured too aggressively, so a sharp punch is best. Fabric belts can fray, so the hole may need reinforcement with an eyelet or stitching. Braided belts usually do not need extra holes because the buckle tongue can pass through the weave. That is one reason braided belts are beloved by people who enjoy lunch without recalculating waist geometry.
For expensive designer belts, be careful. Some luxury belts use coated canvas, laminated leather, or layered construction. Punching through those materials can expose inner layers. When in doubt, use a professional repair service.
When to Visit a Cobbler or Leatherworker
Visit a professional if the belt is expensive, sentimental, very thick, exotic leather, cracked, or unusually constructed. Shoe repair shops often add belt holes quickly and cheaply. They also have proper punches, backing surfaces, and edge-finishing tools. Sometimes the smartest DIY move is knowing when to outsource the tiny circle.
A cobbler can also shorten a belt from the buckle end, which may be better than adding several holes at the tip. If your belt is much too large, shortening keeps the hole pattern balanced and prevents the long tail from wrapping halfway around your body like a leather seatbelt.
How to Care for the Belt After Punching
After adding a new hole, wipe away dust and debris with a dry cloth. If the belt is leather, condition it lightly every few months or when it feels dry. Use a conditioner made for leather and test it on the back first. Avoid soaking the belt, using harsh cleaners, or drying it near high heat.
Store belts rolled loosely or hanging straight. Sharp folds can create stress lines, especially near holes. The new hole will last longer if the leather stays flexible. Think of conditioner as moisturizer for your belt, except your belt will never ask if it looks tired.
Personal Experience: What Actually Works Best in Real Life
After dealing with a few belts that were almost perfectbut not quiteI have learned that the measuring stage matters more than the tool. The first time many people try to add a belt hole, they focus on the punching part. That makes sense because punching feels like the “main event.” But the main event is actually standing in front of a mirror, wearing the belt with real pants, and marking the exact spot where the buckle tongue sits comfortably.
One practical trick is to wear the belt for a minute before marking it. Sit down, stand up, and move around. A belt that feels perfect while standing may feel too tight when sitting. This is especially true with jeans, thicker winter pants, or high-waisted trousers. Mark the hole only after testing real comfort, not wishful comfort. Wishful comfort is how belts become decorative punishment devices.
For most everyday leather belts, a revolving hole punch gives the best balance of clean results and low effort. It is especially useful if you have several belts, pet collars, bag straps, or watch bands to adjust. The punch size matters, though. If the new hole is too large, the buckle tongue may slide around and stretch the leather faster. Matching the existing holes is always the safest choice.
When special tools are not available, the nail-and-hammer method can work better than expected, but only with patience. The cleanest results come from using scrap wood underneath, keeping the nail vertical, and tapping gradually. After the nail goes through, rotating it slightly can round the hole. However, this method tends to push leather fibers aside rather than remove them, so the hole may look tighter and less polished than the original holes.
The drill method is useful for thick belts, but it is easy to overdo. A fast drill can chew the leather and leave a fuzzy ring. The better approach is slow speed, firm backing, and light pressure. If the bit catches, stop and reset. Never hold the belt in your hand while drilling. Clamp it down or use another method. The belt should not become a spinning leather helicopter.
The biggest lesson is that one extra hole usually looks fine, but three or four extra holes can make a belt look poorly fitted. If you need to add several holes, the belt may be too large. In that case, shortening it from the buckle end is often cleaner. Some belts have screws near the buckle that make shortening easier. Others are stitched or riveted and need professional work.
Another helpful habit is finishing the hole after punching. Even a clean hole benefits from a tiny touch of conditioner around the edge. This softens dry fibers and helps prevent cracking. On darker belts, a little edge polish or wax can make the hole blend in. On lighter belts, use products carefully because conditioners can darken leather.
In real life, the best method depends on the belt’s value. For an inexpensive casual belt, a careful DIY hole is completely reasonable. For a designer belt, vintage belt, or sentimental gift, a cobbler is worth it. The job is small, but the difference between “custom fit” and “uh-oh” can be one crooked punch.
Final Thoughts
Learning how to punch a hole in a belt is simple, useful, and oddly satisfying. With a leather hole punch, the job can take less than a minute. Without special tools, you can still get a functional result using a nail, awl, or drill, as long as you measure carefully and protect the leather. The golden rules are simple: match the existing spacing, keep the hole centered, start small, and finish the edges.
A belt should make your clothes fit better, not start a daily argument with your waistband. Add the hole carefully, give the leather a little care afterward, and your belt can return to doing its humble, heroic workquietly holding everything together.