Table of Contents >> Show >> Hide
- Why Proper Bike Lubrication Matters
- Way 1: Lubricate the Chain the Right Way
- Way 2: Lubricate Cables and Pivot Points Sparingly
- Way 3: Grease Threads and Contact Points During Tune-Ups
- Common Bike Lubrication Mistakes
- Which Method Should You Use Most Often?
- Real-World Experiences: What Riders Learn About Lubricating a Bike
- Final Thoughts
If your bike sounds like it is chewing gravel for breakfast, congratulations: it is probably asking for lubrication. Loud chains, creaky contact points, sluggish shifting, and that lovely “sandpaper smoothie” feeling in the pedals usually mean one thingyour bike needs a little love. The good news is that lubricating a bike is not complicated. The even better news is that you do not need to bathe the whole machine in mystery oil like it is starring in a low-budget action movie.
The secret is knowing what to lubricate, how much to use, and which product belongs in each spot. Chain lube, light oil, grease, and carbon assembly paste are not interchangeable. Put the wrong slippery stuff in the wrong place and your bike may still squeak, shift poorly, or attract enough grime to qualify as a mobile compost bin.
In this guide, we will cover the three best ways to lubricate a bike: lubricating the chain, lubricating cables and pivot points, and greasing threaded or contact surfaces during deeper maintenance. By the end, you will know how to keep your bike quieter, smoother, and less dramatic on every ride.
Why Proper Bike Lubrication Matters
Bike lubrication is about more than making things feel smooth. Done properly, it reduces metal-on-metal friction, helps repel moisture, limits corrosion, improves shifting, and can extend the life of expensive drivetrain parts like your chain, cassette, and chainrings. Done poorly, it creates a dirt magnet, contaminates braking surfaces, and turns minor maintenance into a future repair bill with attitude.
That is why experienced mechanics repeat the same rule over and over: lubricate clean parts, use the right product, and wipe off the excess. More lube is not more better. More lube is usually just more mess.
Way 1: Lubricate the Chain the Right Way
If there is one part of the bike that absolutely needs regular lubrication, it is the chain. The chain is the hardworking overachiever of the drivetrain. It deals with load, dirt, water, grit, and your occasional decision to shift under pressure like you are trying to win the Tour from a traffic light.
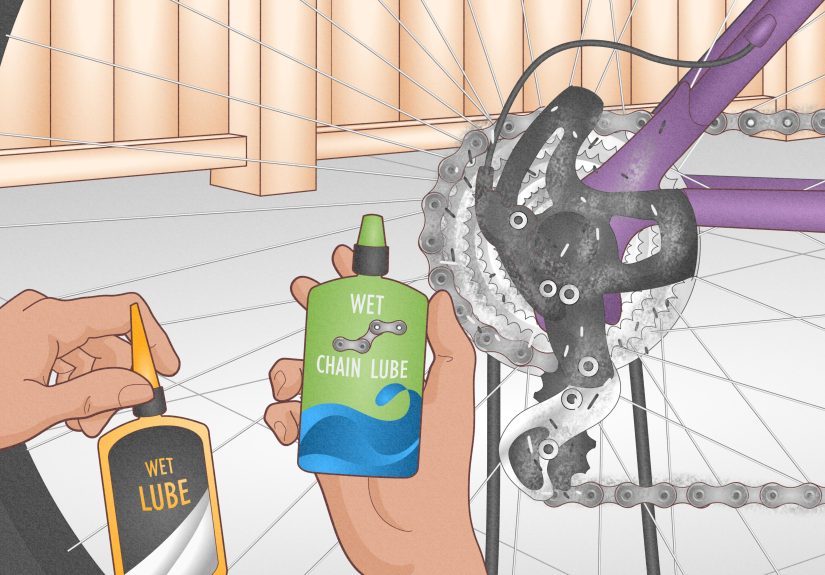
Choose the Right Chain Lube
Before you apply anything, choose a bike-specific chain lubricant. In general, the main choices are:
- Dry lube: Best for dry, dusty, and relatively clean conditions. It tends to attract less dirt, but it usually wears off faster in rain.
- Wet lube: Better for rainy, muddy, slushy, or humid conditions. It lasts longer in bad weather, but it can collect grime if you overapply it.
- Wax-based lube: Popular with riders who want a cleaner drivetrain and lower mess. It can work very well, but it usually rewards people who are willing to prep the chain more carefully.
The easiest rule is this: match the lube to the weather and the dirt level. If you ride dry roads and bike paths, dry lube is usually a smart choice. If you commute through rain, puddles, and winter sludge, wet lube tends to hold up better. If you enjoy being gloriously nerdy about drivetrain efficiency, wax may become your new hobby.
Clean Before You Lubricate
Putting fresh lube on a dirty chain is like spraying cologne on a gym sock. Technically something happened, but nobody should celebrate. Wipe the chain thoroughly with a clean rag first. If it is heavily coated in grime, use a bike-safe degreaser and a brush or chain-cleaning tool, then let the chain dry.
If the chain only has light dust, a solid wipe-down may be enough. If it looks black, gummy, and offended by your neglect, give it a deeper clean.
How to Apply Chain Lube
- Shift the bike into a middle gear or place it where the pedals can rotate freely.
- Hold the lube bottle over the inside of the chain, not the outer plates.
- Backpedal slowly and apply one small drop per roller.
- Keep pedaling backward for several revolutions to help the lubricant work into the links.
- Let it sit for a little while if the product instructions recommend it.
- Wipe the chain thoroughly with a clean rag.
That last step matters more than many riders think. The useful lubricant needs to be inside the chain where the rollers and pins move. The slippery stuff left coating the outside mostly just collects dust and grit. So yes, wiping off excess lube is not ruining your hard work. It is the hard work.
How Often Should You Lube the Chain?
There is no perfect number because riding conditions matter more than your calendar. A road bike in clean, dry weather may go many rides between applications. A commuter bike that sees rain, grit, and salty splash may need attention much sooner. As a rule of thumb, lube the chain when it starts sounding dry, looking rusty, or feeling rough. After wet rides, check it sooner rather than later.
If your chain squeaks, do not ignore it. Chains are excellent at turning a tiny maintenance task into a larger replacement cost if you keep pretending the noise is “just part of the bike’s personality.”
Way 2: Lubricate Cables and Pivot Points Sparingly
Not every bike needs frequent lubrication outside the drivetrain, but certain moving parts can benefit from a small, targeted amount of light lubricant. This is the keyword: small. If your chain lube bottle is acting like a fire hose, step away from the bicycle.
Where a Light Lubricant Can Help
Some bikes benefit from occasional lubrication on:
- Exposed sections of brake or shift cables
- Derailleur pivot points
- Brake caliper pivots on certain designs
- Other small external pivots that squeak or feel sticky
This method is especially helpful on older bikes, commuter bikes, or bikes that have seen wet weather and a lot of grit. On many modern bikes, cable systems are more sealed and may need less frequent attention, so the rule is to lubricate only what is actually exposed or obviously dry.
How to Lubricate Pivot Points
Shift the gears and watch the rear derailleur move. You will see several small pivoting joints. If those pivots are dry or noisy, apply one tiny drop of light lubricant to each moving joint, then shift through the gears and wipe away the excess. The same idea applies to exposed brake pivots on compatible systems.
Use restraint. You are not frosting a cake. A small drop is enough. Too much lubricant on these parts can drip onto places where it does not belong or attract dirt that makes things worse instead of better.
How to Lubricate Exposed Cables
If the cable is visible where it exits housing and you notice rust, drag, or sticky shifting, a tiny bit of light lubricant can help. Apply a drop to the exposed cable, move the lever a few times, and wipe away any extra. This can also help displace moisture after wet riding on some cable-operated systems.
But be careful: if a cable system is badly corroded, frayed, or full of grit inside the housing, lubrication is not a miracle cure. At that point, replacement is usually the real solution.
What to Keep Lubricant Away From
There are several places on a bike where lubricant should absolutely not go:
- Brake rotors
- Brake pads
- Rim braking surfaces
- Tires
- Handlebar clamps that require friction, not grease
Contaminating your brakes is one of the fastest ways to turn “routine maintenance” into “why am I not stopping?” If you are lubricating anything near the braking system, go slowly, use a rag as a shield if needed, and clean up immediately.
Way 3: Grease Threads and Contact Points During Tune-Ups
This is where many riders get tripped up. A bike does not just need lube; it often needs grease in specific places. Grease is thicker than chain lubricant and is meant for different jobs, usually during installation or deeper service. Think of it as less “daily smoothie” and more “structural peanut butter.”
Where Grease Makes Sense
Grease is commonly used on certain metal-to-metal contact points and threads, such as:
- Pedal threads
- Seatposts on metal frames, when appropriate
- Some bolts and threaded parts, depending on manufacturer guidance
- Bottom bracket or axle interfaces during service
Grease helps reduce seizing, makes future disassembly easier, and can stop annoying creaks caused by dry metal interfaces. It is especially useful on pedal threads because pedals are exposed to weather and can become stubbornly fused to crank arms if installed dry.
Seatposts, Threads, and the Material Question
This is where you need to pay attention to material. If you have a metal seatpost in a metal frame, a light coating of grease is often appropriate. It helps prevent corrosion and that legendary seatpost seizure that turns simple maintenance into archaeology.
But if you have carbon components, do not automatically reach for grease. Carbon parts often require carbon assembly paste instead. That paste helps create grip at lower clamping force. In other words, it is designed to hold things in place without asking you to crush your fancy parts like a medieval blacksmith.
How to Grease Contact Points Properly
- Remove the part if you are doing a deeper service or installation.
- Clean off old grease, grime, and moisture.
- Apply a thin, even layer of grease to the appropriate metal contact surface or threads.
- Reinstall the part and tighten to the correct torque specification.
Again, the word is thin. Too much grease just squeezes out, collects dirt, and makes your hands look like you lost a fight with a cheeseburger.
Common Bike Lubrication Mistakes
- Using the wrong product: Chain lube is for chains. Grease is for selected threads and contact points. Carbon paste is for carbon interfaces. Random garage mystery spray is for absolutely no one.
- Lubing a filthy chain: Dirt plus fresh lube equals grinding paste.
- Skipping the wipe-down: Excess lube attracts grime and makes the drivetrain dirtier faster.
- Lubing right before a ride: Some lubes perform better when they have time to settle in rather than being flung everywhere five minutes later.
- Ignoring brake contamination risk: If lube hits the brakes, that is not “fine.” That is a problem.
- Over-lubricating everything that squeaks: Some noises come from looseness, wear, or dry interfaces that need cleaning and correct assembly, not a random squirt of oil.
Which Method Should You Use Most Often?
For most riders, chain lubrication is the regular maintenance habit that matters most. If you only do one thing, do that one. Lubricating cables and pivots is more occasional and usually depends on the bike’s age, design, and riding conditions. Greasing contact points is more of a tune-up task, but it can save you from seized parts, creaks, and future frustration.
A simple maintenance rhythm looks like this:
- Check the chain often and lube as needed
- Inspect pivots and exposed cables when shifting or braking feels sticky
- Grease threaded or contact points when installing parts or doing deeper maintenance
It is not glamorous, but neither is walking home because your neglected bike decided to express itself.
Real-World Experiences: What Riders Learn About Lubricating a Bike
Ask a group of cyclists about lubrication and you will quickly discover two things. First, everybody has an opinion. Second, almost everyone learned the basics the hard way. One rider ignored a squeaky chain for weeks because the bike still “technically worked,” only to discover that the chain had stretched, the cassette wore prematurely, and a cheap bottle of lube could have prevented an expensive replacement. That lesson tends to stick.
Commuters often have the most practical experience because their bikes live in the real world, not in a climate-controlled fantasy. A rider who uses a bike to get to work through rain, curb splash, and city grime usually notices that lubrication schedules change fast when the weather turns ugly. In dry summer conditions, the chain may stay quiet for many rides. After one wet week, though, the drivetrain can start sounding tired almost immediately. Many commuters figure out that post-rain maintenance is not optional if they want clean shifting and a chain that does not rust like an old garden gate.
Mountain bikers learn a different version of the same lesson. They might begin with a dry lube because the trailhead looks dusty and the forecast seems friendly. Then a surprise creek crossing, a muddy patch, or one particularly rude puddle changes everything. By the end of the ride, the drivetrain sounds gritty and the bike feels like it swallowed half the trail. That experience teaches an important truth: chain lubricant is not just about conditions at the start of the ride. It is about the mess your bike actually sees.
Home mechanics also discover that where they put lubricant matters as much as what they use. Plenty of riders start by oiling the outside of the chain because that seems logical. After all, it is the part they can see. Then they notice the chain gets black fast, their calves wear a stripe of grime, and the drivetrain still sounds rough. Once they learn to apply one drop per roller and wipe off the outside, the bike gets quieter and stays cleaner. That moment feels a little like discovering your toaster had a settings dial the whole time.
Then there is the seatpost experience, a classic rite of passage. Many riders never think about greasing a metal seatpost until it begins to creak, slip, or threaten permanent residence inside the frame. A simple removal, cleaning, and correct grease application often fixes the issue quickly. On the flip side, riders with carbon parts usually learnsometimes nervouslythat carbon assembly paste is not just expensive dust in a tube. It helps hold parts securely with less clamp force, which can be the difference between a confident ride and a very expensive mistake.
Perhaps the biggest shared experience is this: lubrication works best when it becomes a small, boring habit. The riders with the happiest bikes are rarely performing dramatic overhauls every weekend. They are the ones who wipe the chain after a dirty ride, notice a squeak before it becomes a complaint, and use the right product in the right place. It is not flashy. It will not go viral. But it does make the bike feel better, last longer, and respond like it actually enjoys being riddenwhich, if you ask any cyclist, is a pretty great return on a few minutes of effort.
Final Thoughts
If you want your bike to run smoothly, you do not need a mechanic’s apron, a workshop stereo, or a maintenance ritual involving candles and whispered torque specs. You just need a little consistency and the right approach. Lubricate the chain regularly, add light lubrication to exposed pivots or cables only when appropriate, and use grease on selected threads and contact points during tune-ups. Keep things clean, use the correct product, and wipe away the extra.
Do that, and your bike will usually reward you with quieter rides, better shifting, fewer creaks, and less drivetrain wear. Ignore it, and your bicycle will eventually start communicating in squeaks, crunches, and invoices.