Table of Contents >> Show >> Hide
- Before You Start: What “Sharp” Actually Means
- What You’ll Need (Cheap, Simple, Effective)
- Grits in Plain English
- Sharpening Angle: The “Good Enough” Zone
- Way #1: The “Scary Sharp” Flat-Plate Method (Best All-Around)
- Way #2: The Mousepad Convex Method (Forgiving, Super Home-Cook Friendly)
- Way #3: The “Sandpaper Stick” for Curves and Tight Spots (Yes, Even Some Serrations)
- Way #4: The Micro-Bevel Touch-Up (Fast Maintenance Without a Full Sharpen)
- Way #5: The Sandpaper “Strop” Finish (Cleaner Edge, Better Push-Cuts)
- How to Tell You’re Done (Without Sacrificing a Tomato)
- Common Mistakes That Make Sandpaper Sharpening Miserable
- Knife Care After Sharpening (So You Don’t Undo Your Work)
- Real-World Experiences: of “What It’s Actually Like”
- Conclusion
Your kitchen knife is supposed to glide through tomatoesnot audition for a role as a butter spreader. If your blade is
struggling, don’t panic (or start sawing at onions like you’re building a log cabin). You can get a seriously sharp edge
with something you probably already have in the garage: sandpaper.
This DIY approach works because sharpening is basically controlled abrasionlike exfoliating, but for steel. With the right
grit progression, a flat backing, and a little patience, sandpaper can take a dull chef’s knife back to
“please keep that away from my fingertips” sharp.
Before You Start: What “Sharp” Actually Means
Sharpening isn’t just making the knife feel nicer. A truly sharp edge is created when both sides of the blade meet cleanly
at the apex (the very edge). Along the way, you’ll usually form a tiny metal fold called a burra sign
you’ve reached the edge and removed enough material. The goal is to form it intentionally, then remove it cleanly.
What You’ll Need (Cheap, Simple, Effective)
- Wet/dry sandpaper (silicon carbide is a favorite for steel). A useful range: 220–2000 grit.
- A flat backing (glass, a granite tile, marble threshold, or a very flat cutting board you don’t love).
- Painter’s tape or spray adhesive (to keep paper from sliding).
- Water + a drop of dish soap (lubrication helps the paper cut smoother and load up less).
- A towel or non-slip mat (because chasing a glass tile around your counter is not a hobby).
- Optional: a Sharpie (for angle checks), a cork or folded newspaper (for deburring), and a strop.
Safety Note (Because Fingers Are Not Replaceable Parts)
Work slowly. Keep your off-hand away from the edge path. Wipe the blade from spine to edge carefully (or better, wipe
away from the edge). If you have a cut-resistant glove, this is its moment.
Grits in Plain English
Think of grit like sand on a beach:
coarse grits (120–320) move metal fast (repairs and reshaping),
medium (400–800) builds the new edge,
and fine (1000–2000+) refines and polishes for smoother cutting.
You don’t need 47 steps. You need the right steps.
Sharpening Angle: The “Good Enough” Zone
Most home cooks do great staying somewhere around 15–20 degrees per side. A lower angle can feel slicier
but can be more delicate; a higher angle is tougher and more forgiving. If your knife is a sturdy Western-style chef’s knife,
lean a bit closer to 20°. If it’s thinner and more laser-like, you can drift closer to 15°as long as you don’t treat it
like a hatchet.
Easy angle hack: Color the edge bevel with a Sharpie. Make a few light strokes on the sandpaper. If you’re
removing ink evenly along the bevel, your angle is close. If you’re only hitting the shoulder or only the very edge, adjust.
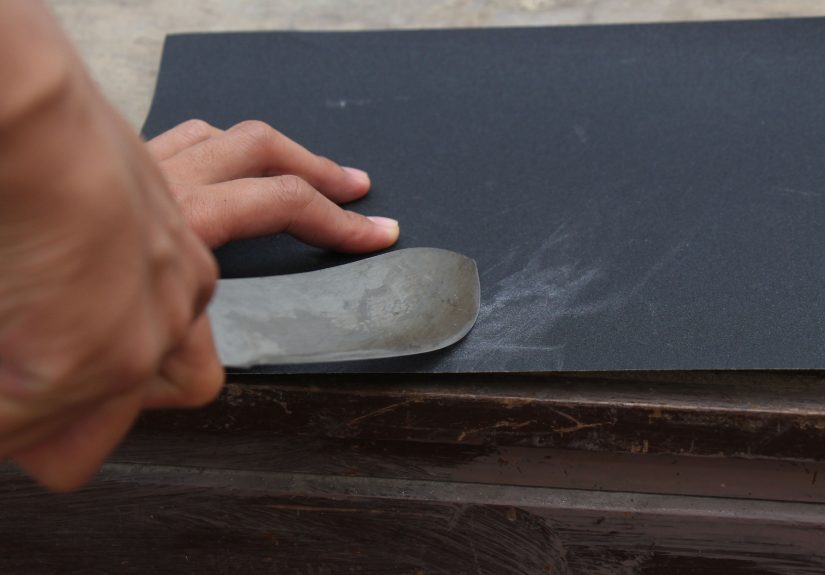
Way #1: The “Scary Sharp” Flat-Plate Method (Best All-Around)
This is the classic sandpaper sharpening setup: abrasive paper on a dead-flat surface. It’s simple, repeatable, and gives
you a very consistent edgegreat for chef’s knives, paring knives, and most straight-edge kitchen blades.
How to do it
- Tape sandpaper to your flat backing. Start around 400 grit if the knife is dull; use
220 only if it’s very dull or has small chips. - Wet the paper with water + a tiny drop of soap.
- Hold the knife at your chosen angle. Use edge-leading strokes (as if you’re trying to shave a thin layer
off the sandpaper). Move from heel to tip, keeping pressure moderate and consistent. - Sharpen one side until you can feel a consistent burr along the opposite side.
- Switch sides and repeat until the burr flips.
- Move up grits: 400 → 800 → 1200 → 2000 (a great progression for kitchen knives).
- As you go finer, lighten pressure. The last grit should feel like you’re barely persuading the edge, not
wrestling it.
Pro tips
- Count strokes if you tend to “favor” one side.
- Rinse the blade between grits so coarse particles don’t scratch your finer stages.
- If the sandpaper starts skating or clogging, add water or replace the sheetsandpaper is cheaper than frustration.
Way #2: The Mousepad Convex Method (Forgiving, Super Home-Cook Friendly)
If the flat-plate method is “precise chef,” this one is “friendly neighbor who helps you move a couch.” You tape sandpaper
to something slightly soft (like a mousepad or thin foam). That tiny bit of give creates a micro-convex edge
often very durable for everyday kitchen use.
How to do it
- Tape 600 grit sandpaper to a mousepad or thin foam sheet on a stable surface.
- Use gentle strokes at roughly 15–20°. The soft backing helps you “find” the edge.
- Raise a burr, then switch sides.
- Progress to 1000 and 2000 grits for refinement.
- Finish with a few ultra-light alternating strokes to reduce the burr before you deburr.
Why it works
That slight cushion can make angle control less stressfulespecially if you’re new. It’s also handy for blades that aren’t
perfectly flat or have a bit of belly.
Way #3: The “Sandpaper Stick” for Curves and Tight Spots (Yes, Even Some Serrations)
Kitchen knives aren’t always simple straight edges. Boning knives curve. Petty knives have tight bellies. Serrated knives
are their own chaotic species. While a proper rod or specialty tool is best for true serrations, sandpaper can still help
for touch-ups or curved sections.
How to build it
- Wrap sandpaper around a dowel, chopstick, marker, or even a wooden spoon handle.
- Secure with tape so it doesn’t slide.
- Choose grit: 400–800 for shaping, 1000–2000 for finishing.
How to use it
- For curved edges, follow the curve in short strokes, keeping the same angle relative to the edge.
- For serrations (if you must), work each scallop lightly from the beveled side only, matching the factory angle as best you can.
Then do a couple of very light passes on the flat side to knock off burrs.
This method is also great for quick repairs on small nicksjust remember: the goal is to remove minimal metal and
keep the edge shape consistent.
Way #4: The Micro-Bevel Touch-Up (Fast Maintenance Without a Full Sharpen)
If your knife is “mostly fine” but not exciting, you don’t always need a full grit ladder. A micro-bevel
is a tiny, slightly steeper bevel right at the edgelike adding a protective bumper to the sharpest part of your knife.
It can make the edge last longer and restores bite quickly.
How to do it
- Start with 1000 or 1200 grit on a flat backing.
- Sharpen as normal for a few strokes per side to clean up the edge.
- Now raise your angle slightly (just a hairthink “one coin higher”) and do
3–6 very light strokes per side. - Finish on 2000 grit with feather-light alternating strokes.
This is a great option when you cook often and want your knife consistently sharp without turning Saturday morning into
“The Great Abrasion Festival.”
Way #5: The Sandpaper “Strop” Finish (Cleaner Edge, Better Push-Cuts)
The final sharpness you feel is often less about the grit number and more about how cleanly you remove the burr. One
easy approach: use very fine sandpaper (like 2000 grit) as a controlled finishing step with
edge-trailing strokessimilar to stroppingso you refine the apex without creating a new stubborn burr.
How to do it
- Tape 2000 grit wet/dry paper to a flat board.
- Use edge-trailing strokes (spine-first, like you’re wiping the blade backward).
- Do 5–10 light strokes per side, alternating sides each stroke.
- Optional: finish by drawing the edge lightly through a cork or folded newspaper to remove any remaining burr fragments.
This method is especially helpful if your knife gets sharp but “loses it fast”a lingering burr can make an edge feel great
for five minutes, then collapse like a cheap lawn chair.
How to Tell You’re Done (Without Sacrificing a Tomato)
- Paper test: It should slice paper smoothly with little snagging.
- Tomato skin test: The edge should bite into the skin without pressing hard.
- Onion test: The knife should start cuts cleanly without slipping.
- Visual check: Under light, a dull edge reflects; a sharp edge is harder to “see” at the apex.
Common Mistakes That Make Sandpaper Sharpening Miserable
1) Using too much pressure
Heavy pressure can create a thick burr that’s harder to remove cleanly. Let the abrasive do the work.
2) Jumping grits like you’re speedrunning
If you go from 220 to 2000, you’ll spend forever trying to erase deep scratches. A steady progression is faster overall.
3) Inconsistent angle
Wobbling angles creates a rounded edge that feels dull quickly. Go slower. Use the Sharpie trick. Count strokes if needed.
4) Forgetting the burr
No burr, no apex. If you never reach the edge, you’re polishing the sides of sadness, not sharpening.
Knife Care After Sharpening (So You Don’t Undo Your Work)
- Hand-wash and dry promptly. Moisture + steel = drama.
- Use wood or plastic cutting boards, not glass/stone/metal surfaces that punish edges.
- Store knives so the edge doesn’t rub in a drawer (guards, blocks, or magnetic strips help).
- Hone regularly if you use the knife often; sharpen when honing stops helping.
Real-World Experiences: of “What It’s Actually Like”
The first time most people try sharpening with sandpaper, there’s a moment of disbelief: “This is it? Tape paper to a tile
and pretend I know what 20 degrees looks like?” And honestlyyes. That’s exactly it. But here’s what tends to happen in real
kitchens (and why the method sticks).
One common experience: you start with a dull chef’s knife that’s been “mysteriously” abused by cutting on a ceramic plate
(no judgmentokay, maybe a tiny bit). You tape down 400 grit, do a few strokes, and… nothing. That’s when you learn the
first sandpaper lesson: you don’t get sharp by wishing. You get sharp by reaching the edge. Once you keep
your angle steady long enough to raise a burr, everything clicks. The knife suddenly feels like it’s cooperating instead of
fighting you.
Another real-life moment is discovering how quickly sandpaper wears out compared to stones. People often expect one sheet to
last forever, like a mythical “eternal grit.” In practice, the paper loads up, the cutting slows, and your results get
inconsistent. The upside is that replacing a sheet feels painless compared with buying a new stone. The trick is treating
sandpaper like a consumablebecause it isand feeling weirdly smug about how inexpensive your sharpening setup is.
The mousepad method also creates memorable “aha” moments. Beginners often struggle to keep a perfect angle on a hard plate.
But with a tiny bit of cushion, suddenly the blade feels more stable and the edge improves faster. A lot of home cooks end up
liking the slightly convex, durable edge for everyday meals. It’s not a museum-polish katana edge; it’s a practical “I cook
five nights a week” edge. That’s a compliment.
Burr removal is where many people either level up or get stuck. You can have a knife that feels sharp on your thumb pad test,
then goes dull after slicing two onions. That’s usually the burr telling on you. In real use, switching to lighter pressure,
doing alternating strokes, and finishing with a gentle deburr (cork, newspaper, or a careful strop-like pass) often turns
“kind of sharp” into “wow, this is different.” It’s also the part where you realize sharpening is less about brute force and
more about control.
Finally, there’s the lifestyle benefit: sandpaper sharpening makes maintenance approachable. Instead of waiting until your
knife is tragically dull, you can do a quick 1000/2000 touch-up and a micro-bevel in under 10 minutes. People who adopt this
habit tend to report something unexpected: cooking feels calmer. Prepping vegetables stops being a chore and starts being,
well… kind of satisfying. Which is the closest thing the kitchen has to therapy that also produces dinner.
Conclusion
Sharpening kitchen knives with sandpaper isn’t a “desperation hack”it’s a legit, repeatable method that can produce a sharp,
durable edge when you use a smart grit progression, keep a steady angle, and remove the burr cleanly. Pick the method that
matches your knife (and your patience level), go light on pressure as you refine, and you’ll be back to slicing tomatoes like
you’re in a cooking show montageminus the dramatic soundtrack.