Table of Contents >> Show >> Hide
- What Are Moss Cookies?
- Why This Is the Best Moss Cookies Recipe
- Ingredients for Moss Cookies
- How To Make Moss Cookies
- Recipe Card: Best Moss Cookies
- Tips for Perfect Moss Cookies
- Flavor Variations
- How To Serve Moss Cookies
- Storage and Make-Ahead Instructions
- Common Mistakes To Avoid
- Best Moss Cookies Recipe Experience: What Makes These Cookies Special
- Conclusion
- SEO Tags
If you have ever looked at a cozy woodland dessert table and thought, “That cake needs more forest floor,” congratulations: moss cookies are your destiny. The good news is that this recipe does not involve hiking boots, a magnifying glass, or actual moss. These moss cookies are soft, buttery green cookies decorated with edible “moss” made from cookie crumbs, matcha, and a little decorating magic. They look like something a fairy would serve at brunch, but they taste like a tender sugar cookie with earthy vanilla, a hint of tea, and a delightfully crumbly topping.
This best moss cookies recipe is designed for home bakers who want a show-stopping treat without needing a pastry degree or a kitchen full of mysterious powders. The base cookie is sturdy enough to hold its shape, soft enough to stay pleasant for days, and flavorful enough that it will not taste like a craft project. The edible moss topping adds texture, color, and that charming “tiny enchanted log cabin” personality everyone secretly wants from dessert.
Use these cookies for spring parties, Easter baskets, woodland baby showers, fairy garden birthdays, Halloween dessert boards, camping-themed treats, or anytime your cookie tray needs to stop being beige and start having a personality.
What Are Moss Cookies?
Moss cookies are decorative cookies inspired by the look of soft green moss. They are usually made with a green-tinted cookie dough, matcha powder, crushed cookies, graham crackers, pistachios, or colored crumbs. The goal is to create a cookie that looks earthy and natural while still tasting sweet, buttery, and delicious.
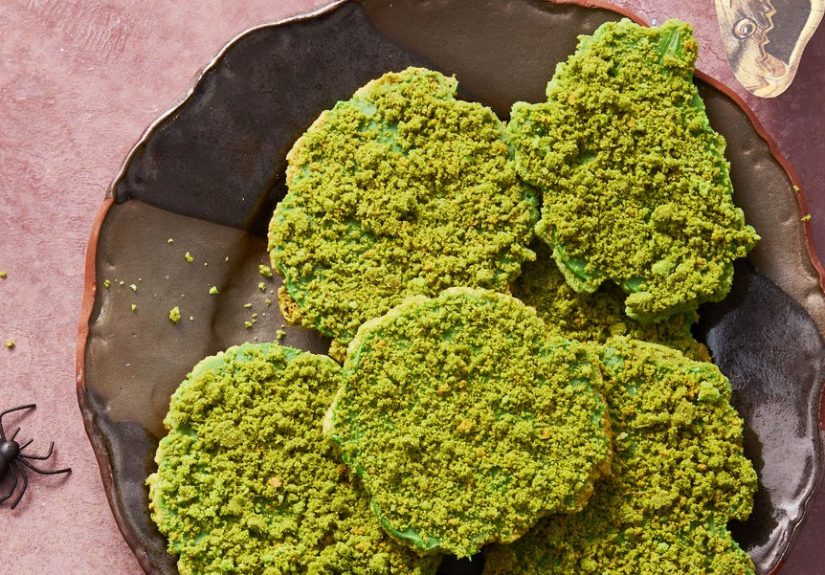
For this version, we make a soft vanilla-matcha sugar cookie and finish it with a textured edible moss topping. The topping uses crushed baked cookie crumbs mixed with matcha powder and a touch of powdered sugar. The result looks realistic without tasting like lawn clippings. Very important distinction.
Why This Is the Best Moss Cookies Recipe
A great moss cookie needs balance. Too much green food coloring and it looks radioactive. Too much matcha and it tastes bitter. Too much flour and the cookie becomes a decorative rock. This recipe keeps everything in the happy middle: soft centers, lightly crisp edges, natural-looking color, and an edible moss effect that is pretty without being fussy.
The dough is chilled before baking, which helps the cookies hold their shape and prevents them from spreading into green pancakes. The butter is softened, not melted, so the texture stays tender. The edible moss is added after baking with a thin layer of glaze, giving the top a realistic, crumbly finish.
Ingredients for Moss Cookies
For the Cookie Dough
- 2 1/2 cups all-purpose flour
- 1 tablespoon culinary-grade matcha powder
- 1/2 teaspoon baking powder
- 1/4 teaspoon baking soda
- 1/2 teaspoon fine sea salt
- 3/4 cup unsalted butter, softened
- 3/4 cup granulated sugar
- 1/4 cup light brown sugar, packed
- 1 large egg, room temperature
- 2 teaspoons vanilla extract
- 1/4 teaspoon almond extract, optional
- Green gel food coloring, optional, 1 to 3 drops
For the Edible Moss Topping
- 1 cup vanilla wafer crumbs, graham cracker crumbs, or extra baked cookie crumbs
- 1 teaspoon culinary-grade matcha powder
- 1 tablespoon powdered sugar
- 1 tablespoon finely chopped pistachios, optional
- 1 tiny drop green gel food coloring, optional
For the Simple Glaze
- 1 cup powdered sugar
- 1 1/2 to 2 tablespoons milk
- 1/2 teaspoon vanilla extract
- Pinch of salt
How To Make Moss Cookies
Step 1: Mix the Dry Ingredients
In a medium bowl, whisk together the flour, matcha powder, baking powder, baking soda, and salt. Whisking is not just a polite suggestion. Matcha can clump like it is forming a tiny green committee, so give it a good stir until the color looks even.
Step 2: Cream the Butter and Sugars
In a large bowl, beat the softened butter, granulated sugar, and brown sugar for 2 to 3 minutes, or until the mixture looks fluffy and lighter in color. This step creates a cookie that is tender instead of dense. Add the egg, vanilla extract, and almond extract if using. Beat until smooth.
Step 3: Add the Dry Ingredients
Add the flour mixture to the butter mixture in two additions. Mix on low speed just until the dough comes together. Do not overmix. Overmixed cookie dough can become tough, and nobody wants a cookie that fights back.
If you want a brighter green color, add 1 to 3 drops of green gel food coloring. Gel coloring works better than liquid because it adds color without watering down the dough. Keep the shade slightly muted if you want a natural mossy look.
Step 4: Chill the Dough
Cover the dough and refrigerate it for at least 45 minutes. Chilling helps the butter firm up, which controls spreading in the oven. It also makes the dough easier to roll and shape. If the dough chills longer than 2 hours and becomes very firm, let it rest on the counter for 10 minutes before scooping.
Step 5: Shape the Cookies
Preheat the oven to 350°F. Line two baking sheets with parchment paper. Scoop the dough into 1 1/2-tablespoon portions and roll them into balls. For a natural mossy-stone look, flatten each ball slightly and press the edges unevenly. Perfect circles are cute, but woodland cookies look better with a little personality.
Step 6: Bake
Bake the cookies for 9 to 11 minutes, or until the edges are set and the centers look slightly soft. Do not wait for the tops to brown. Green cookies can turn dull if overbaked. Let the cookies cool on the baking sheet for 5 minutes, then transfer them to a wire rack to cool completely.
Step 7: Make the Edible Moss
Place the crumbs, matcha powder, powdered sugar, and pistachios in a small bowl. Stir until the mixture looks like soft green moss. For a deeper color, rub in the tiniest dot of green gel food coloring with your fingertips or pulse the mixture briefly in a food processor. The texture should be uneven, with some fine crumbs and a few larger bits. Real moss is not smooth, and neither is good edible moss.
Step 8: Glaze and Decorate
Whisk together the powdered sugar, milk, vanilla, and salt until smooth. The glaze should be thick but spreadable. Brush or spoon a thin layer over each cooled cookie, then immediately sprinkle the edible moss topping over the glaze. Press gently so the crumbs stick. Let the cookies set for 20 to 30 minutes before serving.
Recipe Card: Best Moss Cookies
Prep Time: 25 minutes
Chill Time: 45 minutes
Bake Time: 10 minutes
Total Time: About 1 hour 20 minutes
Yield: 24 cookies
Difficulty: Easy to moderate
Tips for Perfect Moss Cookies
Use Culinary-Grade Matcha
Culinary-grade matcha is ideal for baking because it gives cookies color and flavor without the premium price tag of ceremonial matcha. Choose a matcha that smells fresh and looks green rather than brownish. Old matcha can taste flat or bitter.
Do Not Skip the Chill
Chilling the dough is one of the easiest ways to improve cookie texture. It keeps the cookies from spreading too much and gives the flour time to hydrate. For moss cookies, chilling also helps preserve the rustic shapes you create before baking.
Keep the Topping Dry Until Decorating
The edible moss topping should stay dry and crumbly until it touches the glaze. If you mix it with too much liquid food coloring, it can clump. Start with less color than you think you need. You can always add more; you cannot easily rescue crumbs that have turned into swamp paste.
Let the Cookies Cool Completely
Warm cookies will melt the glaze and make the topping slide around. Wait until the cookies are fully cool before decorating. Patience is annoying, but so is watching your beautiful moss topping slowly migrate off the cookie.
Flavor Variations
Chocolate Moss Cookies
Add 2 tablespoons of cocoa powder to the dough and reduce the flour by 2 tablespoons. Chocolate creates a darker forest-floor flavor that pairs beautifully with matcha crumbs.
Lemon Moss Cookies
Add 1 tablespoon of lemon zest to the dough and replace the almond extract with lemon extract. The citrus flavor brightens the matcha and makes the cookies taste fresh and springy.
Pistachio Moss Cookies
Fold 1/3 cup finely chopped pistachios into the dough and add more pistachio crumbs to the moss topping. This gives the cookies a nutty flavor and a naturally green look.
Halloween Moss Cookies
Make the cookies slightly darker with cocoa powder, then decorate with candy mushrooms, mini chocolate rocks, or tiny fondant bones. Suddenly your woodland dessert has taken a charmingly spooky left turn.
How To Serve Moss Cookies
Moss cookies look beautiful on a wooden serving board, a white cake stand, or a platter sprinkled with extra cookie crumbs. For a woodland dessert table, pair them with chocolate cupcakes, carrot cake, vanilla cupcakes, mushroom meringues, or sugar cookies shaped like leaves. They also make adorable party favors when packed in clear bags with twine and a small tag.
If you are serving them for Easter or spring, add pastel candies and edible flowers. For a fairy garden party, place the cookies around a small cake to create the look of a mossy forest path. For Halloween, add dark chocolate drizzle and black cocoa crumbs for a mysterious forest vibe.
Storage and Make-Ahead Instructions
Store decorated moss cookies in an airtight container at room temperature for up to 3 days. Place parchment paper between layers to protect the topping. The cookies will still taste good after that, but the moss topping may soften slightly.
You can make the cookie dough up to 2 days ahead and keep it refrigerated. You can also freeze the dough balls for up to 2 months. Bake from frozen by adding 1 to 2 minutes to the baking time. For the freshest look, decorate the cookies the day you plan to serve them.
Common Mistakes To Avoid
Using Too Much Food Coloring
A little green coloring can help, but too much makes the cookies look artificial. Moss is naturally uneven, so aim for soft forest green rather than neon traffic cone green.
Overbaking the Cookies
Pull the cookies from the oven when the edges are set and the centers still look slightly soft. They will continue to firm up as they cool. Overbaking can make the green color fade and the texture dry.
Adding Moss Topping to Hot Cookies
Hot cookies and glaze are not friends. Let the cookies cool first, then decorate. This keeps the topping fluffy and textured instead of sticky and flat.
Eating Raw Dough
Even though sneaking cookie dough feels like a cherished kitchen tradition, raw flour and raw eggs are not safe to eat. Bake the cookies fully before tasting. Your stomach will thank you, and it writes fewer complaint emails than your taste buds.
Best Moss Cookies Recipe Experience: What Makes These Cookies Special
The first time you make moss cookies, there is a very specific moment when the recipe goes from “green cookie dough” to “tiny edible forest.” It happens when the crumb topping hits the glaze. Suddenly the cookies look alive in the most charming way. Not alive like a science experiment in the back of the fridge, thankfully, but alive like something from a storybook picnic.
One of the best experiences with this recipe is how forgiving the decorating process is. With many decorated cookies, every line of icing has to be perfect. Moss cookies are the opposite. Uneven edges look better. Random crumbs look natural. A darker patch here and a lighter patch there makes the cookie more realistic. This is a rare baking project where imperfection is not only accepted but encouraged. If your cookie looks a little lumpy, congratulations, you have made nature.
These cookies are also a fun recipe to make with kids because the decorating is hands-on and low pressure. Children can sprinkle the moss crumbs, press the topping into the glaze, and proudly announce that they are helping build a forest. The only tricky part is reminding everyone that the moss topping goes on the cookies, not directly into their mouths by the fistful. The crumbs are tasty, so this reminder may need to happen more than once.
For parties, moss cookies are surprisingly useful because they create instant atmosphere. A plate of regular sugar cookies says, “Here are cookies.” A plate of moss cookies says, “Welcome to my enchanted dessert woodland; please leave your tiny sword at the door.” They photograph beautifully, especially beside fresh flowers, rustic wood, chocolate desserts, or pastel spring decorations. If you run a food blog, bakery page, or party-planning site, these cookies are the kind of recipe that can stop a scrolling thumb.
The flavor is another reason this recipe works so well. Matcha brings a gentle earthy note, but the vanilla, butter, and sugar keep the cookie familiar. People who already love matcha will appreciate the flavor, while people who are unsure about green tea desserts will not feel overwhelmed. The edible moss topping adds a crumbly texture that makes each bite more interesting than a plain sugar cookie. Pistachios are optional, but they add a lovely nutty finish and help the moss look more natural.
My favorite way to serve moss cookies is on a simple white platter with a few extra crumbs scattered around the edges. It looks fancy with very little effort, which is the dream. They also make a memorable homemade gift because they feel custom and creative without requiring advanced decorating skills. Wrap two or three in a clear treat bag, tie it with twine, and suddenly you are the person who brings woodland bakery magic to ordinary life.
In the end, the best moss cookies are not just about looking cute. They are about creating a dessert that makes people pause, smile, and ask, “Wait, how did you make these?” That is the real charm of this recipe. It turns simple pantry ingredients into something playful, beautiful, and delicious. And no actual moss had to suffer.
Conclusion
The best moss cookies recipe combines a soft matcha sugar cookie with a realistic edible moss topping made from crumbs, powdered sugar, and a little decorating creativity. These cookies are perfect for woodland parties, spring celebrations, Easter dessert tables, Halloween boards, or any event that could use a little edible magic. The key is to keep the dough chilled, use fresh matcha, decorate only after cooling, and embrace rustic texture. Moss cookies are not supposed to look factory-perfect. They are supposed to look charming, earthy, and just a little enchanted.
Note: These moss cookies are made with edible ingredients that look like moss. Do not use real moss, outdoor plants, or unidentified greenery on cookies or desserts.