Table of Contents >> Show >> Hide
- Why This Soda-Bottle String Dispenser Works So Well
- Supplies and Tools
- Step-by-Step: Beautiful String Dispenser from a Soda Bottle
- The Mini Engineering Behind the Hack
- Upgrades That Make It Even Better
- Where You’ll Actually Use This (A Lot)
- Common Mistakes (and How to Avoid Them)
- Safety Notes (Quick but Important)
- FAQ
- Real-World Experiences and Lessons Learned (Extra 500+ Words)
- Conclusion
- SEO Tags
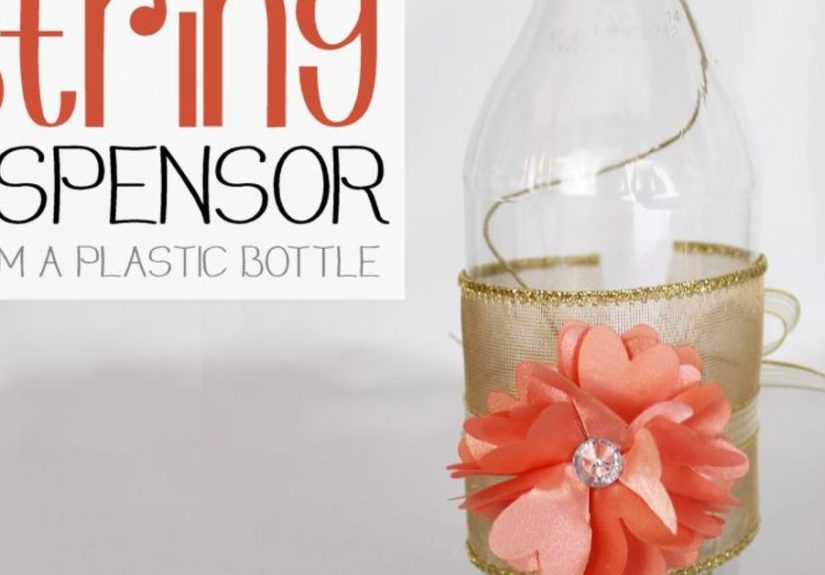
Some DIY projects are glamorous. Others are practical. And then there’s this one: a string dispenser made from a soda bottle that’s somehow both useful and weirdly cute. It keeps twine from turning into a knotty bird’s nest, makes your gift-wrapping station look organized (even if the rest of your life is not), and gives a plastic bottle a second job before it heads off to recycling.
This guide shows you how to make a beautiful DIY twine dispenser using a soda bottleplus smart upgrades, common mistakes to avoid, and real-life “I learned this the hard way” lessons at the end.
Why This Soda-Bottle String Dispenser Works So Well
It solves three annoying problems at once
- No more runaway twine. The bottle contains the ball so it can spin without escaping across the room.
- No more tangles. You pull from one exit point, so the string doesn’t loop around itself like it’s practicing for the Olympics.
- No more “where did the end go?” The tail stays threaded through the cap hole, ready for the next use.
It’s basically a tiny storage tool you can customize
Functionally, it’s a simple dispenser. Aesthetically, it can be anything you want: cottage-core ribbon, modern minimal label, garden-shed rugged, or “I had fake flowers and got carried away.” The “beautiful” part is optionalbut fun.
Supplies and Tools
Materials
- Clean plastic soda bottle (12–20 oz is easy to handle; pick one with a shape you like)
- Ball of twine, string, or thin rope (garden twine, baker’s twine, jute, cotton string)
- Wide ribbon (to cover the access door) + narrow ribbon (for trim and tying)
- Decor extras (optional): artificial flower, small tag/label, washi tape, paint pen
- Glue (hot glue works; strong craft glue or tape can also work depending on decor)
Tools
- Drill (or an awl/heated nail for making a hole in the cap)
- Sharp scissors or craft knife (to cut an access door)
- Marker (to sketch the door outline)
- Optional: sandpaper/emery board (to smooth sharp plastic edges)
- Optional: dowel or pencil + tape (to help thread twine through the cap)
Step-by-Step: Beautiful String Dispenser from a Soda Bottle
1) Clean the bottle (and remove the label like a pro)
Wash and dry the bottle so your glue and ribbon actually stick. Peel off the label. If you’re left with sticky residue, use an adhesive remover or rubbing alcohol and wipe it clean. A clean surface makes decorating easier and keeps your dispenser from looking like it escaped a middle-school cafeteria.
2) Cut an access door for loading the twine
Draw a door on the side of the bottlelarge enough to slip your twine ball in and out without forcing it. Keep one side uncut to act as a hinge if you want the flap to fold open and closed. Cut carefully with scissors or a craft knife.
Tip: Place the door on the “back” of the bottleso your decorations can cover it, and the dispenser looks tidy from the front.
3) Make a clean hole in the cap
Remove the cap and create a hole in the center. The hole should be just big enough for your string to slide through smoothly without snaggingbut not so big that it slips back inside or lets the twine spill out too easily.
- Drill method: Use a drill bit sized to your twine thickness.
- No-drill method: Carefully use an awl, nail, or heated tool (use caution and ventilation).
Smooth the edges: If the hole edge is rough, sand it lightly. Rough edges can “fuzz” cotton twine over time and make pulling harder.
4) Load the twine and thread it through
Drop the ball of twine inside through the access door. Find the twine end and feed it up to the bottle mouth. Then pull it through the hole in the cap and screw the cap back on.
Threading trick: If your fingers feel too big for this job (relatable), tape the twine end to a pencil or dowel, guide it up through the bottle mouth, and then through the cap hole.
5) Decorate it so it looks intentional (not accidental)
Now the fun part: making it “beautiful.” Wrap wide ribbon around the bottle so it covers the access door. Add a narrower ribbon on top as trim. Tie a bow in the back so you can untie it and reload laterno ripping off glued ribbon when you run out of twine.
Finish with a small flower, tag, or label on the front. If you want a cleaner look, skip the flower and add a simple label like “GARDEN TWINE” or “GIFT STRING.”
6) Test-pull (and fix tiny issues before they become daily annoyances)
Give the twine a few gentle pulls. If it snags, widen the cap hole slightly or smooth it more. If the ball inside won’t spin, your twine ball may be too large for that bottleswap to a bigger bottle or a smaller ball of string.
The Mini Engineering Behind the Hack
This dispenser works because it controls friction and direction:
- Direction: The twine exits from one point (the cap), so it can’t wrap around itself inside the container.
- Friction: A correctly sized cap hole adds just enough resistance to prevent the twine from “free-spooling” everywhere.
- Containment: The ball has room to rotate, but not enough freedom to flop around and tangle.
In other words: you’re not just crafting. You’re building a tiny string-management system. Try not to let it go to your head.
Upgrades That Make It Even Better
Add a “smooth-feed” liner
If you use rough jute or thicker garden twine, consider adding a small rubber grommet/bushing in the cap hole. It creates a smoother edge and helps prevent snagging and fraying.
Make it wall-mounted for shed organization
Want it in your garden shed? Mount the bottle so the opening faces down and the twine pulls straight. You can hang it using a simple fastener or clip system depending on your space. Wall-mounting keeps your potting bench clear and your twine always within reach.
Create a matching “set” (because organizing is addictive)
Make multiple dispensers for different strings: one for baker’s twine, one for jute, one for cotton cord, one for thin ribbon. Use different ribbon colors or labels so you can grab the right one instantly.
Where You’ll Actually Use This (A Lot)
- Gift wrapping: Tie tags, bundle tissue paper, wrap bakery boxes, and pretend you’re a boutique.
- Gardening: Stake tomatoes, tie up peas, bundle herbs, and keep twine from becoming a muddy mess.
- Kitchen tasks: If you use cooking twine, a clean dispenser keeps it tidy and ready.
- Craft room: Great for macramé cord (thin), beading thread spools, and general “string things.”
- Moving/organizing: Quick tie-ups for cables, rolled posters, or storage bins.
Common Mistakes (and How to Avoid Them)
Mistake: The hole is too big
If the cap hole is oversized, twine can slip back inside or unravel too fast. Start small. You can always widen itshrinking a hole is a lot harder unless you enjoy re-crafting things twice.
Mistake: Sharp edges on the door or cap
Plastic can leave sharp edges after cutting. Smooth the door edge and the cap hole edge with sandpaper or an emery board. Your fingersand your twinewill thank you.
Mistake: Decorations that block reloading
If you glue ribbon permanently over the access door, you’ll regret it later. Tie the ribbon so you can remove it. The goal is a dispenser you’ll reuse, not a decorative sculpture that becomes a one-twine wonder.
Mistake: Glue doesn’t stick to the bottle
Some plastics are stubborn. Clean the surface thoroughly and consider lightly scuffing the area where glue will go. For ribbon, you can also combine methods: a small dot of glue plus tight wrapping and tying for mechanical hold.
Safety Notes (Quick but Important)
- Cutting: Cut away from your body, go slowly, and stabilize the bottle so it doesn’t slip.
- Hot glue: Use a stand, keep your workspace clear, and avoid touching the nozzle or fresh glue. If you get glue on skin, cool it with cold water right away.
- Ventilation: If you use heated tools or strong adhesives, work in a well-ventilated area.
FAQ
Can I use a 2-liter bottle?
Yesespecially for larger twine balls. Bigger bottles can make the twine spin more freely, so you may need a smaller cap hole (or a bit more friction) to prevent free-spooling.
Can this work for ribbon?
Thin ribbon, yes. Wider ribbon can crease and snag unless the dispenser is large and the exit hole is smooth and wide enough. For ribbon spools, a jar-based dispenser or dowel-based holder can work better.
What’s the best string for this dispenser?
Garden twine and cotton string are the easiest. Very fuzzy twine may drag at the cap hole unless you smooth it well (or add a grommet).
Real-World Experiences and Lessons Learned (Extra 500+ Words)
Even though this is a simple DIY, the way you actually use it in real life is where the project gets interesting. People don’t just make one dispenser and stop. This craft has “I’ll just do one more” energylike potato chips, but with ribbon.
Experience #1: The gift-wrapping glow-up. If you’ve ever wrapped a present and had twine roll off the table like it’s trying to escape your generosity, you’ll appreciate the dispenser immediately. What usually happens is this: you pull twine, snip, tie, and the end stays right where you left itthreaded through the cap, ready for the next gift. The “hidden benefit” is speed. When you’re wrapping five gifts, that saved time feels huge. The bottle dispenser becomes the MVP of holiday chaos, and you suddenly start labeling things like “KRAFT TWINE” as if you run a shipping department.
Experience #2: Gardening twine that doesn’t turn into a dirt magnet. In a shed or garage, twine is famous for two things: tangling and getting grimy. A bottle dispenser keeps the ball contained, which means it stays cleaner longer. If you mount it near a potting bench, you can pull the exact amount you need with one hand while holding a plant with the other. The practical lesson here: don’t make the cap hole too large for garden twine. Outdoors, a little friction is your friendotherwise wind, bumps, and hurried tugging can make the twine unravel more than you intended. Many DIYers end up making a second “outdoor version” that’s less decorated and more rugged, because glitter and potting soil are not best friends.
Experience #3: The “my ribbon fell off” moment (and the fix). A common first attempt is decorating a clean bottle and assuming hot glue will hold everything forever. Sometimes it does. Sometimes it doesn’tespecially if the bottle surface is slick or dusty, or if the dispenser lives in a warm spot where glue softens slightly. The easy fix is to treat the decor like a removable sleeve: wrap and tie ribbon so it holds itself in place mechanically, and use glue only as a helper, not the sole support. Once people switch to “tie-first, glue-second,” the dispenser becomes far more durable. It also makes refilling painlessbecause you can untie the bow, open the door, drop in a new ball, and keep going.
Experience #4: The “I made five and now I’m organized” trap. This is the fun part: once you see how useful it is, you start imagining a whole system. A dispenser for baker’s twine, one for jute, one for cotton cord, one for thin ribbon, one for… something you bought at a craft store because it was on sale. The trick is to label them clearly and keep the hole size matched to what’s inside. If you’re mixing different string thicknesses, you’ll notice the dispenser behaves differently: thin twine can slide too easily, thick jute may snag, and waxed cord may pull like it’s on a mission. Matching the cap hole size (and smoothing it) turns the dispenser from “cute” into “I use this every week.”
Bottom line: the bottle dispenser is one of those projects that looks like a craftbut behaves like a tool. The more you treat it like a tool (right hole size, smooth edges, reload-friendly design), the more it earns its spot on your shelf.
Conclusion
A beautiful string dispenser from a soda bottle is the kind of DIY win we all deserve: cheap, fast, genuinely useful, and customizable enough to match your style. Whether you’re organizing a craft room, leveling up gift wrapping, or taming garden twine, this is a simple upcycle that pays you back every time you pull a neat, tangle-free length of string.