Table of Contents >> Show >> Hide
- Why These White Chocolate Ghost Cupcakes Are So Good
- Ingredients for White Chocolate Ghost Cupcakes
- How to Make White Chocolate Ghost Cupcakes
- How to Make White Chocolate Buttercream Frosting
- How to Pipe Ghost Cupcakes
- Tips for the Best White Chocolate Cupcakes
- Fun Variations for Halloween Ghost Cupcakes
- Make-Ahead and Storage Tips
- Kitchen Experience Notes: What Making White Chocolate Ghost Cupcakes Is Really Like
- Final Thoughts
Halloween desserts do not have to involve advanced sugar sculpture, a fog machine, or a mysterious amount of green food coloring. Sometimes the best spooky treat is a soft vanilla cupcake, a cloud of white chocolate frosting, and two tiny chocolate-chip eyes staring into the middle distance like they have seen things.
These white chocolate ghost cupcakes are sweet, fluffy, festive, and charmingly low-stress. The cupcakes have a tender vanilla-white chocolate crumb, while the frosting brings a creamy white chocolate flavor that feels more special than plain vanilla buttercream. The ghost design is simple enough for beginner bakers, but cute enough to make people assume you own several professional piping bags and possibly a tiny bakery empire.
This recipe makes 12 Halloween ghost cupcakes and includes everything you need: a homemade white chocolate cupcake base, smooth white chocolate buttercream, easy ghost decorating instructions, storage tips, troubleshooting help, and a few ways to make the batch your own.
Why These White Chocolate Ghost Cupcakes Are So Good
The secret to a memorable Halloween cupcake is contrast. A ghost should look snowy white and slightly dramatic, but the cake underneath should still deliver real flavor. That is why this recipe uses white chocolate in both the cupcake batter and the frosting.
White chocolate gives the cupcakes a mellow, creamy sweetness that works beautifully with vanilla. It does not taste like dark chocolate wearing a white costume. It has its own personality: buttery, milky, and lightly caramel-like when paired with a pinch of salt. The result is a cupcake that tastes festive without becoming a sugar avalanche.
The frosting is also sturdy enough for piping. You do not need to create perfect haunted-house architecture. A large round tip, or a piping bag with the end snipped off, makes the ghost shape easy. Pipe a fat base, build it upward, and gently pull away at the top. Suddenly, you have a ghost. It may be a little crooked. That is not a failure. That is character development.
These cupcakes are especially useful for Halloween parties, school events, bake sales, movie nights, costume contests, and those October afternoons when you realize that candy corn alone cannot carry the emotional weight of the season.
Ingredients for White Chocolate Ghost Cupcakes
For the White Chocolate Cupcakes
- 1 1/4 cups all-purpose flour
- 1 1/4 teaspoons baking powder
- 1/4 teaspoon fine salt
- 1/2 cup unsalted butter, softened
- 3/4 cup granulated sugar
- 2 large eggs, at room temperature
- 1 teaspoon vanilla extract
- 4 ounces good-quality white chocolate, melted and cooled slightly
- 1/2 cup whole milk, at room temperature
For the White Chocolate Buttercream Frosting
- 1 cup unsalted butter, softened
- 6 ounces white chocolate, melted and cooled until no longer warm
- 3 1/2 to 4 cups powdered sugar
- 2 tablespoons heavy cream or whole milk
- 1 teaspoon vanilla extract
- 1/4 teaspoon fine salt
For the Ghost Faces
- Mini semisweet chocolate chips, candy eyes, or black decorating gel
- Optional Halloween sprinkles for the cupcake base
- Optional crushed chocolate cookies for a spooky “graveyard dirt” effect
How to Make White Chocolate Ghost Cupcakes
Step 1: Prepare the Cupcake Pan
Heat the oven to 350°F. Line a 12-cup muffin pan with cupcake liners. Black, orange, purple, or striped liners work beautifully here, especially because they make the white ghost frosting stand out like it just floated in from a fancy haunted mansion.
Step 2: Mix the Dry Ingredients
In a medium bowl, whisk together the flour, baking powder, and salt. Whisking now helps distribute the baking powder evenly, which is useful because nobody wants one cupcake to rise like a volcano while another sits there looking emotionally unavailable.
Step 3: Cream the Butter and Sugar
In a large mixing bowl, beat the softened butter and granulated sugar until light and fluffy, about 2 to 3 minutes. This step adds air to the batter and gives the finished cupcakes a lighter texture.
Add the eggs one at a time, mixing after each addition. Stir in the vanilla extract.
Step 4: Add the White Chocolate
Melt the white chocolate gently in the microwave using short bursts, stirring between each round. Let it cool for a few minutes before adding it to the batter. White chocolate can scorch quickly, so treat it like a dramatic celebrity: give it gentle attention, do not overheat it, and never rush it onto a hot stage.
Mix the cooled melted white chocolate into the butter mixture until smooth.
Step 5: Finish the Batter
Add half of the flour mixture and mix on low speed just until combined. Pour in the milk, then add the remaining flour mixture. Mix only until the batter is smooth and no dry streaks remain.
Do not overmix. Cupcake batter is not a grudge; it does not need to be worked out endlessly.
Step 6: Bake the Cupcakes
Divide the batter among the cupcake liners, filling each about two-thirds full. Bake for 17 to 20 minutes, or until a toothpick inserted into the center comes out clean or with a few moist crumbs.
Let the cupcakes cool in the pan for about 5 minutes, then transfer them to a wire rack. Cool completely before frosting. Warm cupcakes and buttercream have a complicated relationship, and it usually ends with frosting sliding sideways.
How to Make White Chocolate Buttercream Frosting
While the cupcakes cool, make the frosting. In a large bowl, beat the softened butter until creamy and smooth. Add the cooled melted white chocolate and beat again until fully blended.
Gradually add 3 1/2 cups powdered sugar, mixing on low speed at first so your kitchen does not suddenly resemble a powdered-sugar snowstorm. Add the cream, vanilla, and salt. Beat on medium-high speed for 2 to 3 minutes until the frosting is light and fluffy.
If the frosting feels too soft for piping, add more powdered sugar, one tablespoon at a time. If it feels too stiff, add a small splash of cream or milk. The ideal texture should hold a tall swirl without feeling dry or grainy.
For the cleanest ghost shapes, refrigerate the frosting for 10 to 15 minutes if your kitchen is warm. This brief chill makes piping easier without turning the buttercream into an edible brick.
How to Pipe Ghost Cupcakes
Fit a piping bag with a large round decorating tip. A large open round tip works best, but you can also cut a wide opening in a sturdy piping bag or zip-top bag.
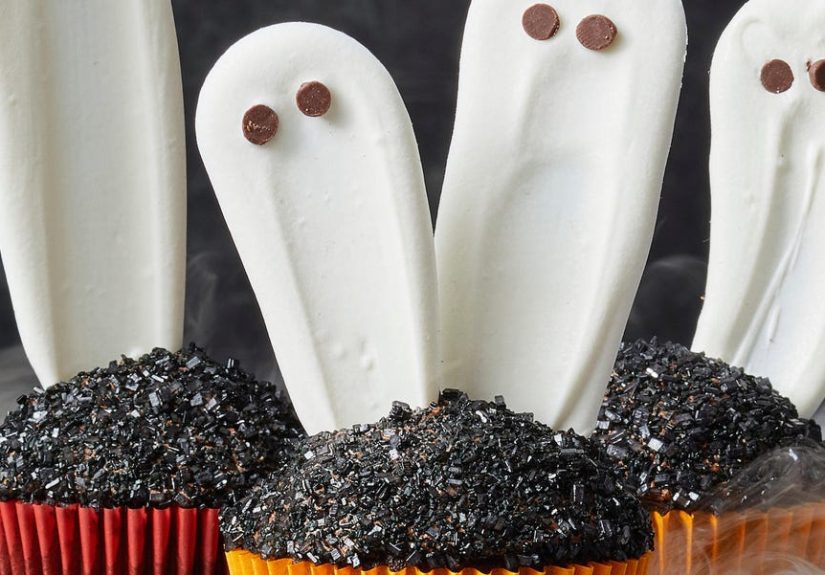
Start in the center of a cooled cupcake. Pipe a thick round mound of frosting to form the ghost’s body. Continue piping upward in a spiral, making each layer slightly smaller than the one beneath it. Finish by lifting the piping bag straight up and then releasing pressure to create a small ghostly peak.
Add two mini chocolate chips for eyes. Place them point-side down for a flatter look, or turn them sideways for a more dramatic haunted expression. Add a third chip for a surprised “O” mouth if you want your ghost to look like it just discovered the price of Halloween candy.
For extra visual contrast, sprinkle crushed chocolate cookies around the bottom edge of the ghost. The effect looks like the ghost is rising from a tiny cupcake graveyard, which is much cuter than it sounds.
Tips for the Best White Chocolate Cupcakes
Use Real White Chocolate When Possible
For the richest flavor, use white chocolate bars or baking chocolate that contains cocoa butter. Candy melts are excellent for decorations and quick coatings, but real white chocolate usually creates a fuller, creamier flavor in the batter and frosting.
Cool Melted White Chocolate Before Mixing
White chocolate should be melted and smooth, but not hot. If it is too warm when it hits the butter and egg mixture, it can make the batter greasy or uneven. Let it sit for a few minutes until it is warm but comfortable to touch.
Measure Flour Carefully
Too much flour is one of the fastest ways to turn a soft cupcake into a dry little sponge with trust issues. Spoon flour into the measuring cup and level it off, or use a kitchen scale for the most accurate results.
Keep the Frosting Simple
White chocolate frosting already brings sweetness, richness, and creaminess. A pinch of salt and a little vanilla make the flavor rounder without competing with the white chocolate.
Make Imperfect Ghosts on Purpose
Halloween is wonderfully forgiving. A ghost with a tilted head, chunky frosting, or tiny lopsided eyes does not look badly decorated. It looks haunted. Lean into it.
Fun Variations for Halloween Ghost Cupcakes
Chocolate Ghost Cupcakes
Use your favorite chocolate cupcake recipe underneath the white chocolate frosting. Dark chocolate cake creates a dramatic black-and-white Halloween dessert that looks especially striking on a party table.
Cookies-and-Cream Ghost Cupcakes
Fold crushed chocolate sandwich cookies into the cupcake batter or sprinkle them over the frosting before adding the ghost. The cookie crumbs give the dessert a fun graveyard look while adding a little crunch.
Pumpkin Spice Ghost Cupcakes
Add 1 teaspoon pumpkin pie spice to the cupcake batter and use the same white chocolate ghost frosting. The warm spices and creamy topping turn these into a Halloween dessert with serious fall energy.
Ghost Cupcakes for Kids
Let children add the eyes and mouths themselves. Set out mini chocolate chips, candy eyes, black gel icing, and Halloween sprinkles. You may get one elegant ghost, one ghost with seventeen eyes, and one ghost wearing a sprinkle mustache. All outcomes are correct.
Make-Ahead and Storage Tips
The unfrosted cupcakes can be baked one day ahead. Store them in an airtight container at room temperature once fully cooled. Frost them the day of serving for the freshest look.
You can also make the buttercream a day ahead and refrigerate it in a covered container. Before using, let it soften at room temperature and beat it briefly until smooth and fluffy again.
Once frosted, store the cupcakes in a covered container in the refrigerator if your kitchen is warm or if you are not serving them within a few hours. Let them sit at room temperature for about 20 minutes before serving so the frosting softens slightly and the white chocolate flavor comes through more clearly.
Kitchen Experience Notes: What Making White Chocolate Ghost Cupcakes Is Really Like
There is a special moment when making ghost cupcakes where the kitchen stops feeling like a regular kitchen and starts feeling like a tiny Halloween workshop. It usually happens after the cupcakes cool and the frosting is ready. You have your piping bag, your chocolate chips, and a suspicious amount of confidence. Then you pipe the first ghost.
The first ghost is often not glamorous. It may resemble a soft-serve ice cream cone that has recently heard bad news. Its eyes may be too far apart. Its frosting peak may lean left as if it is trying to escape the cupcake. This is normal. In fact, it is part of the fun. By the third or fourth cupcake, the ghost shapes begin to look intentional. By the tenth, you may become dangerously convinced you are ready for a televised baking competition.
White chocolate is the ingredient that makes these cupcakes feel more memorable than a standard vanilla Halloween dessert. It brings a smooth, buttery flavor that feels cozy rather than aggressively sweet. When the white chocolate melts properly, it blends into the frosting with a soft richness that makes people pause after the first bite. They may not immediately identify what changed, but they will know the cupcakes are better than expected.
These cupcakes also have a useful social advantage: they look impressive without requiring complicated decorating skills. A tray of ghost cupcakes gets attention at a party because each one has a tiny face. People naturally start choosing favorites. Someone will pick the ghost with the tallest head. Someone else will choose the one that looks confused. At least one person will claim the weirdest ghost is the cutest, which is a beautiful reminder that Halloween desserts are not about perfection.
For family baking, this recipe works especially well because the steps can be shared. One person can measure ingredients, another can stir the batter, and younger helpers can add the chocolate-chip faces. The decorating stage is where the personality shows up. Some ghosts become cheerful. Some become dramatic. Some look like they have just opened an email from their landlord.
There is also something practical about choosing cupcakes for a Halloween gathering. They are easier to serve than a large cake, easier to carry than frosted cookies, and easier to decorate than elaborate haunted-house desserts. Each cupcake is its own little dessert moment. No cutting, no plates covered in frosting rubble, no awkward argument over who got the corner piece.
The best approach is to embrace the small imperfections. Pipe the ghosts tall, squat, wobbly, or slightly sideways. Give some a tiny mouth and some a shocked expression. Add cookie crumbs for graveyard dirt, orange sprinkles for color, or candy eyes for extra silliness. The finished tray will look more charming when the ghosts are not all identical.
That is the real experience of making white chocolate ghost cupcakes: a simple baking project that becomes a little more fun the messier, stranger, and more personal it gets. They are soft, sweet, spooky, and almost impossible to take too seriously. Which, honestly, is exactly what Halloween dessert should be.
Final Thoughts
These white chocolate ghost cupcakes prove that a Halloween dessert can be both playful and genuinely delicious. The tender white chocolate cupcakes offer a rich, vanilla-forward base, while the white chocolate buttercream turns each little ghost into a creamy, festive treat worth haunting the dessert table for.
Make them for a Halloween party, a classroom celebration, a spooky movie marathon, or a quiet October night when you want dessert with a little personality. The ghosts do not need to be perfect. They just need eyes, frosting, and enough charm to disappear before midnight.
Note: This recipe is an original, publication-ready synthesis of established U.S. baking and Halloween cupcake techniques, rewritten in fresh language for web use. White chocolate handling, piping methods, frosting structure, and Halloween decorating approaches were cross-checked against reputable baking and food publishers.