Table of Contents >> Show >> Hide
- What Are Napkin Decoupage Easter Eggs?
- Fresh Eggs, Hard-Boiled Eggs, or Blown-Out Eggs: Which Should You Use?
- Materials You Need for Napkin Easter Eggs
- Food Safety First: Can You Eat Napkin-Decorated Easter Eggs?
- How to Prepare Fresh Eggs for Napkin Decoupage
- Step-by-Step Guide: How to Transform Fresh Eggs with Napkins
- Design Ideas for Napkin Easter Eggs
- Common Mistakes and How to Fix Them
- How to Display Napkin Decoupage Easter Eggs
- Why This Easter Craft Works So Well
- Creative Experience: What It Feels Like to Make Napkin Easter Eggs
- Conclusion
Easter egg decorating has come a long way from dropping eggs into cups of neon dye and hoping the “blue” one does not come out looking like a tired gray potato. If you want Easter eggs that look charming, elegant, handmade, and just fancy enough to make your brunch table whisper, “Oh, we planned this,” napkin decoupage is your new best friend.
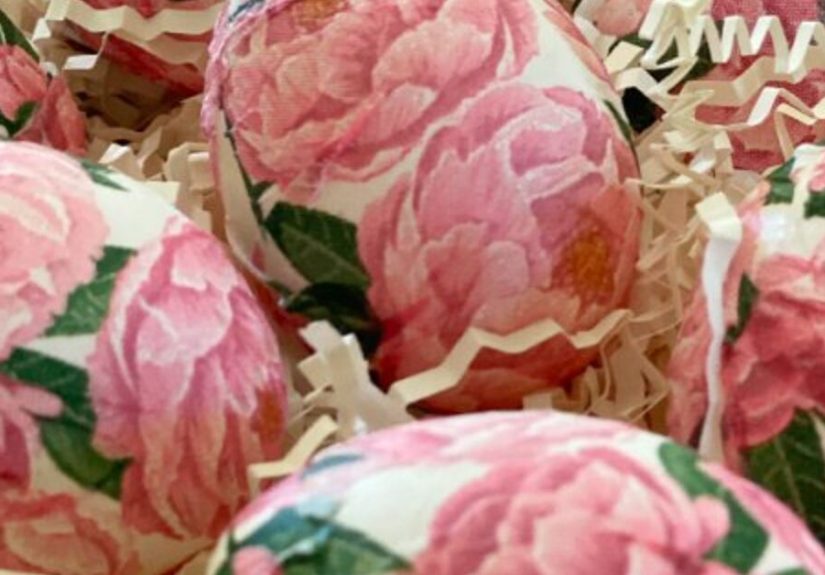
This easy Easter craft uses printed paper napkins to transform fresh eggs, hard-boiled eggs, blown-out eggs, or decorative egg forms into miniature works of art. Floral patterns, vintage birds, gingham, lemons, bunnies, chinoiserie prints, botanical illustrations, and even simple polka dots can turn a plain white egg into something that looks hand-paintedwithout requiring actual painting skills. Your secret? A napkin, a brush, and a little patience. Basically, Easter magic with office-supply energy.
In this guide, you will learn how to decorate Easter eggs with napkins, what materials to use, how to keep the project safe if you are working with real eggs, and how to avoid the classic decoupage disasters: wrinkles, soggy paper, sticky fingers, and eggs that look like they lost a fight with wallpaper.
What Are Napkin Decoupage Easter Eggs?
Napkin decoupage Easter eggs are eggs decorated with the printed top layer of paper napkins. The napkin is cut or torn into small pieces, then attached to the egg with a thin layer of adhesive such as decoupage medium, craft glue, or another suitable binder. Once dry, the egg looks patterned, painted, or illustrated.
The beauty of this Easter egg decorating idea is that the napkin does most of the artistic heavy lifting. If you can tear paper and gently smooth it onto an egg, you can make something beautiful. This makes the craft perfect for adults, kids, family gatherings, Easter brunch prep, spring tablescapes, and anyone who owns more pretty napkins than they reasonably need.
Fresh Eggs, Hard-Boiled Eggs, or Blown-Out Eggs: Which Should You Use?
Before you start cutting napkins like a cheerful craft goblin, decide what kind of egg you want to decorate. Each option has advantages.
Fresh Eggs
Fresh eggs look classic and natural, but they are fragile and must be handled carefully. If you decorate raw eggs, they should be treated as decorative only unless you are using food-safe materials and proper food handling. Raw eggs can crack easily, and cracked shells may create food-safety concerns.
Hard-Boiled Eggs
Hard-boiled eggs are sturdy, easy to handle, and great for kids. However, if you plan to eat them, you should only use food-safe dyes or decorations. Standard craft glue, Mod Podge, glitter, acrylic paint, and most decorative adhesives are not meant for edible eggs. If craft materials touch the shell, treat the eggs as decorations only.
Blown-Out Eggs
Blown-out eggs are real eggshells with the inside removed. They feel authentic but can last longer than boiled eggs. They are delicate, so this option is better for adults or older kids with careful hands. Once dry and decorated, blown-out eggs can be saved for future Easters.
Faux Eggs
Foam, wooden, paper mâché, ceramic, or plastic eggs are the easiest choice if you want decorations that last for years. They are also the safest option for full decoupage with craft glue. If your goal is a beautiful Easter centerpiece, faux eggs are wonderfully low-drama. No refrigeration. No cracking. No mysterious egg smell two weeks later.
Materials You Need for Napkin Easter Eggs
One reason this DIY Easter egg craft is so popular is that it does not require expensive supplies. You may already have most of them at home.
- Fresh, hard-boiled, blown-out, or faux eggs
- Decorative paper napkins with printed designs
- Small scissors
- Decoupage medium, craft glue, or a food-safe alternative depending on your purpose
- Small paintbrush or foam brush
- Wax paper, parchment paper, or a drying rack
- Paper towels for cleanup
- Optional: tweezers for tiny designs
- Optional: skewers or toothpicks to hold lightweight faux eggs while drying
Choose napkins with a white or light background if you want the design to blend seamlessly into white eggs. Bold napkins also work beautifully, but darker backgrounds may show edges more clearly. Floral napkins are the easiest for beginners because petals, leaves, and vines are forgiving. If one rose lands slightly crooked, congratulationsyou have created “organic movement.”
Food Safety First: Can You Eat Napkin-Decorated Easter Eggs?
Here is the most important rule: if you use regular craft glue, decoupage medium, paint, glitter, varnish, or non-food-safe materials, do not eat the eggs. They are decorations, not snacks. They may look deliciously charming, but Easter décor is not an appetizer.
If you want edible Easter eggs, use only food-grade dye and food-safe decorations. Keep eggs refrigerated as much as possible, avoid cracked eggs, and do not leave cooked eggs at room temperature for more than two hours. For egg hunts, especially outdoors, it is usually smarter to use plastic eggs and save decorated real eggs for the table display.
A practical solution is to make two batches: one batch of hard-boiled eggs for eating, decorated only with food-safe materials, and another batch of napkin decoupage eggs purely for display. This keeps your Easter table pretty and your guests safely away from the “Is this glue-flavored?” conversation.
How to Prepare Fresh Eggs for Napkin Decoupage
If you are using fresh eggs for decoration, start by washing your hands and cleaning your workspace. Choose eggs with smooth, uncracked shells. White eggs show napkin designs most clearly, while brown eggs create a warmer, rustic look.
If you plan to blow out the eggs, gently poke a small hole at the top and bottom of each egg, then blow the contents into a bowl. Rinse the empty shell carefully and allow it to dry completely. A dry shell helps the napkin adhere more smoothly. If moisture remains inside, the egg may become unpleasant later, and nobody wants their Easter centerpiece to develop a personality.
For hard-boiled eggs, let them cool fully before decorating. Warm eggs can make thin napkin paper soften too quickly, which increases wrinkles and tearing.
Step-by-Step Guide: How to Transform Fresh Eggs with Napkins
Step 1: Separate the Napkin Layers
Most decorative napkins have two or three layers. You only need the top printed layer. Peel it away carefully. This thin layer blends beautifully into the egg surface and gives the finished design a soft, painted effect.
Step 2: Cut or Tear the Designs
You can cut out specific flowers, birds, leaves, rabbits, or shapes with small scissors. For a softer look, tear around the design instead of cutting. Torn edges usually disappear better once glued down. Cut edges can look sharper, which is great for graphic patterns but less natural for florals.
Step 3: Apply a Thin Layer of Adhesive
Brush a very thin layer of decoupage medium or craft glue onto a small section of the egg. Do not coat the whole egg at once. Eggs are round, paper is delicate, and gravity is not always your friend.
Step 4: Place the Napkin Piece
Lay the napkin design gently onto the adhesive. Start in the center of the piece and smooth outward with your brush. Avoid pressing too hard because wet napkin paper tears easily. Think of it as smoothing a butterfly wing, not scrubbing a casserole dish.
Step 5: Seal the Design
Brush another thin layer of adhesive over the top of the napkin. Use light strokes. The goal is to seal the paper, not drown it. Too much adhesive can cause bubbling, wrinkles, and a glossy mess.
Step 6: Repeat Around the Egg
Continue adding small napkin pieces until you like the look. You can cover the entire egg or leave white space between designs. Partial coverage often looks elegant, especially with floral or botanical napkins.
Step 7: Let the Eggs Dry Completely
Place the eggs on wax paper, parchment, or a drying rack. Turn them occasionally so they do not stick. Once dry, you can add a second sealing coat if the eggs are for decoration only. For display eggs, a matte finish often looks more refined, while a glossy finish adds shine.
Design Ideas for Napkin Easter Eggs
The pattern you choose determines the personality of your Easter eggs. A floral napkin says “spring garden party.” A blue-and-white chinoiserie print says “I own linen napkins and know what a charger plate is.” A bunny print says “children live here, or at least whimsy does.”
Vintage Floral Eggs
Use roses, peonies, wildflowers, or botanical napkins. Apply individual blossoms around the egg with small leaves in between. These look beautiful in a basket with moss, linen ribbon, or shredded kraft paper.
Blue and White Chinoiserie Eggs
Choose napkins with porcelain-inspired patterns. Place larger motifs on one side and smaller fragments around the rest of the egg. These eggs pair beautifully with white dishes, blue glassware, and spring greenery.
Farmhouse Easter Eggs
Use gingham, toile, soft stripes, or tiny florals. Stick with neutral colors, sage green, cream, pale yellow, and dusty blue. Display them in a wooden bowl or egg carton for a relaxed country look.
Kids’ Storybook Eggs
Pick napkins with rabbits, chicks, carrots, rainbows, or butterflies. Let kids choose their designs and apply larger pieces. The eggs may not be perfectly smooth, but they will be full of personalityand possibly one mysterious thumbprint.
Common Mistakes and How to Fix Them
The Napkin Wrinkles Too Much
Use smaller pieces. Large pieces do not wrap smoothly around a curved egg. If wrinkles appear, gently tap them down with a damp brush. Do not keep brushing aggressively or the paper may tear.
The Paper Tears
You may be using too much glue or too much pressure. Let the area dry, then patch it with another small napkin piece. Decoupage is forgiving; that is one of its greatest charms.
The Design Looks Patchy
Choose napkins with a white background for a seamless look. If using colorful backgrounds, overlap pieces intentionally so the patchwork feels planned.
The Egg Sticks While Drying
Rest the egg on wax paper and rotate it after several minutes. For faux eggs, insert a skewer into the bottom and stand it in foam while drying.
How to Display Napkin Decoupage Easter Eggs
Once your eggs are dry, the fun continues. Place them in a ceramic bowl, tuck them into Easter baskets, scatter them along a table runner, or use them as place cards. For place settings, write each guest’s name on a small tag and tie it around the egg with thin ribbon.
You can also create a spring centerpiece by arranging napkin-decorated eggs with moss, tulips, daffodils, faux nests, and candles. Keep real candles away from paper-decorated eggs, of course. Easter should smell like brunch, not toasted napkin.
For a more polished look, repeat one color palette throughout your eggs. For example, use only blue-and-white napkins, only pastel florals, or only green botanical prints. A cohesive palette makes even beginner eggs look intentional.
Why This Easter Craft Works So Well
Napkin decoupage is affordable, beginner-friendly, and surprisingly elegant. It gives you the look of hand-painted Easter eggs without requiring fine art training or a tiny brush collection. It is also a great way to reuse leftover party napkins, especially those pretty ones you bought because they were “too cute” and then protected like museum artifacts.
This craft is also flexible. You can make it simple for kids or sophisticated for adult spring decorating. You can finish a few eggs in under an hour or spend an afternoon creating a full Easter display. Best of all, no two eggs look exactly alike. Each one has its own pattern, texture, and little handmade quirks.
Creative Experience: What It Feels Like to Make Napkin Easter Eggs
The first time you decorate fresh eggs with napkins, the process may feel almost too simple. You look at a plain egg, a paper napkin, and a brush and think, “Surely there is a missing step involving special equipment or a person named Linda who teaches workshops.” But nothe magic really does happen with basic supplies.
One of the best experiences is choosing the napkins. This is where the project starts to feel personal. You might pick soft pink florals because they remind you of your grandmother’s spring table. You might choose lemon prints because your Easter brunch has a bright, sunny theme. You might grab a pack of bunny napkins because a child in the house has declared rabbits to be the official management team of Easter. The design choice sets the mood before the first egg is touched.
Working with the napkin layer is a lesson in slowing down. The printed layer is thin and delicate, so you cannot rush. At first, your fingers may feel clumsy. A petal folds over. A leaf sticks to the brush. A tiny piece of paper lands on your sleeve and follows you around like confetti with commitment issues. But after a few minutes, you find the rhythm: brush, place, smooth, seal, breathe. The egg slowly changes from ordinary to charming.
The most satisfying moment comes when the napkin dries and the edges seem to disappear into the shell. A flower that looked like a scrap of paper suddenly looks painted on. A bird motif curves around the egg as if it was meant to live there. Even wrinkles can look beautiful, adding texture and a handmade softness that store-bought decorations rarely have.
This is also a wonderful group craft. Kids enjoy choosing patterns and sticking pieces onto eggs, while adults can focus on more detailed designs. Everyone can work at their own level. One person may create a careful botanical egg with perfectly placed leaves. Another may cover the entire egg in mismatched butterflies and proudly call it “spring chaos.” Both belong on the table.
If you are decorating before Easter brunch, make the eggs a day ahead. This gives them time to dry fully and saves you from trying to arrange centerpieces while also checking the oven, pouring juice, hiding baskets, and wondering why one shoe has disappeared. Finished napkin eggs look lovely in a bowl near the entryway, on a mantel, or at each place setting.
The experience is not just about making Easter decorations. It is about turning a humble egg into something joyful with your own hands. It is quiet, creative, affordable, and just messy enough to feel fun. In a holiday season often filled with candy, cooking, and busy schedules, this little craft offers a peaceful pause. You sit down, tear paper flowers, brush them onto eggs, and watch spring appear one tiny design at a time.
Conclusion
Transforming fresh eggs with napkins is one of the easiest ways to make Easter feel more personal, creative, and beautiful. With a few patterned napkins and a gentle decoupage technique, plain eggs can become elegant decorations for baskets, brunch tables, mantels, and spring centerpieces.
Just remember the golden rule: decide early whether your eggs are for eating or decorating. If they are edible, use food-safe materials and follow safe egg handling practices. If they are decorative, feel free to explore craft glue, faux eggs, varnish, and all the pretty napkins your heart can justify buying.
Whether you love vintage florals, farmhouse patterns, cheerful bunnies, or blue-and-white designs, napkin Easter eggs are proof that creativity does not need to be complicated. Sometimes, all it takes is a fresh egg, a pretty napkin, and the willingness to get a little glue on your fingers.
Note: If using real eggs with non-food-safe craft supplies, treat the finished eggs as decorations only and do not eat them.