Table of Contents >> Show >> Hide
- Why Boot a Mac from a USB Drive?
- What You Need Before You Start
- Bootable Installer vs. External Startup Disk
- How to Boot Your Mac from a USB Installer Once
- How to Set the USB Drive as the Startup Disk
- How to Create a Bootable macOS USB Installer
- How to Boot from a Full External macOS Drive
- Troubleshooting: When the USB Drive Will Not Boot
- Best Practices for a Smoother Boot Experience
- Real-World Experiences and Lessons Learned
- Conclusion
Booting a Mac from a USB drive sounds like the sort of thing only IT wizards do while sipping coffee over a glowing terminal window. In reality, it is much more approachable. Whether you want to reinstall macOS, troubleshoot a stubborn startup problem, test a second system, or keep an emergency installer on standby like a digital first-aid kit, a bootable USB drive can save the day.
The trick is knowing which kind of USB setup you are using. Some people mean a bootable macOS installer, which starts your Mac so you can install or repair macOS. Others mean a fully installed external startup disk, which runs macOS directly from the USB or external SSD. Both are valid. Both are useful. And yes, both can make you feel like the most competent person in the room.
This guide walks through both approaches in plain American English, with clear steps for Apple silicon Macs and Intel Macs. It also covers the quirks that trip people up, such as T2 security settings, the difference between APFS and Mac OS Extended, and why some cheap flash drives behave like they were raised by chaos. If you want to boot your Mac from a USB drive without turning the afternoon into a tech support drama, you are in the right place.

Why Boot a Mac from a USB Drive?
There are several practical reasons to start your Mac from a USB drive instead of the internal disk. The most common one is installing or reinstalling macOS when the built-in system is damaged, stuck, or just feeling dramatic. A bootable USB installer also helps when internet recovery is slow, unreliable, or unavailable.
Another smart use is testing a different version of macOS on an external drive without touching your main setup. That can be useful for developers, cautious upgraders, or anyone who wants to try a newer release without risking the files on their everyday system. Some people also keep a USB installer in a drawer for emergencies, which is honestly one of the more responsible things a computer owner can do.
In short, a USB startup option gives you flexibility, recovery tools, and a backup plan. And in tech, backup plans are the closest thing we have to wisdom.
What You Need Before You Start
1. A compatible USB drive or external SSD
For a modern macOS installer, a drive with at least 16GB is usually enough, though 32GB gives you more breathing room and matches many current recommendations. A simple USB flash drive can work, but an external SSD is usually faster, more reliable, and far less likely to make you question your life choices halfway through installation.
2. A recent backup
Creating a bootable installer erases the USB drive. Installing macOS can involve choosing disks and volumes, which means one careless click can target the wrong drive. Back up your Mac first with Time Machine or another trusted method. Future you will be grateful, and present you will sleep better.
3. The full macOS installer, if you are creating a bootable USB
If your goal is a bootable installer, download the full macOS installer from Apple. Do not grab a random file from the internet just because it looks confident. Confidence is not compatibility.
4. Know your Mac type
The startup method depends on whether your Mac uses Apple silicon or an Intel processor. Apple silicon Macs use the power button to load startup options. Intel Macs usually use the Option key during startup. If you have an Intel Mac with a T2 Security Chip, you may also need to allow startup from external media in Recovery.
Bootable Installer vs. External Startup Disk
This distinction matters more than people expect.
A bootable installer is a USB drive that launches the macOS installer environment. You use it to install, reinstall, or repair macOS. Think of it as a rescue vehicle.
An external startup disk is a USB or SSD with macOS fully installed on it. When you boot from it, your Mac runs that external copy of macOS like a normal system. Think of it as a second home for your Mac.
If you only need to reinstall macOS or fix a broken startup disk, create a bootable installer. If you want to run macOS from the USB itself, install macOS onto the external drive and choose it as your startup disk.
How to Boot Your Mac from a USB Installer Once
On a Mac with Apple silicon
- Shut down your Mac completely.
- Connect the bootable USB installer directly to the Mac.
- Press and hold the power button.
- Keep holding until you see Loading startup options.
- Select the USB installer from the available bootable volumes.
- Click Continue.
- When the installer opens, follow the on-screen prompts.
This is the clean, official path for Apple silicon Macs. If your USB does not appear, do not panic yet. That usually means the drive is not truly bootable, is connected through an unhelpful hub, or needs to be recreated.

On an Intel Mac
- Shut down your Mac.
- Connect the bootable USB installer directly to the Mac.
- Press the power button, then immediately hold the Option key.
- Release the key when you see the Startup Manager screen.
- Select the USB installer.
- Click the on-screen arrow or press Return.
- Choose your language if prompted, then continue with the installer.

If your Intel Mac has a T2 Security Chip
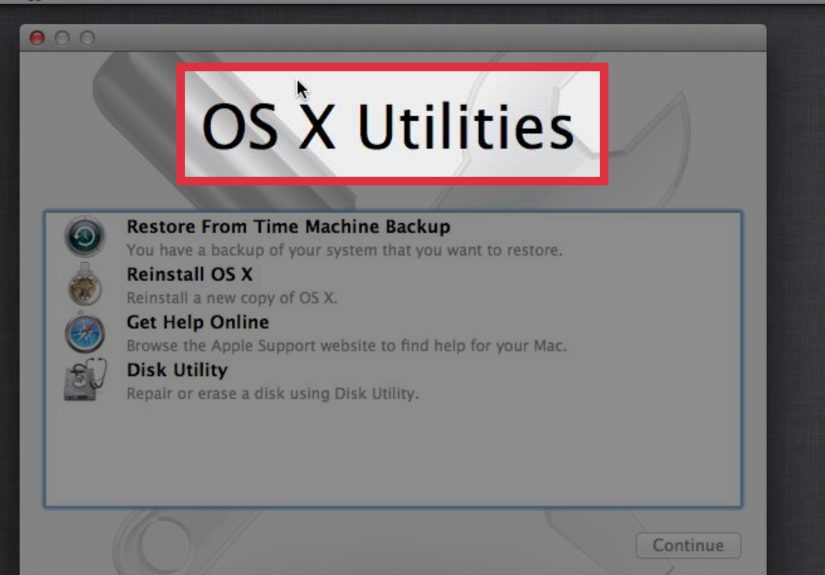
Some Intel Macs with the T2 chip block booting from external or removable media by default. If your USB installer refuses to appear or boot, start your Mac in macOS Recovery by pressing Command-R at startup. Then open Utilities > Startup Security Utility, authenticate with an administrator account, and allow booting from external media.
This extra layer exists for security, which is sensible, but it can be confusing if you are expecting the USB to work instantly. In other words, your Mac is not broken. It is just suspicious.
How to Set the USB Drive as the Startup Disk
If you want the Mac to keep booting from the external drive instead of choosing it manually every time, set it as the startup disk in macOS.
- Boot into any working macOS system.
- Open System Settings > General > Startup Disk or the older System Preferences > Startup Disk interface.
- Select the external USB or SSD.
- Click Restart.
This works best when the USB drive is a full external startup disk with macOS installed on it, not just a bare installer. If you unplug that external drive later, your Mac will usually fall back to the internal disk or ask you to choose another startup volume.
How to Create a Bootable macOS USB Installer
If you do not already have a bootable USB drive, here is how to create one. This is the part where many tutorials suddenly become allergic to clarity. Let us fix that.
Step 1: Download the full macOS installer
Get the full installer for the version of macOS you want from Apple. It should land in the Applications folder with a name like Install macOS Sequoia, Install macOS Sonoma, or similar.
Step 2: Erase and prepare the USB drive
Open Disk Utility. Select the external device itself, not just the volume underneath it. Erase it and use:
- Format: Mac OS Extended (Journaled) for creating a bootable installer
- Scheme: GUID Partition Map
For a full external startup disk that will run modern macOS, APFS is generally the better format, especially on SSDs. This is where people get mixed up: the formatting advice can differ depending on whether you are making an installer or installing a full copy of macOS to the external drive.

Step 3: Run Apple’s createinstallmedia command
Open Terminal and use the command that matches your macOS version. For example, for macOS Sequoia:
Replace MyVolume with the actual name of your USB drive. Press Return, enter your administrator password, type Y when asked to confirm erasing the drive, and wait for the process to complete.
When Terminal says the install media is ready, your bootable USB installer is done. You can now shut down the Mac, connect the drive, and boot from it using the Apple silicon or Intel steps above.
How to Boot from a Full External macOS Drive
If your goal is not just an installer, but a fully usable external macOS system, you will need to install macOS onto the USB or external SSD itself.
- Connect the external drive to your Mac.
- Use Disk Utility to erase it with APFS and GUID Partition Map.
- Run the macOS installer from your current system.
- When asked where to install, choose the external drive. You may need to click Show All Disks.
- Finish the installation.
- Afterward, choose that external drive in Startup Disk settings or from Startup Options during boot.
One important note: a macOS installation on an external drive is often specific to the Mac model it was created on. That means you should not expect it to boot every other Mac in the building just because the USB cable fits.
Troubleshooting: When the USB Drive Will Not Boot
The USB drive does not appear in Startup Options
First, confirm the drive is actually bootable. A USB with an installer file copied onto it is not the same as a USB made with createinstallmedia. Connect it directly to the Mac, not through a flaky hub or adapter chain that looks like a science project.
The Mac sees the drive but will not boot from it
On Intel Macs with the T2 chip, check Startup Security Utility. On Apple silicon Macs, make sure you are using a valid Apple-signed installer or a correctly installed external macOS system. If needed, recreate the installer from scratch.
The installation is painfully slow
That can be normal on a basic flash drive, but it is far less normal on a decent SSD. If speed matters, use an external SSD instead of a bargain-bin thumb drive that tops out at the velocity of regret.
You formatted the drive incorrectly
For a bootable installer, erase the USB and try again using Mac OS Extended (Journaled) and GUID Partition Map. For a full external startup disk running modern macOS, use APFS.
The Mac still refuses to cooperate
Try recreating the installer, using a different USB port, restarting the Mac fully, and redownloading the macOS installer. Also make sure your Mac is connected to the internet during installation, because firmware and model-specific information may still be needed.

Best Practices for a Smoother Boot Experience
Use a quality drive. Label it clearly. Keep one installer for emergencies and another external SSD for testing if you work with multiple macOS versions. If you are using Apple silicon and installing macOS onto an external drive, plug the drive into a compatible port directly during setup. And whenever you are in Disk Utility, read the disk names twice before erasing anything. The delete button has never once said, “Are you absolutely, positively, emotionally certain?”
Real-World Experiences and Lessons Learned
In real-world use, booting a Mac from a USB drive is one of those tasks that looks intimidating until you have done it once. After that, it feels less like advanced wizardry and more like a practical life skill for Mac owners. The biggest lesson most people learn is that preparation matters more than speed. The users who have a smooth experience are usually the ones who downloaded the correct installer, used a decent drive, and took two minutes to verify whether their Mac was Apple silicon or Intel before touching a single key.
A common experience happens when someone tries to rescue an older Intel Mac that suddenly refuses to start normally. They create a bootable USB, hold the Option key, and expect instant victory. Instead, the screen shows nothing useful, and panic begins auditioning for the lead role. In many of these cases, the issue is not the Mac at all. It is usually an incorrectly prepared USB drive, a bad adapter, or a T2 security setting blocking external boot media. Once that setting is adjusted and the installer is rebuilt correctly, the same Mac often boots just fine. It is a good reminder that computers love precision and hate assumptions.
Apple silicon Macs create a different kind of experience. People used to Intel Macs often keep jabbing the Option key like it owes them money, then wonder why nothing happens. On Apple silicon, the startup flow changed, and the power button is now the star of the show. Once users learn to hold the power button until Startup Options appears, the process becomes much more intuitive. In fact, many people end up preferring it because the visual interface feels cleaner and more obvious than the old startup dance.
Another real-life lesson is that not all USB drives are equally good citizens. On paper, a cheap flash drive may be enough. In practice, some of them are slow, inconsistent, or oddly unreliable during large macOS installs. That is why experienced users often move to an external SSD. The difference is noticeable: quicker creation time, faster booting, and fewer mysterious stalls that make you stare at the screen as if intense eye contact will help. If the USB drive is something you plan to keep for emergencies, buying better hardware is usually worth it.
There is also a valuable experience in using an external startup disk for testing. Instead of risking a daily-use Mac with a big system change, many users install macOS on an external SSD and boot from that drive to explore a new version. It is a cleaner, safer way to experiment. If the test goes badly, they disconnect the drive, reboot from the internal disk, and move on with their day. That kind of flexibility is exactly why learning this process is useful. It is not just about fixing disasters. It is also about giving yourself options before disaster ever shows up.
Conclusion
Booting your Mac from a USB drive is one of the most useful troubleshooting and maintenance skills you can learn. The exact startup method depends on whether you are using Apple silicon or Intel, and older Intel Macs with the T2 chip may require a security adjustment before external booting works. Once you understand those differences, the process becomes straightforward: prepare the drive correctly, use the right startup method, and choose the USB volume when your Mac presents the boot menu.
Whether you are creating a recovery installer, running macOS from an external SSD, or keeping a just-in-case tool ready for the day your Mac decides to get theatrical, a properly prepared USB drive gives you control. And when tech starts acting weird, control is a beautiful thing.