Table of Contents >> Show >> Hide
- Why This Idea Works So Well
- What the Original Breadboard Experiment Showed
- Thermochromic Pigments: Smart, Cheap, and Not Actual Wizards
- Why Breadboards Overheat in the First Place
- Breadboards Also Have Electrical Limits Beyond Heat
- How to Use the Idea Wisely
- When You Should Stop Using a Breadboard Altogether
- The Real Value: Faster Debugging and Better Intuition
- Hands-On Experiences With Thermochromic Breadboards
- Conclusion
- SEO Tags
If you have ever built a circuit on a solderless breadboard, you already know the emotional arc. First comes optimism. Then comes wiring. Then comes confidence. Then comes that suspicious smell that says, “Congratulations, you have invented a heater.”
That is exactly why the idea behind a thermochromic treatment for breadboards is so charming, clever, and honestly a little overdue. Instead of waiting for a resistor to roast, a jumper to soften, or the breadboard plastic to audition for a candle impersonation, a thermochromic coating gives you a visual warning. The board changes color where heat builds up, so you can spot trouble before the magic smoke files its resignation letter.
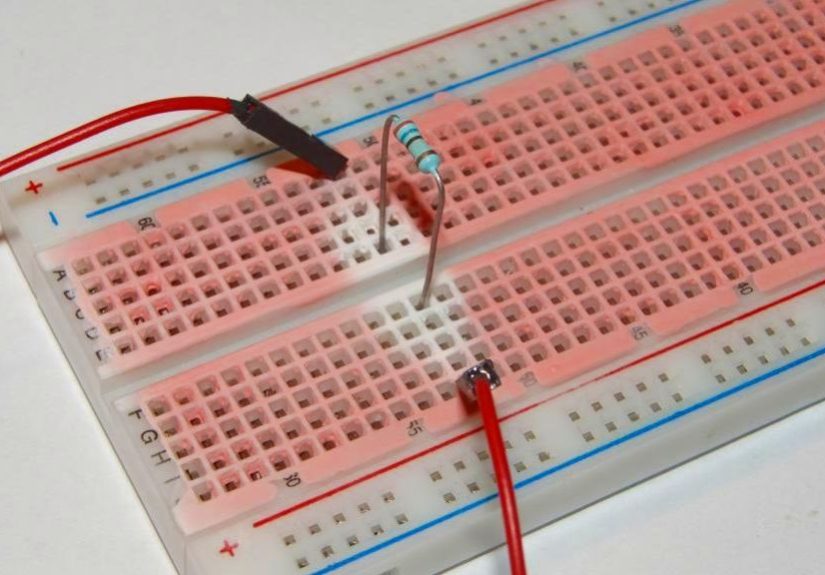
The concept is beautifully simple: coat the working area of a standard solderless breadboard with a thin layer of acrylic paint mixed with thermochromic pigment. When nearby components or contacts heat the board surface, the color shifts. Suddenly, thermal problems become visible. Your breadboard stops being a silent accomplice and starts acting like a tattletale. For electronics debugging, that is a feature, not a flaw.
Why This Idea Works So Well
Solderless breadboards are made for convenience, not heroics. They are fantastic for quick experiments, beginner circuits, sensor demos, blinking LEDs, and low-power prototypes. They are not built for high current, major heat, or electrically messy circuits that demand tight grounding and low parasitics. In other words, a breadboard is a sketchpad, not a battlefield medic.
Inside the board, tiny spring clips connect rows of holes. Those clips make prototyping easy, but they also introduce resistance, contact wear, and heat when too much current passes through them. That means trouble can start both in the obvious places, like an overloaded resistor, and in the sneaky places, like the hidden contacts under the plastic. A thermochromic coating is useful because it does not care whether the heat comes from a resistor body, a voltage regulator lead, or a tired connection under the board’s skin. If heat reaches the surface, you get a clue.
That is the brilliance here. This is not a replacement for proper measurements, thermal cameras, or common sense. It is an early-warning visual layer. Think of it as a mood ring for bad circuit decisions.
What the Original Breadboard Experiment Showed
The project that inspired the title demonstrated that a breadboard coated with thermochromic paint could reveal localized heating surprisingly well. In testing, even a quarter-watt resistor dissipating more than its rating created a visible thermal trace around its lead in just a few seconds. That is not subtle. That is your circuit whispering, “Please stop doing this to me.”
The effect was especially noticeable when the ambient temperature was already close to the pigment’s activation point. That matters, because thermochromic materials respond across a temperature range, not like a tiny courtroom judge banging a gavel at one exact degree. If the room is warm, the coating becomes more responsive. If the room is cooler, the response can be slower or more subdued.
The original experiment also pointed out two important limitations. First, the thermal image is indirect. The color change appears in the breadboard surface, not inside the resistor or regulator itself. Heat has to travel through the component leads and into the plastic area near the socket. Second, the effect lingers. The pigment can show hysteresis, meaning the color may take time to return after the component cools down. That is great for spotting hot spots you missed in the moment, but not perfect if you want lab-grade temperature precision.
Thermochromic Pigments: Smart, Cheap, and Not Actual Wizards
Most thermochromic systems used in practical products rely on materials that reversibly change appearance as temperature changes. Leuco dye systems are especially common because they are relatively affordable, easy to formulate into inks or coatings, and good enough for visual indication. They are not precision thermometers, but they are very good at saying, “Hey, something here is getting warmer than it should.”
That makes them a strong fit for breadboard use. You do not need laboratory calibration to know that a hot regulator, an overworked resistor, or a stressed contact deserves attention. You just need the board to stop pretending everything is fine while a plastic meltdown is quietly warming up backstage.
There is also flexibility in how you choose the pigment. A lower activation temperature can make small rises easy to spot. A higher activation temperature can make the board less twitchy in a warm room. Some experimenters even suggest using two pigments with different thresholds to create a rough temperature map. That is the electronics version of giving your breadboard both a warning light and a second opinion.
Why Breadboards Overheat in the First Place
1. Too Much Current
This is the big one. A commonly cited rule of thumb is to keep breadboard current around 1 amp or less, and even that is not a universal guarantee. Condition matters. Age matters. Contact quality matters. A fresh, decent-quality breadboard may tolerate moderate current better than an old board whose clips have already been through ten thousand component insertions and one mild identity crisis.
When current rises, power loss rises with the square of the current. That means a setup that seems only “a little more ambitious” can create dramatically more heat inside the board. Push several amps through a breadboard rail and you are no longer prototyping. You are conducting an involuntary plastics experiment.
2. Bad or Aging Contacts
The metal clips inside a breadboard fatigue over time. As spring tension weakens or oxidation increases, contact resistance goes up. More resistance means more heating. More heating can worsen oxidation and weaken the contact further. Congratulations, you have discovered the world’s least fun feedback loop.
3. Hot Components Dumping Heat into the Board
Even if the board itself is not carrying outrageous current, components mounted on it can still cook the local area. Linear regulators, power resistors, transistors, and other warm little drama queens can transfer heat through their leads into the breadboard contacts and plastic. That is one reason a thermochromic coating is so helpful: it exposes heat spreading from above and below.
4. Short Circuits and Miswiring
Sometimes the problem is not “too much current for this design.” Sometimes the problem is “the red wire is where the black wire should be and now the breadboard smells like defeat.” Short circuits on the power rails can get hot enough to damage components, melt insulation, and deform the board. A color-changing surface can help you locate where the disaster party started.
Breadboards Also Have Electrical Limits Beyond Heat
Thermal problems are not the only reason breadboards misbehave. They also introduce parasitic capacitance, parasitic inductance, and mediocre grounding behavior. If you are building high-frequency analog circuits, fast digital designs, or anything sensitive to layout, a solderless breadboard can become the circuit equivalent of trying to tune a violin in a wind tunnel.
Measured capacitance between breadboard sections can be a few picofarads, which may sound tiny until your circuit politely disagrees. For low-frequency educational work, that may not matter much. For faster designs, it absolutely can. Ground impedance is another issue. Breadboards do not provide the kind of solid, low-impedance return path that production PCBs achieve with dedicated ground planes.
That is why thermochromic treatment is best understood as a helpful upgrade for the kind of circuits breadboards are already meant to host. It improves visibility. It does not turn a breadboard into a precision RF platform, a high-current power bus, or a substitute for a proper PCB.
How to Use the Idea Wisely
If you want to experiment with a thermochromic breadboard, the smartest approach is restraint. Apply a very thin coating. Keep it out of the socket holes. Focus on the active area where components sit. Let the paint fully dry before use. In short: decorate the board, do not embalm it.
Then use the treated breadboard for what it does best: debugging, teaching, and catching mistakes early. It is especially useful when you are:
- testing resistor values and power dissipation,
- checking whether a regulator is running hotter than expected,
- watching for overloaded rails,
- comparing layouts,
- teaching beginners that heat is data, not just discomfort.
It also pairs beautifully with boring but essential habits: using a multimeter, checking continuity, keeping wires short, labeling rails correctly, and avoiding heavy loads through flimsy jumpers. Breadboard wires are fine for signals and light-duty power. They are not the muscular backbone of a serious high-current system.
When You Should Stop Using a Breadboard Altogether
A thermochromic coating makes a breadboard smarter, but it does not repeal physics. If your project involves sustained current, power conversion, motors, heaters, thermal printers, large LED arrays, or anything that makes you casually use phrases like “ten amps should be fine,” step away from the breadboard.
Move to screw terminals, perfboard, prototype PCB, or a full custom PCB. You will get lower resistance, more reliable mechanical connections, better thermal handling, and less chance of discovering a new melted geometry under your project. Educational boards and solderless prototypes are wonderful for exploration. Permanent or power-heavy builds deserve hardware that is not held together by friction and hope.
The Real Value: Faster Debugging and Better Intuition
The most appealing part of this idea is not just that it helps prevent smoke. It makes invisible behavior visible. That builds intuition. Beginners start understanding that current creates heat, poor connections create heat, overloaded parts create heat, and layout choices matter. Experienced builders get a fast, visual clue about where to probe next.
That is exactly what good prototyping tools should do. They should reduce mystery without reducing curiosity.
In a world full of expensive thermal cameras and fancy lab tools, there is something delightfully scrappy about improving a breadboard with color-changing paint. It is low-tech, useful, and just weird enough to be memorable. Frankly, that is a strong recipe for any workshop trick worth keeping.
Hands-On Experiences With Thermochromic Breadboards
One of the most interesting things about a thermochromic breadboard is how quickly it changes the way you work. On a normal breadboard, overheating is often discovered late. You touch a resistor and regret your life choices. You notice a smell and start unplugging things with the urgency of someone defusing a sandwich. You see discoloration on the plastic and realize the lesson has already been fully delivered.
With a thermochromic treatment, the experience becomes more visual and much less dramatic. You build a simple LED circuit, step back, and the board remains calm. Good sign. Then you swap a resistor value, push the current a little higher, and suddenly a faint halo appears around one lead. Not smoke. Not flames. Just a tiny color shift saying, “Sir, this is not ideal.” That kind of feedback is gold, especially for students and hobbyists who are still learning what “too much power dissipation” looks like in real life.
In more experimental setups, the coating can be surprisingly revealing. A regulator that feels merely warm by finger test might paint a broader heated area than expected. A jumper that looks perfectly normal might leave a narrow heat trail because the connection is poor. Two seemingly identical resistor placements can create different thermal patterns because airflow, lead length, and board position all matter more than you thought. Suddenly the breadboard stops being a passive plastic rectangle and starts acting like a crude thermal map.
There is also a teaching advantage that is hard to overstate. Beginners often understand voltage and current in theory but do not intuitively connect them to heat. Once they see color blooming around an overloaded part, the lesson sticks. It is one thing to hear that a resistor dissipates excess electrical energy as heat. It is another thing to watch the board blush around it like it just overheard a bad idea.
Of course, the experience is not perfect. Warm rooms can make the coating more sensitive than you expect. Cooling can be slower than heating. Residual images may linger, which is useful for post-mistake archaeology but less useful if you want immediate reset behavior. And because the color change is indirect, the hottest part of a component may not align exactly with the brightest patch on the board. Still, those quirks do not really hurt the value. They just remind you that this is a visual debugging aid, not a laboratory thermometer.
Used that way, a thermochromic breadboard becomes one of those rare workshop tricks that is both practical and memorable. It teaches caution without being boring, helps debugging without requiring expensive gear, and turns invisible thermal trouble into something you can literally see coming. In electronics, that is about as close as you get to a polite warning before chaos.
Conclusion
Thermochromic treatment does not magically transform a solderless breadboard into an industrial prototyping platform. What it does do is far more realistic and arguably more useful: it gives you a simple, visual way to notice overheating before damage escalates. For low-power prototyping, education, and troubleshooting, that is a smart upgrade.
The idea succeeds because it respects the nature of breadboards. These boards are temporary, convenient, and imperfect. A color-changing thermal warning layer fits right into that reality. It helps you work faster, learn more, and avoid a few avoidable meltdowns. And in electronics, avoiding smoke is already a respectable form of victory.