Table of Contents >> Show >> Hide
- What Counts as a DIY Screened-In Patio?
- Before You Buy a Single 2×4
- Best Materials for a Screened-In Patio
- Tools You’ll Probably Need
- How to Build a Screened-In Patio Step by Step
- Step 1: Measure everything twice and sketch the layout
- Step 2: Confirm the patio structure is worth enclosing
- Step 3: Install or refine the wall framing
- Step 4: Prime, paint, or seal before screening
- Step 5: Install the door first
- Step 6: Install the screen panels
- Step 7: Reinforce the lower portions
- Step 8: Add trim and finishing details
- Step 9: Make the space actually enjoyable
- A Simple Example Layout
- Common DIY Mistakes to Avoid
- How Much Does a DIY Screened-In Patio Cost?
- Maintenance Tips So It Still Looks Good Next Summer
- Real-World DIY Experiences and Lessons Homeowners Learn
- Final Thoughts
- SEO Tags
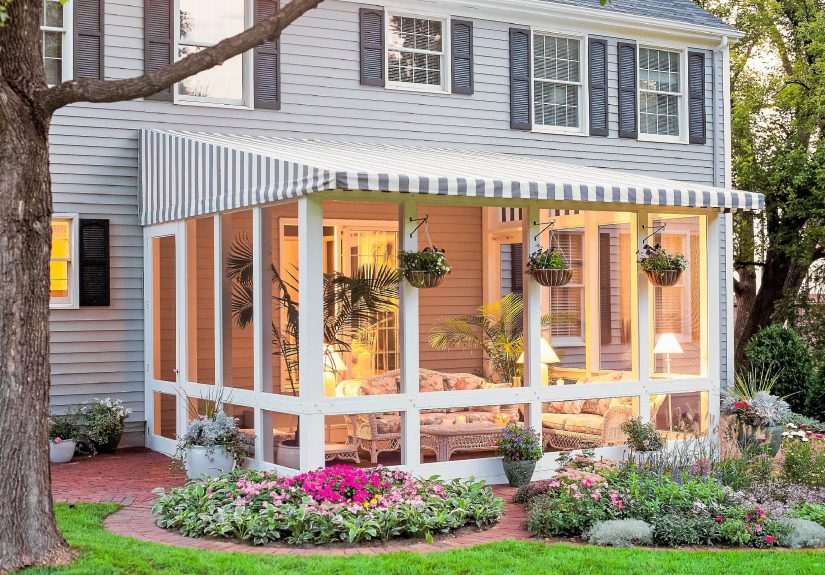
If your patio turns into a mosquito nightclub every summer, a screened-in patio is one of the smartest upgrades you can make. You still get the breeze, the backyard view, and that magical “I should probably live out here now” feeling, but without the bugs, flying leaves, and random moths auditioning for your lamp. Better yet, if you already have a covered patio, porch, or under-deck space, this can be a realistic DIY project instead of a full-blown construction saga.
The trick is knowing what kind of project you’re actually building. A true beginner-friendly screened-in patio usually starts with an existing roof and a solid structure. If you’re adding footings, setting posts, tying a new roof into the house, or running electrical, the project gets bigger fast. Still doable in stages, yes. A “Saturday morning and two iced coffees” project? Not quite.
This guide walks you through the practical version: how to plan, frame, screen, and finish a screened-in patio that looks clean, works well, and does not scream, “I learned carpentry from sheer optimism.”
What Counts as a DIY Screened-In Patio?
For most homeowners, a DIY screened-in patio falls into one of three categories:
1. Screening an existing covered patio or porch
This is the easiest route. You already have a roof, support posts, and a slab or deck. In many cases, you’re simply adding framing, screen panels, and a door.
2. Screening an under-deck patio
This can work beautifully, but only if the space above is managed for water. If rain drips through the deck boards all day, your “cozy retreat” becomes a decorative drip cave. An under-deck drainage system may be needed before screening anything in.
3. Building a brand-new structure and screening it
This is the most ambitious option. It often includes footings, posts, beams, rafters, roofing, flashing, and possibly permits and inspections. If that sounds exciting, great. If it sounds like the beginning of a three-season personality change, hire out the structural work and handle the screening yourself.
Before You Buy a Single 2×4
Check permits, codes, and HOA rules
If you’re changing the structure, adding a roof, pouring footings, or enclosing an elevated surface, check local rules first. A lot of disappointment begins with the phrase, “I figured it would be fine.” If the patio floor is elevated, guardrail requirements may apply. If the new roof attaches to the house, permits are usually part of the story.
Call 811 before digging
Planning on setting footings, posts, or anchors? Call 811 before digging. Underground utilities do not care that your project board on Pinterest looked simple.
Decide how permanent you want the enclosure to be
You can build fixed screen walls, use track-and-spline systems, or make removable wood-framed screens. Fixed systems tend to look cleaner and go faster. Removable frames are great for repairs, repainting, or seasonal changes. There’s no wrong answer here, only the one that matches your patience level and maintenance habits.
Think about sun, wind, and traffic
If one side gets blasted by afternoon sun, you may want solar screen there. If pets or kids are likely to body-check the lower panels, use stronger screen down low and more open-view material above. If your patio gets strong wind, smaller panel sections usually stay tighter and behave better over time than huge wall-to-wall spans.
Best Materials for a Screened-In Patio
Framing
Pressure-treated lumber is the workhorse for anything exposed to weather. Cedar looks nicer and resists rot naturally, but it costs more. Aluminum systems can look sharp and reduce maintenance, though wood is often easier for DIYers who are comfortable cutting and fastening standard lumber.
Screen material
Fiberglass screen is the go-to choice for most DIY patio builds. It is flexible, forgiving, affordable, and less likely to kink when you’re learning.
Aluminum screen is sturdy and crisp-looking, but it is less forgiving during installation. Make one bad move and it remembers forever.
Polyester or pet-resistant screen is excellent for lower sections, doors, or homes with pets. It is tougher, but usually thicker and a little less invisible from inside the patio.
Pool and patio screen or heavier-duty fiberglass mesh is a smart pick for large openings that need extra strength.
Screen installation system
You can staple screen to wood frames and cover it with trim, but track-and-spline systems are cleaner and easier to repair. Many homeowners prefer them because they produce tighter results and make future rescreening much less annoying.
Door
Do yourself a favor and plan the door early. A badly planned screen door is how a nice project turns into a daily argument with a latch. A prehung screen door is usually the simplest option. Just make sure swing direction, threshold height, and clear walkway all make sense before installation day.
Tools You’ll Probably Need
Tape measure, drill/driver, circular saw or miter saw, level, framing square, utility knife, snips or shears, screen roller tool, staple gun if using wood frames, mallet if your track system requires it, clamps, caulk gun, ladder, and safety gear. If you’re painting or sealing wood, add brushes or a sprayer and enough drying time to your schedule.
How to Build a Screened-In Patio Step by Step
Step 1: Measure everything twice and sketch the layout
Measure each opening individually. Do not assume opposite sides match just because the patio was built by adults. Older patios and porches often drift out of square. Sketch every opening, post, beam, and door location. Add a little extra material to your order so you are not making a desperate store run because one piece was cut backward. That happens. More than people admit.
If you’re using a track system, measure the smallest width and height in each opening and follow the manufacturer’s sizing rules. If you’re building wood-framed screen panels, decide whether you want one large panel or several smaller ones. Smaller panels are easier to repair and usually behave better in wind.
Step 2: Confirm the patio structure is worth enclosing
Before you start dressing the patio up, make sure the bones are solid. Check posts for rot, slab edges for major cracks, rails for looseness, and overhead framing for signs of water damage. If the roof leaks, fix that first. A screened-in patio is not a magic trick that makes bad structure good. It just makes bad structure harder to reach later.
If you’re building new supports or adding weight, size footings and connectors according to local code. This is where you stop guessing and either use engineered plans or get advice from your building department.
Step 3: Install or refine the wall framing
Create clear framing bays for the screen. On many patios, that means adding horizontal rails between posts and, if needed, vertical members to break wide openings into manageable sections. Think of it as creating picture frames for the screen.
A practical setup often includes a lower rail around knee height and an upper rail below the header. That gives the wall more structure, improves appearance, and protects the lower screen from stray feet, chairs, toys, and dogs with strong opinions.
If you want removable wood-framed screens, build a receiving system that allows the panels to sit neatly into the openings. If you want a track system, make sure the framing faces are flat, aligned, and ready for straight cuts.
Step 4: Prime, paint, or seal before screening
This is one of those steps people skip because they’re excited. Then they wind up painting around screen mesh like they’re performing surgery with a broom. Prime and paint wood framing before installing screen whenever possible. It protects the lumber better and gives you a cleaner finish.
Step 5: Install the door first
Set the door, shim it plumb and square, and test the swing before moving on. The door determines traffic flow and often becomes the visual center of the whole patio. If it sticks, sags, or slams on day one, it will not develop better manners later.
Add a quality closer if the patio will get heavy use. Screen doors have a special talent for being left open exactly when mosquitoes are holding their reunion.
Step 6: Install the screen panels
If you’re using a track-and-spline system, fasten the base strips to the framing according to the system’s instructions. Keep the strips straight, do not overtighten fasteners, and trim pieces cleanly. Then unroll the screen and install it one opening at a time.
Start at the top, keep even tension, and work methodically. Use one hand to pull the screen taut and the roller tool to press the screen and spline into the groove. Go in a consistent direction and avoid stretching one side too much while the other side stays lazy. Trim excess mesh with a sharp utility knife once the spline is fully seated.
If you’re using wood-framed screens, stretch the screen over the frame on a flat surface, staple it evenly, then cover the staple line with trim or stops. Keep tension firm, but not so aggressive that the frame twists.
Step 7: Reinforce the lower portions
The bottom section of a screened-in patio takes the most abuse. That’s where patio chairs scrape, pets lean, kids poke, and adults forget the screen exists and walk toward it holding nachos. Use pet-resistant screen on lower panels if needed, or install a short knee wall, kick plate, or tighter framing pattern for extra protection.
Step 8: Add trim and finishing details
Snap on cover caps if your system uses them, or install trim over wood-framed edges. Caulk exterior joints where appropriate, touch up paint, and make the whole thing look intentional. Good trim is the difference between “custom backyard retreat” and “temporary tax season project.”
Step 9: Make the space actually enjoyable
Now give the patio a reason to exist beyond bug prevention. Add an outdoor rug, ceiling fan, string lighting rated for damp locations, comfortable seating, and maybe a dining table if you plan to eat outside. If privacy matters, combine the screen with curtains, lattice, planters, or strategic landscaping.
A Simple Example Layout
Imagine a 12-by-16 covered concrete patio with a roof already in place and three open sides. A practical DIY layout could include one screen door centered on the long side, vertical framing every 4 to 6 feet, a lower horizontal rail about 30 to 36 inches above the slab, standard fiberglass screen in upper panels, and tougher pet-resistant screen in the bottom sections. That setup looks balanced, repairs easily, and avoids giant floppy panels that wave around like flags in a storm.
Common DIY Mistakes to Avoid
Ignoring drainage
If water pools on the slab, splashes in during storms, or drips through overhead boards, fix that first. Screens do not stop water drama.
Making openings too large
Huge screen expanses look sleek in theory, but smaller framed sections are often better in real life, especially with wind, pets, and DIY installation.
Choosing the wrong screen for the lifestyle
High-visibility screen looks fantastic, but it may not be the best choice for the lower half of a patio used by kids and pets. Match the mesh to the abuse level.
Skipping pre-finish work
Paint first. Your future self will be less grumpy.
Underestimating the door
If the door is awkwardly placed or poorly aligned, you will notice it every single day.
How Much Does a DIY Screened-In Patio Cost?
The cost depends on whether you are screening an existing covered patio or building the structure from scratch. If you already have a roof and framing, the project can stay relatively affordable, especially with standard fiberglass screen and a basic track system. Small kits and rescreening materials may cost only a few hundred dollars, while a larger custom setup with lumber, trim, heavy-duty mesh, and a quality door can climb into the low thousands.
If you need a new roof, beams, posts, footings, or electrical work, the budget jumps quickly. That is why the smartest “DIY screened-in patio” projects usually start with existing structure and focus on enclosure, finish work, and comfort upgrades.
Maintenance Tips So It Still Looks Good Next Summer
Vacuum or brush the screens gently a few times a year. Hose them down with mild soap when pollen season turns the patio into a yellow crime scene. Check spline lines and door closers every spring. Repaint or reseal wood as needed. Keep an eye on lower panels for damage, because little tears rarely stay little.
Real-World DIY Experiences and Lessons Homeowners Learn
The most useful experience people report after building a screened-in patio is that the planning phase matters far more than expected. At the start, many DIYers think the project is mostly about screen. In reality, the success of the build comes down to geometry, sequence, and patience. If the framing is flat and square, the screen goes in like a dream. If the framing is uneven, the screen will announce that fact loudly and repeatedly.
Another common lesson is that screen choice changes daily life more than expected. Homeowners who pick a mesh based only on price sometimes regret it later when pets scratch through the bottom sections or visibility is not as clean as they hoped. On the flip side, people who mix materials strategically, such as stronger screen on lower panels and standard fiberglass above, often feel like geniuses by the second week. The patio still looks light and airy, but it survives actual family use.
People also discover that the door deserves more respect than it gets on the planning sketch. The screen door is the handshake of the whole space. If it swings naturally, closes well, and lines up with the path from the house to the yard, the patio feels easy to use. If it sticks, slams, or opens into a chair every time, it becomes a tiny daily irritation with enormous emotional range.
There is also a surprisingly universal experience with tensioning screen: the first panel teaches humility. The second panel teaches technique. By the third panel, most DIYers suddenly become very confident and start using phrases like, “Actually, this is pretty straightforward.” That confidence is deserved, but only after learning to keep the mesh centered, the pull even, and the roller moving in a consistent direction. Good screen work is not about force. It is about rhythm.
Many homeowners say the best decision they made was finishing the framing before screening. Priming, painting, or sealing wood ahead of time feels slower in the moment, but it saves an incredible amount of frustration later. No one enjoys trying to paint neatly around mesh while bugs gather outside, waiting for the grand opening.
Another real-world takeaway is that a screened-in patio becomes useful much faster when it is furnished immediately. The build may feel “done” when the last trim piece is nailed in, but the space only becomes part of the house when there is a place to sit, eat, read, or nap. A rug, fan, soft lighting, and durable furniture can turn a technically finished enclosure into a room people actually use.
Finally, homeowners often say the biggest surprise is how much the patio changes their routine. Breakfast moves outside. Evening conversations last longer. Rainstorms become entertainment instead of weather reports. The screened-in patio ends up functioning like a bonus room with better air and worse Wi-Fi, which, honestly, is sometimes the entire point.
Final Thoughts
Building a screened-in patio is one of those DIY projects that pays you back immediately. You get more living space, better comfort, fewer bugs, and a backyard setup that feels custom without necessarily requiring a full home addition. The easiest version starts with an existing covered patio, good measurements, sensible framing, and the right screen system for your lifestyle.
Take your time, respect the structural parts, and do not rush the finishing work. When it is done well, a screened-in patio feels less like a project and more like the room your house should have had all along.