Table of Contents >> Show >> Hide
- What Cropping a Picture in Word Actually Means
- How to Crop a Picture in Word the Basic Way
- How to Crop Picture Margins in Word
- How to Crop a Picture to a Shape in Word
- How to Crop a Picture by Aspect Ratio in Word
- Crop vs. Resize: Do Not Confuse the Two
- Using Fill and Fit After Cropping
- How to Position the Image Inside the Crop Area
- How to Crop Multiple Pictures Consistently
- How Cropping Works with Text Wrapping
- How to Delete Cropped Areas and Reduce File Size
- Common Problems When Cropping Pictures in Word
- Practical Examples: When to Use Margin, Shape, and Aspect Ratio
- Best Practices for Cropping Pictures in Word
- Extra Experience: Real-World Lessons from Cropping Pictures in Word
- Conclusion
Microsoft Word is not Photoshop, and that is actually good news. You do not need a graphic design degree, a drawing tablet, or three cups of coffee to clean up a picture inside a document. Whether you are making a resume, a school handout, a business proposal, a flyer, a newsletter, or a report that should not look like it was assembled during a power outage, Word gives you several easy ways to crop a picture directly on the page.
In this guide, you will learn how to crop a picture in Word using standard crop handles, how to crop picture margins, how to crop an image into a shape, and how to use aspect ratio settings so your photo fits neatly into a layout. We will also cover practical examples, common mistakes, and a few “why is Word doing this to me?” moments that almost every user meets eventually.
The good part: cropping in Word is fast. The better part: once you understand margin, shape, and aspect ratio, your images stop floating around like confused balloons and start behaving like polished design elements.
What Cropping a Picture in Word Actually Means
To crop a picture in Word means to hide or remove parts of an image so only the important area remains visible. You might crop out extra background, remove blank space, focus on a face, fit a picture into a layout, or make several images look consistent on the same page.
For example, imagine you insert a team photo into a company newsletter. The people are centered, but there is a giant wall, a trash can, and half of someone’s elbow in the background. Cropping lets you keep the useful part of the image and politely escort the visual clutter out of the document.
Word cropping is especially useful because it works inside the document. You do not have to open another app, edit the photo, save a new file, reinsert it, and then wonder which version is “final_final_REAL_final.jpg.” You can crop, resize, wrap text, and adjust placement without leaving Word.
How to Crop a Picture in Word the Basic Way
The standard crop tool is the quickest method when you simply want to trim the edges of an image.
Step-by-step: Basic picture crop
- Open your Word document.
- Insert your image by choosing Insert > Pictures.
- Click the picture once to select it.
- Go to the Picture Format tab.
- In the Size group, click Crop.
- Black crop handles will appear around the image.
- Drag a side handle inward to crop one edge.
- Drag a corner handle inward to crop two edges at the same time.
- Click outside the image or press Esc to finish.
When the crop handles appear, Word shows the visible area clearly while the cropped-out area becomes shaded. This makes it easier to see what you are keeping and what you are removing. Think of the shaded area as the part of the image that has been sent to the waiting room.
How to Crop Picture Margins in Word
When people talk about cropping picture margins in Word, they usually mean trimming unwanted blank space around the image. This is common with screenshots, scanned documents, logos, charts, and images copied from other programs.
For example, you may insert a screenshot that includes too much browser toolbar, empty desktop space, or white border. Cropping the margins makes the image tighter and more professional.
How to remove extra margins from a picture
- Select the picture.
- Open Picture Format.
- Click Crop.
- Drag the left, right, top, or bottom crop handles inward until the extra margin disappears.
- Click outside the image to apply the crop.
If the picture contains a white background and your document page is also white, the margin may be hard to see. In that case, temporarily add a picture border or place the image over a lightly shaded shape while cropping. Once the margin is gone, remove the border or background. It is a small trick, but it saves you from squinting at the screen like you are decoding a secret government map.
Can you add margin by cropping outward?
Yes. Word also allows you to drag crop handles outward, which creates extra visible space around the image. This is sometimes called outcropping. It can be helpful when you want breathing room around a picture or when you are positioning an image inside a frame-like area.
However, outcropping does not magically invent new photo details. If you pull the crop boundary beyond the original image, Word may show blank space depending on the formatting and layout. Use it carefully when designing covers, flyers, or image blocks.
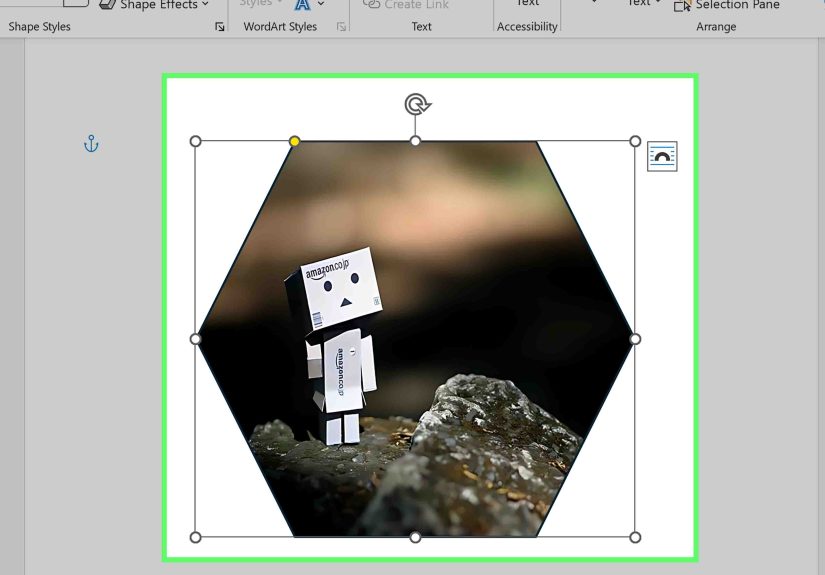
How to Crop a Picture to a Shape in Word
Cropping a picture to a shape is where Word starts acting like it owns a tiny tuxedo. With this feature, you can turn a rectangular photo into a circle, oval, rounded rectangle, triangle, arrow, heart, callout, or other built-in shape.
This is useful for profile photos, event flyers, classroom worksheets, invitations, newsletters, and modern-looking reports. A circle headshot in a resume or team page often looks cleaner than a plain rectangle.
Step-by-step: Crop to shape
- Insert and select the picture.
- Go to Picture Format.
- Click the arrow below Crop.
- Choose Crop to Shape.
- Select the shape you want from the gallery.
Word instantly masks the image into that shape. The original picture is still there behind the mask, but only the selected shape area is visible.
How to crop a picture into a perfect circle
To make a perfect circle, do not just choose the oval shape and hope for the best. If your image is rectangular, the oval may look stretched. Instead, use a square aspect ratio first.
- Select the picture.
- Go to Picture Format > Crop > Aspect Ratio.
- Choose 1:1.
- Adjust the crop area so the subject is centered.
- Then choose Crop > Crop to Shape > Oval.
The result is a circle instead of an egg. Unless you are designing an egg-themed flyer, this is usually the better choice.
How to Crop a Picture by Aspect Ratio in Word
Aspect ratio is the relationship between an image’s width and height. A square image has a 1:1 aspect ratio. A widescreen image often uses 16:9. Traditional photos may use 4:3 or 3:2. The ratio controls the shape of the crop area, not necessarily the final physical size on the page.
Using aspect ratio is one of the best ways to make images look consistent. If you are creating a document with several product photos, staff portraits, screenshots, or project images, matching aspect ratios prevents the layout from looking messy.
Step-by-step: Crop by aspect ratio
- Select the picture.
- Go to Picture Format.
- Click the arrow below Crop.
- Choose Aspect Ratio.
- Select a ratio such as 1:1, 4:3, 3:2, or 16:9.
- Move or resize the crop area if needed.
- Click outside the picture to apply it.
Use 1:1 for profile photos, icons, and square social-style images. Use 16:9 for banners, presentation-style visuals, and wide screenshots. Use 4:3 for traditional document images, classroom materials, and general report visuals.
Crop vs. Resize: Do Not Confuse the Two
Cropping and resizing are related, but they are not the same thing. Cropping changes what part of the image is visible. Resizing changes how large the image appears in the document.
If you drag a corner sizing handle, you make the picture bigger or smaller. If you use crop handles, you trim the visible area. This difference matters because resizing a badly cropped image just gives you a larger badly cropped image. That is not design; that is magnifying the problem.
A good workflow is simple: crop first, resize second. First decide what part of the picture should appear. Then adjust the final size so it fits the page, column, table cell, text box, or design area.
Using Fill and Fit After Cropping
Word includes two helpful options called Fill and Fit. These are especially useful when you are placing an image inside a shape or fixed crop area.
Fill
Fill makes the image fill the entire crop area while keeping the original proportions. This means some parts of the image may be cropped off. Fill is useful when you want a strong visual block with no blank space.
Fit
Fit makes the entire image visible inside the crop area while keeping the original proportions. This may leave blank space if the image and crop area have different shapes. Fit is useful when no part of the image can be cut off, such as with logos, diagrams, certificates, or screenshots with important interface details.
In plain English: use Fill when the frame matters more than showing every pixel. Use Fit when the full image matters more than filling every corner.
How to Position the Image Inside the Crop Area
After you choose a crop, shape, or aspect ratio, you can still reposition the picture inside the crop frame. This is one of the most useful Word image tricks.
- Select the cropped picture.
- Click Crop again.
- Move your cursor over the image until you see the move pointer.
- Drag the picture inside the crop boundary.
- Adjust the crop handles if necessary.
- Click outside the image to finish.
This lets you center a face in a circle, move a product into the middle of a square, or align a screenshot so the important button is visible. It is much easier than repeatedly cropping, undoing, muttering, and questioning your life choices.
How to Crop Multiple Pictures Consistently
If your document has several images, consistency matters. A report with one square image, one tall rectangle, one tiny screenshot, and one massive photo can look chaotic. Consistent cropping makes the page feel intentional.
Best method for consistent image cropping
- Choose one aspect ratio for all similar images.
- Apply that ratio to each picture.
- Use the same width or height for final sizing.
- Align images using Word’s alignment guides or table cells.
- Use the same border, shadow, or style if your design calls for it.
For staff photos, use 1:1 circles or squares. For product images, use 4:3 or 1:1. For website screenshots, use 16:9. For document examples, use a ratio that preserves readability.
How Cropping Works with Text Wrapping
Sometimes cropping looks correct, but the picture still refuses to sit where you want. That is often a text wrapping issue, not a crop issue.
Word pictures can be placed In Line with Text, Square, Tight, Through, Top and Bottom, Behind Text, or In Front of Text. If an image behaves like a giant letter, it is probably set to In Line with Text. If you want to move it freely, try Square or Tight wrapping.
To change wrapping, select the picture, click the Layout Options button near the image, and choose a wrapping style. Cropping controls the visible image area; wrapping controls how text flows around it. They work together, like a tiny office partnership with surprisingly strong opinions.
How to Delete Cropped Areas and Reduce File Size
By default, cropped-out parts of a picture may remain stored in the Word file even though they are hidden from view. This is convenient if you want to adjust the crop later, but it can increase file size. It may also matter if you cropped sensitive or private information from a screenshot.
To permanently remove cropped areas, select the image, go to Picture Format, choose Compress Pictures, and make sure Delete cropped areas of pictures is selected. You can apply this to one image or to all images in the document.
Be careful: after saving, you may not be able to restore those deleted cropped areas. If you might need the original image later, keep a backup copy before compressing the document.
Common Problems When Cropping Pictures in Word
The Picture Format tab does not appear
Click the image once. If that does not work, double-click it. The Picture Format tab only appears when Word knows you are working with a picture.
The crop looks stretched
You may have resized the image without preserving its proportions. Use corner handles for resizing and avoid dragging side handles unless you intentionally want to stretch the image.
The circle looks like an oval
Apply a 1:1 aspect ratio before using Crop to Shape with the oval option. A square crop plus an oval shape creates a circle.
The image jumps around the page
Check text wrapping. Try Square or Tight if you want the image to sit beside text instead of behaving like a text character.
The file is still huge after cropping
Use Compress Pictures and delete cropped areas. Cropping alone may hide image data without removing it from the file.
Practical Examples: When to Use Margin, Shape, and Aspect Ratio
Example 1: Cropping a screenshot for a tutorial
If you are writing a tutorial, crop out unnecessary browser tabs, desktop icons, and empty space. Use margin cropping to focus on the button, menu, or setting being explained. For website screenshots, a 16:9 crop often works well.
Example 2: Cropping a headshot for a resume
Use a 1:1 aspect ratio and then crop to an oval shape for a clean circular headshot. Center the face and leave a little space above the head. Do not crop so close that the photo looks like a passport picture taken during an emergency.
Example 3: Cropping product images for a brochure
Use the same aspect ratio for every product image. A 4:3 or 1:1 ratio usually works well. Consistent cropping makes the brochure look organized and helps readers compare products easily.
Example 4: Cropping a logo
Use Fit rather than Fill if the full logo must remain visible. Remove extra white margins carefully, but do not crop into the logo itself. Logos need breathing room, but not a full vacation home of empty space.
Best Practices for Cropping Pictures in Word
Always start with a good-quality image. Cropping reduces the visible area, so a low-resolution image may look blurry if you crop heavily and then enlarge it. For print documents, use sharp images with enough detail. For digital documents, balance image quality with file size.
Crop for purpose, not just decoration. Ask what the reader needs to see. If the image supports instructions, keep the important details visible. If it supports branding, keep it clean and visually balanced. If it supports storytelling, crop to focus attention on the subject.
Use aspect ratios to create order. A document with consistent image proportions feels more professional, even when the reader cannot explain why. Good design often works quietly in the background.
Finally, preview your document before sharing or exporting it. Cropped images can shift when layout settings, page size, margins, or printer settings change. A quick PDF preview can catch problems before your document goes out into the world wearing mismatched socks.
Extra Experience: Real-World Lessons from Cropping Pictures in Word
After working with Word documents that include reports, guides, resumes, product sheets, classroom materials, and web-ready drafts, one lesson becomes obvious: cropping is rarely just about cutting an image. It is about controlling attention. The reader’s eye goes where the image tells it to go. If the picture contains too much background, too many edges, or too much blank space, the message becomes weaker.
One common experience is dealing with screenshots. Screenshots often look fine when first captured, but once inserted into Word, they suddenly feel too wide, too tall, or full of irrelevant details. A browser screenshot may include bookmarks, tabs, toolbars, notifications, and half the operating system. Cropping the margins turns that screenshot from “look at my entire computer” into “look at this exact button.” For tutorials, that difference is huge.
Another practical lesson involves headshots. Many people insert portrait photos into Word and resize them until they fit, but the result often looks inconsistent. One person’s face appears close, another appears far away, and another is floating somewhere near the top of the frame. The fix is not random resizing. The fix is using the same aspect ratio, usually 1:1, and then positioning each face inside the crop area. When all headshots share the same crop style, the page instantly looks more polished.
Product photos bring a different challenge. If one product is photographed on a white background and another has a messy table behind it, the document can feel uneven. Cropping helps remove distractions, but consistency is still the key. Choosing one aspect ratio for all product images makes the layout easier to scan. Readers may not consciously notice the ratio, but they will feel that the page is cleaner.
There is also a file-size lesson that many users learn the hard way. Cropping a large image in Word does not always make the file smaller. Word may keep hidden image data so the crop can be reversed later. That is helpful during editing, but not ideal when emailing a document or uploading it to a website. Compressing pictures and deleting cropped areas can reduce file size and make the final document easier to share.
One final experience: cropping is better when done with restraint. It is tempting to crop aggressively, especially with portraits or decorative images. But too much cropping can make a picture feel cramped. Leave enough space around the subject so the image can breathe. Good cropping should feel natural, not like the subject is trapped in an elevator.
In short, Word’s crop tools are simple, but they can dramatically improve a document. Cropping margins removes clutter. Cropping to shape adds style. Cropping by aspect ratio creates consistency. Used together, these features help ordinary Word documents look cleaner, sharper, and more intentional.
Conclusion
Learning how to crop a picture in Word is one of those small skills that pays off again and again. You can remove unwanted margins, focus attention on the most important part of an image, create circles and other shapes, and use aspect ratios to keep your layout consistent. The tools are built directly into Word, so you do not need separate editing software for everyday document design.
For the best result, remember the simple workflow: insert the image, crop the visible area, choose a shape or aspect ratio if needed, position the image inside the crop frame, resize it for the page, and preview the final layout. That sequence prevents most formatting headaches and makes your document look far more professional.
Note: Menu names may vary slightly between Word for Windows, Word for Mac, and Word for the web, but the core ideas remain the same: select the picture, open Picture Format, and use Crop, Crop to Shape, Aspect Ratio, Fill, or Fit as needed.