Table of Contents >> Show >> Hide
- Why Turn a Vintage Ironing Board Into a Christmas Tree?
- Choosing the Right Vintage Ironing Board
- How to Design a Vintage Ironing Board Christmas Tree
- Step-by-Step: Turning an Ironing Board Into a Christmas Tree Display
- Creative Decoration Ideas for Your Ironing Board Tree
- Where to Display a Vintage Ironing Board Christmas Tree
- Common Mistakes to Avoid
- Why This DIY Project Feels So Personal
- Personal Experiences and Practical Lessons From Making One
- Conclusion
A vintage ironing board turned Christmas tree sounds like something that wandered out of a farmhouse attic, drank a mug of cocoa, and decided to become the star of the holiday season. And honestly? Good for it. In a world overflowing with plastic trees, glitter explosions, and decorations that look suspiciously identical from house to house, an old ironing board offers something refreshingly different: character, height, history, and just enough quirk to make guests stop mid-cookie and say, “Wait… is that an ironing board?”
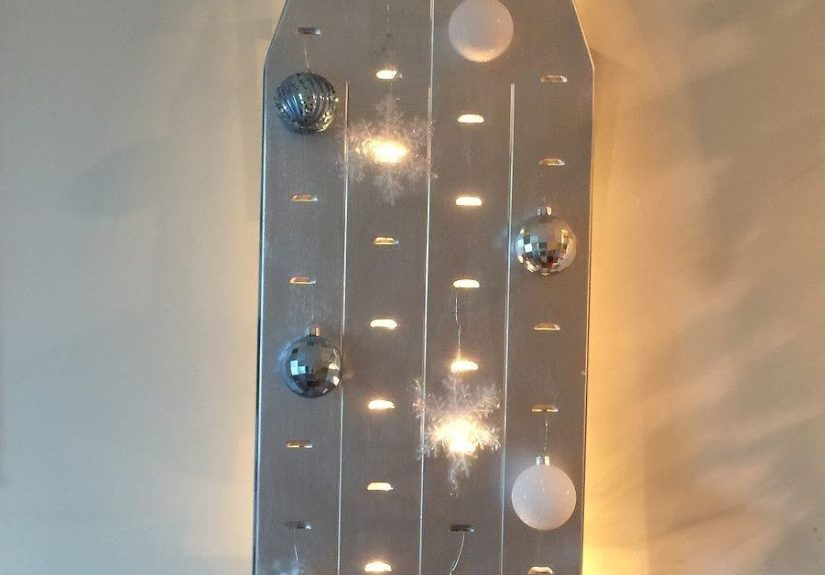
The idea is simple but wonderfully creative. Instead of using a traditional evergreen, you transform a vintage wooden or metal ironing board into a flat, vertical, tree-shaped holiday display. Its long tapered form already hints at a Christmas tree silhouette, especially when it is leaned against a wall or opened upright. Add greenery, ornaments, ribbon, lights, bells, nostalgic signs, or handmade accents, and suddenly a humble laundry-room relic becomes a festive conversation piece.
This project fits beautifully into farmhouse Christmas decor, cottagecore holiday styling, rustic vintage interiors, small-space decorating, and sustainable DIY design. It is also budget-friendly if you already have an old board or can rescue one from a flea market, estate sale, thrift shop, garage, barn, or the mysterious corner of a relative’s basement where forgotten household objects go to retire dramatically.
Why Turn a Vintage Ironing Board Into a Christmas Tree?
The charm of a vintage ironing board Christmas tree lies in the balance between function and imagination. An ironing board was once purely practical. It helped press shirts, linens, aprons, tablecloths, uniforms, and Sunday-best outfits. Turning it into holiday decor gives that everyday object a second life. Instead of wrinkles, it now handles wreaths. Instead of steam, it carries sparkle.
This kind of upcycled Christmas tree also reflects a larger decorating trend: using vintage finds in unexpected ways. Old crocks become tree stands. Mason jars become mantel displays. Sleds hold Christmas cards. Ice skates become door swags. The vintage ironing board fits right into that tradition because it has instant nostalgia and a useful shape. It is tall, narrow, portable, and easy to decorate without needing a lot of floor space.
A Space-Saving Christmas Tree Alternative
Not every home has room for a full-size Christmas tree. Apartments, dorm rooms, narrow entryways, kitchens, porches, mudrooms, and small living rooms often need festive decor that does not swallow the entire space like a cheerful green monster. A vintage ironing board turned Christmas tree is ideal because it can lean against a wall, stand in a corner, or serve as a vertical display behind a console table.
It is especially useful in rooms where a traditional tree would feel too formal or bulky. Imagine one in a farmhouse kitchen decorated with cookie cutters, red gingham ribbon, dried orange slices, and tiny rolling pins. Or picture it in an entryway with evergreen garland, bells, and a chalkboard sign that says “Merry Christmas” in hand-lettered style. It brings holiday personality without demanding half the room and three hours of branch fluffing.
Choosing the Right Vintage Ironing Board
Before you start decorating, choose the right board for your space and style. Vintage ironing boards come in several forms, including wooden folding boards, metal boards with perforated tops, wall-mounted boards from old kitchen cabinets, and narrow sleeve boards. A full-size wooden board usually creates the warmest farmhouse look, while a metal board can lean more industrial, retro, or shabby chic.
Look for a board that feels sturdy, balanced, and visually interesting. Scratches, old paint, worn edges, faded wood, and little imperfections often add charm. However, there is a difference between “beautifully aged” and “this might collapse if a candy cane looks at it too aggressively.” Check the legs, hinges, screws, joints, and surface before decorating. If the board wobbles, tighten hardware or use it as a leaning wall display instead of a freestanding piece.
Wooden vs. Metal Ironing Boards
A wooden vintage ironing board is usually the easiest to style because greenery, ribbon, twine, and ornaments look naturally at home against aged wood. It works well for rustic Christmas decor, primitive Christmas style, Scandinavian-inspired simplicity, and warm neutral palettes.
A metal ironing board offers a different look. It can feel more mid-century, industrial, or retro. If the board has a painted finish in cream, mint, red, or faded turquoise, it may already have plenty of personality. For metal boards, lightweight decorations are best. Magnetic hooks may work on some metal surfaces, while removable clips and ribbon ties can help avoid permanent damage.
Safety Check for Old Paint and Electrical Decor
Because many vintage items were made before modern safety expectations, inspect old paint before sanding, scraping, or drilling. If the board may have lead-based paint, avoid disturbing the finish. Keep flaky paint away from children and pets, and consider sealing the surface with a clear protective coating made for decorative use. When in doubt, treat the finish gently and avoid aggressive refinishing.
If you add lights, use modern low-heat LED lights in good condition. Check cords for cracks, exposed wires, missing bulbs, or loose plugs. Battery-operated fairy lights are often the easiest choice, especially for a metal board or a display placed away from an outlet. Do not overload outlets, hide damaged cords under rugs, or leave lights on unattended. The goal is “cozy Christmas glow,” not “surprise visit from the fire department.”
How to Design a Vintage Ironing Board Christmas Tree
The best design begins with a clear theme. Because the ironing board itself is already unusual, the decorations should support the idea rather than fight it. Choose a style that matches your home and the board’s character.
Farmhouse Christmas Style
For a farmhouse look, use evergreen garland, pinecones, burlap ribbon, ticking stripe fabric, wooden bead garland, galvanized bells, dried orange slices, and simple white ornaments. A small star, wood cutout, or metal angel can serve as the topper. This style feels cozy, casual, and timeless. It is perfect for kitchens, breakfast nooks, mudrooms, and covered porches.
Retro Holiday Style
For a retro Christmas tree effect, decorate with colorful vintage ornaments, shiny tinsel, candy-colored bulbs, bottle brush trees, old postcards, and playful ribbon. If you have inherited ornaments that are too fragile for a full tree, the ironing board can become a controlled display area where each piece gets attention. Think 1950s sparkle, grandma’s ornament box, and just enough kitsch to make the room smile.
Primitive or Country Christmas Style
Primitive Christmas decor works beautifully with a worn wooden board. Try dried apples, cinnamon sticks, homespun fabric strips, rusty bells, tea-stained tags, small stockings, and handmade ornaments. This approach feels humble and historic, as if the display has been part of the house for generations.
Elegant Vintage Style
If your taste leans polished, use velvet ribbon, antique gold ornaments, pearl garland, ivory candles nearby, and soft white lights. A vintage ironing board does not have to look rustic. Styled with restraint, it can feel surprisingly elegant, especially in a dining room or foyer.
Step-by-Step: Turning an Ironing Board Into a Christmas Tree Display
Step 1: Clean and Stabilize the Board
Wipe the board with a soft cloth and mild cleaner. Avoid soaking old wood or scrubbing fragile paint. If the hinges or legs are loose, tighten them carefully. If the board will lean against the wall, add felt pads to the top edge to protect the paint. If it will stand open, make sure the legs lock securely.
Step 2: Create the Tree Shape
The ironing board already has a tapered shape, but you can exaggerate the Christmas tree effect by attaching greenery in a triangular pattern. Start wider near the bottom and narrow the garland as it moves toward the pointed end. Use floral wire, removable hooks, ribbon ties, or small clamps. Avoid heavy nails if you want to preserve the vintage piece.
Step 3: Add Lights
Wrap a short strand of LED fairy lights around the greenery or along the board’s edge. Warm white lights create a classic glow, while multicolor lights lean cheerful and nostalgic. If using battery lights, hide the battery pack in a small fabric pouch, mini basket, or wrapped faux gift at the base.
Step 4: Layer Ornaments and Texture
Add ornaments in different sizes, but keep them lightweight. Flat ornaments, small bells, tiny wreaths, fabric stars, wooden snowflakes, and paper tags work especially well. For a vintage look, mix materials: wood, metal, glass, fabric, paper, greenery, and ribbon. The more layered the textures, the more collected and charming the display feels.
Step 5: Finish With a Topper and Base
Place a star, bow, angel, small wreath, or old-fashioned ornament at the narrow end. At the bottom, style the base with wrapped boxes, a crate, lanterns, pinecones, a small stool, or a basket of greenery. This grounds the display and makes it feel intentional rather than like the ironing board got lost on the way to laundry day.
Creative Decoration Ideas for Your Ironing Board Tree
One of the joys of this project is that it can be customized endlessly. For a kitchen tree, hang mini cookie cutters, measuring spoons, cinnamon ornaments, gingerbread shapes, and recipe cards. For a sewing-room tree, use wooden spools, lace, buttons, thimbles, fabric scraps, and tiny embroidery hoops. For a family memory tree, clip on old Christmas photos, handwritten recipe cards, gift tags from past years, and small heirloom ornaments.
A laundry-room version can be especially funny and charming. Add clothespins, tiny socks, linen sachets, plaid ribbon, and a sign that says “Pressing Matters: Merry Christmas.” Yes, it is a pun. Yes, your guests may groan. That is how you know it is working.
You can also create a neutral winter display that lasts beyond Christmas. Use cedar garland, white berries, snowflake ornaments, soft lights, and simple linen ribbon. Remove the obvious Christmas pieces after the holiday, and the board becomes a winter vignette for January.
Where to Display a Vintage Ironing Board Christmas Tree
This project works in more places than you might expect. In an entryway, it creates an instant welcome. In a kitchen, it becomes a charming nod to old household routines. In a dining room, it can serve as a festive backdrop for a buffet or dessert table. In a living room, it can stand beside a fireplace, bookcase, or antique cabinet. On a covered porch, it can add farmhouse holiday character, provided it is protected from rain and harsh weather.
For small spaces, place the board behind a narrow console table or lean it in an unused corner. For a holiday market booth, antique shop, craft fair, or boutique display, it can hold ornaments, tags, garlands, or small gift items. Retailers and makers love vertical displays because they show products without taking up too much table space.
Common Mistakes to Avoid
The biggest mistake is overloading the board. A vintage ironing board Christmas tree looks best when the decorations feel layered but not chaotic. Too many bulky ornaments can hide the shape of the board and make it look like a craft bin had a very festive accident.
Another mistake is ignoring balance. If the board is standing open, keep heavier pieces low and centered. If it leans, make sure the angle is secure and the base cannot slide. Use museum putty, rubber feet, or a discreet anchor if needed. Homes with pets or young children may need extra stabilization, because cats view unusual vertical decor as either a climbing challenge or a personal insult.
Finally, do not force a theme that fights the board. A battered wooden ironing board may not need glossy modern ornaments. A bright retro metal board may not want muted beige everything. Let the board tell you what it wants to be. Vintage pieces are bossy like that.
Why This DIY Project Feels So Personal
A vintage ironing board turned Christmas tree is more than a clever decoration. It is a small act of storytelling. It honors the past while making something new. Many families have memories tied to ironing boards: a grandmother pressing table linens before guests arrived, a parent preparing shirts for work, or holiday cloth napkins being smoothed before a big meal. Turning that object into Christmas decor keeps those memories visible.
It also supports a slower, more meaningful approach to decorating. Instead of buying every new trend, you reuse what already exists. You shop secondhand. You rescue pieces with patina. You create decor that cannot be duplicated exactly by a big-box store. That originality is what makes the project special.
Personal Experiences and Practical Lessons From Making One
The first thing you learn when decorating a vintage ironing board as a Christmas tree is that the board has opinions. It may lean slightly to one side. It may have a hinge that squeaks like a mouse wearing tap shoes. It may feature scratches, paint marks, or one mystery stain that nobody wants to investigate too closely. But those quirks are exactly what make it charming.
A good experience begins with placing the board before decorating it. Many people decorate first, then discover the finished piece does not fit where they imagined. The smarter move is to set it in the entryway, kitchen, living room, or porch first and look at it from different angles. Once it feels right, decorate it in place. This prevents the classic holiday decorating workout known as “carrying a fully decorated object across the room while ornaments jump ship.”
Another helpful lesson is to start with fewer decorations than you think you need. The ironing board is not a full tree with deep branches. It is a narrow display surface, so every ornament shows. Begin with greenery, lights, and one type of ribbon. Then step back. Add ornaments slowly. The best version usually happens before the “just one more thing” stage. Holiday decorating has a sneaky way of turning “tasteful vintage charm” into “North Pole yard sale” if nobody supervises the ribbon.
Texture makes the biggest difference. A plain board with a strand of lights can look cute, but a board with cedar garland, velvet ribbon, brass bells, old postcards, and wooden ornaments feels collected and rich. If the board is wooden, soft greenery and fabric make it warmer. If the board is metal, paper ornaments, bottle brush trees, and bright retro colors help soften the industrial look.
Personal items make the display memorable. A handwritten recipe card from a grandparent, a tiny framed family photo, an old cookie cutter, or a child’s handmade ornament can turn the project into a holiday memory wall. Guests notice those details. They ask questions. The decoration becomes part of the celebration instead of just background sparkle.
Storage is also easier than expected. Unlike a traditional tree, an ironing board display can be undecorated quickly, folded, and stored flat. Keep the decorations in one labeled bin so the theme is easy to recreate next year. If you use removable ties instead of glue, the board can change styles every season. In December it becomes a Christmas tree. In spring it can hold seed packets and faux flowers. In fall it can display leaves, pumpkins, and plaid ribbon. That kind of flexibility makes the project worth the effort.
The most satisfying part is the reaction. People are used to wreaths, garlands, and regular trees. They are not used to seeing an ironing board dressed up like it has been invited to the holiday ball. It feels playful, nostalgic, and clever without trying too hard. And in a season that can easily become expensive and overcomplicated, there is something delightful about making magic from an object that was once used to flatten pants.
Conclusion
A vintage ironing board turned Christmas tree is the perfect DIY project for anyone who loves old things, clever decorating, and holiday style with a wink. It saves space, reuses a forgotten household item, and creates a display that feels personal rather than mass-produced. Whether you decorate it with farmhouse greenery, retro ornaments, handmade keepsakes, or elegant ribbon, the result is festive, meaningful, and guaranteed to start conversations.
Best of all, this project proves that Christmas decor does not have to be expensive or predictable to feel beautiful. Sometimes the most memorable holiday pieces are the ones with dents, history, and a second chance. So if you find an old ironing board at a thrift store or tucked away in storage, do not dismiss it. With a little greenery, a little glow, and a sense of humor, it may become your new favorite Christmas tree.