Table of Contents >> Show >> Hide
- Why Tall Planters Need a Different Filling Strategy
- What You Need Before You Start
- Step-by-Step: How to Fill a Tall Planter
- The Best Materials to Put in the Bottom of a Tall Planter
- What Not to Put in the Bottom of a Tall Planter
- How Much Potting Mix Do You Really Need?
- Best Tall Planter Setups for Different Uses
- Common Mistakes to Avoid
- Real-Life Experience: What Filling a Tall Planter Actually Teaches You
- Conclusion
Tall planters are the supermodels of the container-gardening world. They look elegant, dramatic, and just a little intimidating. They can make a front porch feel polished, turn a plain patio into something magazine-worthy, and give your plants the kind of stage presence that says, “Yes, I absolutely meant to make my entryway look this good.”
But here is the catch: filling a tall planter the wrong way can get expensive fast. A very deep planter can swallow an astonishing amount of potting mix, weigh as much as a baby rhino, and create drainage problems if you treat it like a giant hole that needs to be stuffed with random rocks and hope. That is how you end up with soggy roots, sad plants, and a backache that deserves its own apology card.
The good news is that learning how to fill a tall planter is not complicated. You just need a smart system. In most cases, the goal is simple: create enough healthy root space for your plants, keep the container draining properly, reduce unnecessary weight, and avoid wasting money on more potting mix than you actually need.
This guide walks you through exactly how to do it, step by step, with practical tips for flowers, herbs, mixed arrangements, and decorative front-door planters. By the end, you will know what to put in the bottom of a tall planter, what never belongs there, and how to set the whole thing up so your plants have a real chance to thrive instead of merely surviving out of spite.
Why Tall Planters Need a Different Filling Strategy
A short pot is easy. You fill it with potting mix, add a plant, water it, and call yourself a gardening genius. A tall planter is different because depth changes everything. If a planter is much deeper than your plants need, filling the entire thing with potting mix can be wasteful. It also makes the container harder to move and more expensive to set up.
At the same time, you cannot just toss anything into the bottom and expect a happy ending. The lower section of the planter still has to support drainage. Water must be able to move through the container freely. The upper section must hold enough quality growing medium for roots to spread, breathe, and access moisture evenly.
That is why the best approach is usually a layered one. Think of your tall planter like a good outfit: structure on the bottom, substance in the middle, and the fun, flashy stuff on top.
What You Need Before You Start
- A tall planter with drainage holes
- Lightweight potting mix or container mix
- Optional filler for the bottom section
- Landscape fabric, mesh, or a coffee filter to separate layers if needed
- Plants
- Watering can or hose
- Slow-release fertilizer, if your potting mix does not already include it
The most important item here is not the plant. It is the potting mix. Regular garden soil is too dense for most containers. In a tall planter, heavy soil compacts, drains poorly, and can leave roots with too little air. Container plants need a mix designed to hold moisture while still draining well. In other words, your plants want a home with good plumbing.
Step-by-Step: How to Fill a Tall Planter
1. Check the Drainage First
Before you add a single scoop of anything, flip the planter over and inspect the bottom. If there are no drainage holes, fix that problem first. Most plants do not want to sit in trapped water, and tall containers are especially unforgiving when drainage is poor.
If you cannot drill into the planter because it is decorative or delicate, use a double-potting method. Place your plants in a slightly smaller nursery pot with drainage, then set that pot inside the decorative container. That way, your outer planter still looks fabulous, and your plant roots are not quietly plotting their demise in a swamp.
2. Decide Whether You Actually Need Bottom Filler
Not every tall planter needs filler, but many do. Ask yourself one question: do my plants need all of this depth for roots? If the answer is no, filler makes sense.
Bottom filler is especially helpful in tall decorative planters used for annual flowers, front-door arrangements, seasonal displays, and mixed ornamental containers. It is less useful when you are growing large shrubs, deep-rooted vegetables, or plants that truly need the full soil volume.
A good rule is this: if the planter is much deeper than about a foot and the planting is mostly shallow-rooted or decorative, you can usually reduce the soil depth and still get great results.
3. Add Lightweight Filler to the Bottom
Now for the part that saves money and your lower back. Add lightweight, inert filler to the bottom section of the planter. You usually want the filler to occupy about one-quarter to one-third of the container, though very tall planters used only for seasonal displays can sometimes handle a bit more.
Good filler options include:
- Upside-down plastic nursery pots
- Empty plastic bottles with caps on
- Plastic milk jugs
- Crushed aluminum cans
- Non-biodegradable packing peanuts kept contained in mesh bags
The keyword here is inert. You want something that takes up space without rapidly breaking down. If the material decomposes too quickly, the soil above can sink over time, and your planter will settle like a bad mattress.
4. Separate the Filler from the Potting Mix
Once the filler is in place, add a layer of landscape fabric, mesh, or another water-permeable barrier over it. This does two helpful things. First, it keeps the potting mix from sifting down into the filler. Second, it makes the planter easier to empty later because you are not excavating loose peanuts, bottles, and mystery debris like an archeologist of poor decisions.
Do not use a solid plastic barrier. Water still needs to drain through the planter. The divider should separate the layers, not create a bathtub.
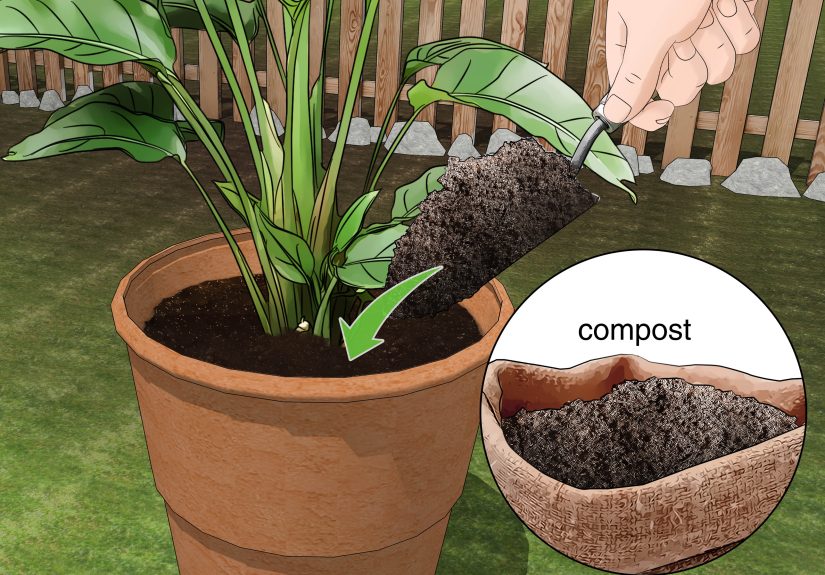
5. Add Potting Mix Almost to the Top
Fill the rest of the planter with a quality potting mix made for containers. Moisten the mix as you go if it is very dry. Dry potting mix can behave like a stubborn sponge that refuses to get wet at first, which is deeply unhelpful when you are trying to establish fresh plantings.
Stop before the soil reaches the rim. Leave about 1 to 2 inches of space at the top so water can pool briefly and soak in instead of immediately running over the edge and onto your shoes. This space is called headroom, and in container gardening it is the difference between efficient watering and accidental sidewalk irrigation.
6. Arrange Plants Before Planting
Before digging holes, set the plants on top of the soil and play around with the layout. For a classic tall planter arrangement, use the familiar “thriller, filler, spiller” formula:
- Thriller: a tall, eye-catching focal plant in the center or back
- Filler: mounding plants that make the arrangement look full
- Spiller: trailing plants that soften the edges
This design works because tall planters already emphasize height. A good thriller plant leans into that drama. Ornamental grasses, canna lilies, upright salvias, and other vertical plants can create that “wow” moment. Fillers and spillers do the rest of the styling work so the planter looks lush rather than like one lonely plant standing in a bucket.
7. Plant, Water Thoroughly, and Top Off if Needed
After planting, water thoroughly until water drains from the bottom. This helps settle the potting mix around the roots. If the soil level drops noticeably, add a bit more mix to bring it back up. Just keep that 1 to 2 inches of headspace at the top.
If your planter sits on a saucer, empty standing water after watering. Roots need moisture, yes, but they also need oxygen. They are plants, not snorkelers.
The Best Materials to Put in the Bottom of a Tall Planter
If you are wondering what to put in the bottom of a tall planter, here is the practical ranking.
Best Choice: Upside-Down Nursery Pots
These are lightweight, reusable, sturdy, and already garden-related, which feels satisfying on a spiritual level. They create air space, reduce soil use, and do not break down midseason.
Best Budget Option: Plastic Bottles or Milk Jugs
These work well because they are easy to find and very light. Use them clean and capped so they keep their shape. They are especially useful in massive entryway planters that would otherwise require an absurd amount of soil.
Best for Odd Spaces: Packing Peanuts in Mesh Bags
If you use packing peanuts, keep them contained in mesh or bags so cleanup does not become a windy-yard nightmare. Also, use only the kind that will not break down quickly in moisture.
Useful but Less Elegant: Crushed Cans
Crushed aluminum cans can take up space effectively, though they are usually not as neat and tidy as nursery pots or bottles. Still, if you are filling one huge planter and trying not to spend your entire weekend budget on potting mix, they can help.
What Not to Put in the Bottom of a Tall Planter
Let us save you from one of the oldest container-gardening myths on the books: do not add a layer of rocks or gravel to improve drainage. It sounds logical. It is also misleading. In containers, gravel at the bottom does not magically fix drainage. Instead, water can collect above that layer, leaving the root zone wetter than you intended.
You should also skip heavy garden soil, random yard dirt, and organic junk that breaks down unpredictably unless you are building a specific long-term system and fully understand how that material will change over time. For most home gardeners, the smartest path is boring but effective: inert filler below, quality potting mix above.
How Much Potting Mix Do You Really Need?
The amount depends on the planter’s dimensions and how much of the bottom is filled with lightweight material. This is where many gardeners either underbuy and have to make a second trip to the store, or overbuy and wind up with three half-open bags of mix sitting in the garage until next spring.
If your planter is very tall but only the top 10 to 14 inches will actually hold roots, you can reduce soil volume quite a bit. That is one of the biggest advantages of filling a tall planter strategically. You are buying root space, not just filling a decorative cavity because it exists.
When in doubt, measure the planter, estimate the filler section first, then calculate the remaining volume for potting mix. It is not glamorous, but neither is hauling extra 40-pound bags of mix because optimism got involved.
Best Tall Planter Setups for Different Uses
For Front Porch Flowers
Use filler in the lower section, then a rich all-purpose potting mix on top. Choose one tall focal plant, two to three mounding plants, and one or two trailing plants. This is the classic setup for showy seasonal containers.
For Herbs
Use less filler if you want to grow a mix of herbs that may need a bit more root room. Make sure the soil drains well. Herbs hate having wet feet and will communicate that dislike with yellow leaves and disappointment.
For Shrubs or Small Evergreens
Go easy on filler. Woody plants usually benefit from more soil volume, especially if they will stay in the planter for more than one season. A dramatic tall planter with a boxwood or dwarf conifer can look fantastic, but long-term roots need real space.
For Faux Seasonal Displays
If the planter is mostly decorative and you are arranging branches, pumpkins, faux stems, or holiday pieces, you can fill much more of the container with lightweight material and keep only a smaller top section available for anchoring your display.
Common Mistakes to Avoid
- Using garden soil instead of potting mix
- Forgetting to check for drainage holes
- Adding rocks at the bottom and calling it drainage
- Filling the entire planter with expensive soil when the plants do not need that much depth
- Choosing filler that breaks down too quickly
- Overwatering because the container looks dry on top
- Underwatering because the planter is large and you assume it stays moist forever
- Planting without leaving headspace for watering
Container gardening rewards attention. Tall planters can dry differently than shallow pots, especially in hot weather or windy spots. Check moisture regularly and adjust your watering routine based on the season, the plant type, and the container material.
Real-Life Experience: What Filling a Tall Planter Actually Teaches You
The first time I filled a tall planter, I did what many enthusiastic gardeners do: I saw a beautiful container, got emotionally attached, and immediately forgot that volume is a real thing. I bought the planter because it looked stunning by the front door. It was elegant, tapered, and dramatically tall. In the store, it looked sophisticated. At home, once I started pouring in bag after bag of potting mix, it looked like a financial decision I should have discussed with a calculator first.
I filled the whole planter with soil because that seemed like the obvious thing to do. More soil equals more plant happiness, right? Not exactly. The planter became unbelievably heavy. Moving it even a few inches required the kind of body language usually associated with refrigerator delivery. Then I watered it, which somehow made it feel as if I had planted a small planet on the porch.
The second lesson arrived a few weeks later. The plants on top looked fine, but I realized most of the lower soil mass was doing absolutely nothing except existing. The roots were never going to use that entire depth. I had basically paid premium potting-mix prices to create an underground basement no plant had requested.
So the next season, I got smarter. I used lightweight filler in the bottom, added a layer to separate it from the mix, and kept the good potting soil where the roots would actually grow. The difference was immediate. The planter was easier to position, easier to refresh, and much less expensive to set up. It still looked full and impressive, but now it was working with me instead of against me.
I also learned that drainage is one of those boring details that becomes exciting only after it goes wrong. One decorative pot I loved had poor drainage, and I tried to convince myself it would be fine. Reader, it was not fine. The soil stayed too wet, the roots sulked, and the plant slowly turned into a cautionary tale. That was the moment I fully converted to the “drainage first, beauty second” philosophy. Fortunately, a lot of planters can have both.
Another thing experience teaches you is that tall planters are not just about planting. They are about maintenance. You need enough space at the top for watering. You need a soil mix that does not compact into a brick by midsummer. You need plants that suit the light conditions, not just the color palette you dreamed up while wandering through the garden center in a state of unreasonable confidence.
And then there is the fun part: once you understand how to fill a tall planter properly, you stop seeing these containers as fussy decor objects and start using them creatively. You can frame an entryway, soften hardscaping, add height to a flat patio, or create seasonal displays that look custom and expensive. In spring, maybe it is grasses and calibrachoa. In summer, tropical foliage. In fall, ornamental kale and trailing ivy. In winter, evergreen branches and berries. Same planter, different performance, no drama below the soil line.
That is really the magic of it. A tall planter looks high-end, but the trick is not spending more. The trick is filling it smarter. Once you figure that out, you get all the beauty, none of the unnecessary weight, and far fewer moments of standing on your porch whispering, “Why is this thing so heavy?”
Conclusion
If you want your container garden to look polished and perform well, the smartest approach is simple: start with drainage, use lightweight filler only when it makes sense, separate layers properly, and finish with a high-quality potting mix in the root zone. That is how to fill a tall planter without wasting money, creating root problems, or accidentally building the world’s heaviest flowerpot.
Once the foundation is right, the fun begins. You can style your planter with bold focal plants, lush fillers, and soft trailing accents for a design that looks intentional and full. In other words, the secret to a gorgeous tall planter is not stuffing it to the brim with whatever is nearby. It is giving your plants the right setup from the bottom up.