Table of Contents >> Show >> Hide
- What Makes a No-Sew Crib Skirt “Good”?
- Before You Start: Safe Sleep & Smart Placement
- Method 1 (Most Popular): Panel-Style No-Sew Crib Skirt with Hem Tape + Velcro
- Supplies
- Step 1: Measure Like You Mean It
- Step 2: Decide: 2 Panels or 3 Panels?
- Step 3: Calculate Your Cut Sizes
- Step 4: Prewash Your Fabric (Yes, Even If You’re Tired)
- Step 5: Cut Your Panels
- Step 6: Hem the Edges with Iron-On Hem Tape
- Step 7: Attach Velcro to the Crib Frame
- Step 8: Stick the Panels in Place
- Step 9: Put the Mattress Back and Admire Your Work
- How to Make It Adjustable for Mattress Height Changes
- Method 2: No-Sew Crib Skirt with Fabric Tape (No Iron Required)
- Method 3 (Farmhouse Favorite): Ruffled Drop Cloth Crib Skirt with Staples
- Cleaning & Durability Tips
- Common Mistakes (and How to Avoid Them)
- FAQ
- Conclusion: Your Crib, But Make It Dressed
- Real-Life Experience: What It’s Actually Like Making a No-Sew Crib Skirt (and What I’d Do Differently)
- SEO Tags
A crib skirt is one of those nursery details that feels wildly “extra”… right up until you put the mattress on the
highest newborn setting and realize your under-crib storage is basically on display like it’s auditioning for a reality
show. A no-sew crib skirt fixes that, adds polish, and lets you customize the look without owning a sewing machineor
knowing where your thimble even is.
This tutorial focuses on the most reliable, adjustable no-sew methods (hem tape + Velcro, fabric tape + Velcro, and a
ruffled drop-cloth staple method). You’ll get clean edges, a tailored look, and a setup you can remove for washing or
adjust as you lower the mattress over time.
What Makes a No-Sew Crib Skirt “Good”?
A great no-sew crib skirt does three things:
- Looks intentional (aka not like a blanket you panic-tucked at 2 a.m.).
- Stays put (no slumping, sagging, or shifting after two days).
- Adjusts easily when the mattress drops (because it will, and time is a thief).
The secret is attaching the skirt to the crib’s metal mattress support/frame (not the mattress, and not
the baby’s sleep space). Most tutorials that “work forever” use some combination of finished panels plus Velcro.
Before You Start: Safe Sleep & Smart Placement
A crib skirt should live on the outside of the cribcovering the gap below the mattress levelwithout
introducing anything loose into the baby’s sleep area. Keep the sleep space simple: a firm mattress with a fitted sheet,
and no soft objects or loose bedding. If your skirt construction or attachment method would create loose fabric inside
the crib, stop and rework it. Pretty is optional; safe is not.
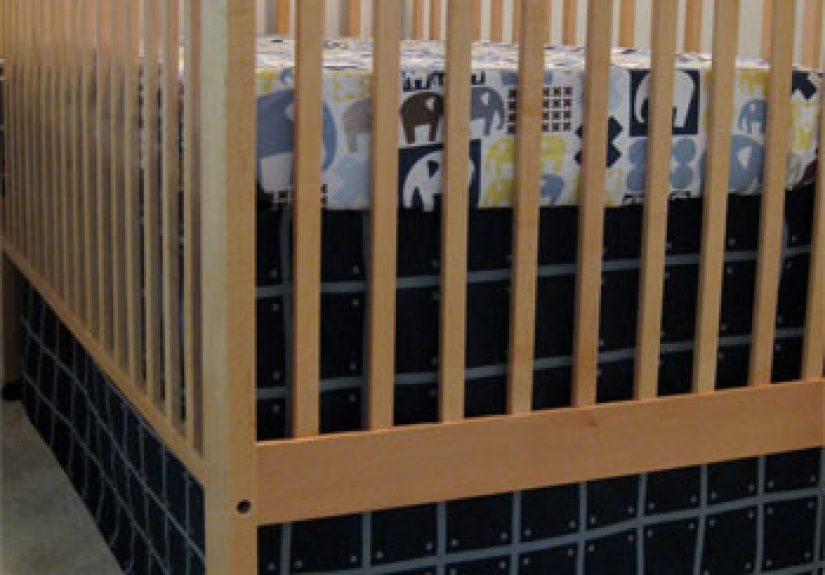
Method 1 (Most Popular): Panel-Style No-Sew Crib Skirt with Hem Tape + Velcro
This is the “clean, tailored, removable” approach. You’ll make 2–3 fabric panels (front + two sides) and attach them to
the metal mattress frame with Velcro dots/squares/strips. It’s also easy to adjust later by trimming or moving Velcro.
Supplies
- Fabric: Typically 1.5–2 yards for a 2–3 panel setup (depends on drop and whether you do one or two sides).
- Iron-on hem tape (or fusible bonding web designed for hems).
- Sticky-back Velcro (dots/squares) or hanging-strip style hook-and-loop.
- Measuring tape
- Fabric scissors or rotary cutter + mat
- Iron + ironing board
- Optional: fabric marker or chalk
Step 1: Measure Like You Mean It
Remove the mattress so you can see the mattress support/frame. You’re measuring two things:
(1) the lengths of the sides you want to cover and (2) the “drop” heightthe visible
space between the mattress support and the lower crib frame/base.
- Front length: Measure the long side of the metal mattress support.
- Side length(s): Measure each short side of the metal mattress support.
-
Drop height: Measure from the top of the metal support down to where you want the skirt to end (often
just above the base, or closer to the floor if you’re hiding storage underneath).
Pro tip: Look closely for any hardware arms, brackets, or odd shapes that change where fabric can sit.
Some cribs have metal features that force you to shift Velcro placement or tweak panel widths.
Step 2: Decide: 2 Panels or 3 Panels?
- 3-panel skirt (front + two sides): Best if the crib is visible from all angles.
- 2-panel skirt (front + one side): Great if one side is against a wall.
- No back panel: Totally normal, especially if the crib is against the wall.
Step 3: Calculate Your Cut Sizes
For each panel, take your measured length and drop height, then add allowances so you can finish edges neatly:
- Add 1–2 inches to the drop for bottom hem allowance (more if you want a thicker, weightier hem).
- Add 1–2 inches to each side for side hems.
- Add 1–2 inches at the top so you can fold a clean top edge (and have room for Velcro placement).
If you want a crisp, “store-bought” look, consider a slightly deeper hem at the bottom. It adds weight,
which helps the fabric hang straight instead of flaring like it’s trying to be a bell-bottom.
Step 4: Prewash Your Fabric (Yes, Even If You’re Tired)
Fabric shrinkage is the arch-nemesis of perfectly measured DIY projects. Prewash and dry your fabric the way you plan to
clean it later. This matters even more because many no-sew hems don’t love repeated hot washes.
Step 5: Cut Your Panels
Cut the front and side panels using your calculated sizes. If your fabric has a directional print (stripes, vines,
animals doing yoga), keep all panels oriented the same way so the pattern doesn’t flip on one side.
Step 6: Hem the Edges with Iron-On Hem Tape
You’re going to finish the raw edges so the fabric doesn’t fray and the skirt looks polished. Work one panel at a time:
- Lay the panel wrong-side up. Place hem tape near the edge, following the product instructions.
- Iron to fuse the tape in place (keep the adhesive where it belongsbetween fabric layers).
- Peel paper backing if required, fold fabric over to create a hem, then iron again to bond.
- Repeat on all edges you want finished (usually both sides + bottom; the top can be finished too for durability).
Corner sanity tip: For neat corners, fold the long edges first, then the short edges, pressing as you go.
Take your time hereyour future self will thank you when it looks clean instead of “abstract.”
Step 7: Attach Velcro to the Crib Frame
With the mattress still removed, add Velcro pieces to the top side of the metal mattress support/frame.
Use enough points so the panel doesn’t sag:
- Front panel: typically 3 attachment points (left, center, right).
- Each side panel: typically 2 attachment points (front corner, back corner).
- Add more if your fabric is heavier or your frame is longer.
Press firmly and follow adhesive cure time if recommended. (Velcro that’s not fully adhered will betray you at the exact
moment you show the nursery to someone.)
Step 8: Stick the Panels in Place
- With Velcro pairs connected, remove the backing from the side that will adhere to the metal frame and press onto the frame.
- Remove backing from the other Velcro side, then carefully line up the top edge of your fabric panel and press to attach.
- Start in the center and work outward so the panel hangs straight.
Extra-hands hack: A second person helps keep panels level while you press the Velcro down. If you’re solo,
painter’s tape can temporarily hold the top edge in place while you attach.
Step 9: Put the Mattress Back and Admire Your Work
Once the mattress is back on, the frame and Velcro should be hidden, and the skirt should look like it was always meant
to be therelike a tiny suit for your crib.
How to Make It Adjustable for Mattress Height Changes
As your baby grows, you’ll lower the mattress. If your skirt is the “falls-to-the-floor” kind, it may start puddling.
For an adjustable setup, you have two simple options:
-
Trim the bottom: If the bottom edge is left “seamless” (or you’re okay re-hemming), you can shorten by
cutting and reapplying hem tape. -
Move the attachment point: Add a new Velcro square slightly lower on the back side of the panel and
reattach so the panel sits higher.
This is why panel-style skirts are beloved: you can adjust in minutes without dismantling your entire nursery.
Method 2: No-Sew Crib Skirt with Fabric Tape (No Iron Required)
If you’d rather not iron (or you’re allergic to ironing boards), you can use peel-and-stick fabric tape to create clean
seams on three sides of each panel, leaving the bottom edge unseamed. This method is especially convenient for quick,
modern “waterfall” panels attached by Velcro.
How It Works
- Measure and cut panels with extra allowance (wiggle room helps).
-
On the back side, apply fabric tape along the top and side edges, trim corners so folded seams don’t overlap, then fold
and press firmly. - Leave the bottom edge raw if you want easy future trimming (or fold/finish it if you prefer).
- Attach panels to the metal frame using Velcro squarestypically 3 for the front, 2 per side.
Best for: canvas or heavier cotton that behaves nicely and doesn’t fray aggressively.
Method 3 (Farmhouse Favorite): Ruffled Drop Cloth Crib Skirt with Staples
Want that soft linen look without paying “linen look” prices? Painter’s drop cloths (100% cotton) can deliver a relaxed,
textured skirt that looks high-endespecially if you bleach or wash it for a lighter tone. This method is truly no-sew,
but it uses a staple gun and usually a support board/platform approach.
Supplies
- 100% cotton drop cloth
- Measuring tape + scissors
- Staple gun + staples
- Optional: scrap wood strips cut to crib side lengths (helpful for attaching and hiding staples)
Basic Approach
- Measure drop height from mattress support to desired skirt length (some people inset fabric a few inches so staples stay hidden).
- Cut fabric strips long enough for each side, adding extra length for ruffles/pleats.
- Attach fabric to the support (wood strip or platform edge) with evenly spaced pleats, stapling at folds.
- Place the attached support pieces on the crib’s mattress platform so the ruffles hang down.
Why people love it: Drop cloth reads like linen, hides storage beautifully, and looks intentionally
“collected.” Tradeoff: It’s not as quick to remove for washing, so it’s better for low-mess nurseries
(or for people who are team “spot clean and pray”).
Cleaning & Durability Tips
- Prewash fabric before hemming and attaching. Shrinkage is real and deeply unfun.
-
If you used adhesive Velcro or bonding web, consider cold water + delicate cycle or spot cleaning.
Some DIYers reinforce Velcro on fabric with a stitch or two for extra security. - Heavier fusible tape can add structure and weight, helping panels hang straighter.
- If you used drop cloth + staples, plan to vacuum/spot treat rather than toss it in the wash often.
Common Mistakes (and How to Avoid Them)
1) Measuring the crib rails instead of the mattress frame
Your skirt attaches to the mattress support/frame, so measure thatnot the outside of the crib. Otherwise, you’ll end up
with panels that “almost fit,” which is DIY for “this will haunt me.”
2) Ignoring hardware and support arms
Some cribs have metal arms or brackets that interfere with where fabric can sit. Inspect first, then plan Velcro
placement accordingly.
3) Skipping prewash
Nothing says “handmade” like a skirt that shrank into a crop top after the first wash. Prewash.
4) Under-using Velcro
Too few attachment points = droop city. Add more if the panel isn’t hanging taut.
FAQ
How much fabric do I need for a no-sew crib skirt?
Many panel-style skirts use about 1.5–2 yards, depending on drop height and whether you cover two sides or
three. If you want ruffles, plan for more because gathering/pleating eats length.
Can I make a no-sew crib skirt from a bedsheet?
Absolutely. Flat sheets are great because they’re wide, often pre-hemmed on some edges, and usually affordable. You can
cut panels from the sheet and finish remaining edges with hem tape, then attach with Velcro.
Will the Velcro adhesive damage the crib?
It can leave residue depending on the finish and adhesive strength. If you’re concerned, test a small piece on an
inconspicuous area first or use removable hanging-strip style hook-and-loop intended for clean removal.
Conclusion: Your Crib, But Make It Dressed
A no-sew crib skirt is the rare nursery DIY that’s fast, impactful, and doesn’t require learning a new
life skill. Measure the mattress frame, make clean panels with hem tape (or fabric tape), attach with Velcro, and enjoy a
crib that looks finishedeven when the under-crib drawer is full of “backup everything.”
If you want the simplest win, do the panel-style hem tape + Velcro method. If you want texture and that linen-ish vibe,
go drop cloth ruffles. Either way, you’ll get a custom look that’s adjustable as your baby growsand you’ll get to say,
casually, “Oh, this? I made it.” (Then pretend it wasn’t while wearing mismatched socks.)
Real-Life Experience: What It’s Actually Like Making a No-Sew Crib Skirt (and What I’d Do Differently)
The first time you decide to make a no-sew crib skirt, you’ll probably think, “This will take 20 minutes.” That is the
same lie we tell ourselves about assembling furniture, wrapping gifts, and “quickly” organizing the pantry. In reality,
the project is still beginner-friendlybut the timeline depends on whether you measure once or measure like a person who
has known the pain of re-doing hems.
The biggest “aha” moment is realizing the crib skirt isn’t really about the crib rails at all; it’s about the mattress
frame. Once the mattress comes off and you’re staring at the metal support, everything clicks. You can see where Velcro
should go, where hardware might interfere, and exactly how much space you’re trying to hide. That’s also when you notice
the under-crib storage situation and wonder if you should use the skirt as motivation to declutter. (Spoiler: you will
not declutter. You will simply hide the chaos more elegantly.)
If you’re using hem tape, the ironing step is where perfectionists either thrive or spiral. The trick is to set up a
“flow” so you’re not constantly repositioning the fabric: do long edges, then short edges, press corners carefully, and
keep your hems consistent. The good news is hem tape is forgiving. The bad news is it can get gunky if you accidentally
iron directly on the adhesive side. If that happens, don’t paniclet the iron cool, clean it according to the iron
manufacturer’s instructions, and promise yourself you’ll pay attention next time. (You will. For about five minutes.)
Velcro is the unsung hero. It turns fabric panels into something that feels almost custom-upholstered. But placement
matters more than you think. If you stick Velcro randomly like you’re decorating a cupcake, the panel can droop in weird
places. I’ve found it’s best to place a center point first, hang the panel, then add the outer points after you like how
it falls. This is also where having an extra pair of hands is magical: one person holds the fabric level while the other
presses the Velcro down with conviction.
The “adjustable” part becomes very real later. The mattress goes down, and suddenly your skirt is pooling like it’s
auditioning for a bridal train. If you left the bottom edge unfinished (or lightly finished), trimming is easy. If you
finished it beautifully with a deep hem… you may briefly consider leaving it as-is and pretending you love puddling.
Realistically, you’ll either re-hem with fresh tape or move the attachment point by adding Velcro lower on the back of
the panel. I prefer moving Velcro because it preserves your finished bottom edge.
Drop cloth skirts are a totally different vibe: more texture, more farmhouse softness, and more “I definitely own at
least one wicker basket.” They’re also less “toss in the wash.” If you’re in a low-mess phase of life (or you’re okay
vacuuming and spot-treating), they look incredible. If your household believes in dramatic spills, panel skirts are
easier to remove and clean.
If I were advising a friend making their first no-sew crib skirt, I’d say: choose the panel method, prewash your fabric,
don’t skimp on Velcro, and do a quick “test hang” before committing every attachment point. The project is genuinely
satisfyingbecause you finish it, step back, and the whole nursery suddenly looks more pulled together. It’s the home
decor equivalent of putting on shoes that match your outfit: you didn’t change everything, but somehow you look
like you have your life together. At least until the next diaper blowout.