Table of Contents >> Show >> Hide
- Why a Simple Homemade Incubator Can Actually Work
- What You Need Before You Start
- How to Make a Simple Homemade Incubator for Chicks: 11 Steps
- Step 1: Pick a Container That Holds Heat Well
- Step 2: Add a Safe, Controlled Heat Source
- Step 3: Install a Thermometer and Hygrometer at Egg Level
- Step 4: Make Ventilation Holes
- Step 5: Create a Humidity Source
- Step 6: Build a Raised Egg Platform
- Step 7: Test-Run the Incubator for 24 Hours
- Step 8: Choose Good Fertile Eggs
- Step 9: Set the Eggs the Right Way
- Step 10: Turn and Monitor the Eggs Every Day
- Step 11: Stop Turning at Day 18 and Let the Hatch Happen
- Common Mistakes That Ruin a Homemade Chick Incubator
- Final Thoughts
- Real-World Experience: What People Usually Learn the Hard Way
- SEO Tags
Note: This guide is designed for a small, simple homemade incubator for a few fertile chicken eggs. If your setup uses a lamp, thermostat, or any electrical component, have an adult help with assembly and test everything for at least 24 hours before you set the eggs.
If you have ever looked at a carton of fertile eggs and thought, “I could probably turn this into a tiny chicken apartment complex,” welcome. You are in exactly the right place. Building a simple homemade incubator is one of those projects that sounds wildly scientific, slightly chaotic, and strangely wholesome all at once. And honestly, it is.
The good news is that a basic incubator does not need to look like a NASA prototype. What it does need is stable warmth, the right humidity, decent airflow, and a plan for turning the eggs until hatch time. In other words, the eggs are not asking for luxury. They are asking for a clean, steady environment and for you to stop opening the lid every five minutes like an anxious reality show producer.
This guide walks you through how to make a simple homemade incubator for chicks in 11 beginner-friendly steps. You will learn what materials to use, how to set up the container, how to manage temperature and humidity, and what to do during the final days before hatching. Along the way, you will also avoid the classic first-timer mistakes, including “I guessed the temperature” and “I thought one tiny air hole was enough.”
Why a Simple Homemade Incubator Can Actually Work
A homemade chick incubator works when it copies the few conditions a broody hen naturally provides: warmth, moisture balance, fresh air, and regular egg turning. That is the whole game. Fancy commercial incubators make these things easier and more automatic, but a small DIY version can still do a solid job when you build it carefully and monitor it consistently.
That said, this is not the place for wild shortcuts. A cardboard box plus blind optimism is not an incubation strategy. A simple incubator should be insulated, easy to monitor, and stable enough to hold temperature without big swings. Think practical, not pretty. The eggs do not care whether the incubator is aesthetically pleasing. They care whether it behaves like spring under a very committed hen.
What You Need Before You Start
- A small insulated container, plastic tote, foam cooler, or sturdy wooden box
- A safe heat source, such as a low-watt bulb in a secure fixture or a reptile/seed-starting heat source paired with a thermostat
- A thermostat or temperature controller
- A reliable thermometer and hygrometer
- A shallow water dish or sponge tray for humidity
- Wire mesh, hardware cloth, or a raised rack to keep eggs above the water tray
- Small tools for making ventilation holes
- Clean pencil for marking eggs
- Fertile chicken eggs
- A stable room away from drafts, direct sunlight, pets, and chaos
If you already own a digital thermometer-hygrometer combo, congratulations: you are ahead of the “I just used vibes” crowd. Accurate measuring tools make a huge difference in hatch success.
How to Make a Simple Homemade Incubator for Chicks: 11 Steps
Step 1: Pick a Container That Holds Heat Well
Start with a small insulated container. A foam cooler is a popular choice because it holds warmth well and is easy to modify. A plastic tote can also work, especially if the room temperature is fairly steady. The point is not to build a designer incubator. The point is to create a controlled environment that does not lose heat every time the room sneezes.
Pick a size that fits the number of eggs you want to hatch. Bigger is not always better. A small incubator is usually easier for beginners to heat consistently. If you only want to hatch a handful of eggs, do not build a chicken mansion.
Step 2: Add a Safe, Controlled Heat Source
Your incubator needs a steady heat source, not a dramatic one. A low-watt bulb in a secure fixture can work, as can a small heat mat or reptile-style heating element when paired with a thermostat. The thermostat matters because eggs do not appreciate temperature surprises.
Mount the heat source securely so it cannot shift, touch plastic, or create hot spots directly against the eggs. This is also where adult help is smart if any wiring or lamp installation is involved. The goal is gentle, even heat, not a tiny solar flare.
Step 3: Install a Thermometer and Hygrometer at Egg Level
If you remember only one phrase from this article, let it be this: measure at egg level. Temperature in small incubators can vary from top to bottom, especially in still-air setups. Place your thermometer where the eggs actually sit, because the eggs do not care how warm the lid feels.
A hygrometer helps track humidity, which matters just as much as temperature. During most of incubation, you want the eggs to lose moisture gradually. During the final hatch period, you want enough humidity to keep membranes from drying out. Without a hygrometer, you are basically trying to bake a soufflé in the dark.
Step 4: Make Ventilation Holes
Embryos need oxygen, especially as they grow larger. Add small ventilation holes near the upper sides of the container so fresh air can move through. Do not make the incubator airtight. That would be less “cozy hatchery” and more “terrible biology experiment.”
At the same time, do not go overboard and turn the box into Swiss cheese. Too many holes can make it hard to hold heat and humidity. Start modestly, then adjust only if needed once you see how stable the environment stays during testing.
Step 5: Create a Humidity Source
Place a shallow water dish, tray, or small container inside the incubator, below or beside the egg platform. Some people also use a clean sponge to help increase surface area and raise humidity. The water should never touch the eggs directly.
This simple moisture source helps maintain the humidity level your eggs need. Later, during the last few days before hatch, you can increase humidity by adding a bit more water or increasing water surface area. The eggs need moisture, not a pool party.
Step 6: Build a Raised Egg Platform
Use wire mesh, hardware cloth, or a small rack to keep the eggs above the water tray and away from direct contact with the heat source. The platform should be steady, level, and easy to access for turning. A shaky platform is a terrible roommate for fragile eggs.
If the eggs are resting on their sides, make sure they cannot roll into one another too aggressively. If you are placing them slightly upright, keep the large end higher than the small end. Stability matters because developing embryos are delicate, especially early on.
Step 7: Test-Run the Incubator for 24 Hours
Before you add eggs, run the incubator empty for at least 24 hours. This is the step that separates “careful builder” from “why is my thermometer lying to me?” Check temperature and humidity several times during the day and evening. Watch how quickly the incubator recovers after you briefly open it.
Use this test period to adjust the thermostat, water amount, and ventilation. You want a stable setup before the eggs go in. Making big changes after setting eggs can reduce hatch success. Get the environment right first, then invite the future chicks in.
Step 8: Choose Good Fertile Eggs
Use clean, fertile eggs from healthy chickens. Skip cracked, oddly shaped, thin-shelled, or very dirty eggs. These are more likely to fail or contaminate the incubator. In incubation, quality matters more than quantity.
For best results, use eggs that were laid recently and stored properly in a cool place, not in a regular refrigerator. Let stored eggs warm gradually to room temperature before placing them in the incubator. Putting cold eggs straight into warm humidity can cause condensation, and condensation is a fast track to trouble.
Step 9: Set the Eggs the Right Way
If your eggs are resting on their sides, mark one side with an “X” and the other with an “O” using a pencil. This makes turning easier and helps you keep track without guessing. If you are setting eggs at a slight angle, keep the large end slightly higher because that is where the air cell is located.
Place the eggs gently. Do not shake, jar, or stack them. Once they are in, close the incubator and let the environment settle. It is normal for the temperature and humidity to wobble a bit at first. Resist the urge to panic-adjust every three minutes.
Step 10: Turn and Monitor the Eggs Every Day
This is the daily-care phase, and it is where consistency wins. Turn the eggs at least three times a day until day 18. Some experienced hatchers prefer five turns a day, but three careful turns is a realistic minimum for a homemade setup. Always turn an odd number of times daily so the eggs do not spend every night on the same side.
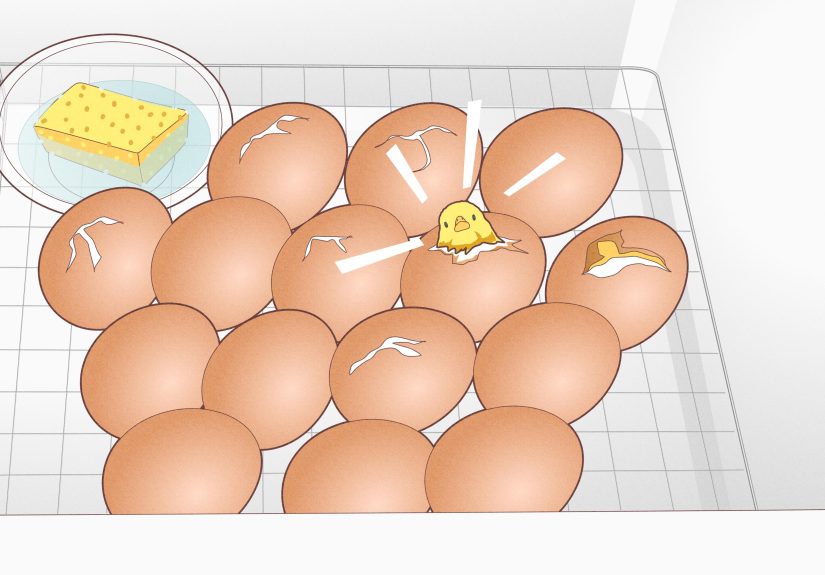
Keep monitoring temperature and humidity, and record what you see. Candling the eggs around day 7 and again around day 14 can help you check development and remove eggs that are clearly not viable. Keep your hands clean when handling eggs, and do not leave the incubator open longer than necessary. The embryos need consistency more than they need your commentary.
Step 11: Stop Turning at Day 18 and Let the Hatch Happen
At day 18, stop turning the eggs. This stage is often called lockdown, and yes, it sounds dramatic because it is. Raise humidity for the final hatch period, make sure ventilation is adequate, and leave the eggs alone so the chicks can move into position for hatching.
Once pipping starts, do not keep opening the incubator. That sudden drop in humidity can dry the membranes and make hatching harder. Also, do not rush to “help” a chick out of the shell unless you are working under expert guidance. Most chicks need time, not a rescue mission led by impatience.
Common Mistakes That Ruin a Homemade Chick Incubator
- Using an inaccurate thermometer and trusting it like it is a prophet
- Putting the incubator in a drafty room or in direct sun
- Forgetting ventilation
- Turning eggs inconsistently
- Opening the incubator too often during hatch
- Using dirty or cracked eggs
- Making large temperature changes after the eggs are already set
If you avoid those mistakes, your simple homemade incubator has a much better shot at doing its job. A steady, boring incubator is usually a successful incubator. This is one of those rare times in life when “boring” is an elite performance standard.
Final Thoughts
Learning how to make a simple homemade incubator for chicks is part DIY project, part biology lesson, and part test of your ability to stop fussing with things that are finally working. A homemade incubator does not need expensive bells and whistles to be effective. It needs insulation, measured heat, proper humidity, ventilation, egg turning, and patience.
If you build the setup carefully, test it before setting eggs, and stick to a steady daily routine, you can absolutely hatch chicks in a basic homemade incubator. The eggs are not grading your craftsmanship like a home renovation show. They just need you to recreate the right conditions and not accidentally turn their nursery into a sauna, freezer, or wind tunnel.
And when you hear that first peep from inside the shell, it is hard not to feel like a genius. A slightly sleep-deprived, humidity-obsessed genius, but still a genius.
Real-World Experience: What People Usually Learn the Hard Way
The funny thing about building a homemade incubator is that most people start out thinking the hardest part will be construction. It is not. The hardest part is restraint. First-time builders often spend an entire day adjusting the thermostat by microscopic amounts, staring at the thermometer like it owes them an apology, and opening the lid so often that the incubator never gets a fair chance to stabilize. The lesson usually arrives on day two: eggs do better when the human relaxes a little.
Another common experience is discovering that room conditions matter more than expected. A setup that behaves beautifully in a calm, temperature-stable room can act completely different near a window, in a garage, or next to an air conditioner vent. Many beginners learn this after noticing mysterious swings in heat or humidity and realizing the incubator itself is not the villain. The room is. Moving the incubator to a quieter environment often fixes more problems than buying new gadgets.
People also learn very quickly that cheap measuring tools can be sneaky little troublemakers. A homemade incubator can be built with care, good materials, and decent insulation, but if the thermometer is off or the hygrometer is inaccurate, everything starts drifting in the wrong direction. That is why experienced hatchers become almost comically loyal to reliable gauges. It is not because they enjoy collecting tiny screens. It is because bad readings can send you into a spiral of unnecessary adjustments.
Then there is the matter of turning eggs. On paper, turning sounds easy. In real life, people forget. They get busy, they leave the house, they fall asleep, or they suddenly realize they turned the eggs twice before lunch and then not again until bedtime. This is why many home hatchers use a notebook, a whiteboard, or a simple phone reminder. It sounds excessive until day 11, when your brain has become a soup of temperature numbers, humidity percentages, and egg symbols. A turning routine saves you from guessing.
Lockdown teaches another valuable lesson: stop interfering. Many beginners make it all the way to day 18 with decent habits, only to unravel at the exact moment patience matters most. They hear peeping, see a pip, and start opening the incubator like excited sports announcers leaning over the field. Experienced hatchers know that the final stretch is mostly about maintaining humidity, keeping airflow steady, and letting the chicks work. Hatching can take hours. Sometimes a long time. Nature is not rushing because you have dinner plans.
Finally, people often remember their first successful hatch not as a perfect process, but as a series of small corrections. They learn to trust stable conditions over constant fiddling. They learn that cleanliness matters, that fresh fertile eggs give better odds, and that every incubator has its own little personality. Most of all, they learn that a simple homemade chick incubator does not need to be fancy to be effective. It just needs careful setup, calm daily management, and a builder who is willing to learn. Preferably one who has also accepted that, for three weeks, the house may revolve around a box full of future chickens.